


201
Create a scan-to-file job
4.
Select one of the profiles from the list with scan profiles.
Note:
You can only select 1 scan profile for all the subsets to come.
5.
Select 'Edit...' to access the job settings for the scan-to-file job.
6.
You can also skip the 'Edit...' option and press the Set-build key
. The first subset
is scanned.
7.
If necessary, enter a number for your scan job (20 digits maximum).
You can use this number to retrieve your scan later.
8.
Repeat the steps for the next subsets and press the Set-build key
again.
9.
When you have scanned the last subset, you can press the Start key
.
Result
After you start the scan-to-file job, the job is scanned and the digitised result is sent
to the scan server. The file is stored in a designated directory. The file is stored under
the predefined name.
There is no message on the operator panel to inform you that the file was stored
successfully. You can access the status information on the Océ Smart Imager through
the Océ VarioPrint
®
2100/2110 Settings Editor.
Incorrect images
Access the files in the designated directory on the scan server. Open the file to check
the result. The situation can occur that the scan results are not correct. The table
below displays the problems that can occur and offers a solution.
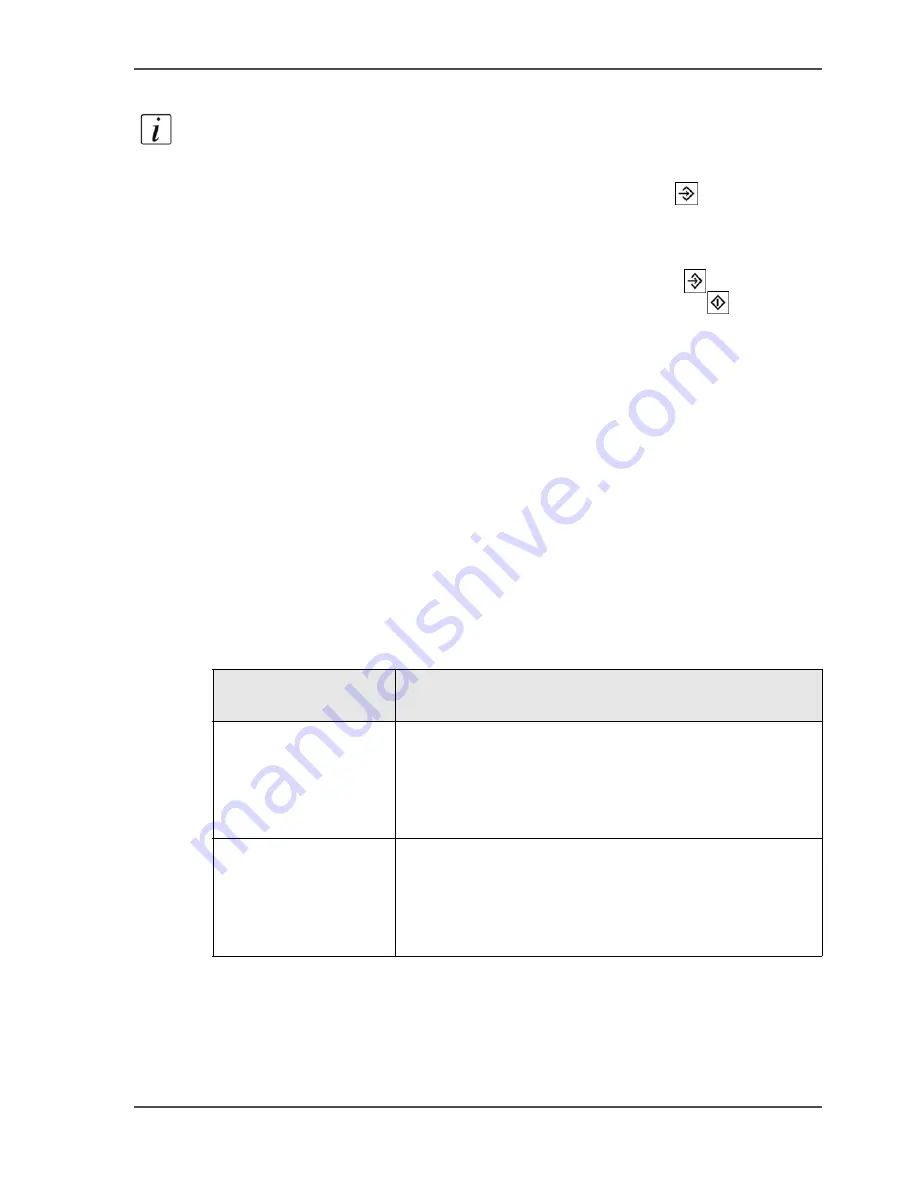
[64]
[64] Incorrect images
(1 – 2)
Description of the
problem
Solution
All the pages are
upside down
You have put the originals in the wrong direction in the
automatic document feeder or on the glass plate.
Scan the originals again and make sure the originals are
correctly placed (
see ‘Original input on the glass plate or
into the ADF’ on page 197
).
Every second page is
upside down
The 'Document type' settings that you selected do not
correspond with the orientation of the information on the
originals.
Scan the originals again and select the correct 'Document
type' setting.
Summary of Contents for VarioPrint 2100
Page 1: ...Oc VarioPrint 2100 2110 Oc User manual User manual...
Page 12: ...12 Contents...
Page 13: ...13 Chapter 1 Introduction...
Page 21: ...21 Chapter 2 Power...
Page 26: ...26 Chapter 2 Power Restart the system...
Page 27: ...27 Chapter 3 Get to know the Oc VarioPrint 2100 2110...
Page 37: ...37 The main screen The sections of the main screen 14 14 The sections of the main screen...
Page 95: ...95 Chapter 4 Adapt the system...
Page 103: ...103 Chapter 5 The print function...
Page 109: ...109 Interactive printing Illustration 42 42 Interactive print job...
Page 143: ...143 Chapter 6 The copy function...
Page 179: ...179 Chapter 7 The scan function optional...
Page 215: ...215 Chapter 8 The accounting function...
Page 238: ...238 Chapter 8 The accounting function Make a copy or print with the copy card...
Page 256: ...256 Chapter 9 Security Job name suppression...
Page 257: ...257 Chapter 10 Add the supplies...
Page 280: ...280 Chapter 10 Add the supplies Replace the stapler cartridge 6 optional stacker stapler...
Page 281: ...281 Chapter 11 Error handling...
Page 289: ...289 Appendix A Overview and tables...
Page 297: ...297 Appendix B Miscellaneous...


