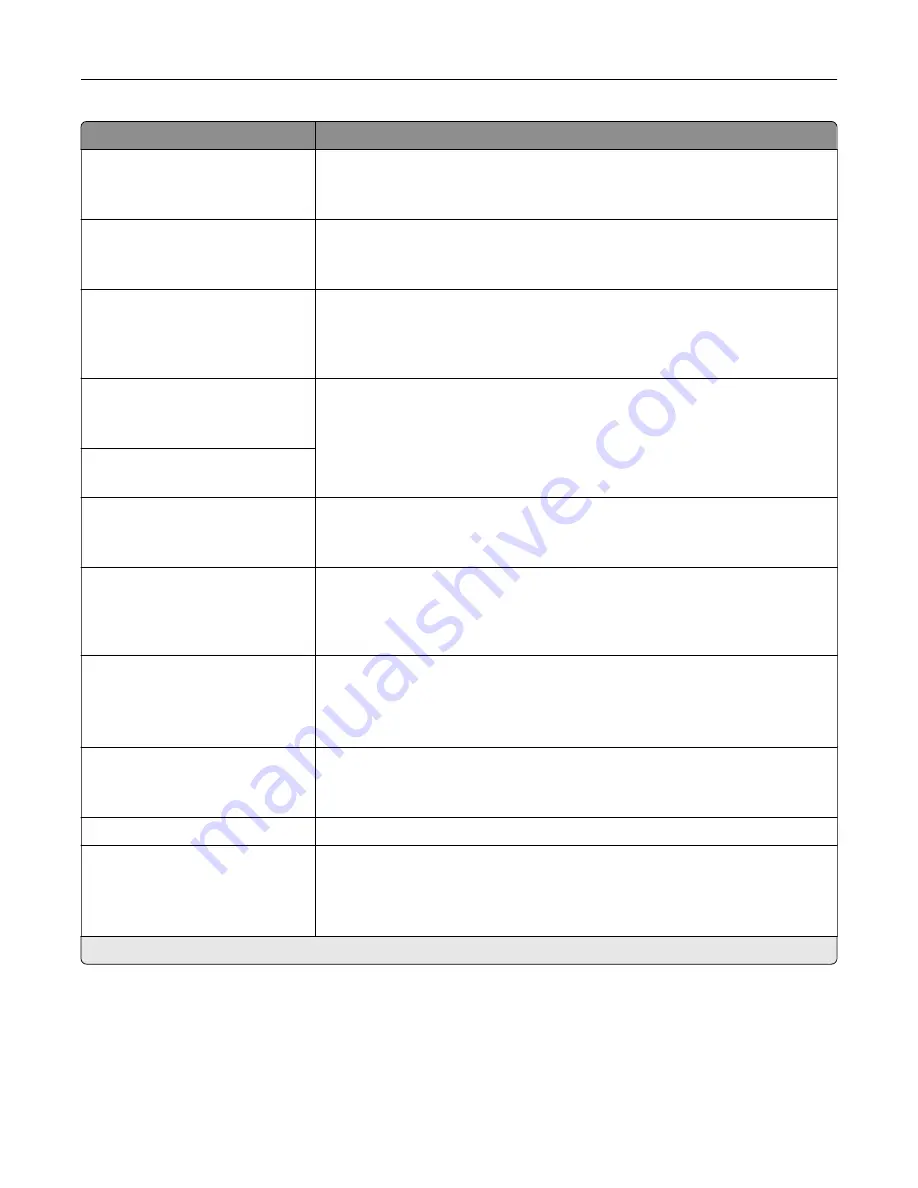
Menu item
Description
E
‑
mail Log Cleared Alert
Off*
On
Send e
‑
mail notification to the administrator when a log entry is deleted.
E
‑
mail Log Wrapped Alert
Off*
On
Send e
‑
mail notification to the administrator when the log becomes full and
begins to overwrite the oldest entries.
Log Full Behavior
Wrap Over Oldest Entries*
E
‑
mail Log Then Delete All
Entries
Resolve log storage issues when the log fills its allotted memory.
E
‑
mail % Full Alert
Off*
On
Send e
‑
mail notification to the administrator when the log fills its allotted
memory.
% Full Alert Level
1–99 (90*)
E
‑
mail Log Exported Alert
Off*
On
Send e
‑
mail notification to the administrator when a log is exported.
E
‑
mail Log Settings Changed
Alert
Off*
On
Send e
‑
mail notification to the administrator when Enable Audit is set.
Log Line Endings
LF (\n)*
CR (\r)
CRLF (\r\n)
Specify how the log file terminates the end of each line.
Digitally Sign Exports
Off*
On
Add a digital signature to each exported log file.
Clear Log
Delete all audit logs.
Export Log
Syslog (RFC 5424)
Syslog (RFC 3164)
CSV
Export a security log to a flash drive.
Note:
An asterisk (*) next to a value indicates the factory default setting.
Use printer menus
194
Summary of Contents for XC4342
Page 64: ...3 Remove the fax cover 4 Remove the fax bracket Set up install and configure 64 ...
Page 65: ...5 Install the fax card to the bracket Set up install and configure 65 ...
Page 70: ...4 Install the ISP into its housing Set up install and configure 70 ...
Page 71: ...5 Attach the housing to the controller board shield Set up install and configure 71 ...
Page 76: ...Set up install and configure 76 ...
Page 84: ...Set up install and configure 84 ...
Page 85: ...3 Install the wireless module into its housing Set up install and configure 85 ...
Page 86: ...4 Attach the wireless module to the controller board shield Set up install and configure 86 ...
Page 88: ...6 Attach the controller board shield Set up install and configure 88 ...
Page 205: ...2 Remove the used toner cartridge 3 Unpack the new toner cartridge Maintain the printer 205 ...
Page 206: ...4 Insert the new toner cartridge 5 Close door B Maintain the printer 206 ...
Page 207: ...Replacing the black imaging unit 1 Open door B Maintain the printer 207 ...
Page 209: ...3 Remove the toner cartridges Maintain the printer 209 ...
Page 210: ...4 Disconnect the imaging kit cable Maintain the printer 210 ...
Page 214: ...9 Insert the imaging kit Maintain the printer 214 ...
Page 216: ...Replacing the color imaging kit 1 Open door B Maintain the printer 216 ...
Page 218: ...3 Remove the toner cartridges Maintain the printer 218 ...
Page 219: ...4 Disconnect the imaging kit cable Maintain the printer 219 ...
Page 220: ...5 Remove the used imaging kit Maintain the printer 220 ...
Page 222: ...8 Insert the black imaging unit into the new imaging kit Maintain the printer 222 ...
Page 223: ...9 Insert the new imaging kit Maintain the printer 223 ...
Page 225: ...Replacing the waste toner bottle 1 Open door B Maintain the printer 225 ...
Page 238: ...2 Remove the used ADF pick roller Maintain the printer 238 ...
Page 240: ...5 Insert the new ADF separator roller until it clicks into place Maintain the printer 240 ...
Page 250: ...2 Remove the ADF pick roller Maintain the printer 250 ...
Page 252: ...5 Insert the ADF separator roller until it clicks into place Maintain the printer 252 ...


