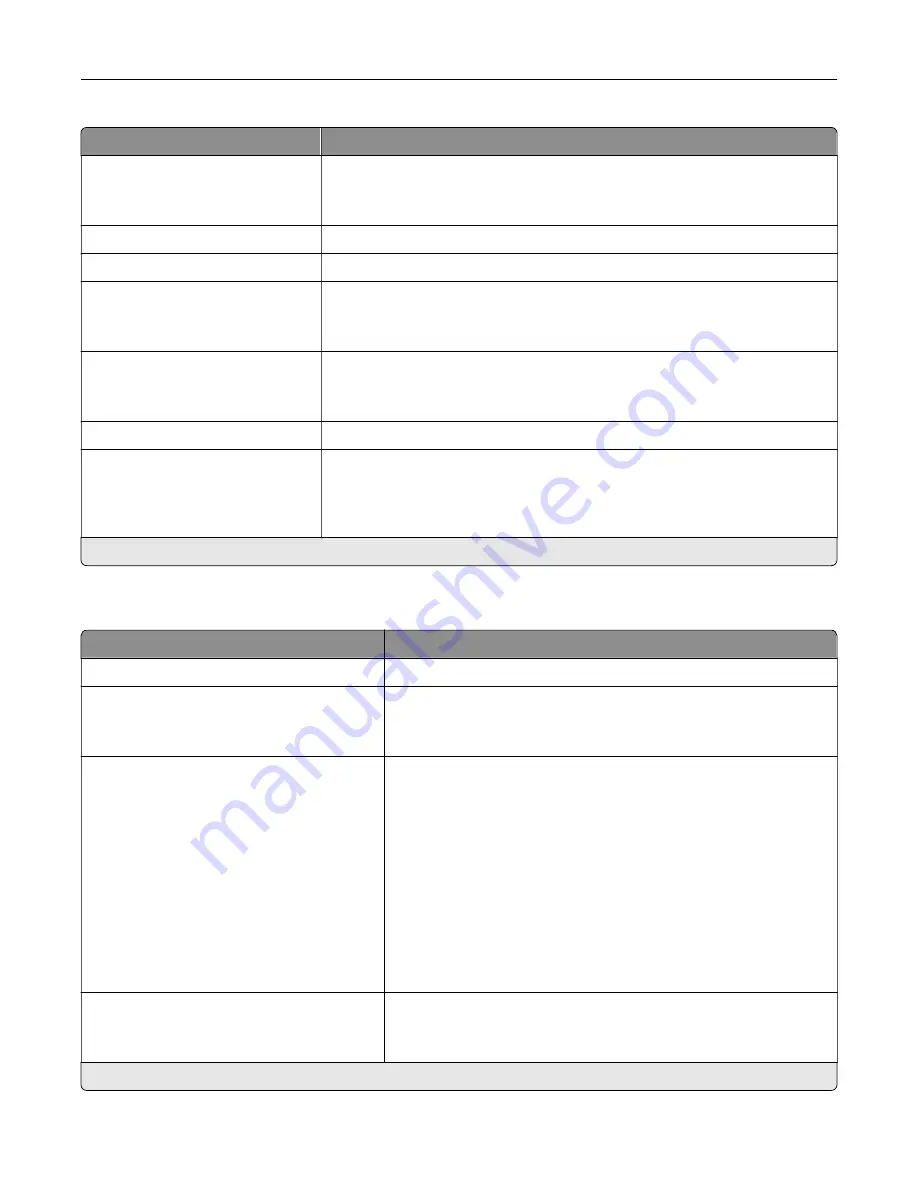
Menu item
Description
Enable Wi
‑
Fi Direct
On
Off*
Set the printer to connect directly to Wi-Fi devices.
Wi
‑
Fi Direct Name
Specify the name of the Wi
‑
Fi Direct network.
Wi
‑
Fi Direct Password
Set the password to authenticate and validate users on a Wi
‑
Fi connection.
Show Password on Setup Page
Off
On*
Show the Wi
‑
Fi Direct Password on the Network Setup Page.
Preferred Channel Number
1–11
Auto*
Set the preferred channel of the Wi
‑
Fi network.
Group Owner IP Address
Specify the IP address of the group owner.
Auto
‑
Accept Push Button
Requests
Off*
On
Accept requests to connect to the network automatically.
Note:
Accepting clients automatically is not secured.
Note:
An asterisk (*) next to a value indicates the factory default setting.
Ethernet
Menu item
Description
Network Speed
Show the speed of the active network adapter.
IPv4
Enable DHCP (On*)
Set Static IP Address
Configure the IPv4 settings.
IPv6
Enable IPv6 (On*)
Enable DHCPv6 (Off*)
Stateless Address Autoconfiguration
(On*)
DNS Server Address
Manually Assigned IPv6 Address
Manually Assigned IPv6 Router
Address Prefix (64*)
All IPv6 Addresses
All IPv6 Router Addresses
Configure the IPv6 settings.
Network Address
UAA
LAA
Specify the network address.
Note:
An asterisk (*) next to a value indicates the factory default setting.
Use printer menus
181
Summary of Contents for XC4342
Page 64: ...3 Remove the fax cover 4 Remove the fax bracket Set up install and configure 64 ...
Page 65: ...5 Install the fax card to the bracket Set up install and configure 65 ...
Page 70: ...4 Install the ISP into its housing Set up install and configure 70 ...
Page 71: ...5 Attach the housing to the controller board shield Set up install and configure 71 ...
Page 76: ...Set up install and configure 76 ...
Page 84: ...Set up install and configure 84 ...
Page 85: ...3 Install the wireless module into its housing Set up install and configure 85 ...
Page 86: ...4 Attach the wireless module to the controller board shield Set up install and configure 86 ...
Page 88: ...6 Attach the controller board shield Set up install and configure 88 ...
Page 205: ...2 Remove the used toner cartridge 3 Unpack the new toner cartridge Maintain the printer 205 ...
Page 206: ...4 Insert the new toner cartridge 5 Close door B Maintain the printer 206 ...
Page 207: ...Replacing the black imaging unit 1 Open door B Maintain the printer 207 ...
Page 209: ...3 Remove the toner cartridges Maintain the printer 209 ...
Page 210: ...4 Disconnect the imaging kit cable Maintain the printer 210 ...
Page 214: ...9 Insert the imaging kit Maintain the printer 214 ...
Page 216: ...Replacing the color imaging kit 1 Open door B Maintain the printer 216 ...
Page 218: ...3 Remove the toner cartridges Maintain the printer 218 ...
Page 219: ...4 Disconnect the imaging kit cable Maintain the printer 219 ...
Page 220: ...5 Remove the used imaging kit Maintain the printer 220 ...
Page 222: ...8 Insert the black imaging unit into the new imaging kit Maintain the printer 222 ...
Page 223: ...9 Insert the new imaging kit Maintain the printer 223 ...
Page 225: ...Replacing the waste toner bottle 1 Open door B Maintain the printer 225 ...
Page 238: ...2 Remove the used ADF pick roller Maintain the printer 238 ...
Page 240: ...5 Insert the new ADF separator roller until it clicks into place Maintain the printer 240 ...
Page 250: ...2 Remove the ADF pick roller Maintain the printer 250 ...
Page 252: ...5 Insert the ADF separator roller until it clicks into place Maintain the printer 252 ...


