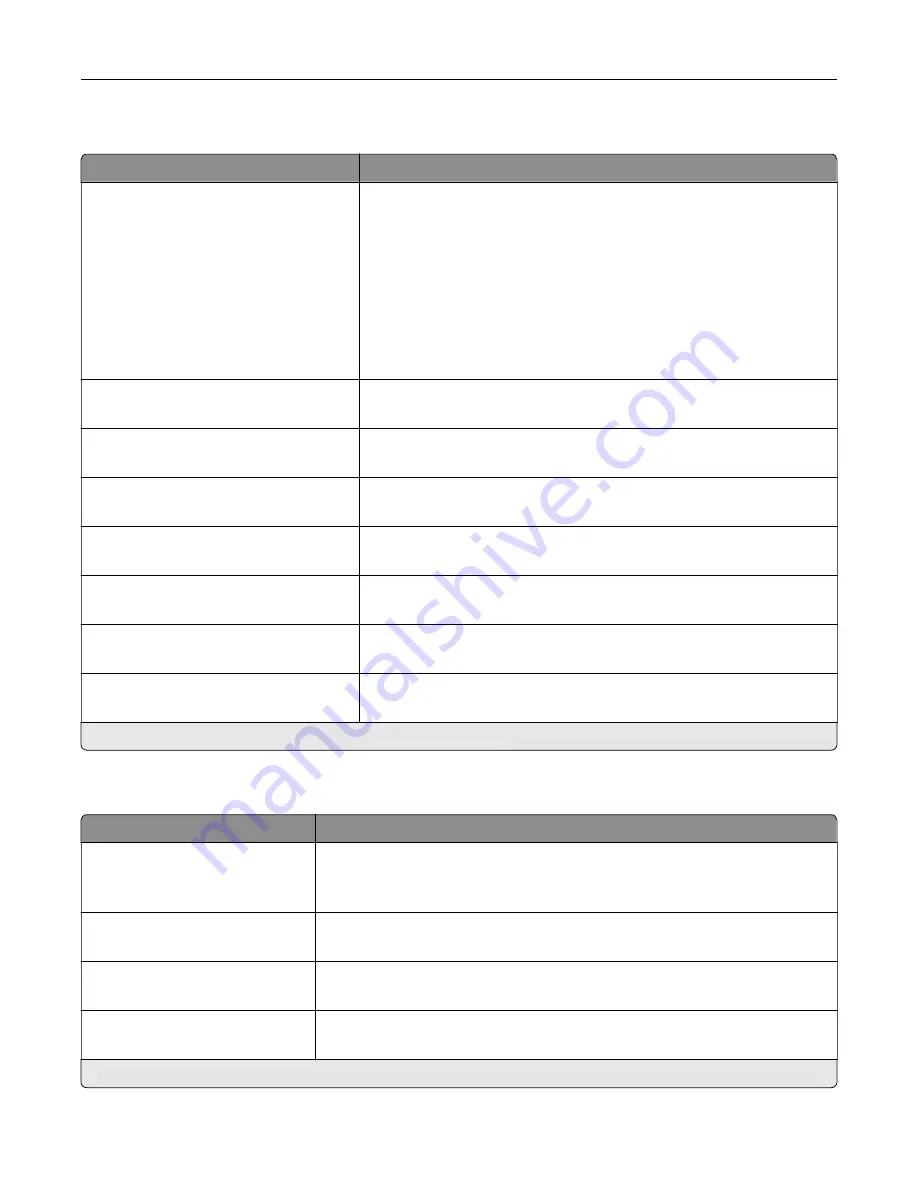
HTTP/FTP Settings
Menu item
Description
Proxy
HTPP Proxy IP Address
HTTP Default IP Port
FTP Proxy IP Address
FTP Default IP Port
Authentication
User Name
Password
Local Domains
Configure the HTTP and FTP server settings.
Other Settings
Enable HTTP Server (On*)
Access the Embedded Web Server to monitor and manage the printer.
Other Settings
Enable HTPPS (On*)
Enable Hypertext Transfer Protocol Secure (HTTPS) to encrypt data
transferring to and from the print server.
Other Settings
Force HTTPS Connections (Off*)
Force the printer to use HTTPS connections.
Other Settings
Enable FTP/TFTP (On*)
Send files using FTP/TFTP.
Other Settings
HTTPS Device Certificate (default*)
View the HTTP device certificate used on the printer.
Other Settings
Timeout for HTTP/FTP Requests (30*)
Specify the amount of time before the server connection stops.
Other Settings
Retries for HTTP/FTP Requests (3*)
Set the number of retries to connect to the HTTP/FTP server.
Note:
An asterisk (*) next to a value indicates the factory default setting.
ThinPrint
Menu item
Description
Enable ThinPrint
Off*
On
Print using ThinPrint.
Port Number
4000–4999 (4000*)
Set the port number for the ThinPrint server.
Bandwidth (bits/sec)
100–1000000 (0*)
Set the speed to transmit data in a ThinPrint environment.
Packet Size (kbytes)
0–64000 (0*)
Set the packet size for data transmission.
Note:
An asterisk (*) next to a value indicates the factory default setting.
Use printer menus
188
Summary of Contents for XC4342
Page 64: ...3 Remove the fax cover 4 Remove the fax bracket Set up install and configure 64 ...
Page 65: ...5 Install the fax card to the bracket Set up install and configure 65 ...
Page 70: ...4 Install the ISP into its housing Set up install and configure 70 ...
Page 71: ...5 Attach the housing to the controller board shield Set up install and configure 71 ...
Page 76: ...Set up install and configure 76 ...
Page 84: ...Set up install and configure 84 ...
Page 85: ...3 Install the wireless module into its housing Set up install and configure 85 ...
Page 86: ...4 Attach the wireless module to the controller board shield Set up install and configure 86 ...
Page 88: ...6 Attach the controller board shield Set up install and configure 88 ...
Page 205: ...2 Remove the used toner cartridge 3 Unpack the new toner cartridge Maintain the printer 205 ...
Page 206: ...4 Insert the new toner cartridge 5 Close door B Maintain the printer 206 ...
Page 207: ...Replacing the black imaging unit 1 Open door B Maintain the printer 207 ...
Page 209: ...3 Remove the toner cartridges Maintain the printer 209 ...
Page 210: ...4 Disconnect the imaging kit cable Maintain the printer 210 ...
Page 214: ...9 Insert the imaging kit Maintain the printer 214 ...
Page 216: ...Replacing the color imaging kit 1 Open door B Maintain the printer 216 ...
Page 218: ...3 Remove the toner cartridges Maintain the printer 218 ...
Page 219: ...4 Disconnect the imaging kit cable Maintain the printer 219 ...
Page 220: ...5 Remove the used imaging kit Maintain the printer 220 ...
Page 222: ...8 Insert the black imaging unit into the new imaging kit Maintain the printer 222 ...
Page 223: ...9 Insert the new imaging kit Maintain the printer 223 ...
Page 225: ...Replacing the waste toner bottle 1 Open door B Maintain the printer 225 ...
Page 238: ...2 Remove the used ADF pick roller Maintain the printer 238 ...
Page 240: ...5 Insert the new ADF separator roller until it clicks into place Maintain the printer 240 ...
Page 250: ...2 Remove the ADF pick roller Maintain the printer 250 ...
Page 252: ...5 Insert the ADF separator roller until it clicks into place Maintain the printer 252 ...


