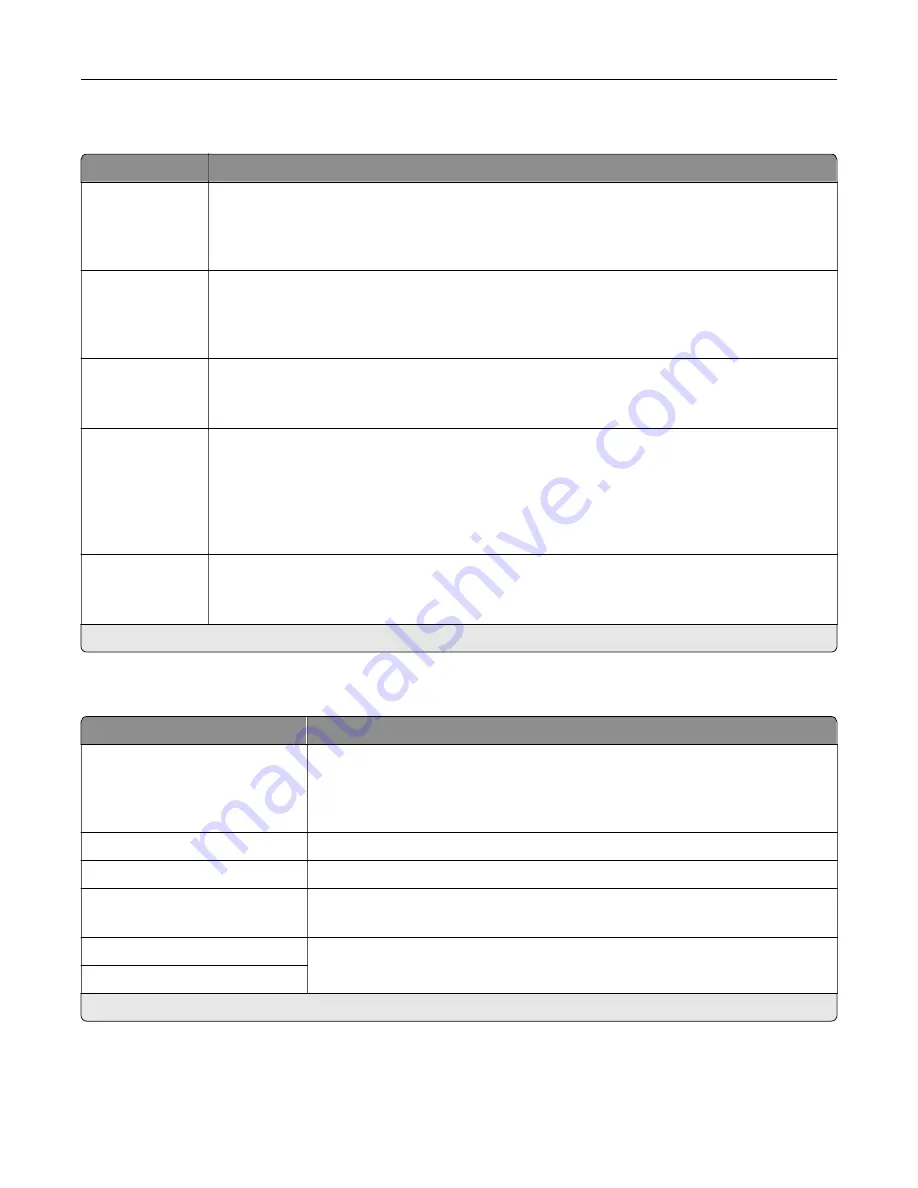
USB
Menu item
Description
PCL SmartSwitch
Off
On*
Set the printer to switch to PCL emulation when a print job received through a USB port requires
it, regardless of the default printer language.
Note:
When this setting is disabled, the printer does not examine incoming data and uses the
default printer language specified in the Setup menu.
PS SmartSwitch
Off
On*
Set the printer to switch to PostScript emulation when a print job received through a USB port
requires it, regardless of the default printer language.
Note:
When this setting is disabled, the printer does not examine incoming data and uses the
default printer language specified in the Setup menu.
Job Buffering
Off*
On
Temporarily store print jobs in the hard disk or intelligent storage drive (ISD) before printing.
Note:
This menu item appears only when a hard disk or an ISD is installed.
Mac Binary PS
Auto*
On
Off
Set the printer to process Macintosh binary PostScript print jobs.
Notes:
•
Auto processes print jobs from computers using either Windows or Macintosh operating
systems.
•
Off filters PostScript print jobs using the standard protocol.
Enable USB Port
Off
On*
Enable the front USB drive port.
Note:
An asterisk (*) next to a value indicates the factory default setting.
Restrict external network access
Menu item
Description
Restrict external network
access
Off*
On
Restrict access to network sites.
External network address
Specify the network addresses with restricted access.
E
‑
mail address for notification
Specify an e
‑
mail address to send a notification of logged events.
Ping frequency
1–300 (10*)
Specify the network query interval in seconds.
Subject
Specify the subject and message of the notification e
‑
mail.
Message
Note:
An asterisk (*) next to a value indicates the factory default setting.
Use printer menus
189
Summary of Contents for XC4342
Page 64: ...3 Remove the fax cover 4 Remove the fax bracket Set up install and configure 64 ...
Page 65: ...5 Install the fax card to the bracket Set up install and configure 65 ...
Page 70: ...4 Install the ISP into its housing Set up install and configure 70 ...
Page 71: ...5 Attach the housing to the controller board shield Set up install and configure 71 ...
Page 76: ...Set up install and configure 76 ...
Page 84: ...Set up install and configure 84 ...
Page 85: ...3 Install the wireless module into its housing Set up install and configure 85 ...
Page 86: ...4 Attach the wireless module to the controller board shield Set up install and configure 86 ...
Page 88: ...6 Attach the controller board shield Set up install and configure 88 ...
Page 205: ...2 Remove the used toner cartridge 3 Unpack the new toner cartridge Maintain the printer 205 ...
Page 206: ...4 Insert the new toner cartridge 5 Close door B Maintain the printer 206 ...
Page 207: ...Replacing the black imaging unit 1 Open door B Maintain the printer 207 ...
Page 209: ...3 Remove the toner cartridges Maintain the printer 209 ...
Page 210: ...4 Disconnect the imaging kit cable Maintain the printer 210 ...
Page 214: ...9 Insert the imaging kit Maintain the printer 214 ...
Page 216: ...Replacing the color imaging kit 1 Open door B Maintain the printer 216 ...
Page 218: ...3 Remove the toner cartridges Maintain the printer 218 ...
Page 219: ...4 Disconnect the imaging kit cable Maintain the printer 219 ...
Page 220: ...5 Remove the used imaging kit Maintain the printer 220 ...
Page 222: ...8 Insert the black imaging unit into the new imaging kit Maintain the printer 222 ...
Page 223: ...9 Insert the new imaging kit Maintain the printer 223 ...
Page 225: ...Replacing the waste toner bottle 1 Open door B Maintain the printer 225 ...
Page 238: ...2 Remove the used ADF pick roller Maintain the printer 238 ...
Page 240: ...5 Insert the new ADF separator roller until it clicks into place Maintain the printer 240 ...
Page 250: ...2 Remove the ADF pick roller Maintain the printer 250 ...
Page 252: ...5 Insert the ADF separator roller until it clicks into place Maintain the printer 252 ...


