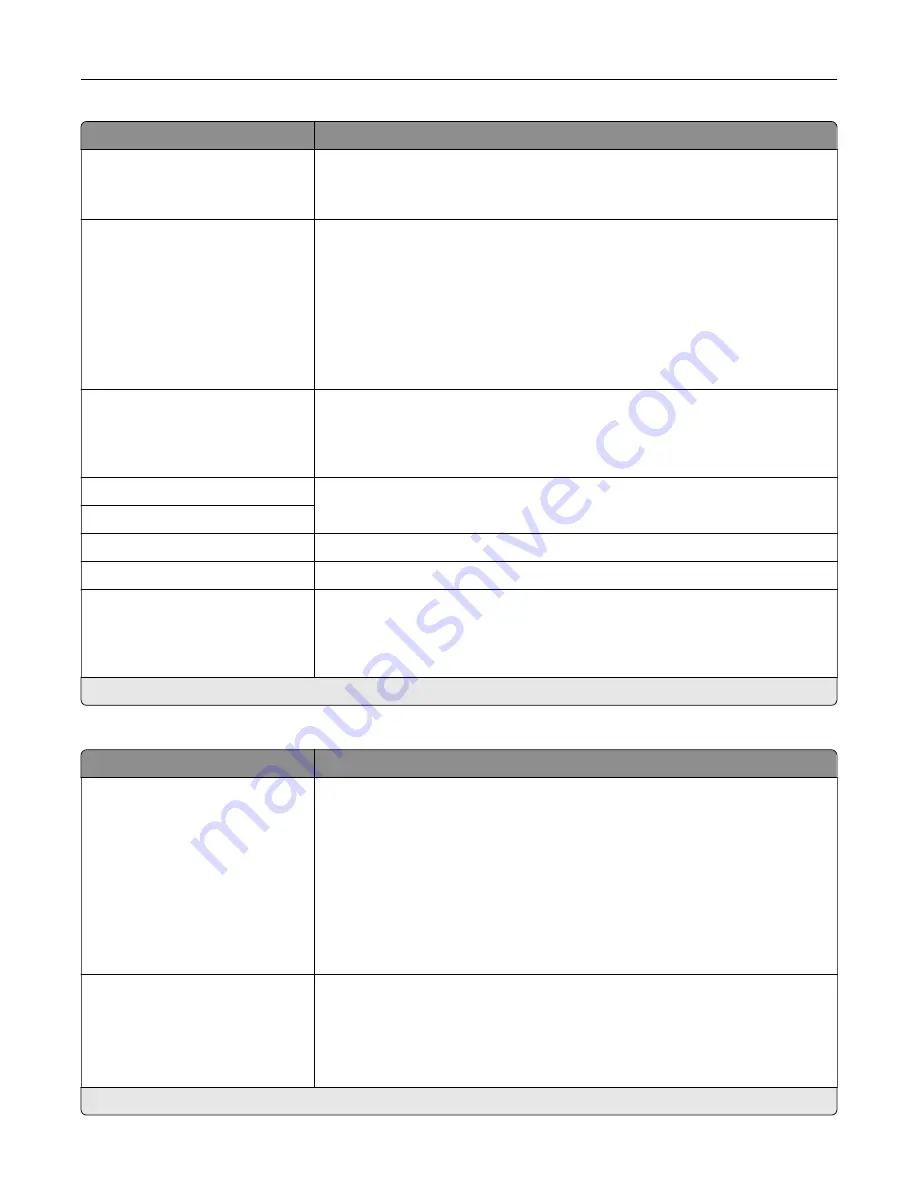
Menu item
Description
Device
‑
Initiated E
‑
None*
Use Device SMTP Credentials
Specify whether credentials are required for device
‑
initiated e
‑
mail.
User
‑
Initiated E
‑
None*
Use Device SMTP Credentials
Use Session User ID and
Password
Use Session E
‑
mail address
and Password
Prompt user
Specify whether credentials are required for user
‑
initiated e
‑
mail.
Use Active Directory Device
Credentials
Off*
On
Enable user credentials and group destinations to connect to the SMTP server.
Device Userid
Specify the user ID and password to connect to the SMTP server.
Device Password
Kerberos 5 REALM
Specify the realm for the Kerberos 5 authentication protocol.
NTLM Domain
Specify the domain name for the NTLM security protocol.
Disable "SMTP server not set
up" error
Off*
On
Hide the “SMTP server not set up” error message.
Note:
An asterisk (*) next to a value indicates the factory default setting.
Fax Server Scan Settings
Menu item
Description
Image Format
TIFF (.tif)
PDF (.pdf)*
XPS (.xps)
TXT (.txt)
RTF (.rtf)
DOCX (.docx)
XLSX (.xlsx)
CSV (.csv)
Specify the file format for the scanned image.
Content Type
Text*
Text/Photo
Photo
Graphics
Improve the output result based on the content of the original document.
Note:
An asterisk (*) next to a value indicates the factory default setting.
Use printer menus
160
Summary of Contents for XC4342
Page 64: ...3 Remove the fax cover 4 Remove the fax bracket Set up install and configure 64 ...
Page 65: ...5 Install the fax card to the bracket Set up install and configure 65 ...
Page 70: ...4 Install the ISP into its housing Set up install and configure 70 ...
Page 71: ...5 Attach the housing to the controller board shield Set up install and configure 71 ...
Page 76: ...Set up install and configure 76 ...
Page 84: ...Set up install and configure 84 ...
Page 85: ...3 Install the wireless module into its housing Set up install and configure 85 ...
Page 86: ...4 Attach the wireless module to the controller board shield Set up install and configure 86 ...
Page 88: ...6 Attach the controller board shield Set up install and configure 88 ...
Page 205: ...2 Remove the used toner cartridge 3 Unpack the new toner cartridge Maintain the printer 205 ...
Page 206: ...4 Insert the new toner cartridge 5 Close door B Maintain the printer 206 ...
Page 207: ...Replacing the black imaging unit 1 Open door B Maintain the printer 207 ...
Page 209: ...3 Remove the toner cartridges Maintain the printer 209 ...
Page 210: ...4 Disconnect the imaging kit cable Maintain the printer 210 ...
Page 214: ...9 Insert the imaging kit Maintain the printer 214 ...
Page 216: ...Replacing the color imaging kit 1 Open door B Maintain the printer 216 ...
Page 218: ...3 Remove the toner cartridges Maintain the printer 218 ...
Page 219: ...4 Disconnect the imaging kit cable Maintain the printer 219 ...
Page 220: ...5 Remove the used imaging kit Maintain the printer 220 ...
Page 222: ...8 Insert the black imaging unit into the new imaging kit Maintain the printer 222 ...
Page 223: ...9 Insert the new imaging kit Maintain the printer 223 ...
Page 225: ...Replacing the waste toner bottle 1 Open door B Maintain the printer 225 ...
Page 238: ...2 Remove the used ADF pick roller Maintain the printer 238 ...
Page 240: ...5 Insert the new ADF separator roller until it clicks into place Maintain the printer 240 ...
Page 250: ...2 Remove the ADF pick roller Maintain the printer 250 ...
Page 252: ...5 Insert the ADF separator roller until it clicks into place Maintain the printer 252 ...


