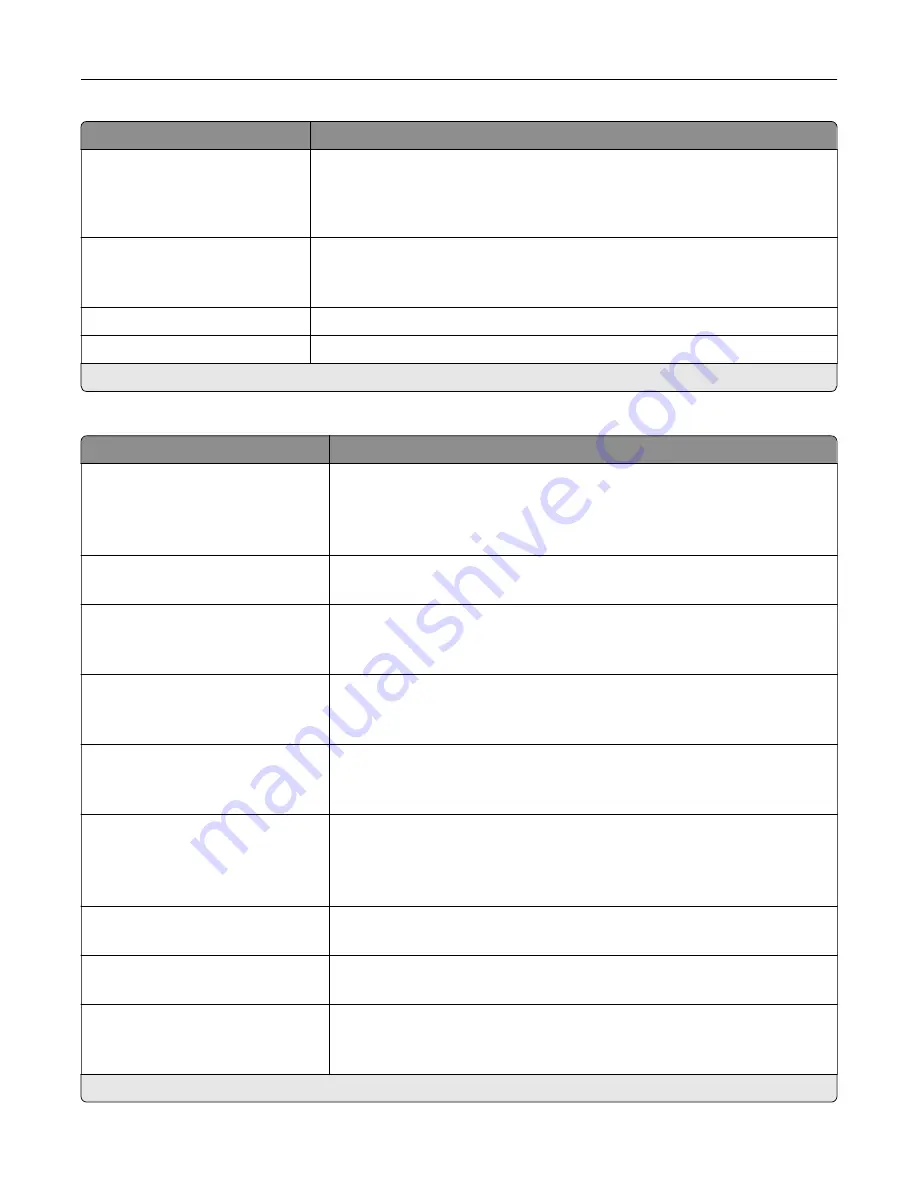
Menu item
Description
Auto Convert Color Faxes to
Mono Faxes
On*
Off
Convert all outgoing color faxes to black and white.
Confirm Fax Number
Off*
On
Ask the user to confirm the fax number.
Dial Prefix
Set a dialing prefix.
Dialing Prefix Rules
Establish a dialing prefix rule.
Note:
An asterisk (*) next to a value indicates the factory default setting.
Fax Receive Settings
Menu item
Description
Fax Job Waiting
None*
Toner
Toner and Supplies
Remove fax jobs that request specific unavailable resources from the print
queue.
Rings to Answer
1–25 (3*)
Set the number of rings required before the printer answers the incoming
calls.
Auto Reduction
On*
Off
Scale incoming fax to fit on the page.
Paper Source
Tray [X]
Auto*
Set the paper source for printing incoming fax.
Sides
On
Off*
Print on both sides of the paper.
Separator Sheets
None*
Before Job
After Job
Specify whether to insert blank separator sheets when printing.
Separator Sheet Source
Tray [X] (1*)
Specify the paper source for the separator sheet.
Output Bin
Standard Bin
Specify the output bin for received faxes.
Fax Footer
On
Off*
Print the transmission information at the bottom of each page from a received
fax.
Note:
An asterisk (*) next to a value indicates the factory default setting.
Use printer menus
152
Summary of Contents for XC4342
Page 64: ...3 Remove the fax cover 4 Remove the fax bracket Set up install and configure 64 ...
Page 65: ...5 Install the fax card to the bracket Set up install and configure 65 ...
Page 70: ...4 Install the ISP into its housing Set up install and configure 70 ...
Page 71: ...5 Attach the housing to the controller board shield Set up install and configure 71 ...
Page 76: ...Set up install and configure 76 ...
Page 84: ...Set up install and configure 84 ...
Page 85: ...3 Install the wireless module into its housing Set up install and configure 85 ...
Page 86: ...4 Attach the wireless module to the controller board shield Set up install and configure 86 ...
Page 88: ...6 Attach the controller board shield Set up install and configure 88 ...
Page 205: ...2 Remove the used toner cartridge 3 Unpack the new toner cartridge Maintain the printer 205 ...
Page 206: ...4 Insert the new toner cartridge 5 Close door B Maintain the printer 206 ...
Page 207: ...Replacing the black imaging unit 1 Open door B Maintain the printer 207 ...
Page 209: ...3 Remove the toner cartridges Maintain the printer 209 ...
Page 210: ...4 Disconnect the imaging kit cable Maintain the printer 210 ...
Page 214: ...9 Insert the imaging kit Maintain the printer 214 ...
Page 216: ...Replacing the color imaging kit 1 Open door B Maintain the printer 216 ...
Page 218: ...3 Remove the toner cartridges Maintain the printer 218 ...
Page 219: ...4 Disconnect the imaging kit cable Maintain the printer 219 ...
Page 220: ...5 Remove the used imaging kit Maintain the printer 220 ...
Page 222: ...8 Insert the black imaging unit into the new imaging kit Maintain the printer 222 ...
Page 223: ...9 Insert the new imaging kit Maintain the printer 223 ...
Page 225: ...Replacing the waste toner bottle 1 Open door B Maintain the printer 225 ...
Page 238: ...2 Remove the used ADF pick roller Maintain the printer 238 ...
Page 240: ...5 Insert the new ADF separator roller until it clicks into place Maintain the printer 240 ...
Page 250: ...2 Remove the ADF pick roller Maintain the printer 250 ...
Page 252: ...5 Insert the ADF separator roller until it clicks into place Maintain the printer 252 ...


