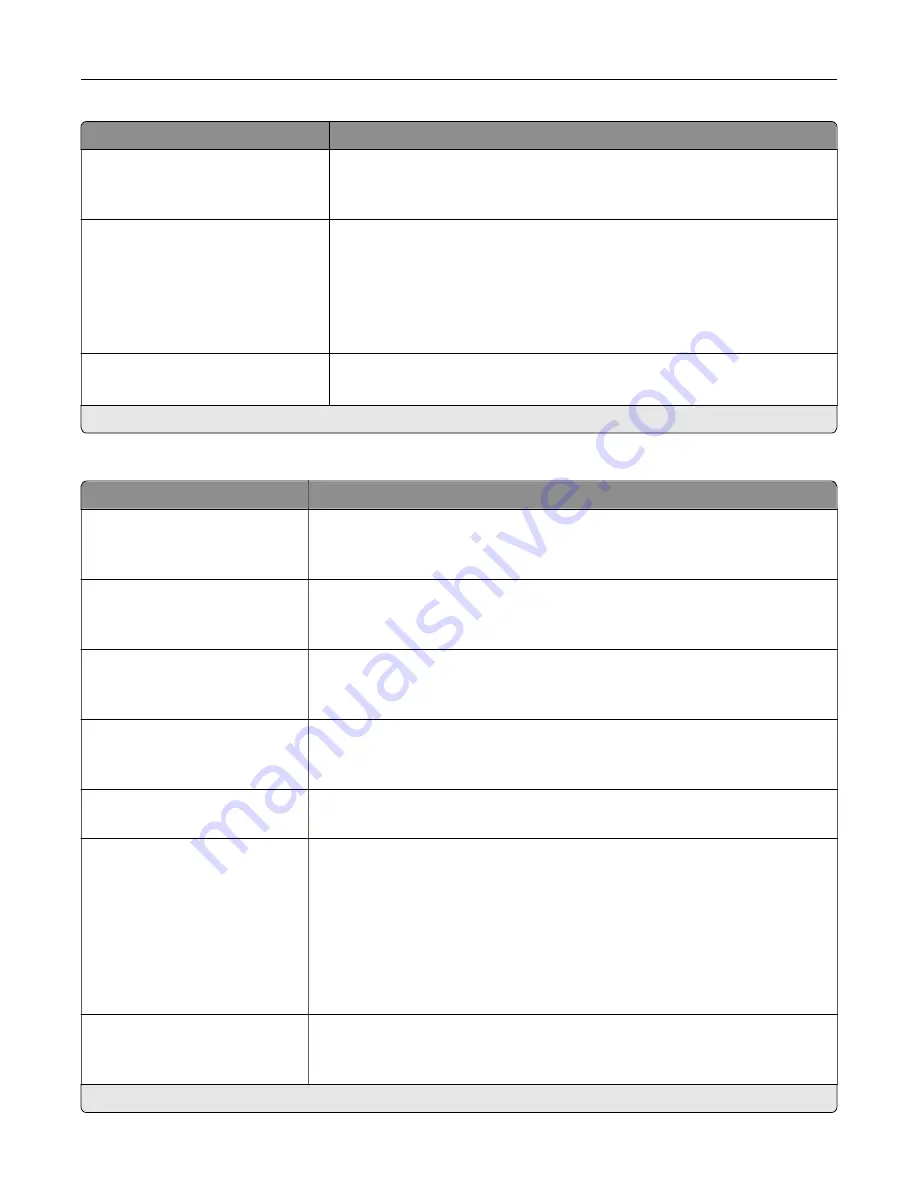
Menu item
Description
Fax Footer Time Stamp
Receive*
Print the time stamp at the bottom of each page from a received fax.
Holding Faxes
Held Fax Mode
Off*
Always On
Manual
Scheduled
Hold received faxes from printing until they are released.
Holding Faxes
Fax Holding Schedule
Assign a schedule for holding faxes.
Note:
This menu item appears only if Held Fax Mode is set to Scheduled.
Note:
An asterisk (*) next to a value indicates the factory default setting.
Admin Controls
Menu item
Description
Enable Fax Receive
On*
Off
Set the printer to receive fax.
Enable Color Fax Receive
On*
Off
Set the printer to receive fax in color.
Enable Caller ID
On
Off*
Show the caller ID information of the incoming call on the printer display.
Block No Name Fax
On
Off*
Block incoming faxes without fax IDs.
Banned Fax List
Add Banned Fax
Specify the phone numbers that you want to block.
Answer On
All Rings*
Single Ring Only
Double Ring Only
Triple Ring Only
Single or Double Rings Only
Single or Triple Rings Only
Double or Triple Rings Only
Set a distinctive ring pattern for incoming fax.
Auto Answer
On*
Off
Set the printer to receive fax automatically.
Note:
An asterisk (*) next to a value indicates the factory default setting.
Use printer menus
153
Summary of Contents for XC4342
Page 64: ...3 Remove the fax cover 4 Remove the fax bracket Set up install and configure 64 ...
Page 65: ...5 Install the fax card to the bracket Set up install and configure 65 ...
Page 70: ...4 Install the ISP into its housing Set up install and configure 70 ...
Page 71: ...5 Attach the housing to the controller board shield Set up install and configure 71 ...
Page 76: ...Set up install and configure 76 ...
Page 84: ...Set up install and configure 84 ...
Page 85: ...3 Install the wireless module into its housing Set up install and configure 85 ...
Page 86: ...4 Attach the wireless module to the controller board shield Set up install and configure 86 ...
Page 88: ...6 Attach the controller board shield Set up install and configure 88 ...
Page 205: ...2 Remove the used toner cartridge 3 Unpack the new toner cartridge Maintain the printer 205 ...
Page 206: ...4 Insert the new toner cartridge 5 Close door B Maintain the printer 206 ...
Page 207: ...Replacing the black imaging unit 1 Open door B Maintain the printer 207 ...
Page 209: ...3 Remove the toner cartridges Maintain the printer 209 ...
Page 210: ...4 Disconnect the imaging kit cable Maintain the printer 210 ...
Page 214: ...9 Insert the imaging kit Maintain the printer 214 ...
Page 216: ...Replacing the color imaging kit 1 Open door B Maintain the printer 216 ...
Page 218: ...3 Remove the toner cartridges Maintain the printer 218 ...
Page 219: ...4 Disconnect the imaging kit cable Maintain the printer 219 ...
Page 220: ...5 Remove the used imaging kit Maintain the printer 220 ...
Page 222: ...8 Insert the black imaging unit into the new imaging kit Maintain the printer 222 ...
Page 223: ...9 Insert the new imaging kit Maintain the printer 223 ...
Page 225: ...Replacing the waste toner bottle 1 Open door B Maintain the printer 225 ...
Page 238: ...2 Remove the used ADF pick roller Maintain the printer 238 ...
Page 240: ...5 Insert the new ADF separator roller until it clicks into place Maintain the printer 240 ...
Page 250: ...2 Remove the ADF pick roller Maintain the printer 250 ...
Page 252: ...5 Insert the ADF separator roller until it clicks into place Maintain the printer 252 ...


