background image

LabelTac

®

 Pro X     |     REFERENCE GUIDE

WELCOME TO LABELTAC

®

LET’S START LABELING

1


|

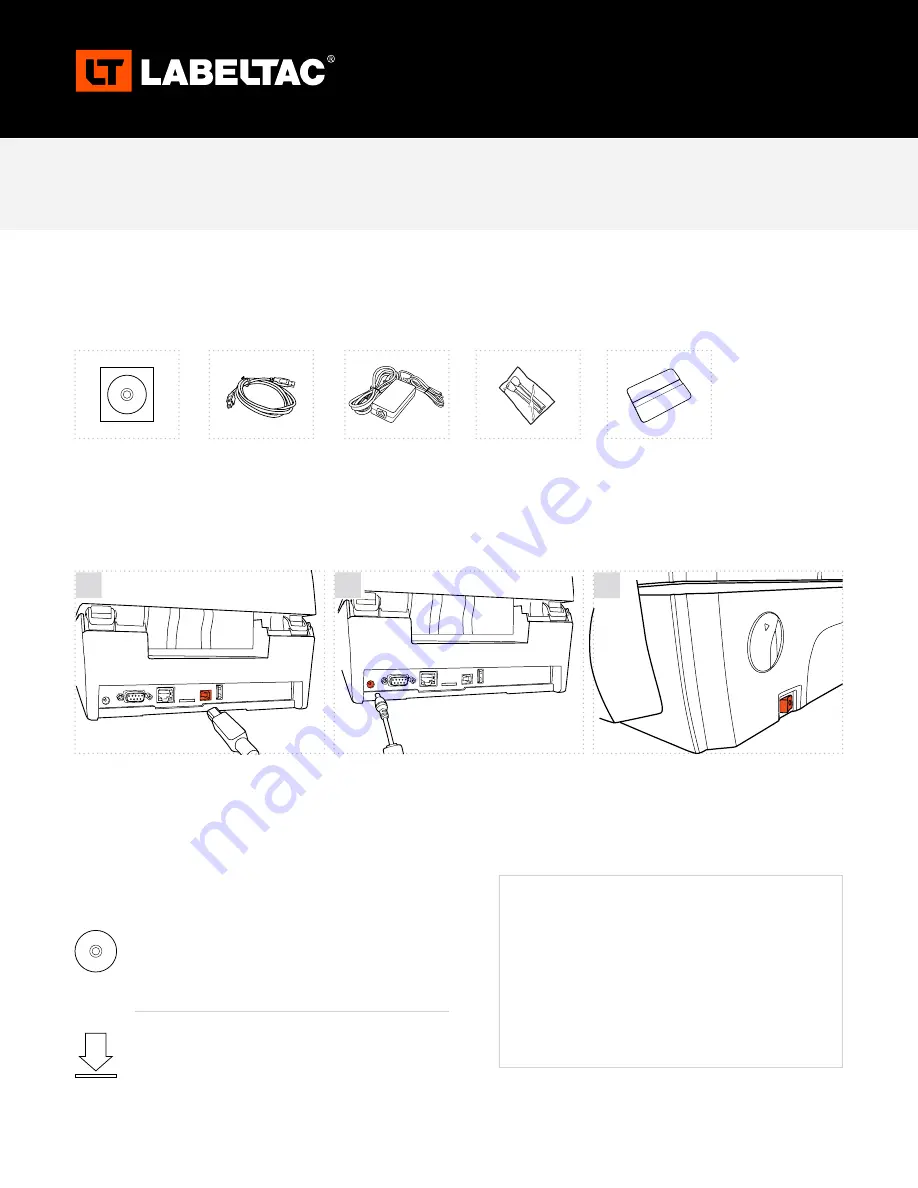
  UNBOX & CHECK CONTENTS

2


|

  CONNECT

3


|

  INSTALL SOFTWARE

USER MANUAL  

LabelTac

®

 Pro X Thermal Transfer Printer

Included Accessories

Option 1: Install from CD

Option 2: Digital download

Insert the USB cable to the back of your 
printer and plug the other end into a USB 
port on your computer.

Put the included CD in your computer’s CD drive and 
follow the prompts on your screen to install the software. 

Head to the LabelTac

®

 support page, select your printer 

model, and download the driver for your printer. 


labeltac.com/support

Connect the the two halves of the power 
cable and plug into the power jack socket. 
Plug the other end into an electrical outlet.

Power on your printer.

Note: It is important that your LabelTac

®

 printer 

is powered on before installing software.

Cleaning Swabs (2)

USB Cable

Power Cable

Software CD

1

2

3

SUPPORT

Your LabelTac

®

 printer includes a free, full lifetime 

warranty on all parts and labor and unlimited support by 
phone, email or live chat.

Online Support

 labeltac.com/support

Support by phone

 1-877-356-6584

Support by email

 [email protected]

Label Squeegee

Summary of Contents for Pro X

Page 1: ...the LabelTac support page select your printer model and download the driver for your printer labeltac com support Connect the the two halves of the power cable and plug into the power jack socket Plug...

Page 2: ...r The end of the supply should stick out a little at the front of the printer Open the printer Then open the ribbon access cover and media cover Insert the ribbon into the rear ribbon hub by pressing...

Page 3: ...ERENCE GUIDE LCD Menu Function Press the Menu button to enter the main menu Use the Cross button to select the item on main menu The selected item will turn red Press the Feed button to enter the sett...

Page 4: ...D Print Mode Print Mode Maximum Length Wi Fi option Display Printer Information Sensor Contact us Offset Print Width Advanced Shift X List Fonts Shift Y List Images Reference X List Formats Reference...

Page 5: ...Menu TSPL Speed None Offset Cutter Batch Reference Y Direction Peeler Mode Shift Y Country Density Batch Mode Shift X Code Page Print Mode Cutter Mode Reference X TSPL2 This TSPL2 category can set up...

Page 6: ...0 Reference X This item is used to set the origin of printer coordinate system horizontally and vertically Available setting value is from 0 to 9 000 Reference Y 000 Code Page Use this item to set the...

Page 7: ...ed Feed Print Width List Setup Tear Off Cutter Left Position 200 600 Disabled Reprint Mode 300 600 None Format Convert List Images Format Prodix Print Speed Peeler Off Label Top 150 600 Enabled List F...

Page 8: ...er Char This feature is used to set delimiter character N A Media Power Up This option is used to set the action of the media when you turn on the printer No Motion Head Close This option is used to s...

Page 9: ...alibration Printer will feed 2 to 3 gap labels to calibrate the sensor sensitivity automatically N A Manual Setup In case Auto calibration cannot apply to the media please use Manual setup function to...

Page 10: ...9200 bps 38400 bps 57600 bps 115200 bps None Odd Even 7 8 1 2 Parity Data Bits Stop Bit s Serial Comm This option is used to set the printer RS 232 settings Item Description Default Baud Rate This ite...

Page 11: ...setting status N A DHCP This item is used to ON or OFF the DHCP Dynamic Host Configuration Protocol network protocol N A Static IP Use this menu to set the printer s IP address subnet mask and gatewa...

Page 12: ...computer Infrastructure Scan AP This item is used to scan the access point devise N A DHCP This item is used to ON or OFF the DHCP Dynamic Host Configuration Protocol network protocol ON Menu FLASH DR...

Page 13: ...On the configuration printout there is a print head test pattern which is useful for checking if there is any dot damage on the print head heater element Self test printout Model name F W version Firm...

Page 14: ...Control prefix Format prefix Delimiter prefix Printer power up motion Printer head close motion Note ZPL is emulating for Zebra language RS232 serial port configuration Numbers of download files Total...

Page 15: ...t the data received by printer In the dump mode all characters will be printed in 2 columns The left side characters are received from your system and right side data are the corresponding hexadecimal...

Reviews: