GE M
EDICAL
S
YSTEMS
D
IRECTION
FK091075, R
EVISION
04
V
IVID
3N P
RO
/E
XPERT
S
ERVICE
M
ANUAL
8-114
Section 8-6 - Lower Section Components Replacement
8-6-9-4
Rear Wheel Installation Procedure
WARNING: Do not lean on the machine, or leave it unattended without support, if a wheel has
been removed.
WARNING: When BOTH rear wheels are being replaced, the machine must be safely supported
on two wooden blocks (or on a jack capable of supporting the weight of the machine). Always
remove and replace one wheel at a time, before attempting to remove the second wheel.
1) Having removed one rear wheel, position the new wheel on the chassis (in the same position as
that of the wheel removed).
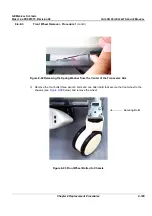
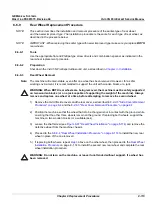
2) Tighten the shaft screw (see
Figure 8-97
below), making sure the wheel is firmly secured.
3.) If replacing both wheels, when the second rear wheel has been removed, repeat
step 1
and
step 2
above to install the second new rear wheel.
4) Return the Vivid 3N rear, left and right covers, as described in
8-2-4-4 "Rear Cover Installation
Procedure" on page 8-7
and the
8-2-2-4 "Side Covers Installation Procedure" on page 8-4
.
Figure 8-97 Rear Wheel Installation
Shaft Screw


