9-5
Cisco Network Modules Hardware Installation Guide
OL-2485-20
Chapter 9 Connecting Digital Modem Network Modules
Adding 6-Port MICA Modules to a Digital Modem Network Module
Removing the Digital Modem Network Module
Caution
Digital modem network modules do not currently support online insertion and removal (hot swap) of
network modules. To avoid damaging the module, you must turn off electrical power and disconnect
network cables before you remove it from the chassis slot.
To remove a digital modem network module, follow these steps:
Step 1
Turn off electrical power to the router. However, to channel ESD voltages to ground, do not unplug the
power cable. Remove all network interface cables, including telephone cables, from the rear panel.
The following warning applies to routers that use a DC power supply:
Warning
Before performing any of the following procedures, ensure that power is removed from the DC
circuit. To ensure that all power is OFF, locate the circuit breaker on the panel board that services
the DC circuit, switch the circuit breaker to the OFF position, and tape the switch handle of the
circuit breaker in the OFF position.
Statement 7
Step 2
Loosen the modules captive mounting screws, using a Phillips or flat-blade screwdriver.
Step 3
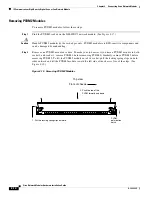
Hold the captive screws between two fingers, and pull the network module toward you until it slides free
of the chassis. (See
Figure 9-3
.)
Step 4
Set the network module on an ESD-preventive mat.
Figure 9-3
Removing a Digital Modem Network Module from a Router
H11202
INPUT 100-240VAC 50/60HZ 3.0-1.5 AMPS
2
3
1
2E
2W
W1
STP
ETHERNET 0
AUI
EN
ACT
LNK
ACT
LNK
AC
T
SERIAL
AC
T
ETHERNET 1
LOOPBACK
CTRLR 0
EN
cT1
PRI
LOCAL
ALARM
REMOTE
ALARM
CARRIER
DETECT
EN
ACT
LINK
3
2
1
0
ETH 0
ETH 3
ETHERNET
4E
ETH 2
ETH 1
DIGITAL MODEMS
MICA
BANK 0
MICA
BANK 1
MICA
BANK 2
MICA
BANK 3
MICA
BANK 4
EN

