FUEL INJECTION SYSTEM
8-30
2
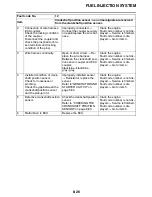
Connection of wire harness
ECU coupler.
Check the locking condition
of the coupler.
Disconnect the coupler and
check the pins (bent or bro-
ken terminals and locking
condition of the pins).
Improperly connected
Connect the coupler securely
or repair/replace the wire har-
ness.
Push the start switch.
Fault code number is not dis-
played
Service is finished.
Fault code number is dis-
played
Go to item 3.
3
Wire harness continuity.
Open or short circuit
Re-
place the wire harness.
Between throttle position
sensor coupler and ECU cou-
pler.
black/blue–black/blue
yellow–yellow
blue–blue
Push the start switch.
Fault code number is not dis-
played
Service is finished.
Fault code number is dis-
played
Go to item 4.
4
Installed condition of throttle
position sensor.
Check for looseness or
pinching.
Improperly installed sensor
Reinstall or replace the
sensor.
Push the start switch.
Fault code number is not dis-
played
Service is finished.
Fault code number is dis-
played
Go to item 5.
5
Applied voltage of throttle po-
sition sensor lead.
Check the applied voltage.
(black/blue–blue)
Push the start switch.
Fault code number is not dis-
played
Service is finished.
Fault code number is dis-
played
Go to item 6.
Location of discon-
nected lead
Output
voltage
Disconnected
ground lead
5V
Disconnected out-
put lead
0V
Disconnected
power supply lead
0V
6
Defective throttle position
sensor.
Check throttle position sen-
sor signal.
Execute the diagnostic mode.
(Code No. 01)
When the throttle valve is fully
closed:
A value of 11–14 is indicated.
When throttle valve is fully
open:
A value of 109–116 is indicat-
ed.
An indicated value is out of
the specified range.
Re-
place the throttle position
sensor.
Push the start switch.
Fault code number is not dis-
played
Service is finished.
Fault code number is dis-
played
Go to item 7.
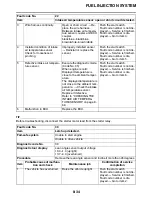
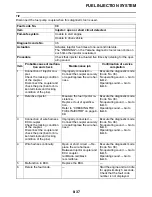
Fault code No.
15
Item
Throttle position sensor: open or short circuit detected.
Содержание YZ 2016 Series
Страница 6: ...EASB296006 YAMAHA MOTOR CORPORATION U S A YZ MOTORCYCLE LIMITED WARRANTY...
Страница 10: ......
Страница 31: ...CONTROL FUNCTIONS 1 19 a 2...
Страница 63: ...LUBRICATION POINTS AND LUBRICANT TYPES 2 22...
Страница 66: ...LUBRICATION SYSTEM CHART AND DIAGRAMS 2 25...
Страница 68: ...LUBRICATION SYSTEM CHART AND DIAGRAMS 2 27...
Страница 69: ...LUBRICATION SYSTEM CHART AND DIAGRAMS 2 28 1 Exhaust camshaft 2 Intake camshaft 3 Oil filter element 4 Oil pump...
Страница 70: ...LUBRICATION SYSTEM CHART AND DIAGRAMS 2 29...
Страница 71: ...LUBRICATION SYSTEM CHART AND DIAGRAMS 2 30 1 Camshaft 2 Oil pressure check bolt 3 Oil filter element 4 Oil pump...
Страница 72: ...CABLE ROUTING DIAGRAM 2 31 EASB296066 CABLE ROUTING DIAGRAM...
Страница 74: ...CABLE ROUTING DIAGRAM 2 33...
Страница 76: ...CABLE ROUTING DIAGRAM 2 35...
Страница 78: ...CABLE ROUTING DIAGRAM 2 37...
Страница 80: ...CABLE ROUTING DIAGRAM 2 39...
Страница 82: ...CABLE ROUTING DIAGRAM 2 41...
Страница 84: ...CABLE ROUTING DIAGRAM 2 43...
Страница 86: ...CABLE ROUTING DIAGRAM 2 45...
Страница 239: ...ELECTRIC STARTER 5 40 5 Install Bolt 1 O ring 2 TIP Apply the lithium soap based grease on the O ring New...
Страница 262: ...OIL PUMP AND BALANCER GEAR 5 63 a 2 10 b 2 9 1 b 5 3 a 4 10 5 9 3 E c d 6 7 8 8 b 6...
Страница 282: ...TRANSMISSION 5 83...
Страница 302: ...8 CHECKING THE INTAKE AIR TEMPERATURE SENSOR 8 68 CHECKING THE FUEL INJECTOR 8 68...
Страница 317: ...CHARGING SYSTEM 8 15...
Страница 321: ...COOLING SYSTEM For JPN 8 19...
Страница 351: ...FUEL PUMP SYSTEM 8 49...
Страница 352: ...ELECTRICAL COMPONENTS 8 50 EASB296346 ELECTRICAL COMPONENTS EASB296347 7 8 9 1 3 2 4 5 6...
Страница 354: ...ELECTRICAL COMPONENTS 8 52 11 10 9 2 3 1 6 7 8 4 5...
Страница 356: ...ELECTRICAL COMPONENTS 8 54 EASB296348 CHECKING THE SWITCHES 4 1 3 2 B B Sb B B B B B B B B...
Страница 357: ...ELECTRICAL COMPONENTS 8 55 1 Engine stop switch 2 Neutral switch 3 Clutch switch 4 Start switch...
Страница 378: ...LIST OF SELF DIAGNOSTIC AND FAIL SAFE ACTIONS 9 7...
Страница 392: ...ON OFF ON OFF Gy Gy B B Gy B B B L L B B B B B YZ250FXG 2016 WIRING DIAGRAM B29 28199 11_W D indd 2 2015 06 15 13 19 32...

