


The Analyzer Module
How to Perform Motor Current Measurements
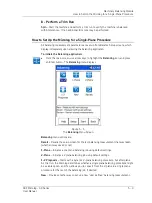
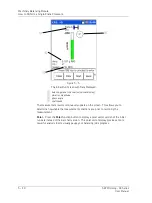
Figure 4 - 27.
The Motor Current Test Default Setup Screen (Expanded View).
The setup screen initially displays a “reduced” list of measurement parameters, those
that are more frequently changed by analysts prior to performing the measurement.
The complete parameter list may be viewed using the setup screen’s
Expand
function
button.
To alter the measurement’s setup and then perform the measurement:
•
Use the up / down arrow keys to highlight the measurement parameter to change,
then use the right arrow to display the parameter’s options.
•
Highlight or enter the desired option, then press the left arrow key (or Enter button)
to select the highlighted option.
Motor Current Measurement Setup Fields
Motor Current measurement setup fields operate as previously described in the
Analyzer Measurement Setup Fields
section. Reference this previous section for
details.
Save
– If desired, from the measurement setup screen, you may press the
Save
function button to save the measurement setup for easy reuse in the future. Reference
this chapter’s section on
How to Save, View, and Delete Analyzer Measurement
Results
for detailed information on these procedures.
•
After you are finished with your measurement setup changes, press the
Start
function button to begin the measurement using the new settings. The
measurement is performed and the initial measurement results display.
•
Use cursor functions to analyze the measurement.
Average
,
Stop
,
Start
,
View
and
Save
function button options operate as previously
described in the
Using the Default Measurement Setup
section. Reference this
previous section for details.
4 - 38
SKF Microlog - GX Series
User Manual


