Chapter 7---Troubleshooting
7-8
Model 250 Service Manual
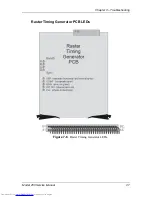
Raster Timing Generator PCB LEDs
Band LEDs
The range horizontal scan frequencies accepted by the Model 250 projector is
divided into four “bands”. The four LEDs (A, B, C, & D) toward the front of the
projector on the Raster Timing Generator PCB indicate which range of horizontal
scan frequencies the input source is operating. The four bands of horizontal
frequencies are
Band A = 15-25 kHz
Band B = 26-29 kHz
Band C = 29-56 kHz
Band D = 56-90 kHz
Only one of these LEDs will be illuminated green at one time. As an example, if
the input source horizontal scan frequency is 64 kHz, Band D LED would be
illuminated green.
Sync Type LEDs
The five LEDs, toward the rear of the projector on the Raster Timing Generator
PCB, indicate the sync of the input source. As an example, the SEP LED would
be illuminated green if the input source had separate horizontal and vertical syncs.
The following list gives a brief description of the each LED and its associated
sync type.
SEP - Separate horizontal and vertical sync inputs.
COMP -Composite (Red, Green, Blue, Horizontal, and Vertical signals all
combined into one signal).
INT - Internal sync means there is no input source sync signal present so the
System Controller PCB generates an internal sync at a horizontal scan rate of
33.7 kHz and a vertical rate of 59.7 Hz interlaced.
GRN - Sync-on-Green sync is where the horizontal and vertical sync signals are
combined with the green image signal.
PLL - Phase Locked Loop is the circuitry that locks onto the horizontal sync. This
LED indicates that the projector has locked onto the horizontal sync signal.
One of the first four LEDs should be illuminated indicating the type of sync used
by the input source. The fifth LED (PLL) should always be illuminated when the
projector is operating except during input source changes.
Содержание 250
Страница 16: ...Chapter 2 System Description Model 250 Service Manual 2 9 ...
Страница 43: ...Chapter 4 Optical 4 10 Model 250 Service Manual Figure 4 6 Optical Path ...
Страница 55: ...Chapter 5 Optical 3 4 22 Model 100 Service Manual ...
Страница 85: ...Chapter 5 Electronics 5 30 Model 250 Service Manual Figure 5 19 Convergence Deflection PCB I O Diagram ...
Страница 86: ...Chapter 5 Electronics Model 250 Service Manual 5 31 Figure 5 20 Convergence Deflection PCB I O Diagram ...
Страница 91: ...Chapter 5 Electronics 5 36 Model 250 Service Manual Figure 5 22 Scan Reversal PCB I O Diagram ...
Страница 100: ...Chapter 5 Electronics Model 250 Service Manual 5 45 Figure 5 26 Video Amplifier PCB I O Diagram ...
Страница 131: ...Chapter 5 Electronics 5 76 Model 250 Service Manual Figure 5 44 Backplane Diagram right side ...
Страница 132: ...Chapter 5 Electronics Model 250 Service Manual 5 77 ...
Страница 138: ...Chapter 6 Miscellaneous Items 6 6 Model 250 Service Manual ...
Страница 166: ...Chapter 7 Troubleshooting 7 28 Model 250 Service Manual Figure 7 19 Backplane Diagram right side ...
Страница 167: ...Chapter 7 Troubleshooting Model 250 Service Manual 7 29 ...
Страница 181: ...Chapter 8 Software and Protocol 8 14 Model 250 Service Manual ...
Страница 185: ...Chapter 9 Parts List 9 4 Model 250 Service Manual ...


