118
Network Setting
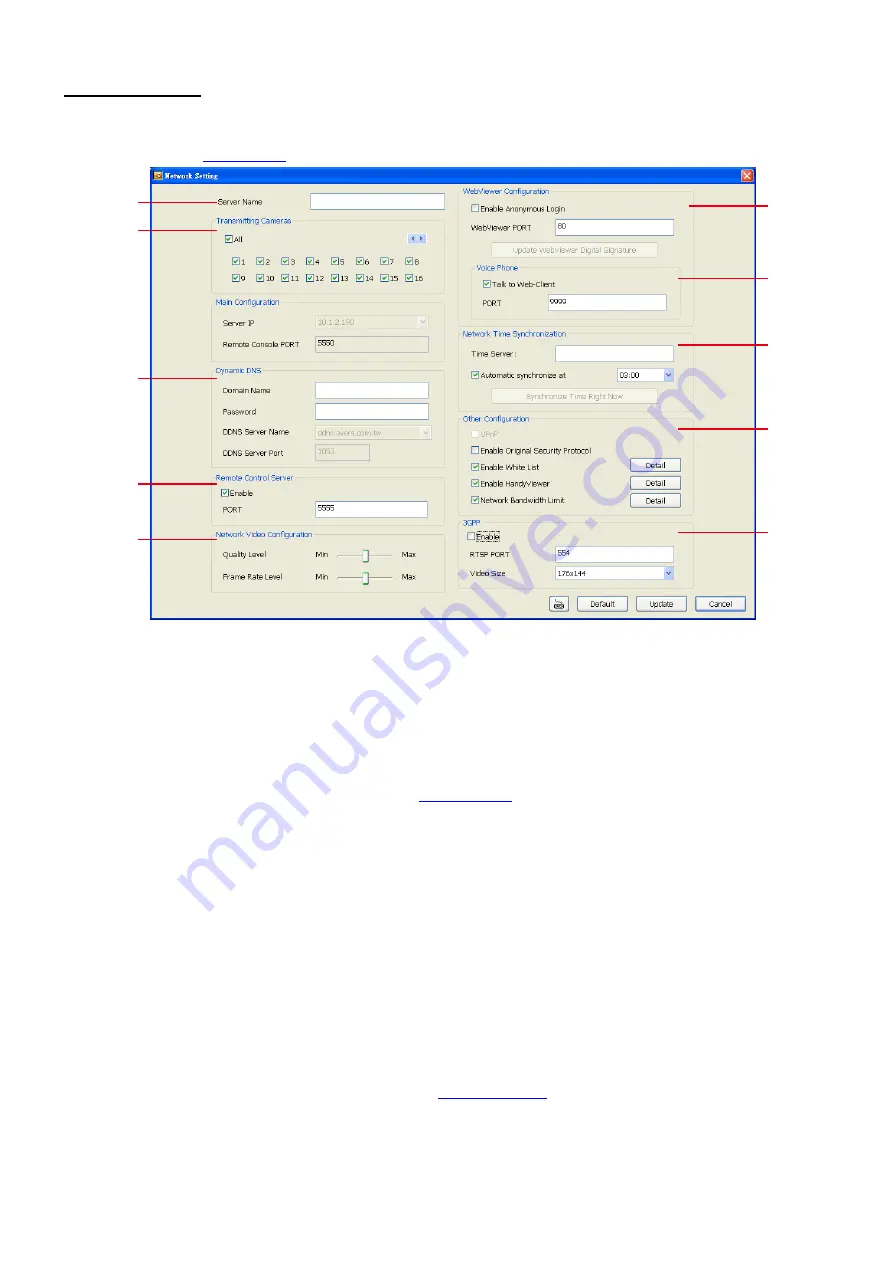
In the Network Setting window, click
Update
to accept the new settings, click
Cancel
to exit without saving,
and click
Default
to revert back to original factory settings. For the network service ports that use by DVR
(1)
(2)
(3)
(4)
(5)
(6)
(7)
(8)
(9)
(10)
(1) Server Name
Assign a name for the DVR unit. Letters of the alphabet and numbers only.
(2) Transmitting Cameras
Select and click on the camera number in the Transmitting Camera section you want to make it accessible
via internet using WebViewer, Remote Console, PDA Viewer and HandyViewer (still image). To select all the
cameras, enable the
ALL
check box.
(3) Dynamic DNS (Domain Name System)
Enter the Domain Name and Password the user has setup when applied a DDNS. To use this feature, go to
http://ddns.avers.com.tw and register. (see also
). Use this service if the IP address changes
each time when you connect to internet.
(4) Remote Control Server
Enable/disable remote control from remote application (ex. CMS). Enter the remote accessing port in
Port
column.
(5) Network Video Configuration
Set up the video quality and frame rate for viewing and transmitting to the remote program. Scrolling adjust
bar to set the
Quality Level
and
Frame Rate
Level
.
(6) WebViewer Port
Activate
Enable Anonymous Login
to remotely access the DVR server without the need of password. The
default of WebCam port is 80.
(7)
Voice Phone
Voice Phone
is a 2-Way Talk feature that allows the client and server to talk via internet using microphone.
Make sure both microphone and speakers work before using this feature. If the
Talk to Web-Client
is
disabled, the person in the DVR server side can only hear the voice from the client side that is when the
WebCam 2-Way Talk button is activated. (See also
). The default port of voice phone is 9999.
(8) Network Time Synchronization
Adjust the DVR system time same as network time server. Fill in the
Time Server
IP address or domain
name. Select
Automatic Synchronize
time to set automatic synchronize time on a daily basis.
(9) Other Configuration
Содержание IWH3216 Touch
Страница 1: ...AVerMedia IWH3216 Touch User Manual June 2010...
Страница 51: ...45 Power Management To setup UPS configuration Device Management To manage the DVR system devices...
Страница 153: ...147 10 To switch back to iEnhance interface click iEnhance button...
Страница 176: ...170 11 If user wants to burn the back file into DVD disk click Burn button and select the file to burn...
Страница 180: ...174 4 When the below screen show up press CTRL I 5 Select Create RAID Volume...


