


Using Help
|
Contents
|
Index
Back
174
Adobe Premiere Pro Help
Mixing Audio
Using Help
|
Contents
|
Index
Back
174
By default, the Audio Mixer window displays all audio tracks and the master fader, and the
VU meters monitor output signal levels. The Audio Mixer window represents the tracks in
the active sequence only, not all project-wide tracks. If you want to create a master project
mix from multiple sequences, set up a master sequence and nest other sequences within
it.
You can quickly organize windows for audio mixing by choosing Window >
Workspace > Audio. You can modify the window arrangement further and choose
Window > Workspace > Save Workspace to create your own audio workspace.
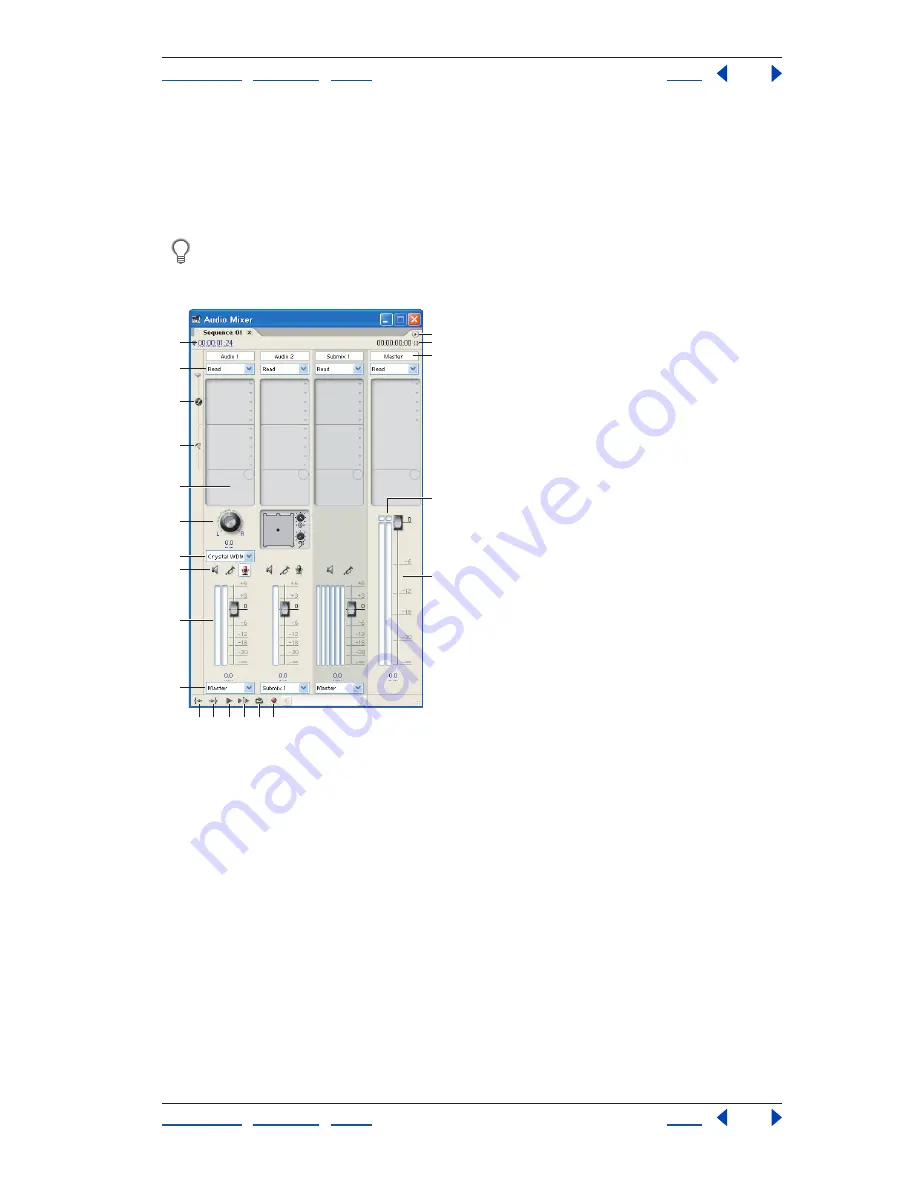
Audio Mixer window
A.
Timecode
B.
Automation options
C.
Effects
D.
Sends
E.
Effect or send option
F.
Pan/balance
control
G.
Input
H.
Mute/Solo Track/Record Enable buttons
I.
VU meters and faders
J.
Output
K.
Window menu
L.
In/out program duration
M.
Track names
N.
Clipping indicator
O.
Master VU
meter and fader
P.
Go To In Point
Q.
Go To Out Point
R.
Play
S.
Play In To Out
T.
Loop Enable
U.
Sequence Record
Enable
To modify the Audio Mixer window:
Choose one of the following from the Audio Mixer window menu:
•
To display or hide specific tracks, choose Show/Hide Tracks, use the options to mark the
tracks you want to see, and click OK.
•
To display only the level meters for the master tracks (hiding all track and master
displays and controls), choose Master Meters Only.
•
To display hardware input levels on the VU meters (not track levels in Adobe Premiere
Pro), choose Meter Input(s) Only. When this option is on, you can still monitor audio in
Adobe Premiere Pro for all tracks that aren’t being recorded.
A
C
B
D
E
F
I
G
H
J
P
Q
R
S
T
U
O
N
L
K
M


