background image

Specifications 


232 

Xerox

®

 WorkCentre

®

 6655 Color Multifunction Printer 


User Guide 


Electrical Specifications 

Power Supply Voltage and Frequency 


Power Supply Voltage 

Power Supply Frequency 

100–127 VAC +/-10%, (90–140 VAC) 

50 Hz +/- 3 Hz 
60 Hz +/- 3 Hz 

220–240 VAC +/-10%, (198–264 VAC) 

50 Hz +/- 3 Hz 
60 Hz +/- 3 Hz 


Power Consumption 


Power Saver Mode (Sleep): 2.7 W 


Ready, with fuser on: 71 W 


Continuous printing: 565 W 

This printer does not consume electric power when the main power switch is turned off even if the 

printer is connected to an AC outlet. 


ENERGY STAR Qualified Product 


The Xerox

®

 WorkCentre

®

 6655 Color Multifunction Printer is ENERGY


STAR

®

 qualified 

under the ENERGY


STAR Program Requirements for Imaging Equipment. 

The ENERGY


STAR and ENERGY


STAR mark are registered United States trademarks. 

The ENERGY


STAR Imaging Equipment Program is a team effort between United 

States, European Union, and Japanese governments and the office equipment industry 

to promote energy-efficient copiers, printers, fax, multifunction printers, personal 

computers, and monitors. Reducing product energy consumption helps combat smog, 

acid rain, and long-term changes to the climate by decreasing the emissions that result 

from generating electricity. 

Xerox

®

 ENERGY STAR equipment is preset at the factory to switch to Power Saver modes after 2 minutes 

from the last copy or print. 


Summary of Contents for WorkCentre6655

Page 1: ...Guida per l utente Deutsch Benutzerhandbuch Espa ol Gu a del usuario Portugu s Guia do usu rio Nederlands Gebruikershandleiding Svenska Anv ndarhandbok Dansk Betjeningsvejledning Suomi K ytt opas Nors...

Page 2: ...ple Bonjour EtherTalk TrueType iPad iPhone iPod iPod touch Mac and Mac OS are trademarks of Apple Inc registered in the U S and other countries AirPrint and the AirPrint logo are trademarks of Apple I...

Page 3: ...View 20 Rear View 21 Internal Parts 22 Control Panel 23 Information Pages 25 Printing the Configuration Report 25 Administration Features 26 Accessing the Printer 26 CentreWare Internet Services 28 Fi...

Page 4: ...51 Supported Paper 52 Recommended Media 52 Ordering Paper 52 General Paper Loading Guidelines 52 Paper That Can Damage Your Printer 53 Paper Storage Guidelines 53 Supported Paper Types and Weights 54...

Page 5: ...n for Windows 84 Printing Special Job Types 85 Secure Print 85 Sample Set 86 Delay Print 87 Saved Job 88 Held Print Jobs 90 Releasing Held Print Jobs 90 Print From 91 Printing from a USB Flash Drive 9...

Page 6: ...134 Scanning to a USB Flash Drive 135 Scanning to an Email Address 136 Sending a Scanned Image to an Email Address 136 Setting Email Options 137 Scanning to a Destination 138 Sending a Scanned Image...

Page 7: ...rint 193 Printing Takes Too Long 194 Document Prints From Wrong Tray 194 Automatic 2 Sided Printing Problems 195 Printer Makes Unusual Noises 195 Paper Tray Fails to Close 195 Condensation Has Formed...

Page 8: ...35 Basic Regulations 236 United States FCC Regulations 236 Canada 236 European Union 237 European Union Lot 4 Imaging Equipment Agreement Environmental Information 237 Germany 239 Turkey RoHS Regulati...

Page 9: ...Contents Xerox WorkCentre 6655 Color Multifunction Printer 9 User Guide...

Page 10: ......

Page 11: ...Safety 14 Maintenance Safety 16 Printer Symbols 17 Environmental Health and Safety Contact Information 18 Your printer and the recommended supplies have been designed and tested to meet strict safety...

Page 12: ...rming these installations Disconnect the power cord when removing covers and guards for installing optional equipment Except for user installable options there are no parts that you can maintain or se...

Page 13: ...wer cord becomes frayed or worn replace it To avoid electrical shock and damage to the cord grasp the plug when unplugging the power cord The power cord is attached to the printer as a plug in device...

Page 14: ...rinter in a well ventilated room For more information in the United States and Canada go to www xerox com environment In other markets please contact your local Xerox representative or go to www xerox...

Page 15: ...er containers into an open flame When handling cartridges for example toner and such avoid skin or eye contact Eye contact can cause irritation and inflammation Do not attempt to disassemble the cartr...

Page 16: ...y maintenance procedure that is not specifically described in the documentation supplied with your printer Do not use aerosol cleaners Clean with a dry lint free cloth only Do not burn any consumables...

Page 17: ...to avoid damage to the property Hot surface on or in the printer Use caution to avoid personal injury Do not burn the item Do not expose the imaging unit to light for more than 10 minutes Do not expo...

Page 18: ...ealth and Safety in relation to this Xerox product and supplies contact the following customer help lines United States and Canada 1 800 ASK XEROX 1 800 275 9376 Europe 44 1707 353 434 For product saf...

Page 19: ...Xerox WorkCentre 6655 Color Multifunction Printer 19 User Guide This chapter includes Parts of the Printer 20 Information Pages 25 Administration Features 26 More Information 30 2 Features...

Page 20: ...This section includes Front View 20 Rear View 21 Internal Parts 22 Control Panel 23 Front View 1 Tray 1 2 Bypass Tray 3 Front Door 4 Output Tray Paper Stop 5 Control Panel 6 Duplex Automatic Document...

Page 21: ...or Multifunction Printer 21 User Guide Rear View 1 USB Type B Port 2 Ethernet Connector 3 USB Type A Port 4 USB Type A Port 5 Power Connector 6 Rear Door 7 Duplex Unit 8 Transfer Roller 9 Fuser 10 USB...

Page 22: ...function Printer User Guide Internal Parts 1 Output Tray Paper Stop 2 Front Door 3 Toner Cartridges 4 Duplex Automatic Document Feeder 5 Document Cover 6 Document Glass 7 Staple Cartridge 8 Waste Cart...

Page 23: ...ccess to Troubleshooting menus and videos Prompts you to load paper replace supplies and clear jams Displays errors and warnings Item Name Description 1 Touch Screen Display The screen displays inform...

Page 24: ...the selected copy scan fax or Print From job such as Print from USB 11 Stop Button This button stops the current job temporarily To cancel or resume your job follow the onscreen instructions 12 Clear...

Page 25: ...1 At the printer control panel press the Machine Status button 2 On the Machine Information tab touch Information Pages then touch the desired information page 3 Touch Print Note Information pages can...

Page 26: ...n the printer compares the information that you provide to another source of information such as an LDAP directory The information can be a user name and password or the information stored on a magnet...

Page 27: ...directory The system administrator sets authorization permissions To set or edit user permissions for access to printer features you must log in as the administrator Accounting Accounting monitors th...

Page 28: ...ttings on the Tools tab on the control panel touch screen Logging In as the System Administrator at the Control Panel 1 At the control panel press Log In Out 2 Type admin then touch Next 3 Type your p...

Page 29: ...ormation Pages Configuration Report Print 3 Touch Close after the report prints Automatic Data Collection This printer automatically collects data and transmits it to a secure offsite location Xerox o...

Page 30: ...office WC6655support Information about menus or error messages Press the control panel Help button Information Pages Print from the control panel or from CentreWare Internet Services click Status Info...

Page 31: ...the following space _________________________________ If you need additional help using your printer 1 Refer to this user guide 2 Contact the system administrator 3 Visit the Xerox website at www xer...

Page 32: ......

Page 33: ...cting a Location for the Printer 35 Power Cord Safety Information 36 Connecting the Printer 37 Configuring Network Settings 41 Modifying General Settings 42 Installing the Software 44 See also Install...

Page 34: ...irements vary for the different connection methods Routers network hubs network switches modems Ethernet cables and USB cables are not included with your printer and must be purchased separately Xerox...

Page 35: ...ansfer 2 Place the printer on a level solid non vibrating surface with adequate strength for the weight of the printer The printer must be horizontal with all four feet in solid contact with the surfa...

Page 36: ...ound adapter plug to connect the printer to an electrical outlet that does not have a ground connection terminal WARNING Avoid the potential of electrical shock by ensuring that the printer is grounde...

Page 37: ...with your printer and must be purchased separately Network If your computer is connected to an office network or home network use an Ethernet cable to connect the printer to the network You cannot con...

Page 38: ...tosh OS X version 10 7 and later To connect the printer to the computer using a USB cable 1 Ensure that the printer is turned off 2 Connect the B end of a standard A B USB 2 0 cable to the USB Port on...

Page 39: ...down method is to press the power button To turn on the printer Turn on the power switch If the power switch is on but the printer is powered off the printer was turned off using the power button To t...

Page 40: ...rol panel press Power 2 Touch Power Down After 10 seconds the touch screen goes dark and the Power Saver button flashes until the printer has completed powering down Note When all of the control panel...

Page 41: ...nter For Macintosh OS X systems TCP IP is preferred Unlike TCP IP however Bonjour does not require printers or computers to have IP addresses With TCP IP protocols each printer and computer must have...

Page 42: ...appear contact the system administrator or log in as a system administrator For details see Logging In as the System Administrator at the Control Panel on page 28 3 Touch Save Setting Energy Saver Mo...

Page 43: ...ee Logging In as the System Administrator at the Control Panel on page 28 3 To set the time zone touch Time Zone then touch the arrows to adjust the time zone 4 To set the date touch Date select a for...

Page 44: ...ned on connected correctly and has a valid IP address The IP address usually appears in the upper right corner of the control panel If you cannot find the IP address see Finding the IP Address of Your...

Page 45: ...and you know the IP address a Click the Network Printer icon at the top of the window b Enter the IP address or the DNS name of the printer c Click Search d From the list of discovered printers select...

Page 46: ...then click OK 8 From the list of discovered printers select your printer then click Next If your printer does not appear in the list of discovered printers a Click the Network Printer Icon b Type the...

Page 47: ...click Log Out Installing Print Drivers and Utilities for UNIX and Linux Printing For details about UNIX and Linux drivers see the System Administrator Guide at www xerox com office WC6655docs Xerox Pr...

Page 48: ...m to support RPM based 32 bit Linux environments Xeroxv5Pkg Linuxi686 x xx xxx xxxx deb to support Debian based 32 bit Linux environments Xeroxv5Pkg Linuxx86_64 x xx xxx xxxx rpm to support RPM based...

Page 49: ...ur network including those printers made by other manufacturers It configures itself for your individual printer upon installation The Xerox Mobile Express Driver works with any printer available to y...

Page 50: ......

Page 51: ...Xerox WorkCentre 6655 Color Multifunction Printer 51 User Guide This chapter includes Supported Paper 52 Loading Paper 56 Printing on Special Paper 62 4 Paper and Media...

Page 52: ...results use Xerox paper and media recommended for your printer Recommended Media A list of paper and media recommended for your printer is available at www xerox com paperRecommended Media List United...

Page 53: ...ntative for details Paper Storage Guidelines Storing your paper and other media properly contributes to optimum print quality Store paper in dark cool relatively dry locations Most paper is susceptibl...

Page 54: ...0 1 in 215 x 315 mm 8 5 x 12 4 in Legal 216 x 356 mm 8 5 x 14 in Folio 216 x 330 mm 8 5 x 13 in Letter 216 x 279 mm 8 5 x 11 in Executive 184 x 267 mm 7 25 x 10 5 in 203 x 254 mm 8 x 10 in Bypass Tray...

Page 55: ...ond 75 105 g m Lightweight Cardstock Lightweight Glossy Cardstock 106 163 g m Supported Custom Paper Sizes Trays 1 and 2 Width 148 0 215 9 mm 5 8 8 5 in Length 210 355 6 mm 8 3 14 in Bypass Tray Width...

Page 56: ...ading Paper in the Bypass Tray 56 Configuring Trays 1 or 2 for the Paper Length 58 Loading Paper in Trays 1 2 59 Loading Paper in the Bypass Tray 1 Open the bypass tray 2 If the bypass tray is loaded...

Page 57: ...the possibility of jams Note To avoid jams and misfeeds do not remove paper from its packaging until you are ready to use it 5 Load the paper in the tray 6 Load hole punched paper with the holes to th...

Page 58: ...d 2 to accommodate A4 Letter and Legal paper sizes In the Legal length settings the trays protrude from the front of the printer To change the 550 sheet feeders in trays 1 and 2 to match the paper len...

Page 59: ...ther hand at the front of the tray press the release latch then push the ends inward until they latch 5 Load paper into the tray then insert it back into the printer For details see Loading Paper in T...

Page 60: ...align the edges of the stack on a level surface This procedure separates any sheets that are stuck together and reduces the possibility of jams 5 Load paper into the tray Load hole punched paper with...

Page 61: ...the printer 8 Push the tray in all the way Notes If the tray does not go in all the way ensure that the paper lift plate at the back of the tray is locked down If the tray is extended for legal size p...

Page 62: ...he envelopes Try another envelope brand if you do not get desired results Maintain constant temperatures and relative humidity Store unused envelopes in their packaging to avoid excess moisture and dr...

Page 63: ...User Guide Loading Envelopes in the Bypass Tray 1 Open the bypass tray 2 Move the width guides to the edges of the tray Note If you do not load envelopes in the bypass tray right after they have been...

Page 64: ...nvelopes select an option To load envelopes with long edge flaps place the envelopes with the short edge going into the printer flaps down and to the right To load envelopes with non adhesive short ed...

Page 65: ...d a sheet of labels through the printer more than once Do not use dry gum labels Print only on one side of the sheet of labels Use full sheet labels only Store unused labels flat in their original pac...

Page 66: ...can print Lightweight Glossy Cardstock and Glossy Cardstock up to 220 g m from any tray Guidelines for Printing on Glossy Cardstock Do not open sealed packages of glossy cardstock until you are ready...

Page 67: ...lor Multifunction Printer 67 User Guide This chapter includes Printing Overview 68 Selecting Printing Options 69 Managing Jobs 73 Printing Features 76 Printing Special Job Types 85 Held Print Jobs 90...

Page 68: ...specify the size color and type 3 Access the print settings in your software application For most software applications press CTRL P for Windows or CMD P for Macintosh 4 Select your printer 5 Access t...

Page 69: ...g options that are set from within the software application are temporary The application and the computer do not save the settings after the application is closed Print Driver Help Xerox print driver...

Page 70: ...alize Control Panel Home Devices and Printers 2 In the list right click the icon for your printer and click Printing Preferences 3 In the Printing Preferences window click a tab select the options the...

Page 71: ...Options Selecting Printing Options for Macintosh To use specific printing options change the settings before sending the job to the printer 1 With the document open in your application click File Prin...

Page 72: ...g lp lpr To create a job ticket using the Xerox GUI print driver 1 Open the Xerox GUI print driver 2 Select the desired options 3 Click Save As then store the job ticket in a public location such as t...

Page 73: ...job 2 To resume printing press the Interrupt button again To pause the print job with the option to delete it 1 At the control panel press the Stop button 2 Do one of the following To delete the print...

Page 74: ...y typing a passcode at the control panel To view a list of secure print jobs 1 At the printer control panel press the Job Status button 2 Touch Secure Print Jobs or My Secure Jobs For details see Secu...

Page 75: ...de Managing Jobs in CentreWare Internet Services You can view a list of active jobs and delete print jobs from the Active Jobs list in CentreWare Internet Services You can also print copy move or dele...

Page 76: ...ating and Saving Custom Sizes 83 Selecting Job Completion Notification for Windows 84 Printing on Both Sides of the Paper Paper Types for Automatic 2 Sided Printing The printer can print a 2 sided doc...

Page 77: ...2 Sided Print Flip on Short Edge Selecting Paper Options for Printing There are two ways to select the paper for your print job You can let the printer select which paper to use based on the document...

Page 78: ...the thickness of the folded paper which can cause the page images to shift outward slightly when folded You can select a value from zero to 1 point Gutter Creep Print Quality Print quality modes Stan...

Page 79: ...s How Much Change Lets you select how much effect to make to the selected color What Type of Change Lets you select the type of change such as Vivid from a list The Color Adjustments tab provides a se...

Page 80: ...multiple exceptions For example your print job contains 30 pages You want five pages to print on only one side of a special paper and the remainder of the pages printed 2 sided on regular paper You c...

Page 81: ...ions to the right of the Paper field click the arrow then select Other Size Advanced Paper Size 2 Select an option No Scaling You can use this option to retain the original image size Automatically Sc...

Page 82: ...as font size font type font color and angle A Picture Watermark uses an image as the watermark The picture file can be in bmp gif or jpg format You can create a picture watermark to print on a documen...

Page 83: ...ve custom sizes for Windows 1 In the print driver click the Printing Options tab 2 For Paper click the arrow then select Other Size Advanced Paper Size Output Paper Size New 3 In the New Custom Paper...

Page 84: ...ishes printing A message appears on your computer screen with the name of the job and the name of the printer where it was printed Note This feature is available on a computer printing to a network pr...

Page 85: ...application print driver Sending a Secure Print Job 1 On the Printing Options tab from the Job Type list select Secure Print 2 Type a 4 10 digit passcode for the Secure Print job 3 In the Confirm Pass...

Page 86: ...ple copy job and hold the remaining copies at the printer After you review the sample copy you can select the job name from the printer control panel to print the additional copies Sending a Sample Se...

Page 87: ...e following day The Delayed Print default time is midnight Sending a Delay Print Job 1 On the Printing Options tab from the Job Type list select Delay Print 2 In the Delay Print window select the Tab...

Page 88: ...rom the list To remove names from the list other than the selected name select Clear List 3 In Save To or Folder Number specify where you want the file saved on the printer Do one of the following Typ...

Page 89: ...t of the field then select a folder name from the list Click the arrow to the right of the field then select Default Public Folder 4 To print the job now and also save the job select the Print and Sav...

Page 90: ...t of the copies hold until you release them If the system administrator has configured the Hold All Jobs feature any job sent to the printer is held until you release it Releasing Held Print Jobs 1 At...

Page 91: ...the list and locate the printable file next to the list use the arrows If the print file is in a folder to open the folder touch the name 3 Touch the name of the printable file 4 Select the number of...

Page 92: ...f Mailbox is not displayed use CentreWare Internet Services to enable the Scan to Mailbox and Print From Mailbox features Then create a scan to mailbox folder For details see the System Administrator...

Page 93: ...ck the Print tab 3 To select the file from a local network or remote location click Browse select the file then click Open 4 For Printing select the desired options for the job Normal Print prints a j...

Page 94: ......

Page 95: ...Xerox WorkCentre 6655 Color Multifunction Printer 95 User Guide This chapter includes Basic Copying 96 Selecting Copy Settings 98 6 Copying...

Page 96: ...The number of copies appears in the upper right corner of the touch screen Note To correct the number of copies entered using the alphanumeric keypad press the C button then re enter the number 5 Cha...

Page 97: ...he paper guides so they fit against the originals The document feeder supports paper weights of 50 125 g m for 1 sided pages and 60 125 g m for 2 sided pages The document feeder supports paper sizes f...

Page 98: ...re 6655 Color Multifunction Printer User Guide Selecting Copy Settings This section includes Basic Settings 99 Image Quality Settings 102 Layout Settings 105 Output Format Settings 108 Advanced Copyin...

Page 99: ...ains color you can create copies in full color a single color or in black and white To select the output color 1 Press the Services Home button then touch Copy 2 For Output Color select an option Colo...

Page 100: ...To center the image on the page select the Auto Center check box To reduce or enlarge the width and length of the image by different percentages touch Reduce Enlarge then touch Independent Width X all...

Page 101: ...scans both sides of the originals and produces 1 sided copies 3 Press the green Start button The document feeder automatically copies both sides of the 2 sided original A message appears on the contr...

Page 102: ...ated To specify the original type 1 Press the Services Home button then touch Copy 2 Touch the Image Quality tab then touch Original Type 3 On the Original Type screen select the setting that matches...

Page 103: ...then touch Copy 2 Touch the Image Quality tab then touch Image Enhancement 3 On the Image Enhancement screen adjust the contrast Auto Contrast allows the printer to set the contrast automatically Manu...

Page 104: ...hen touch Color Balance Note This feature is not available when Output Color is set to Black and White 3 To adjust the density levels of all four colors a On the Color Balance screen touch Basic Color...

Page 105: ...refer to the images on the originals Upright Images and Sideways Images refer to the direction the originals are loaded in the document feeder Note If you are using the document glass the orientation...

Page 106: ...mm 1 in Right Page Only to copy only the right page of an open book on a single sheet of paper If Binding Edge Erase is required touch the arrows to erase up to 25 4 mm 1 in 4 Touch OK Shifting the Im...

Page 107: ...ach edge touch Side 1 then touch the Left Right Top and Bottom arrows To specify the amount to erase from each edge touch Side 2 then touch the Left Right Top and Bottom arrows or touch Mirror Side 1...

Page 108: ...e booklet feature reduces the original page images to fit two images on each side of the printed page You can print copies in booklet format Note In this mode the printer scans all of the originals be...

Page 109: ...oklet Creation is turned off or the paper supply is set to Auto Select Special Pages are unavailable 4 On the Special Pages screen touch Covers 5 Under Covers Options select an option Front Back Same...

Page 110: ...he paper for the body pages of the job Note If the paper supply is set to Auto Select Chapter Starts is unavailable 3 Touch the Output Format tab then touch Special Pages Chapter Starts 4 On the Chapt...

Page 111: ...ch the desired tray c Touch OK 7 Touch Add The insert appears in the list on the right side of the screen 8 Repeat the three previous steps to add additional inserts 9 Touch Close The inserts appear i...

Page 112: ...notations You can automatically add annotations such as page numbers and the date to your copies Notes Annotations are not added to covers tabs inserts or blank chapter start pages Annotations cannot...

Page 113: ...f To change the text formatting touch Format Style choose the desired settings then touch OK 6 To insert a Bates Stamp a Touch Bates Stamp On b Touch the Starting Page Number field then use the alpha...

Page 114: ...en Portrait Originals or Landscape Originals 5 Touch OK Repeating an Image You can make multiple copies of an original image on one or both sides of the paper This is useful for duplicating a small im...

Page 115: ...ment b Select the required settings such as layout adjustments image quality and options c Touch the Job Assembly tab then touch Build Job On d Touch Options e Select or clear the Display Summary wind...

Page 116: ...the sample copy is unsatisfactory touch Delete Saving Copy Settings To use a particular combination of copy settings for future copy jobs you can save the settings with a name and retrieve them for la...

Page 117: ...e Services Home button then touch ID Card Copy 2 Touch the ID Card Copy tab 3 Verify the output color paper supply and reduce enlarge settings Change the settings as needed 4 Touch the Image Quality t...

Page 118: ...ly touch Plus or Minus To reduce or enlarge the percentage using the alphanumeric keypad to type a specific value touch the current displayed value To use a preset value touch the corresponding button...

Page 119: ...ghtening or Darkening ID Card Copies You can lighten or darken the copy for each side Use the slider to lighten or darken the output for the first side After the first side is complete use the slider...

Page 120: ...aper text or images printed on one side of the paper can be seen on the other side Use the Auto Suppression setting to reduce the sensitivity of the printer to variations in light background colors To...

Page 121: ...o a Destination 138 The system administrator must set up this feature before you can use it For details see the System Administrator Guide at www xerox com office WC6655docs If the system administrato...

Page 122: ...o clear previous settings 2 Load your original documents Use the document glass for single pages or paper that cannot be fed using the document feeder Place the first page of the document face down in...

Page 123: ...ss rather than the duplex automatic document feeder Paper with paper clips or staples attached Paper with wrinkles curls folds tears or notches Coated or carbonless paper or items other than paper suc...

Page 124: ...feeder follow these guidelines Insert originals face up with the top of the page entering the feeder first Only place loose sheets of paper in the duplex automatic document feeder Adjust the paper gui...

Page 125: ...d images You do not need a password to scan images to the public folder or to retrieve them All users can view scanned documents in the public folder You can also create a password protected private f...

Page 126: ...he system administrator can create a private folder at any time For details on enabling or disabling Scan to Mailbox see the System Administrator Guide for your printer model To create a private folde...

Page 127: ...n select Mailboxes 4 In the Scan to Mailbox section click the folder containing the scan Your scan file appears in the Folder Contents window Notes For a password protected private folder click the Fo...

Page 128: ...a Predefined Network File Repository To scan an image and send it to a predefined network file repository 1 Load the original on the document glass or in the document feeder 2 Press the Services Home...

Page 129: ...ck the Friendly Name field then create a name for the template 7 Under Protocol select an option 8 Configure the destination IP Address Port number or Host Name Port number 9 Enter the name of the des...

Page 130: ...the original on the document glass or in the document feeder 2 Press the Services Home button then touch Workflow Scanning 3 Touch the Down arrow then select Scan to Home Templates from the menu 4 Fr...

Page 131: ...e only Grayscale Detects and scans various shades of gray Color Scans in full color 3 Touch 2 Sided Scanning then select an option 1 Sided Scan Scans only one side of the original document or image an...

Page 132: ...set the contrast automatically Manual Contrast allows you to adjust the contrast manually Move the Manual Contrast slider up or down to increase or decrease the contrast The middle position on the sli...

Page 133: ...n option 8 Touch OK 9 To manage how the scanner processes blank pages touch Blank Page Management then select an option 10 Touch OK Selecting Filing Options Filing Options provide additional settings...

Page 134: ...utton then touch Workflow Scanning 2 Touch the Job Assembly tab then touch Build Job On 3 Touch Options a Select or clear the Display this window between segments check box b Select or clear the Turn...

Page 135: ...s already in the USB memory port press Services Home then touch Workflow Scanning Scan to USB 3 On the USB Drive Detected screen touch Scan to USB 4 To change any of the scan settings use the options...

Page 136: ...ouch New Recipient b Touch the Down arrow then select To or Cc or Bcc from the menu c Touch the Enter email address and select Add field then use the touch screen keyboard to type the email address d...

Page 137: ...ile format and options a Touch File Format b On the File Format screen under Format select an option c Under Options for PDF PDF A XPS or TIFF select an option Multi page creates a multi page document...

Page 138: ...To icon appears grayed out on the touch screen To scan an image and send it to a destination 1 Load the original on the document glass or in the document feeder 2 Press the Services Home button then...

Page 139: ...g 140 Sending an Embedded Fax 143 Sending a Server Fax 153 Sending an Internet Fax 157 Sending a LAN Fax 162 Using the Address Book 163 The system administrator must set up this feature before you can...

Page 140: ...appropriate fax 3 Address the fax using one or more of the available options The Enter Number and Press Add field allows you to enter a fax number manually Use the alphanumeric keypad to enter the num...

Page 141: ...s rather than the duplex automatic document feeder Paper with paper clips or staples attached Paper with wrinkles curls folds tears or notches Coated or carbonless paper or items other than paper such...

Page 142: ...eeder follow these guidelines Insert originals face up with the top of the page entering the feeder first Only place loose sheets of paper in the duplex automatic document feeder Adjust the paper guid...

Page 143: ...from the address book Address Book allows you to select fax numbers from your Address Book Touch the Down arrow then select Individual or Group from the drop down menu Touch the Up or Down arrows to...

Page 144: ...ails see Selecting Fax Options on page 145 9 Press the green Start button The printer scans the pages and transmits the document when all pages have been scanned Note To pause the job press the Stop b...

Page 145: ...ending a Fax to a Remote Mailbox 149 Storing a Fax in a Local Mailbox 149 Printing Local Mailbox Documents 149 Deleting Local Mailbox Documents 150 Storing a Fax for Local or Remote Polling 150 Printi...

Page 146: ...s you to adjust the contrast manually Under Manual Contrast move the slider up or down to increase or decrease the contrast The middle position on the slider Normal does not change the contrast Auto C...

Page 147: ...n touch Fax 2 Touch the Layout Adjustment tab then touch Book Faxing 3 Touch an option Off is the default setting Both Pages scans both pages of the book Left Page Only scans the left page of the book...

Page 148: ...can range from 15 minutes through 24 hours Note Before using this feature set the printer to the current time To specify the time to send your fax 1 Press the Services Home button then touch Fax 2 To...

Page 149: ...use this feature For details see the System Administrator Guide at www xerox com office WC6655docs To store a fax in a local mailbox 1 Press the Services Home button then touch Fax 2 Touch the Fax Op...

Page 150: ...r To store a fax 1 Press the Services Home button then touch Fax 2 Touch the Fax Options tab then touch Local Polling 3 Under Store for Local Polling touch one of the following options Non Secure Poll...

Page 151: ...the Services Home button then touch Fax 2 Touch the Fax Options tab then touch Remote Polling 3 Under Poll touch Remote Fax 4 To address the fax select one or more options The Enter Number and Press...

Page 152: ...ess book 3 Touch the Job Assembly tab then touch Build Job On 4 Touch Options a Select or clear the Display this window between segments check box b Select or clear the Turn Build Job Off after Job is...

Page 153: ...ions The Enter Number and Press Add field allows you to enter a fax number manually Use the alphanumeric keypad to enter the number then touch Add Dialing Characters allows you to insert characters su...

Page 154: ...ton then touch Server Fax 2 Touch the Image Quality tab then touch Image Options 3 On the Image Options screen adjust the Lighten Darken slider up or down as needed 4 Touch OK Automatically Suppressin...

Page 155: ...refer to the direction the originals are loaded in the document feeder Portrait Originals and Landscape Originals refer to the images on the originals Note If you are using the document glass the ori...

Page 156: ...time To specify the time to send your fax 1 Press the Services Home button then touch Server Fax 2 Touch the Fax Options tab then touch Delay Send 3 Touch Specified Time a Touch the Hour field then t...

Page 157: ...email address and select Add field then use the touch screen keyboard to type the email address d Touch Add e Use the touch screen keyboard to type additional email addresses f When you are finished t...

Page 158: ...harpness To adjust the image 1 Touch the Services Home button then touch Internet Fax 2 Touch the Advanced Settings tab then touch Image Options 3 On the Image Options screen adjust the sliders as nee...

Page 159: ...ng and small file size 150 dpi produces good image quality for onscreen viewing and small file size 200 x 100 dpi produces good image quality and moderate file size 200 dpi produces good image quality...

Page 160: ...touch Internet Fax 2 Touch the Layout Adjustment tab then touch Original Size 3 On the Original Size screen select an option Auto Detect This options allows the printer to determine the size of the o...

Page 161: ...or a delivery receipt from each recipient then prints the report Note The report could be delayed depending on the response time of the recipients To print an acknowledgment report 1 Touch the Service...

Page 162: ...applications click File Print or press CTRL P 2 Select your printer then click Properties to open the print driver dialog box 3 On the Paper Output tab from the Job Type list select Fax 4 Click Recip...

Page 163: ...to the address book touch Create New Contact To add the new recipient information to an existing address book contact touch Add to Existing Contact 5 To add name and company information for the new en...

Page 164: ...to the right of the blue Internet Fax icon touch the field Touch Enter Internet Fax Number use the alphanumeric keypad to enter the number then touch OK 6 To mark a contact as a favorite to the right...

Page 165: ...delete a favorite to the right of the global address book fax or Internet fax field touch the corresponding orange star 8 Touch OK 9 To return to the main menu press the Services Menu button Printing...

Page 166: ......

Page 167: ...rox WorkCentre 6655 Color Multifunction Printer 167 User Guide This chapter includes Cleaning the Printer 168 Billing and Usage Information 183 Ordering Supplies 184 Moving the Printer 187 9 Maintenan...

Page 168: ...t use pressurized spray cleaning aids on or in the printer Some pressurized sprays contain explosive mixtures and are not suitable for use in electrical applications Use of pressurized spray cleaners...

Page 169: ...r the printer through a gap and cause problems Never use cleaning agents other than water or mild detergent Cleaning the Scanner Xerox recommends that you clean the scanner about once a month or when...

Page 170: ...Guide 4 Wipe the surfaces of the document glass and CVT glass until they are clean and dry Note For best results to remove marks and streaks use a standard glass cleaner 5 Wipe the white underside of...

Page 171: ...er Cleaning the Interior To prevent stains inside the printer that can deteriorate print quality clean the interior of the printer regularly Clean the printer interior whenever you replace the drum ca...

Page 172: ...accidentally get toner on your clothes lightly dust them off as best as you can If some toner remains on your clothes use cool water not hot to rinse off the toner If toner gets on your skin wash it...

Page 173: ...Guide 3 Grasp the handle of the waste cartridge then pull it out To prevent toner spills keep the openings facing up Notes Be careful not to spill toner when handling the waste cartridge After removi...

Page 174: ...55 Color Multifunction Printer User Guide 4 Place the removed waste cartridge on a level surface CAUTION To avoid toner spills or malfunction do not lay the waste cartridge on its side 5 Remove the cl...

Page 175: ...ur cleaning holes until it clicks then pull it out Repeat this two more times 7 Repeat the procedure for the holes in the other three slots 8 Return the cleaning rod to its original location 9 Reinser...

Page 176: ...ees clockwise 11 Close the side door Cleaning the Color Toner Density Sensors 1 Turn off the printer CAUTION If the optional Productivity Kit HD is not installed ensure that the Ready LED is off befor...

Page 177: ...Maintenance Xerox WorkCentre 6655 Color Multifunction Printer 177 User Guide 3 Open the side door 4 To unlock the waste cartridge turn the waste cartridge lever 90 degrees counterclockwise...

Page 178: ...Guide 5 Grasp the handle of the waste cartridge then pull it out To prevent toner spills keep the openings facing up Notes Be careful not to spill toner when handling the waste cartridge After removi...

Page 179: ...nction Printer 179 User Guide 6 Place the removed waste cartridge on a level surface CAUTION To avoid toner spills or malfunction do not lay the waste cartridge on its side 7 Turn the control panel so...

Page 180: ...tre 6655 Color Multifunction Printer User Guide 8 Open the top cover 9 Put your fingers through the loops on both sides of the transfer belt unit then pull it out 10 Use a dry cotton swab to clean the...

Page 181: ...or Multifunction Printer 181 User Guide 11 Reinsert the belt unit into the printer 12 Close the top cover 13 Reinsert the waste cartridge Note If the waste cartridge does not fit into place properly e...

Page 182: ...enance 182 Xerox WorkCentre 6655 Color Multifunction Printer User Guide 14 To lock the waste cartridge turn the waste cartridge lock lever 90 degrees clockwise 15 Close the side door 16 Close the rear...

Page 183: ...rinter control panel press the Machine Status button 2 To view basic impression counts touch the Billing Information tab Black Impressions Total number of pages printed with no color specified Color I...

Page 184: ...ot recommended The Xerox Warranty Service Agreement and Total Satisfaction Guarantee do not cover damage malfunction or degradation of performance caused by use of non Xerox supplies or the use of Xer...

Page 185: ...Notes Each consumable includes installation instructions To ensure print quality the toner cartridge has been designed to cease functioning at a predetermined point CAUTION Use of toner other than ge...

Page 186: ...ws You cannot maintain or service any parts that are behind these covers and guards Do not attempt any maintenance procedure that is not described in the documentation supplied with your printer Do no...

Page 187: ...printer If the optional 550 Sheet Feeder is not fixed to the printer securely it could fall to the ground and cause injury To move the printer 1 Always turn off the printer and wait for the printer to...

Page 188: ...ng the printer over a long distance remove the imaging units and toner cartridges to prevent toner from spilling Repack the printer and its options using the original packing material and boxes or a X...

Page 189: ...Xerox WorkCentre 6655 Color Multifunction Printer 189 User Guide After moving the printer 1 Reinstall any parts you removed 2 Reconnect the printer to the cables and power cord 3 Plug in and turn on...

Page 190: ......

Page 191: ...Xerox WorkCentre 6655 Color Multifunction Printer 191 User Guide This chapter includes General Troubleshooting 192 Paper Jams 196 Getting Help 221 10 Troubleshooting...

Page 192: ...Causes Solutions One of the power switches is not turned on Turn on both power switches For details see Turning the Printer On and Off on page 39 The power cord is not correctly plugged into the outle...

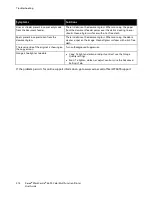
Page 193: ...gain If the error persists contact your Xerox representative The printer is out of paper Load paper into the tray A toner cartridge is empty Replace the empty toner cartridge The front door is open En...

Page 194: ...mode The way the printer was installed on the network could be an issue Determine if a print spooler or a computer sharing the printer is buffering all print jobs and then spooling them to the printer...

Page 195: ...uses Solutions The paper tray does not close fully The paper tray lift plate is not locked down Push down on the paper stack at the back of the tray until it locks down If the tray is extended for leg...

Page 196: ...e fuser You can get burned If a sheet of paper is wrapped around the heat roller do not try to remove it immediately Switch off the printer immediately and wait 40 minutes for the fuser to cool Try to...

Page 197: ...rate the sheets before loading into the tray fan the paper Observe the paper tray fill line never overfill the tray Adjust the paper guides in all trays after inserting the paper A guide that is not p...

Page 198: ...s from the Bypass Tray 200 Clearing Paper Jams from the Tray 2 Area 203 Clearing Paper Jams from the Fuser Area 206 Clearing Paper Jams from the Duplex Automatic Document Feeder 1 Remove the remaining...

Page 199: ...ultifunction Printer 199 User Guide 4 To reset the interlock switch and clear the paper jam message open and close the back door 5 Reload the document in the duplex automatic document feeder then adju...

Page 200: ...ing Paper Jams from the Bypass Tray To resolve the error displayed on the control panel you must clear all paper from the paper path 1 Remove any paper from the bypass tray 2 Grasp both sides of the b...

Page 201: ...or Multifunction Printer 201 User Guide 4 To remove the tray lift the front of it slightly then pull it out of the printer 5 Remove the jammed paper 6 To reset the interlock switch and clear the paper...

Page 202: ...tended for legal size paper the tray protrudes when it is inserted into the printer 8 Insert the bypass tray back into the printer Push the tray in all the way 9 If the control panel prompts you on th...

Page 203: ...03 User Guide Clearing Paper Jams from the Tray 2 Area To resolve the error displayed on the control panel you must clear all paper from the paper path 1 Pull out tray 2 until it stops 2 To remove the...

Page 204: ...g 204 Xerox WorkCentre 6655 Color Multifunction Printer User Guide 3 Remove any paper jammed at the front of the printer 4 To reset the interlock switch and clear the paper jam message open and close...

Page 205: ...all the way in Note If the tray is extended for legal size paper the tray protrudes when it is inserted into the printer 6 If the control panel prompts you on the screen verify the paper size and typ...

Page 206: ...function Printer User Guide Clearing Paper Jams from the Fuser Area 1 Push down on the rear door release and pull open the door 2 If paper is jammed in the fuser raise both green levers to open the fu...

Page 207: ...ooting Xerox WorkCentre 6655 Color Multifunction Printer 207 User Guide 4 Remove any jammed paper from the back of the printer 5 Close the paper guide on the fuser 6 Lower the levers to their original...

Page 208: ...Troubleshooting 208 Xerox WorkCentre 6655 Color Multifunction Printer User Guide 7 Remove any jammed paper from the back of the printer 8 Close the rear door...

Page 209: ...paper For details see Supported Paper on page 52 Humidity is too high for coated paper Feed paper one sheet at a time Fan paper before loading it in the paper tray Paper Misfeeds Probable Causes Solut...

Page 210: ...for Printing Envelopes on page 62 Paper Jam Message Stays On Probable Causes Solutions Some paper remains jammed in the printer Recheck the media path and ensure that you have removed all of the jamme...

Page 211: ...x Total Satisfaction Guarantee is available in the United States and Canada Coverage could vary outside these areas Please contact your local representative for details Note To ensure consistent print...

Page 212: ...iver matches the paper type on which you are printing If you have the same size paper loaded in more than one tray ensure that the proper tray is selected in the print driver Store your paper and othe...

Page 213: ...ge is insufficient for the paper type Verify that the paper loaded in the tray matches the paper type selected at the control panel and in the print driver The settings in the application or print dri...

Page 214: ...nded specification range Replace the paper with a recommended size and type and confirm that your control panel and print driver settings are correct For details see Supported Paper on page 52 The ton...

Page 215: ...he correct type for the printer and is loaded properly For details see Supported Paper on page 52 Verify that the paper loaded in the tray matches the paper type selected at the control panel and in t...

Page 216: ...rough all colors Paper or debris is dragging against the bottom of the transfer belt unit Remove any paper or debris from the paper path Replace the transfer belt unit For assistance go to the Xerox S...

Page 217: ...print driver settings are correct For details see Supported Paper on page 52 Condensation inside the printer causes partial blanks or creased paper Turn on the printer and leave it on for at least one...

Page 218: ...ts present in copies taken from the document glass There is debris on the document glass When scanning the debris creates a spot on the image Clean all glass surfaces with a lint free cloth The revers...

Page 219: ...document glass is dirty Clean the document glass The text in the document is too light Adjust the resolution Adjust the contrast There is a problem with the telephone connection Verify that the teleph...

Page 220: ...n the printer Faxes cannot be received automatically The printer is set to receive faxes manually Set the printer to automatic reception The memory is full Load paper if it is empty and then print the...

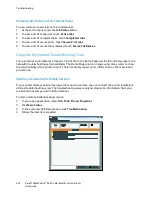
Page 221: ...message appears on the screen A graphical illustration appears to indicate the location of the fault with a brief explanation of the action to take to clear the fault The illustration changes to indi...

Page 222: ...age and the Error History report can help with troubleshooting certain problems The Demo Page prints an image using many colors to show the current ability of the printer to print The Error History re...

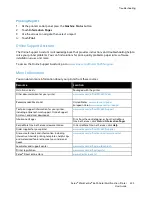
Page 223: ...entation for your printer www xerox com office WC6655docs Recommended Media List United States www xerox com paper European Union www xerox com europaper Technical support information for your printer...

Page 224: ......

Page 225: ...function Printer 225 User Guide This appendix includes Printer Configurations and Options 226 Physical Specifications 228 Environmental Specifications 231 Electrical Specifications 232 Performance Spe...

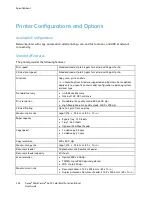
Page 226: ...n operating system or driver type Standard memory 4 GB Device Memory Internal 160 GB hard drive Print resolution Standard print quality mode 600 x 600 dpi High Resolution print quality mode 2400 x 600...

Page 227: ...WSD Scan File formats JPEG TIFF PDF Control panel 7 0 inch LCD touch screen and keypad navigation Connectivity Universal Serial Bus USB 2 0 USB Flash drive Ethernet 10 100 1000Base T Remote access Cen...

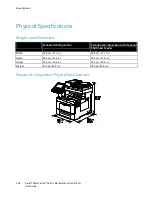
Page 228: ...s Weights and Dimensions Standard Configuration Standard Configuration with Optional 550 Sheet Feeder Width 53 8 cm 21 2 in 53 8 cm 21 2 in Depth 55 3 cm 21 8 in 55 3 cm 21 8 in Height 62 5 cm 24 6 in...

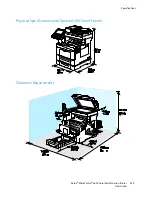
Page 229: ...Specifications Xerox WorkCentre 6655 Color Multifunction Printer 229 User Guide Physical Specifications with Optional 550 Sheet Feeder Clearance Requirements...

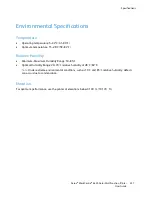
Page 230: ...Specifications 230 Xerox WorkCentre 6655 Color Multifunction Printer User Guide Clearance Requirements with Optional 550 Sheet Feeder...

Page 231: ...Optimum temperature 15 28 C 59 82 F Relative Humidity Minimum Maximum Humidity Range 10 85 Optimal Humidity Range 20 70 relative humidity at 28 C 82 F Note Under extreme environmental conditions such...

Page 232: ...ntre 6655 Color Multifunction Printer is ENERGY STAR qualified under the ENERGY STAR Program Requirements for Imaging Equipment The ENERGY STAR and ENERGY STAR mark are registered United States tradem...

Page 233: ...larger and heavier media Note Print speeds are the same for Standard print quality mode and High Resolution print quality mode Several factors affect print speed Paper weight Lightweight prints faste...

Page 234: ......

Page 235: ...x WorkCentre 6655 Color Multifunction Printer 235 User Guide This appendix includes Basic Regulations 236 Copy Regulations 241 Fax Regulations 244 Material Safety Data Sheets 248 B Regulatory Informat...

Page 236: ...uipment in a residential area is likely to cause harmful interference in which case the user will be required to correct the interference at his her own expense If this equipment does cause harmful in...

Page 237: ...ssist users and has been issued in relation to the European Union EU Energy Related Products Directive specifically the Lot 4 study on Imaging Equipment This requires manufacturers to improve environm...

Page 238: ...encourage you to check if this is suitable for your printing needs ENERGY STAR The ENERGY STAR program is a voluntary scheme to promote the development and purchase of energy efficient models which h...

Page 239: ...ification This certification indicates that a product has undergone rigorous scientific testing exhaustive auditing or both to prove its compliance with stringent third party environmental performance...

Page 240: ...LAN radio transmitter module which complies with the requirements specified in FCC Part 15 Industry Canada RSS 210 and European Council Directive 99 5 EC Operation of this device is subject to the fol...

Page 241: ...o reproduce a legal document on which there is a canceled revenue stamp this may be done provided the reproduction of the document is performed for lawful purposes Postage Stamps canceled or uncancele...

Page 242: ...ty is assumed for its completeness or accuracy In case of doubt consult your attorney For more information about these provisions contact the Copyright Office Library of Congress Washington D C 20559...

Page 243: ...rk owner This list is provided for your convenience and assistance but it is not all inclusive and no liability is assumed for its completeness or accuracy In case of doubt consult your solicitor Othe...

Page 244: ...ber must be provided to the Telephone Company A plug and jack used to connect this equipment to the premises wiring and telephone network must comply with the applicable FCC Part 68 rules and requirem...

Page 245: ...omething that affects the operation of the equipment they should notify you in order for you to make necessary modifications to maintain uninterrupted service If you experience trouble with this Xerox...

Page 246: ...e see the label on the equipment European Union Radio Equipment and Telecommunications Terminal Equipment Directive The Facsimile has been approved in accordance with the Council Decision 1999 5 EC fo...

Page 247: ...5 Use of pulse dialing when this equipment is connected to the same line as other equipment may give rise to bell tinkle or noise and cause a false answer condition If you encounter such problems do n...

Page 248: ...r User Guide Material Safety Data Sheets For Material Safety Data information regarding your printer go to North America www xerox com msds European Union www xerox com environment_europe For the Cust...

Page 249: ...Xerox WorkCentre 6655 Color Multifunction Printer 249 User Guide This appendix includes All Countries 250 North America 251 European Union 252 Other Countries 254 C Recycling and Disposal...

Page 250: ...al may be regulated due to environmental considerations The presence of these materials is fully consistent with global regulations applicable at the time that the product was placed on the market For...

Page 251: ...an equipment take back and reuse recycle program Contact your Xerox representative 1 800 ASK XEROX to determine if this Xerox product is part of the program For more information about Xerox environmen...

Page 252: ...used electrical and electronic equipment to designated collection facilities free of charge Please contact your local disposal authority for information In some member states when you purchase new equ...

Page 253: ...handling For more information about collection and recycling of old products and batteries please contact your local municipality your waste disposal service or the point of sale where you purchased...

Page 254: ...Recycling and Disposal 254 Xerox WorkCentre 6655 Color Multifunction Printer User Guide Other Countries Please contact your local waste management authority to request disposal guidance...

Reviews: