background image

3 Copy 

52

Xerox CopyCentre/WorkCentre/WorkCentre Pro 123/128 User Guide

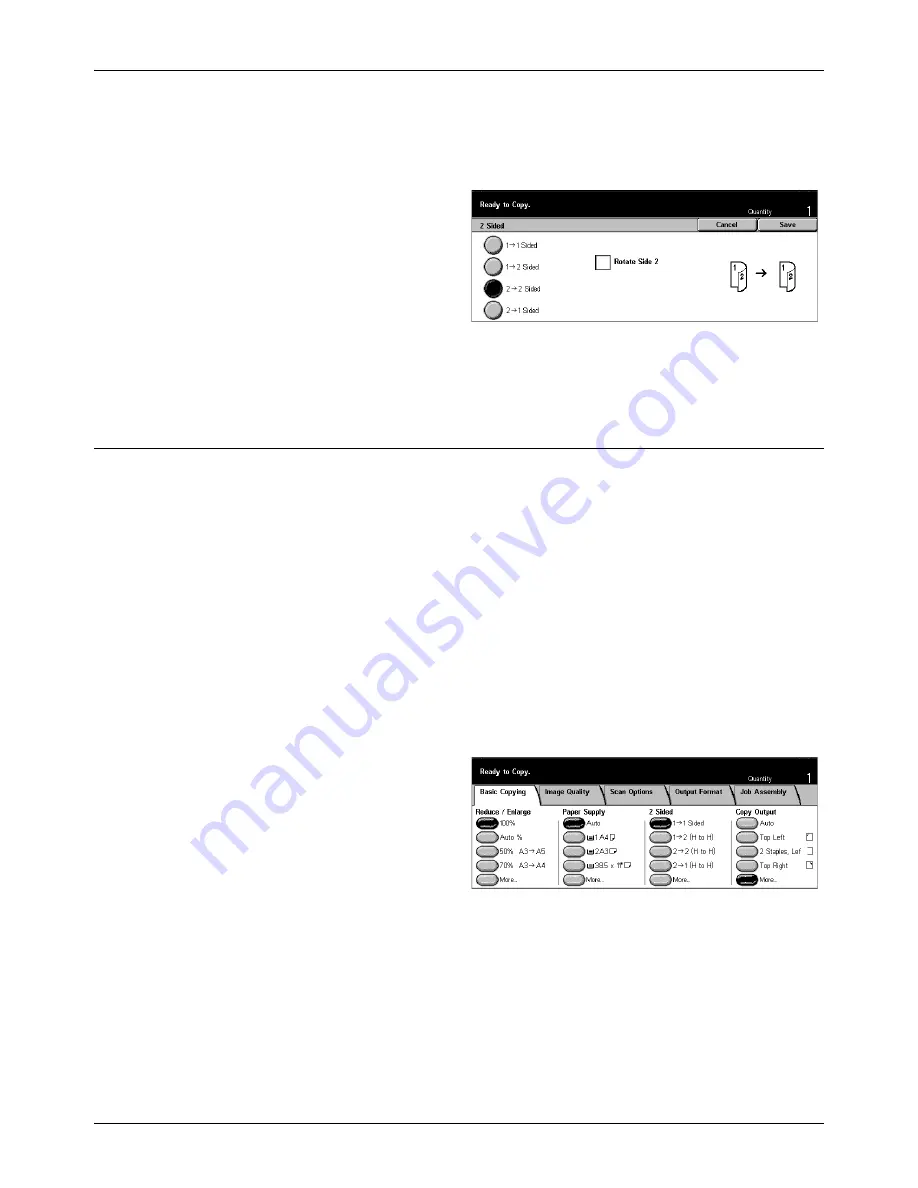
[2 Sided] Screen

Allows you to select the previous option and whether to rotate side 2 pages head to toe 
on the printouts.

1.

Select [More] for [2 Sided] 
feature on the [Basic Copying] 
screen.

2.

Select the required option.

3.

Select [Save].

Rotate Side 2

Select this check box to rotate side 2 of the printouts head to toe.

NOTE: 

This option is available only for [1 

J

 2 (H to H)] and [2 

J

 2 (H to H)].

Copy Output

This feature allows you to sort copy outputs. If the optional finisher has been installed, 
the stapling feature is also available. You can select the staple position on the copy 
output.

NOTE: 

 The features displayed on the screen vary if the finisher is not installed.

NOTE: 

If the correct size paper is not loaded in the machine when the stapling feature 

is applied to a copy or print job, a paper size error may occur while processing the job. 
When this happens, the finisher contains the wrong size paper already processed up 
to this point. If the machine displays “The paper size/orientation currently loaded in 
Tray 5 (Bypass) is different from the setting:” or “The paper size/orientation in Tray X is 
different from the selected size. Load xxx” on the touch screen, open the Finisher Top 
Cover and remove the wrong size paper, load the correct size paper in a tray, and 
restart the job. If you simply replace the paper in a tray and resume the job without 
removing the processed paper in the finisher, the machine will staple the wrong size 
paper still in the finisher and the correct size paper from the tray together.

Auto

Automatically applies either [Collated] or [Uncollated] for sorting copy output. The 
[Collated] option is applied when you use the document feeder or you have enabled 
[Bound Originals], [Covers], [Blank Sepa N Sets], [Stapling], [Build Job], 
[Sample Set], or  [Booklet Creation]. For all other options, [Uncollated] is applied.

Top Left

Staples the top left corner of the output.

Summary of Contents for C123 Copycentre

Page 1: ...WorkCentrePro WorkCentre CopyCentre C123 C128 M123 M128 123 128 User Guide 604P17457 ...

Page 2: ...ed in subsequent editions of the documentation For the latest information go to www xerox com Products Subject To Ordinary Export Regulations An export of this product is strictly limited in accordance with Laws concerning Foreign Exchange and Foreign Trade of Japan and or the export control regulations of the United States You must obtain if you wish to export this product any appropriate export ...

Page 3: ...mation 18 Maintenance Information 19 Ozone Safety Information 20 For Consumables 20 Radio Frequency Emissions 20 Product Safety Certification 20 Regulatory Information 21 CE Mark 21 For FAX Function 21 Regulatory Information for RFID 24 Environmental Compliance 24 USA 24 Canada 25 Europe 25 About License 25 Illegal Copies 28 USA 28 Canada 29 Other Countries 30 Product Recycling and Disposal 30 2 P...

Page 4: ...3 2 Select the Features 45 3 Enter the Quantity 46 4 Start the Copy Job 46 5 Confirm the Copy Job in the Job Status 46 Stop the Copy Job 47 Basic Copying 47 Reduce Enlarge 48 Paper Supply 49 2 Sided 51 Copy Output 52 Image Quality Copy 54 Original Type 54 Lighten Darken 55 Sharpness 55 Auto Exposure 56 Scan Options Copy 56 Bound Originals 57 2 Sided Book Copy 58 Original Size 58 Mixed Size Origina...

Page 5: ... the Fax Internet Fax Job 77 5 Confirm the Fax Internet Fax Job in the Job Status 78 Stop the Fax Internet Fax Job 78 Specifying Destinations 79 Next Recipient 79 Address Book 79 Speed Dial 80 Keyboard 81 Relay Broadcast 82 Special Characters 83 Basic Features Fax Internet Fax 84 Internet Fax 85 2 Sided Originals 85 Resolution 86 Original Type 87 Image Quality Fax Internet Fax 87 Original Type 87 ...

Page 6: ...Receive 103 5 Scan E mail 105 Scanning Procedure 105 1 Load the Documents 106 2 Select the Features 106 3 Start the Scan Job 107 4 Confirm the Scan Job in the Job Status 107 5 Save the Scanned Data 107 Stop the Scan Job 108 E mail 109 Address Book 109 Keyboard 111 Sender 112 Sender s Details 112 Change Settings 113 Save in Scan to Mailbox 113 Job Templates Network Scanning 114 Save in Scan to FTP ...

Page 7: ...128 Split Send 128 Document Name 129 Login Name 129 Password 130 Meta Data 130 6 Check Mailbox 131 Check Mailbox 131 Document List 132 7 Stored Programming 137 Using Stored Programming 137 Stored Programming 137 8 Print 139 Print Driver Features 140 Emulation Parameters 142 PCL Emulation 142 PDF 145 9 CentreWare Internet Services 147 Target Computers 147 Accessing CentreWare Internet Services 148 ...

Page 8: ...e Paper Trays 179 Bypass Tray Tray 5 181 Tandem Tray Module TTM 182 Auto Tray Switching 182 Storing and Handling Paper 182 Supported Paper Sizes and Types 183 Supported Paper Sizes 183 Supported Paper Types 186 11 Setups 187 System Settings Procedure 187 1 Entering the System Settings Mode 187 2 Customizing the Settings 188 System Settings 188 Common Settings 188 Machine Clock Timers 189 Audio Ton...

Page 9: ...Allocate Memory 218 Other Settings 220 Scan Mode Settings 221 Scan Defaults 222 Scan to FTP SMB Defaults 223 Scan Size Defaults 223 Output Size Defaults 224 Reduce Enlarge Presets 225 Other Settings 225 Fax Mode Settings 226 Screen Defaults 226 Fax Defaults 227 Fax Control 228 File Destination Output Destination 231 Reduce Enlarge Presets 232 Scan Size Defaults 232 Local Terminal Information 233 I...

Page 10: ...mum Login Attempts 255 Login Setup Auditron Administration 255 Create Check User Accounts 256 Reset User Accounts 257 System Administrator Copy Meter 258 User Details Setup 258 Charge Print Settings 259 Fax Billing Data 260 Remote Login Setup 260 Login Setup Auditron Mode 261 12 Job Status 263 Job Status 263 Current and Pending Jobs 264 Completed Jobs 265 Stored Documents 266 Charge Print 266 Secu...

Page 11: ...Sheets to Mailboxes 292 Overview of Auditron Administration 294 Authentication and Auditron Administration 294 Manageable Features and Services 294 15 Maintenance 301 Ordering Supplies 301 Cleaning the Machine 301 The Document Glass and Constant Velocity Transport Glass 302 The Control Panel and Touch Screen 302 The Document Feeder and Output Trays 302 Replacing the Drum Cartridge 302 Removing the...

Page 12: ...18 Paper Jams in the Finisher Optional 319 Document Jams 320 Troubleshooting Tables 321 Fault Codes 325 Screen Messages 334 Output Quality 335 Xerox Welcome Center 335 17 Specifications 337 Machine Specifications 337 Paper Supply 339 Paper Output 340 Electrical Specifications 340 Specifications for the Fax Feature 341 18 Appendix 343 Additional Information 343 Languages Displayed on the Touch Scre...

Page 13: ...r experts at the Xerox Welcome Center A local representative telephone number may have been provided when the product was installed For convenience and future reference please record the telephone number in the space below Welcome Center or local representative telephone number Xerox US Welcome Center 1 800 821 2797 Xerox Canada Welcome Center 1 800 93 XEROX 1 800 939 3769 When you call the Welcom...

Page 14: ...long edge feed or short edge feed Long Edge Feed LEF When loading documents long edge feed into the document feeder load with one of the long edges facing into the document feeder The short edges appear at the top and bottom of the paper facing the front and back of the document feeder When loading paper long edge feed into a paper tray place the paper with one of the long edges on the left hand s...

Page 15: ... clear the suspended job Italic Typeface The Italic typeface is used to indicate references to other sections and chapters For example For information on cleaning the document glass refer to the Maintenance chapter on page 301 Paper Supply page 49 Warnings Warnings are statements that alert you to the possibility of personal harm For example WARNING This product must be connected to a protective e...

Page 16: ...supplies have been designed and tested to meet strict safety requirements These include safety agency approval and compliance to established environmental standards Please read the following instructions carefully before operating the product and refer to them as needed to ensure the continued safe operation of your product The safety and environment testing and performance of this product have be...

Page 17: ...Do not carry out any maintenance procedures on this product which are not described in the customer documentation Cleaning Your Product Before cleaning this product unplug the product from the electrical outlet Always use materials specified for this product The use of other materials may result in poor performance and may create a hazardous situation Do not use aerosol cleaners they may be explos...

Page 18: ...ures other than those specified herein may result in hazardous light exposure With specific regard to laser safety the equipment complies with performance standards for laser products set by government national and international agencies as a Class 1 laser product It does not emit hazardous light as the beam is totally enclosed during all phases of customer operation and maintenance Operational Sa...

Page 19: ...guards that are fastened with screws There are no operator serviceable areas within these covers Never locate the equipment near a radiator or any other heat source Never push objects of any kind into the ventilation openings Never override or cheat any of the electrical or mechanical interlock devices Never operate the equipment if you notice unusual noises or odors Disconnect the power cord from...

Page 20: ...tal device pursuant to Part 15 of the FCC Rules These limits are designed to provide reasonable protection against harmful interference when the equipment is operated in a commercial environment This equipment generates uses and can radiate radio frequency energy and if not installed and used in accordance with the customer documentation may cause harmful interference to radio communications Opera...

Page 21: ...is is a Class A product In a domestic environment the product may cause radio frequency interference in which case the user may be required to take adequate measures WARNING Shielded interface cables must be used with this product to maintain compliance with Council Directive 89 336 EEC For FAX Function USA FAX Send Header Requirements The Telephone Consumer Protection Act of 1991 makes it unlawfu...

Page 22: ...auses harm to the telephone network the Telephone Company will notify you in advance that temporary discontinuance of service may be required But if advance notice is not practical the Telephone Company will notify the customer as soon as possible Also you will be advised of your right to file a complaint with the FCC if you believe it is necessary The Telephone Company may make changes in its fac...

Page 23: ... own protection that the electrical ground connections of the power utility telephone lines and internal metallic water pipe systems if present are connected together This precaution may be particularly important in rural areas CAUTION Users should not attempt to make such connections themselves but should contact the appropriate electric inspection authority or electrician as appropriate NOTE The...

Page 24: ...o frequency identification system device RFID This system is certified in compliance with European Council Directive 99 5 EC and applicable local laws or regulations as applicable Environmental Compliance USA Energy Star As an ENERGY STAR partner Xerox Corporation Fuji Xerox has determined that the basic configuration of this product meets the ENERGY STAR guidelines for energy efficiency The ENERG...

Page 25: ... products Europe Energy Xerox Corporation has designed and tested this product to meet the energy restrictions required to establish Group for Energy Efficient Appliances GEEA compliance and has notified the registration authorities About License JPEG Code Our printer software uses some of the codes defined by the Independent JPEG Group Heimdal Copyright 2000 Kungliga Tekniska Högskolan Royal Inst...

Page 26: ...in the documentation and or other materials provided with the distribution 3 All advertising materials mentioning features or use of this software must display the following acknowledgment This product includes software developed by the OpenSSL Project for use in the OpenSSL Toolkit http www openssl org 4 The names OpenSSL Toolkit and OpenSSL Project must not be used to endorse or promote products...

Page 27: ...Redistribution and use in source and binary forms with or without modification are permitted provided that the following conditions are met 1 Redistributions of source code must retain the copyright notice this list of conditions and the following disclaimer 2 Redistributions in binary form must reproduce the above copyright notice this list of conditions and the following disclaimer in the docume...

Page 28: ... Bonds Treasury Notes Federal Reserve Notes Fractional Notes Certificates of Deposit Paper Money Bonds and Obligations of certain agencies of the government such as FHA etc Bonds U S Savings Bonds may be photographed only for publicity purposes in connection with the campaign for the sale of such bonds Internal Revenue Stamps If it is necessary to reproduce a legal document on which there is a can...

Page 29: ...the head of such department or bureau Reproducing the following is also prohibited in certain states Automobile Licenses Drivers Licenses Automobile Certificates of Title The above list is not all inclusive and no liability is assumed for its completeness or accuracy In case of doubt consult your attorney Canada Parliament by statute has forbidden the reproduction of the following subjects under c...

Page 30: ...ernment bonds and securities Passports and identification cards Copyright material or trademarks without the consent of the owner Postage stamps and other negotiable instruments This list is not inclusive and no liability is assumed for either its completeness or accuracy In case of doubt contact your legal counsel Product Recycling and Disposal Xerox operates a worldwide equipment take back and r...

Page 31: ...machine configuration However machine features described here remain the same For more information on available options not described here visit the Xerox website or contact your Xerox Sales Representative Machine Components The following diagrams show the standard and optional components of the machine Configuration may vary depending on the model NOTE Depending on the configuration the Document ...

Page 32: ...from Tray 1 2 3 or 4 For more information refer to 2 Sided in the Copy chapter on page 51 Trays 3 4 At the base of the machine the following optional trays will be available depending on the configuration Two Tray Module Can be added to the standard 2 tray configuration Each tray can hold 500 sheets of 20 lb bond or 80 g m2 paper Tandem Tray Module Can be added to the standard 2 tray configuration...

Page 33: ...when you change languages 4 Power Saver green light Indicates whether the machine is in power saver mode Also cancels Low Power Mode or Sleep Mode 5 Clear All Resets to the default settings and displays the first screen for the current pathway 6 Interrupt Temporarily interrupts a job for programming a priority job 7 Stop Suspends or cancels a job depending on the job type When multiple jobs are be...

Page 34: ...screens 3 Select the required service Copy Allows you to copy documents in various ways For example you can produce output which has been reduced or enlarged to a different size or copy two or four independent documents onto one sheet of paper For more information refer to the Copy chapter E mail Allows you to send scanned documents by e mail in various ways For example you can set the density for...

Page 35: ...work Scanning in the Scan E mail chapter on page 114 and Services in the CentreWare Internet Services chapter on page 149 Scan to Mailbox Enables the confidential mailbox or polling feature by storing the scanned documents to private mailboxes For more information refer to Save in Scan to Mailbox in the Scan E mail chapter on page 113 Scan to FTP SMB Allows you to scan and store documents to speci...

Page 36: ...he machine is in the reset position Powering Off When you switch off the machine if it is equipped with the optional hard disk it remains on for approximately 10 seconds while it stores files and prepares for shutdown The machine then shuts down completely NOTE Wait at least 20 seconds between powering the system on and off Failure to do this could cause damage to the hard disk Ground Fault Interr...

Page 37: ...control panel and lights up when the power saving feature is enabled The power saving feature operates in the following two modes Low Power Mode Sleep Mode Low Power Mode The machine automatically switches to the Low Power Mode after a certain period of time from the last copy fax scan or print operation In this mode the touch screen is turned off and the Power Saver light is on The Low Power Mode...

Page 38: ... machine enters the Low Power Mode For more information refer to Auto Power Saver in the Setups chapter on page 190 NOTE By default the machine skips the Low Power Mode and switches directly to the Sleep Mode after 2 minutes of inactivity Changing the Default Time Settings This section describes how to change the default time settings using the Key Operator access If you need assistance or more in...

Page 39: ...em Administrator Menu screen 4 Select System Settings on the System Settings screen 5 Select Common Settings on the System Settings screen 6 Select Machine Clock Timers on the Common Settings screen 7 Select the required option 8 Select Change Settings 9 Change the value using the scroll buttons or select required options 10 Select Save ...

Page 40: ...rvices Features Job Status Machine Status NOTE These buttons do not respond when the machine is in the System Settings mode All Services Use this button to access all the services available on the machine NOTE The arrangement of service icons displayed on the screen can be changed by the Key Operator 1 Press the All Services button on the control panel 2 Use the scroll buttons to switch between sc...

Page 41: ...ck delete or print various special printings or the documents in the public mailbox of the machine For more information refer to the Job Status chapter Machine Status Use this button to check the machine status the billing meter the status of the toner cartridge or print various reports For more information refer to the Machine Status chapter Job Interrupt Use this feature to temporarily suspend t...

Page 42: ...paper in the machine benefits the environment with no degradation in performance Xerox recommends recycled paper with 20 post consumer content which can be obtained both through Xerox and other office suppliers Contact your Xerox representative or go to www xerox com for more information on other types of recycled paper ...

Page 43: ...ed an account number before using the machine To get an account number or for further information contact the Key Operator 1 Load the Documents Document input areas are as follows Document feeder for single or multiple documents Document glass for single documents or bound originals NOTE The document glass cover will be fitted in the non document feeder configuration NOTE The machine automatically...

Page 44: ...nt feeder For information on how to copy mixed size originals using the document feeder refer to Mixed Size Originals on page 59 1 Before loading the documents into the document feeder remove all staples and paper clips 2 Insert the documents neatly into the document feeder face up The first page should be on top with the headings towards the back or left of the machine 3 Place the stack in the mi...

Page 45: ...n are those used most often NOTE Only those features relevant to the machine configuration will be available 1 Press the All Services button on the control panel 2 Select Copy on the All Services screen Ensure that the Basic Copying screen is displayed NOTE If the Authentication feature is enabled you may be required to enter the user ID and password if one is set up If you need assistance contact...

Page 46: ...r right hand corner of the touch screen NOTE To cancel an incorrect entry press the C button and enter the correct quantity 4 Start the Copy Job 1 Press the Start button Each document is scanned only once The number of copies remaining is displayed in the upper right hand corner of the touch screen While copying if the document feeder or document glass is ready and the machine is equipped with the...

Page 47: ...Start button on the control panel to resume the suspended copy job 2 If required press Job Status button to display the Job Status screen To exit the Job Status screen press the Features button 3 Press the C button on the control panel to delete the suspended copy job Basic Copying This section describes the basic features for a copy job on the Basic Copying screen For information on the features ...

Page 48: ...er Supply If Auto Size Detect is selected for Paper Size in Tray 5 Bypass pressing the Start button will result in an error Presets Allows you to select a reduction enlargement ratio from the two most frequently used presets set up by the Key Operator More Displays the Reduce Enlarge screen Reduce Enlarge Screen Allows you to select or specify the reduction enlargement ratio on this screen 1 Selec...

Page 49: ...s selected automatically even if Auto is selected in Paper Supply Paper Supply The available paper trays are displayed on the touch screen together with the media size and orientation preset for each tray When changing the size or type of media in the tray the tray must be reprogrammed by the Key Operator to match the media being loaded For more information on reprogramming the tray contact the Ke...

Page 50: ...rogrammed trays Up to a 10 mm or 0 4 inch stack of paper approximately 95 sheets of 80 g m2 paper can be loaded into the bypass tray Follow the steps below to make full use of the bypass tray 1 Select Bypass Tray on the Paper Supply screen 2 Select the required option 3 Select Save Paper Size Auto Size Detect Automatically senses the paper size fed from the bypass tray Standard Size Displays the p...

Page 51: ...The double sided copy option cannot be used with the following paper types Transparency Lightweight Heavyweight Labels cover stock as well as paper already printed on one side i e scrap paper 1 J 1 Sided Produces single sided copies from single sided documents 1 J 2 H to H Produces double sided copies from single sided documents 2 J 2 H to H Produces double sided copies from double sided documents...

Page 52: ...or may occur while processing the job When this happens the finisher contains the wrong size paper already processed up to this point If the machine displays The paper size orientation currently loaded in Tray 5 Bypass is different from the setting or The paper size orientation in Tray X is different from the selected size Load xxx on the touch screen open the Finisher Top Cover and remove the wro...

Page 53: ... specify the output tray 1 Select More for Copy Output feature on the Basic Copying screen 2 Select the required option 3 Select Save Staple Position Select one of the five options displayed to specify the staple position Collation Auto Automatically applies sorting methods for copy output Refer to the Auto option explained previously Collated Delivers the specified number of copy sets in the same...

Page 54: ... features used to adjust the quality of the output image using the Image Quality options For more information on the features available refer to the following Original Type page 54 Lighten Darken page 55 Sharpness page 55 Auto Exposure page 56 1 Press the All Services button on the control panel 2 Select Copy on the touch screen 3 Select the Image Quality tab 4 Select the required option Original ...

Page 55: ...ual areas Photo Use this option to copy documents that contain photographs only Pencil Text Use this option to copy documents written in pencil These images are light and difficult to see and are therefore printed darker Lighten Darken This feature allows you to select the density for copying documents 1 Select Lighten Darken on the Image Quality screen 2 Select the density level 3 Select Save Sha...

Page 56: ...Scan Options Copy This section describes the Scan Options used to adjust the layout For more information on the features available refer to the following Bound Originals page 57 2 Sided Book Copy page 58 Original Size page 58 Mixed Size Originals page 59 Border Erase page 59 Margin Shift page 60 Image Rotation page 62 Mirror Image Negative Image page 63 Original Orientation page 64 1 Press the All...

Page 57: ... open book from left to right Right Page then Left Copies both pages of an open book from right to left Top Page then Bottom Copies both pages of an open book from top to bottom Both Pages Copies both pages of an open book Left Page Only Copies only the left side page of an open book Right Page Only Copies only the right side page of an open book Top Page Only Copies only the upper side of an open...

Page 58: ...tom Copies both pages of an open book from top to bottom Start Page End Page Displays the 2 Sided Book Copy Start Page End Page screen Specifies the front or back of the page to be the starting or ending side for copying The specified page sides must be identified using the bound originals Center Erase Erases printing of the center gutter area of the book that tends to be shadowed Use the scroll b...

Page 59: ...er at the same time NOTE To enable the feature select Auto Size Detect on the Original Size screen NOTE To use this feature the document orientation must be specified to indicate top of the document in Original Orientation on the Output Format screen NOTE When loading standard size documents you may still see a message asking you to manually input the document size Follow the messages to input the...

Page 60: ...ect Variable Erase and select 0 0 using the scroll buttons Variable Erase Allows you to adjust the amount of deletion from the edge or center of the documents Enter the amount you want to erase from the top bottom right left and center margins Up to 50 mm 2 inches can be entered Margin Shift This feature allows you to change the position of the image on an output page NOTE To use this feature the ...

Page 61: ...Shift Side 2 screen Margin Shift Side 1 Screen Use this feature to move images on the Side 1 page 1 Select Margin Shift Variable Shift in the Margin Shift screen 2 Select Side 1 to display the Margin Shift Side 1 screen 3 Select the required option 4 Select Save No Shift Disables the feature Auto Center Automatically moves images to the center of the paper Corner Shift Moves images to the corner o...

Page 62: ...ovement Variable Shift Moves images by specified amounts on the paper You can specify up to 50 mm 2 inches for both dimensions using the scroll buttons Independent Shift Allows you to make settings for Side 2 independently from the settings for Side 1 Mirror Shift Automatically places the image on the Side 2 page matching the position of the image on the Side 1 page Image Rotation This feature all...

Page 63: ...on This option is available only when the finisher is installed to on the machine Portrait Orientation Left Edge Rotates the image to align the top of a landscape document with the left side of a portrait document Portrait Orientation Right Edge Rotates the image to align the top of a landscape document with the right side of a portrait document Mirror Image Negative Image This screen offers you t...

Page 64: ...n the top of the document is orientated towards the back of the machine Head to Left Select this option when the top of the document is orientated towards the left of the machine Output Format Copy This section describes features that enhance the appearance of a copy job For more information on the features available refer to the following Booklet Creation page 65 Covers page 67 Transparency Separ...

Page 65: ...es Otherwise the extra pages in the book will be blank 1 Select Booklet Creation on the Output Format screen 2 Select the required option 3 Select Save Off Disables the feature Left Bind Top Bind Make a booklet that opens to the left or upward Right Bind Makes a booklet that opens to the right Gutter Displays the Booklet Creation Gutter screen Booklet Creation Gutter Screen Allows you to specify t...

Page 66: ...omatically On Copies the first page of the set of documents onto the cover stock You must add blank sheets to the set of documents if you want only the front or the back covers to be printed Paper Tray Settings Displays the Booklet Creation Covers Paper Tray Settings screen Select one of the presets to specify Covers Tray and Body Pages Tray Five presets including bypass tray are available for eac...

Page 67: ...the instructions on the screen to cancel the job Delete the stored documents or reduce the amount of pages to free some memory and try scanning again 1 Select Covers on the Output Format screen 2 Select the required option 3 Select Save No Covers Disables the feature Front Cover Makes copies with a different type of paper specified as the cover page before the first page of documents Front Back Co...

Page 68: ...o make hard copy sets for handouts 1 Select Transparency Separators on the Output Format screen 2 Select the required option 3 Select Save Off Disables the feature Blank Separators Places a blank sheet of paper between each transparency sheet Blank Separators N Sets Copies one set of transparencies with blank dividers along with sets of paper copies for handouts No Separators N Sets Copies one set...

Page 69: ...ts onto one sheet of paper Image Order Sets how to lay out the documents on a page For 2 Up you can select either Left to Right Head to Toe or Right to Left Head to Toe For 4 Up or 8 Up you can select either Left Start Horizontal Right Start Horizontal Left Start Vertical or Right Start Vertical Poster This feature allows you to divide and enlarge an original document and to copy each divided part...

Page 70: ...y the tray for the job Five presets including Tray 5 Bypass are available For more information on the bypass tray refer to Tray 5 Bypass Screen on page 50 Repeat Image This feature allows you to print an original image repeatedly onto one sheet of paper 1 Select Repeat Image on the Output Format screen 2 Select the required option 3 Select Save Off Disables the feature Auto Repeat Automatically ca...

Page 71: ...nnotation Stamp Position screen Select where to stamp on each page Print On Displays the Annotation Stamp Print On screen Specify which of the pages you wish to print on from First Page Only or All pages Date Displays the Annotation Date screen Use this screen to print the current date on the copies based on the selections made The following options are available Off Disables the feature On Enable...

Page 72: ...he numeric keypad If you select Enter First page Number manually enter Start Page and Start Number Select Include Cover Separators when you want to print the page number on the cover page or the divider Set Numbering This feature allows you to add information such as a control number predetermined text and the machine serial number to copy output 1 Select Set Numbering on the Output Format screen ...

Page 73: ...ge 73 1 Press the All Services button on the control panel 2 Select Copy on the touch screen 3 Select the Job Assembly tab Build Job This feature allows you to make copies with different settings for individual or groups of pages but still run the job as a single job For example if a job consists of some sections with text and some with photos you can select the appropriate settings to be applied ...

Page 74: ...using the double sided copy option the first page of the next set is copied onto the front of the paper This means the back of last paper copied will be blank if the last page of previous set is odd Separators Automatically splits chapters and places a separator page between chapters Select one of the five presets for Separators Tray including the bypass tray to specify the tray for separator page...

Page 75: ...ettings Also refer to Country Code for Fax Option on page 343 Fax Internet Fax Procedure This section describes the basic procedure for sending faxes and Internet Faxs Follow the steps below 1 Load the Documents page 75 2 Select the Features page 76 3 Specify the Destination page 77 4 Start the Fax Internet Fax Job page 77 5 Confirm the Fax Internet Fax Job in the Job Status page 78 Stop the Fax I...

Page 76: ... document at its original size or smaller is recommended An enlarged image may be cut off during transmission 2 Select the Features The features available on the Basic Features screen are those used most often NOTE Only those features relevant to the machine configuration will be available 1 Press the All Services button on the control panel 2 Select Fax Internet Fax on the touch screen Ensure tha...

Page 77: ...ol panel Using the Address Book refer to Address Book on page 79 Using the Speed Dial refer to Speed Dial on page 80 For Internet Fax Using the screen keyboard on the touch screen refer to Keyboard on page 81 1 Enter the destination using any method from the above You can send a document to multiple destinations in a single operation For more information refer to Next Recipient on page 79 If you n...

Page 78: ... Job Follow the steps below to manually cancel an activated fax Internet Fax job 1 Select Stop on the touch screen or press the Stop button on the control panel to suspend the fax job while the document is being scanned 2 If required press the Job Status button on the control panel to display the Job Status screen To exit the Job Status screen press the Features button 3 Press the C or Clear All b...

Page 79: ...destination You can enter destinations using the numeric keypad or speed dialing You can also use the Address Book to quickly look up and enter destinations registered for speed dialing The maximum number of destinations that you can designate at one time is 200 1 Enter the first destination 2 Select Next Recipient 3 Enter the next destination 4 Repeat steps 2 and 3 as required NOTE You can return...

Page 80: ...e ABCDE FGHIJ KLMNO PQRST UV Z 0 9 Locates a destination by the index number assigned to it Group Locates destinations registered in group codes Speed Dial This feature allows you to select a destination quickly using a 3 digit code assigned to it An asterisk on the screen keypad or the control panel can be used to specify multiple speed dial codes and a pound sign to designate a group code For in...

Page 81: ...atures screen 2 Select the keys on the screen to enter the required information 3 Select Save Alphanumeric Displays number and letter keys on the screen Symbol Displays symbol keys on the screen For information on using symbols as special characters in fax numbers refer to Special Characters on page 83 Internet Fax Switches transmission mode between the regular fax and the Internet Fax Select this...

Page 82: ...ered as a relay station in a speed dial code on your machine For more information on registering relay stations for speed dialing refer to Address Book in the Setups chapter on page 247 DTMF You can manually enter DTMF codes as part of a fax number to specify a relay station and destinations that also understand DTMF codes G3 compatible machines that allow manual sending can initiate relay broadca...

Page 83: ... switch Switches pulse dialing to tone dialing for example when using an automated message recording system that requires tone signals Speed dial or group code Indicates a 3 digit speed dial or group code Place this character before and after the code Communication line switch Switches communication lines that include parameter data where the parameter data include characters 0 to 9 or The paramet...

Page 84: ...n to select the basic features for a fax Internet Fax job For information on the features available refer to the following Next Recipient page 79 Address Book page 79 Speed Dial page 80 Keyboard page 81 Special Characters page 83 Internet Fax page 85 2 Sided Originals page 85 Resolution page 86 Original Type page 87 Telephone number of remote machine Mailbox number of remote machine Mailbox passwo...

Page 85: ...machine an Internet Fax capable relay station for broadcasting to regular fax machines or forward a faxed document stored in the machine s mailbox as e mail using a job flow sheet For more information Refer to Mailbox Screen on page 102 Internet Fax on page 81 or Document List in the Check Mailbox chapter on page 132 respectively NOTE The following features are not available for Internet Fax trans...

Page 86: ...quality of the fax the remote machine receives A higher resolution yields better quality A lower resolution reduces communication time Standard Scans documents with a resolution of 200 100 dpi This option is recommended for text documents It requires less communication time but does not produce the best image quality for graphics and photos Fine Scans documents with a resolution of 200 200 dpi Thi...

Page 87: ... Photo Select this option for documents that contain photographs only Image Quality Fax Internet Fax You can also set Original Type or Lighten Darken features as follows Original Type page 87 Lighten Darken page 88 1 Press the All Services button on the control panel 2 Select Fax Internet Fax on the touch screen 3 Select the Image Quality tab 4 Select the required option Original Type This feature...

Page 88: ... 85 Bound Originals page 88 Scan Size page 89 Mixed Size Originals page 90 Reduce Enlarge page 90 1 Press the All Services button on the control panel 2 Select Fax Internet Fax on the touch screen 3 Select the Scan Options tab 4 Select the required option Bound Originals Use this feature to scan facing pages of a bound document in the correct page sequence using the document glass The facing pages...

Page 89: ... page of an open book Right Page Only Scans only the right side page of an open book Scan Size Using this feature the size of the document can be automatically detected or selected from a list of preset sizes If a preset size is selected documents will be scanned according to the specified size regardless of their actual size 1 Select Scan Size on the Scan Options screen 2 Select a desired option ...

Page 90: ...large This feature allows you to enlarge or reduce a scanned document to a specified ratio before sending 1 Select Reduce Enlarge on the Scan Options screen 2 Perform the necessary operations 3 Select Save Preset 100 Sets the enlargement reduction ratio to 100 original size Auto After scanning the document with original size automatically selects the enlargement reduction ratio depending on the ou...

Page 91: ...N page 96 Recipient Print Sets page 97 Remote Mailbox page 97 F Code page 98 Internet Fax Profile page 99 1 Press the All Services button on the control panel 2 Select Fax Internet Fax on the touch screen 3 Select the Send Options tab Use the side tabs to switch screens 4 Select the required option Communication Mode Use this feature to select a communication mode for fax transmissions 1 Select Co...

Page 92: ... Select Priority Send Delayed Start on the Send Options screen 2 Perform the necessary operations 3 Select Save Priority Send Off Disables the feature On Sends or polls the job prior to the already stored documents Delayed Start Off Disables the feature On Applies the delayed start time When you select this option Start Time is displayed at the right side of the screen Start Time Displays the dela...

Page 93: ...art time from 1 to 12 Minutes Sets the minutes of the delayed start time from 00 to 59 Current Time Displays the current time Send Header Use this feature to add a remark RESEND or space the start time the date of transmission the sender name the destination name the fax number and the quantity at the top of each page of the document NOTE A regular fax sent from the United States must show this in...

Page 94: ...ure On Attaches a Cover Note When you select this option Comment is displayed at the right side of the screen Comment Displays the status of Recipient s Comment and Sender s Comment and displays the Comment screens to specify comments You can add two comments on a cover sheet Recipient s Comment and Sender s Comment You can specify the same comment in both screens Comment Recipient s Comment Scree...

Page 95: ... This feature is not available for regular fax transmissions For adding comments on a regular fax refer to Cover Note on page 94 1 Select Internet Fax Comment Mail Contents on the Send Options screen 2 Perform the necessary operations Off Disables the feature On Attaches the Internet Fax Comment When you select this option Comment 1 and Comment 2 are displayed at the right side of the screen You c...

Page 96: ...x you sent has been opened by the recipient MDN or delivered to the destination DSN Whether to use Read Status MDN or Send Status DSN can be selected on the Internet Fax Control screen in the Fax Mode Settings For more information refer to Other Settings in the Setups chapter on page 239 Transmission Report is used for regular faxes and Read Status MDN and Send Status DSN are used for Internet Fax...

Page 97: ...are displayed at the right side of the screen to specify the number of copies Remote Mailbox This feature allows you to access a mailbox on a remote machine to send and retrieve confidential documents You must know the mailbox number and the password if one is set up to access the remote mailbox For more information on how to retrieve confidential documents from a remote mailbox refer to Polling o...

Page 98: ...F Code and password if set up before sending the document Example F Code 0 to designate an F Code transmission followed by the mailbox number Password if required the password for the mailbox Confidential polling using F Code You can send a polling request to receive a document from a remote machine using F Code if a confidential mailbox is set up in the remote machine to hold the document to be p...

Page 99: ... keypad on the control panel Password You can enter a password composed of spaces numbers 0 9 and symbols up to 20 characters Enter the code using the numeric keypad on the control panel Next Sets the entered value and moves to the other entry field Internet Fax Profile This feature allows you to specify a profile to restrict the attribute information for transmissions between machines equipped wi...

Page 100: ...All Services button on the control panel 2 Select Fax Internet Fax on the touch screen 3 Select the On hook Others tab 4 Select the required option Polling This feature allows you to retrieve a document from a remote machine which is referred to as polling The remote machine information is entered using the same method for sending faxes but the Polling option is used to initiate retrieving the fax...

Page 101: ...his option Save in Public Mailbox is displayed at the right side of the screen Private Mailbox Stores confidential documents in the private mailbox ready to be polled When you select this option Save in Private Mailbox is displayed at the right side of the screen Save in Public Mailbox Displays the Public Mailbox Document List screen to confirm the status or delete stored documents from the list S...

Page 102: ...confirm the status of stored documents in the mailbox 1 Select Save in Private Mailbox on the Store for Polling screen 2 Perform the necessary operations 3 Select Save Go to The mailbox number you entered in this field is displayed at the top of the list You can specify the number using the numeric keypad on the control panel Document List Displays Mailbox Document List to confirm or delete docume...

Page 103: ...en On hook Manual Send Receive is selected 1 Select On hook Manual Send Receive on the On hook Others screen 2 Perform the necessary operations 3 Select Save Send Receive Switches from the telephone mode to the fax Manual Send Manual Receive modes Alphanumeric Displays letters and numbers on the screen Symbol Displays symbols on the screen Manual Send Select this option to start sending a fax whil...

Page 104: ...4 Fax Internet Fax 104 Xerox CopyCentre WorkCentre WorkCentre Pro 123 128 User Guide ...

Page 105: ...s are scanned processed and then uploaded to a specified server To scan and send documents using the FTP or SMB protocol page 5 115 After a document is scanned scanned data is automatically uploaded to a specified destination using the FTP or SMB protocol NOTE To use the scan features you need to set the machine for use on a network For more information refer to the System Administration Guide NOT...

Page 106: ...Network Scanning to scan and send documents according to a scan job template Select Scan to Mailbox to scan and save documents in the mailbox Select Scan to FTP SMB to scan and send documents using the FTP or SMB protocol 1 Press the All Services button on the control panel 2 Select a scan type on the touch screen NOTE If the Authentication feature is enabled you may be required to enter the user ...

Page 107: ...nd password if set up If you need assistance contact the Key Operator 4 Confirm the Scan Job in the Job Status 1 Press the Job Status button on the control panel to display the Job Status screen The queued scan job will be displayed If no job is displayed on the screen it may have already been processed For more information refer to Current and Pending Jobs in the Job Status chapter on page 264 5 ...

Page 108: ...u can also select multiple documents For other functions available on Mailbox Viewer2 refer to the Mailbox Viewer2 On line Help Stop the Scan Job Follow the steps below to manually cancel an activated scan job 1 Select Stop on the touch screen or press the Stop button on the control panel to suspend the current scan job NOTE Select the Start button on the control panel to resume the suspended job ...

Page 109: ... Select E mail on the touch screen 3 Perform the necessary operations Address Book This feature allows you to choose a destination from the address book Address books are held locally on the machine and remotely on a directory server When the address book saved in a directory server is accessible the remote address book is displayed If it is inaccessible the local address book saved in the machine...

Page 110: ...Search Directory Svc Displays the Address Book screen for searching the remote address book on the directory server Selectable when the local address book is displayed on the screen Address Book Screen Use this feature to search the address book You can select a destination from search results 1 Select Local Search or Remote Search on the Address Book screen 2 Perform the necessary operations 3 Se...

Page 111: ...ing the local address book on the machine Remote Search Directory Svc Displays the Address Book screen for searching the address book on the directory server NOTE When searching the address book on the directory server you can abort halfway through Keyboard You can enter an address using the screen keyboard 1 Select Keyboard on the E mail screen 2 Perform the necessary operations 3 Enter an addres...

Page 112: ...cipient Sender s Details Use this feature to add information in the message header sender s address subject reply to address and file name 1 Select Sender s Details on the E mail screen 2 Perform the necessary operations 3 Select Save From Displays the preset sender s address To change the address select this entry field and then select Keyboard or Address Book E mail Subject To change the subject...

Page 113: ...me For more information on keyboard entry refer to Keyboard in the Fax Internet Fax chapter on page 81 Change Settings Use this feature to change the entered destination address 1 Select Change Settings on the E mail screen 2 Perform the necessary operations 3 Select Save For more information on keyboard entry refer to Keyboard in the Fax Internet Fax chapter on page 81 Save in Scan to Mailbox Thi...

Page 114: ... how to program a job template refer to Services in the CentreWare Internet Services chapter on page 149 For information on how to select a scan job template refer to the following The name of a template created on the machine begins with The template created with the CentreWare Scan Services carries the name you specified For information on the CentreWare Scan Services refer to the CentreWare Sca...

Page 115: ...select Keyboard and use the displayed keyboard Not required for FTP servers Save in Specify the location or path of the directory for saving files If you select a server from the address book the preset location is displayed To change the location select Keyboard and use the displayed keyboard Login Name Enter a log in name if required by the destination server If you select a server from the addr...

Page 116: ... authenticated eg User xyz really is user xyz will the feature be made available Address Book Use this feature to select a destination server from the Address Book Selecting a server causes the preset information to be entered into the entry fields Server Shared Name Save in Login Name and Password For information on how to register destinations refer to Address Book in the Setups chapter on page ...

Page 117: ...ng a 3 digit number e g 001 to the end of the current file name Overwrite Name and Save Overwrites the old file with the new file Clear Field Deletes the entered file name Change Settings Displays the screen keyboard to enter or revise the file name For more information on keyboard entry refer to Keyboard in the Fax Internet Fax chapter on page 81 Keyboard Use the screen keyboard to enter paramete...

Page 118: ... density of the scanned image in seven levels Use the scroll buttons to increase or decrease the darkness 2 Sided Originals Use this feature to specify whether the documents are single sided or double sided and how documents are to be positioned 1 Sided Scans single sided documents 2 Sided H to H Scans double sided documents opened side by side NOTE If you select this option the Original Orientati...

Page 119: ...ng screen 2 Select the required option 3 Select Save 1 Sided Scans single sided documents 2 Sided Scans double sided documents When you select this option Originals is displayed at the right of the screen Originals Head to Head Select to scan documents opened side by side Head to Toe Select to scan documents opened vertically Original Orientation Head to Top Select to position documents with the h...

Page 120: ...aphs are automatically identified and an appropriate quality mode is selected for individual areas Text Use for documents that contain text only Photo Use for documents that contain photographs only File Format Select the file format to save scanned data from the following options NOTE The selections for the feature are not displayed if you have selected Scan to Mailbox Multi page TIFF Saves multi...

Page 121: ...BasicScanning Xerox CopyCentre WorkCentre WorkCentre Pro 123 128 User Guide 121 JPEG Saves scanned data in JPEG format ...

Page 122: ...tab Lighten Darken Contrast Use this feature to specify brightness and density levels for scanning documents NOTE Contrast will be displayed if you select Grayscale on the Original Type screen 1 Select Lighten Darken Contrast on the Image Quality screen 2 Select the brightness or density level 3 Select Save Lighten Darken Specifies the brightness level for black and white documents Contrast Specif...

Page 123: ...123 Bound Originals page 124 Scan Size page 125 Mixed Size Originals page 126 Border Erase page 126 Reduce Enlarge page 127 1 Press the All Services button on the control panel 2 Select a scan type on the touch screen 3 Select the Scan Options tab Scan Resolution Use this feature to select the resolution for scanning the document The greater the resolution selected the larger the size of the store...

Page 124: ...e Scan Options screen 2 Perform the necessary operations 3 Select Save NOTE The facing pages of a bound document must be placed in a horizontal orientation on the document glass Off Disables the feature Left Page then Right Scans both pages of an open book from left to right Right Page then Left Scans both pages of an open book from right to left Top Page then Bottom Scans both pages of an open bo...

Page 125: ...nually specified using the custom option If Custom is used documents will be scanned according to the specified size regardless of their actual size 1 Select Scan Size on the Scan Options screen 2 Perform the necessary operations 3 Select Save Auto Size Detect Automatically detects the size of standard sized documents Presets Allows you to select from the 11 preset standard sizes in Portrait or La...

Page 126: ...re 1 Select Border Erase on the Scan Options screen 2 Perform the necessary operations 3 Select Save Normal Uses the default values for the edge or center area to be erased The default values are set in Variable Erase If you do not want to erase any edge and or center area select Variable Erase and then select 0 0 using the scroll buttons Variable Erase Allows you to adjust the edge or center area...

Page 127: ...re set up by the Key Operator Variable Allows you to specify an enlargement reduction ratio within the range of 25 to 400 Auto Automatically selects the enlargement reduction ratio depending on the size of documents and the Output Size set When you select this option Output Size is displayed at the right side of the screen Output Format This section describes how to configure the settings for outp...

Page 128: ...e compression level 3 Select Save Read Status MDN This feature allows you to request the recipients to notify you by e mail that they have received your e mail attachment NOTE The selections for this feature are displayed only when you have selected E mail 1 Select Read Status MDN on the Output Format screen 2 Select On to enable the feature 3 Select Save Split Send When sending data by e mail use...

Page 129: ...to use the name assigned by the machine NOTE The selection for this feature is displayed only when you have selected Scan to Mailbox 1 Select Document Name on the Output Format screen 2 Perform the necessary operations 3 Select Save For information on keyboard entry refer to Keyboard in the Fax Internet Fax chapter on page 81 Login Name Use this feature to set the login name for a job template ser...

Page 130: ...Network Scanning 1 Select Password on the Output Format screen 2 Perform the necessary operations 3 Select Save For information on keyboard entry refer to Keyboard in the Fax Internet Fax chapter on page 81 Meta Data Use this feature to change the value of the Document Management Field DMF if it is set up for the selected job template NOTE The selection for this feature is displayed only when you ...

Page 131: ...eet to process the stored documents manually and automatically For more information refer to Document List on page 132 Check Mailbox You can check print or delete documents in the private mailboxes displayed on the Check Mailbox screen Some mailboxes however may require you to enter a password depending on the operation you attempt Private mailboxes created by other users are inactive and inaccess...

Page 132: ... Deletes the selected document s Print Prints out the selected document s NOTE The documents stored in a private mailbox by scanning cannot be printed Job Flow Settings Displays the Job Flow Settings screen Job Flow Settings Screen This screen allows you to set modify or release linkage with a job flow sheet You can also execute the linked job flow sheet from this screen A job flow sheet allows yo...

Page 133: ...to execute are displayed on the screen NOTE In case of forwarding a document faxed or stored in the mailbox by E mail FTP or SMB it cannot be opened by the recipient if the File Format of the job flow sheet is set to JPEG 1 Select Job Flow Settings on the Document List screen NOTE To link a document to a job flow sheet select the required document on the screen 2 Perform the necessary operations 3...

Page 134: ...creen allows you to create or modify a job flow sheet 1 Select Create Change Link on the Job Flow Settings screen 2 Perform the necessary operations 3 Select Save Sheet Filtering Displays the Sheet Filtering screen Create Allows you to create a new job flow sheet Edit Delete Allows you to modify or delete an existing job flow sheet For more information on Create and Edit Delete refer to Job Flow S...

Page 135: ...e Job Flow Settings screen 2 Perform the necessary operations 3 Select Close Name Last Updated Select either of these options to sort the job flow sheets by their names or the dates they were last updated Selecting the same option again toggles the order in which they are listed as indicated with an upward ascending order or downward descending order triangle shown to the right of the name of the ...

Page 136: ...6 Check Mailbox 136 Xerox CopyCentre WorkCentre WorkCentre Pro 123 128 User Guide Edit Destination Refer to Job Flow Sheets in the Setups chapter on page 244 ...

Page 137: ...ces button on the control panel 2 Select Stored Programming on the touch screen 3 Select a job number to be executed 4 Change the settings as necessary 5 Press the Start button on the control panel NOTE On the Stored Programming screen only job numbers that have been programmed are active and selectable Stored Programming You can store up to 58 consecutive operations in each job number up to the t...

Page 138: ... Perform the necessary operations 5 Select Save Store Allows you to register a series of operations in a job number After selecting the required job number 1 to 40 perform a series of operations to be stored Then press the Start or Clear All button on the control panel to complete registering the operations in the job number Delete Clears the contents of a selected job number Select this button fo...

Page 139: ...e information refer to the CentreWare CD ROM Charge Print This feature allows you to store or cancel print jobs that failed authentication when the Authentication feature is enabled Authentication is required to print the stored documents For more information refer to Charge Print in the Job Status chapter on page 266 Secure Print This feature allows you to store a confidential document sent from ...

Page 140: ...ne as a logical printer which you can later select from your PC to print documents Logical printers can be created for PCL TIFF and PostScript using CentreWare Internet Services For more information refer to Properties in the CentreWare Internet Services chapter on page 158 Print Driver Features When you select the machine as the printer the associated print screen is displayed on the networked co...

Page 141: ...00 to 100 using the keyboard or slider bar You can check the outcome of a change in the setting using the picture quality image displayed on the left of the window Watermarks Makes settings for printing a watermark over a file Skip Blank Pages Does not print blank pages when printing documents that contain blank pages Draft Mode Prints the text and graphic in gray rather than black thus reducing t...

Page 142: ...er whose size is specified on the Paper Supply screen Auto Size 202 3 A3 4 Default A4 5 A5 14 B4 15 B5 21 8 5 14 22 8 5 13 23 Default 8 5 11 24 11 17 30 8K Sets the default paper size when the machine is set to select the paper size automatically Only available when Paper Tray is set to Auto The default value will be either 4 or 23 depending on the region of use Bypass Size 203 3 A3 4 Default A4 5...

Page 143: ... Clarendon Condensed 33 Coronet 34 Marigold 35 Arial 36 Arial Italic 37 Arial Bold 38 Arial Bold Italic 39 Times New 40 Times New Italic 41 Times New Bold 42 Times New Bold Italic 43 Symbol 44 Wingdings 45 Line Printer 46 Times Roman 47 Times Italic 48 Times Bold 49 Times Bold Italic 50 Helvetica 51 Helvetica Oblique 52 Helvetica Bold 53 Helvetica Bold Oblique 54 CourierPS 55 CourierPS Oblique 56 ...

Page 144: ...t size of a font in increments of 25 The value of 100 represents 1 point Font Pitch 210 600 2400 Default 1000 Specifies the pitch size of a font The value of 100 represents the pitch size of 1 Form Line 211 5 128 Default 64 or 60 Specify the number of lines on a page The default value will be 64 if the default value of the item 202 203 is 4 60 if the value for 202 203 is 23 Print Sets 212 1 999 De...

Page 145: ... sets 2 Side Print 402 0 Default Off 1 LEF Binding 2 SEF Binding Specifies which edge of paper is to be bound for double sided printing Print Mode 403 0 Default Standard 1 Fast 2 High Quality Selects the print mode Sort 404 0 Default Off 1 On Sets whether to enable sorting Paper Size 406 0 Auto 1 Default A4 Sets the paper size Password Enter a password up to 32 characters ...

Page 146: ...8 Print 146 Xerox CopyCentre WorkCentre WorkCentre Pro 123 128 User Guide ...

Page 147: ...This service must be installed and set up by the System Administrator prior to use For more information on installation and setups of the CentreWare Internet Services feature refer to the System Administration Guide Some of the CentreWare Internet Services features will have restricted access Contact the System Administrator for further assistance NOTE This feature is not available on a machine in...

Page 148: ...erator NOTE When your access to CentreWare Internet Services is encrypted enter https followed by the internet address instead of http Standard Features CentreWare Internet Services CentreWare Internet Services allows you to display configure and change the current status or settings of the machine through a web browser on a computer instead of the control panel of the machine Interface Options Th...

Page 149: ...to the required pages Refresh Status is also displayed on most pages For more information about each function refer to the following Services page 149 Jobs page 154 Status page 156 Properties page 158 Maintenance page 177 Support page 177 Services This page allows you to send jobs to the machine for printing or create change job templates to be saved on the machine from this screen Follow the step...

Page 150: ...ny template to a scan job retrieve the job template first on the machine To create or change job templates from this screen follow the steps below 1 Click the Services tab on the Header Panel of the CentreWare Internet Services home page 2 Select Job Templates 3 Click Display Job Template Screen 4 The Job Template page with the list of device templates is displayed 5 Select Template File Repositor...

Page 151: ...pe Enter the address of the server to transfer scanned data Port No NOTE This item will be displayed only when Private is selected for Repository Type Enter the port number Remote Path NOTE This item will be displayed only when Private is selected for Repository Type Enter the path where the scanned data will be transferred on the screen When SMB is selected in Protocols you can enter the name of ...

Page 152: ... TIFF Multi page TIFF or PDF will be displayed in the drop down menu If the Output Color is set to Grayscale TIFF Multi page TIFF JPEG or PDF will be displayed Image Quality Background Suppression Specify whether to enable background suppression on the scanned image Contrast Select the contrast of the scanned data You can select from five different levels in the drop down menu Lighten Darken Selec...

Page 153: ... be deleted To cancel the deletion click Cancel NOTE Only one template can be deleted at a time Apply Use to transmit to the machine new settings made using Internet Services The previous device settings will be replaced with the new settings If a configuration error occurs in one setting the settings before the error setting appear on the screen The settings after the error setting will remain un...

Page 154: ... below to select the features available on the Jobs tab 1 Click Jobs on the Main Panel of the home page 2 On the collapsible menu of the Menu Panel click Job List to view the list of active jobs or click Job History List then Job History to view the list of completed jobs Job List This page displays the list of active jobs being processed when you select Job List Details include the following File...

Page 155: ...ame Displays the name of the job Owner Displays the name of the client user who sent the job Job Status Displays the status of the job The status includes Completed Error Deleted Shutdown Cancelled and Unknown Job Type Displays the type of job Pages Displays the number of pages printed Output Destination Displays the output destination address document receipt number or name of the recipient serve...

Page 156: ...lick Delete Status This page allows you to check the status of the paper trays output trays and consumables of the machine The details displayed may differ from those shown on the touch screen of the machine Follow the steps below to select features available on the Status tab 1 Click Status on the Main Panel on the home page 2 Click the required feature on the collapsible menu of the Menu Panel G...

Page 157: ...ity is number 1 The greater the number the lower the priority Output Tray Trays Lists the available output trays NOTE Trays displayed will depend on the configuration Status Displays the status of the output tray NOTE If the output tray becomes full remove the stack from the output tray Consumables The consumables menu displays the status of the drum cartridge toner cartridge and the staple cartri...

Page 158: ... To select an item in the Security Port Settings Protocol Settings or Emulation Settings folder click on the left of the folder to open the item 3 To change settings use the drop down list box text boxes and check boxes on the page The default settings in the drop down list box are indicated with an asterisk 4 After changes have been made click Apply New Settings To cancel any changes you have mad...

Page 159: ...he System Administrator Machine E mail Address Enter the e mail address of the machine Comment Enter a comment on the machine Configuration Memory Displays the size of the memory installed amount of memory used for each protocol and the size of PostScript memory if installed Available Printer Language Lists the printer languages used by the machine and their versions Software Displays the version ...

Page 160: ...w Power Mode from user operation Sleep Mode Time Out Allows you to specify the time out period when the machine enters the Sleep Mode from the Low Power Mode Address Book Allows you to store or retrieve address information in the CSV format When storing the new Address Book as CSV format all previous addresses are replaced by the new ones Import Allows you to store address information in the machi...

Page 161: ...Date Displays the date and time of the document when it was stored in the mailbox Compression Format Displays the compression format of the document Pages Displays the number of pages in the document Type Displays the type of job of the document Retrieve Allows you to specify the retrieval method of the scanned document or the Internet Fax document in the mailbox Retrieve Page Specify whether to r...

Page 162: ...they reach specified expiration dates Number of Documents Displays the number of documents stored in the mailbox Display Job Flow Sheets List Document Order Allows you to select the order of job flow sheets displayed on the list Display Job Flow Sheets List Click this button to display the job flow sheets list Job Flow Sheets List Mailbox Number Display the mailbox number Sheet Type Displays the j...

Page 163: ... relay station Relay Station ID Broadcast Recipients Specify the relay station ID or destinations F Code Enter the F Code Password F Code Communication Enter the password for the F Code if required Send as Internet Fax Name Displays the name of the job flow sheet Recipient Name 1 10 Enter the recipient s name Recipient Address 1 10 Enter the recipient s e mail address Comment Enter the comment to ...

Page 164: ...otocol Port Number Specify the port number Certificate Management Lists the certificate information assigned to the machine Subject Displays the subject for the certificate Issuer Displays the issuer of the certificate Serial Number Displays the serial number of the certificate Size of Public Key Displays the size of the public key assigned to the certificate Valid From Displays the date when the ...

Page 165: ... specify the number of rejections before sending an e mail notice to users whose IP address is not allowed Domain Reject Frequency Allows you to specify the number of rejections before sending an e mail notice to users whose domain is not allowed Next Notice Date Displays the date on which the next notice will be sent Mail Recipient Settings Recipient Mail Address Allows you to specify up to three...

Page 166: ...out user IDs Account Number Specify the account number and click the Edit button to change account user information Auditron User Account Settings Account Number Displays the specified account number User Name Enter the user name User ID Enter the user ID Password Enter the password for the user ID Card ID Enter the card ID for the user Black Print Limit Specify the impression limit for printing B...

Page 167: ... protocol select the check box of UDP and or IPX IPP Allows you to select the check box to enable Port9100 Allows you to select the check box to enable UPnP Allows you to select the check box to enable FTP Client Allows you to select the check box to enable Receive E mail Allows you to select the check box to enable Mail Notice Service Allows you to select the check box to enable Internet Services...

Page 168: ...USB port settings Auto Eject Time Allows you to specify the time when the paper will be automatically ejected from the printer if no data are sent to the printer Adobe Communication Protocol Only displayed when PostScript is enabled Select one of the following options Normal Select this when the communication protocol is in the ASCII format Binary Select this when the communication protocol is in ...

Page 169: ...ber of searches Enter the maximum number of searches Password Enter the print server PServer password Re enter Password Allows you to verify the PServer password by re entering the same password TBCP Filter This is only displayed when PostScript is enabled NDS Configure the NDS settings Tree Name Enter the tree name Context Name Enter the context name of the Print Server Object Up to 511 character...

Page 170: ...rmat DNS Allows you to configure DNS settings as follows Get DNS Address Allows you to enable or disable the automatic setting of the DNS server address via DHCP DNS Address 1 3 Enter the DNS address 1 DNS address 2 and DNS address 3 in the xxx xxx xxx xxx format DNS Name Enter the DNS domain name Generate Domain Search List Automatically Allows you to enable or disable the automatic setting to ge...

Page 171: ... connection time out period when transmission fails SNMP Allows you to configure the following options when accessing the printer via SNMP Community Name Read Only Enter the community name used for display Community Name Read Write Enter the community name for display and update Community Name Trap Notification Enter the trap notification community name System Administrator Enter the name of the S...

Page 172: ...atically Maximum E mail Size Allows you to specify the maximum e mail size Max No of pages for Split Send Allows you to set the size of outgoing e mail in pages Response to Read Status MDN Select whether to send a confirmation to MDN POP3 Server Address Enter the POP3 server address Up to 128 characters can be entered including periods and hyphens POP3 Port Number Specify the POP3 port number POP ...

Page 173: ... SSDP protocol settings as follows Valid Advertising Period Specify the time during which the advertising period remains valid Maximum TTL Specify the maximum TTL LDAP Allows you to configure the LDAP protocol settings as follows LDAP Server Address Enter the LDAP server address Port Number Specify the LDAP port number Emulation Settings Print Mode Allows you to specify the type of printer languag...

Page 174: ...lows you to specify the resolution Bypass Tray Wait User Allows you to specify whether to enable disable this feature when the Tray 5 Bypass is selected TIFF Allows you to configure the settings when TIFF is enabled Logical Printer Number Enter the logical printer number and click the Edit button Memory Settings Allows you to select a memory setting when the machine is switched off on Document Siz...

Page 175: ... Bypass Allows you to select the paper size for Tray 5 Bypass Output Destination Allows you to select the destination for your output Quantity Allows you to specify the number of sets to print between 1 and 999 2 Sided Print Allows you to select whether to print both sides of paper Image Orientation Allows you to select the image orientation Form Lines Allows you to specify the page length printin...

Page 176: ...int page buffer text box will be blank and the value cannot be updated Off Enter a value between 64 KB and 1024 KB in 32 KB increments NetWare Enter the print page buffer of NetWare between 64 KB and 1024 KB in 32 KB increments LPD Allows you to select the spool destination for the job Memory Enter a value between 512 KB and 32 MB 32768 KB in 256 KB increments Hard Disk The print page buffer text ...

Page 177: ...formation is displayed in the form of xxx yyy Support This page displays the link to the customer support website The name for the link displayed on the screen and the URL for the customer support website can be changed NOTE The customer support website will not be displayed if the machine is not connected to Internet Changing the Settings Click Change Settings enter the new name and URL for the w...

Page 178: ...9 CentreWare Internet Services 178 Xerox CopyCentre WorkCentre WorkCentre Pro 123 128 User Guide ...

Page 179: ...aper jams may occur For information on configurable paper sizes and media types for each tray refer to Supported Paper Sizes and Types on page 183 For information on the acceptable range of paper sizes and capacity for each tray refer to Paper Supply in the Specifications chapter on page 339 Preparing Paper for Loading Before loading paper into the paper trays fan the edges This procedure separate...

Page 180: ...more information on reprogramming the tray contact the Key Operator 3 Load the paper neatly and tightly against the left hand side of the tray NOTE Do not load paper above the maximum fill line NOTE When making single double sided copies on perforated paper load the paper so that the opposite side to the perforations feeds first Feeding the perforated edge first may cause paper jams 4 If the paper...

Page 181: ...chapter on page 50 NOTE To reduce unnecessary fuser and paper jams it is important that the programmed paper size and type is identical to the paper stock loaded 1 Load the paper neatly into the bypass tray making sure that the paper stock is in the center of the tray NOTE Do not load paper above the maximum fill line NOTE When making single double sided copies on perforated paper load the paper t...

Page 182: ...ition When printing and the active tray runs out of paper When the paper size sensed differs from the previously determined size When paper feeding starts and the selected tray is open When paper feeding starts and the selected tray malfunctions NOTE The bypass tray cannot be used with Auto Tray Switching NOTE Key Operator access is required to set target trays and priorities For more information ...

Page 183: ...ule and the finisher NOTE For the capacity of each tray refer to the Specifications chapter Standard Sizes NOTE The standard sizes of paper that can be detected vary depending on the paper size table specified by the Key Operator For information on setting the paper size table refer to Paper Size Settings in the Setups chapter on page 198 Paper Size Dimensions mm LEF SEF Tray 1 2 Tray 3 4 Two Tray...

Page 184: ... 4 228 6 LEF X X O O X 16K 194 0 267 0 SEF X X O O X LEF O X O O O 8K 267 0 388 0 SEF O X O O O Postcard 100 0 148 0 LEF X X O X X Prepaid Postcard 148 0 200 0 SEF X X O X X 4 6 101 6 152 4 SEF X X O O X LEF X X O X X Photo 2L 5 7 127 0 177 8 SEF X X O O X Youkei 0 Envelope 120 0 235 0 LEF X X O X X Commercial 10 Envelope 104 8 241 3 LEF X X O X X Monarch Envelope 98 4 190 5 LEF X X O X X DL Envel...

Page 185: ...izes Paper Size Tray 1 2 Tray 3 4 Two Tray Module Tray 3 4 TTM Tray 5 Bypass Duplex Module Finisher Width 140 to 297 mm 5 5 to 11 7 Not Available 89 to 297 mm 3 5 to 11 7 89 to 297 mm Not Available Length 182 to 432 mm 7 2 to 17 0 99 to 432 mm 3 9 to 17 0 127 to 432 mm for Tray 5 Bypass 182 to 432 mm for Tray 1 4 ...

Page 186: ...r LEF If loading the paper SEF printed quality may be negatively affected Lightweight If you select Lightweight the machine lowers the temperature of the fuser unit when printing Select this option when paper curls or other pritning problems occur due to high temperature in the fuser unit when it sets toner on the paper Heavyweight Depending on heavyweight paper the machine cannot load Short Edge ...

Page 187: ...g the System Settings Mode 1 Press the Log In Out button on the control panel 2 Enter the correct user ID using the numeric keypad on the control panel or the screen keyboard For information on keyboard entry refer to Keyboard in the Fax Internet Fax chapter on page 81 NOTE The default Key Operator ID is 11111 If the Authentication feature is enabled you may be also required to enter a password Th...

Page 188: ...n refer to the following Common Settings page 188 Copy Mode Settings page 202 Network Settings page 209 Print Mode Settings page 217 Scan Mode Settings page 221 Fax Mode Settings page 226 E mail Internet Fax Settings page 235 Mailbox Settings page 240 Application Communication Settings page 241 1 Select System Settings on the System Settings screen 2 Select the required option 3 Select Close Commo...

Page 189: ...witch between screens 3 Perform the necessary operations 4 Select Close Date Set the current date You can select from three date formats Y M D M D Y and D M Y The date set here is printed on lists and reports Time Set the current time You can select a 12 or 24 hour display format If you select 12 Hour Clock the buttons for specifying AM or PM are displayed The time set here is printed on lists and...

Page 190: ... On Auto Job Release With this feature enabled if a problem such as a paper jam interrupts the current copy or scan job and is not resolved within the selected period of time the machine allows execution of the next job You can select the time period in the range from 4 to 99 minutes The time entry field appears only when you select On Auto Print With this feature enabled the machine allows execut...

Page 191: ...ne Select the volume level of the tone generated when an inappropriate button on the control panel is pressed Machine Ready Tone Select the volume level of the tone generated when the machine becomes ready to copy or print for example after the power is switched on Copy Job Complete Tone Select the volume level of the tone generated when copying finishes successfully Non Copy Job Complete Tone Sel...

Page 192: ...the tone generated just before the machine performs auto clear Base Tone Select the volume level of the base tone generated when you toggle settings The machine emits a base tone when it exits the interrupted mode Screen Defaults This feature allows you to customize the initial screen and select the initial language to be displayed on the touch screen 1 Select Screen Defaults on the Common Setting...

Page 193: ...ating to paper supply Paper Type Specify the type of paper to be loaded in Tray 1 Tray 2 and Tray 5 Bypass Trays 3 and 4 can also be set up when these optional trays are fitted Paper Size Specify whether the size of paper loaded in Tray 1 to 2 Trays 3 and 4 can also be set up when these optional trays are fitted is to be automatically identified by the machine as one of the standard paper sizes or...

Page 194: ... Select from paper sizes in A and B series formats Inch Size Select from paper sizes presented in inches Others Select from other sizes such as postcards and envelopes Variable Size Specify the height and width of paper using the scroll buttons Auto Tray Switching Specify this option to enable Auto Tray Switching For more information on Auto Tray Switching refer to Auto Tray Switching in the Paper...

Page 195: ...s become more easily recognizable as text If you select More Photo halftone images on newspapers and flyers become more easily recognizable as photos Image Enhancement Specify whether or not to perform smoothing on print data for copy and fax jobs This will give smoother images on printed paper Reports Use this feature to specify how reports are to be automatically printed 1 Select Reports on the ...

Page 196: ...ailbox in the Fax Internet Fax chapter on page 97 Broadcast Multi Poll Report Specify whether to automatically print a Broadcast Multi Poll Report for fax jobs A Broadcast Multi Poll Report shows the results of transmissions and polling requests to multiple remote machines Relay Broadcast Report Specify whether to automatically print a Relay Broadcast Report for fax jobs A Relay Broadcast Report s...

Page 197: ...te initialization After the initialization finishes select Confirm NOTE This process may take a while depending on the machine configuration Delete All Data Use this feature to delete all document data on the machine Select Delete All Data and then select Start Then select Yes to execute deletion After the deletion finishes you need to switch the machine off and then on NOTE This process may take ...

Page 198: ...nt job This allows you to identify the start of each set or job Extended Tray Module Select the type of the Extended Tray Module used If the optional finisher is installed select Offset Stacking Module Default Print Paper Size Specify the paper size to be used as the initial setting Odd Page 2 Sided Select whether to add a blank page to a document that contains an odd number of pages to print it a...

Page 199: ...EF Letter 215 9 279 4 O O O 1 O 1 O O O 8 5 11 LEF Letter 279 4 215 9 O O O O O 1 O 1 O O O 8 5 13 SEF Legal 215 9 330 2 O O O O 8 5 14 SEF Legal 215 9 355 6 O O B4 SEF 257 0 364 0 O O O O O O 1 O 1 O 1 16K SEF 194 0 267 0 O 16K LEF 267 0 194 0 O O 1 O 1 8K SEF 267 0 388 0 O O 1 O 1 A3 SEF 297 0 420 0 O O O O O O O O O O 11 17 SEF 279 4 431 8 O O O O O 1 O 1 O O O 7 25 10 5 SEF Executive 184 2 266...

Page 200: ...Series A B Series 8 x 13 A B Series A B Series 8K 16K A B Series 8 x 13 8 x 14 Inch Series A5 SEF 148 0 210 0 O O O O A5 LEF 210 0 148 0 5 5 8 5 LEF 215 9 139 7 5 5 8 5 SEF 139 7 215 9 O B5 SEF 182 0 257 0 O O O O O B5 LEF 257 0 182 0 O O O O O O A4 SEF 210 0 297 0 O O O O O A4 LEF 297 0 210 0 O O O O O O O O O O 8 5 11 SEF Letter 215 9 279 4 O O O O O 8 5 11 LEF Letter 279 4 215 9 O O O O O O O O...

Page 201: ...h screen to be held pressed for fast scrolling 7 25 10 5 LEF Executive 266 7 184 2 O O O O C4 Envelope SEF 229 0 324 0 C5 Envelope LEF 229 0 162 0 C5 Envelope SEF 162 0 229 0 Commercial 10 Envelope LEF 241 3 104 8 DL Envelope LEF 220 0 110 0 Monarch Envelope LEF 190 5 98 4 Youkei 0 Envelope LEF 235 0 120 0 A6 SEF 105 0 148 0 A6 LEF 148 0 105 0 Postcard SEF 100 0 148 0 Postcard LEF 148 0 100 0 4 6 ...

Page 202: ...ke it effective Note that all data corresponding to the encoding then will be initialized NOTE Encrypted data cannot be recovered if a problem occurs in the hard disk Software Download Specify whether the machine is to allow software downloads Country Specify the country code for the line type used in your area NOTE When setting up Fax options users in European countries and North American countri...

Page 203: ... allocation allows you to select easily the paper trays you frequently use with the exception of Tray 3 and 4 of the optional TTM Reduce Enlarge 3rd 4th Button Sets the display contents on the third to fourth rows of magnification buttons shown in Reduce Enlarge on the Basic Copying screen This allocation allows you to select easily the reduction enlargement ratios you frequently use The preset va...

Page 204: ...anged For more information refer to Reduce Enlarge Presets on page 208 Original Type Sets the default for the Original Type feature on the Image Quality screen Lighten Darken Sets the default for the Lighten Darken feature on the Image Quality screen Sharpness Sets the default for the Sharpness feature on the Image Quality screen Auto Exposure Sets the default for the Auto Exposure feature on the ...

Page 205: ...configured to perform double sided copies you can set the default position of Side 2 in the Margin Shift feature on the Scan Options screen Image Rotation Sets the default for the Image Rotation feature on the Scan Options screen Image Rotation Direction Sets the default for the image rotation direction when you select Always On or On during Auto with the Image Rotation feature on the Scan Options...

Page 206: ...orm the necessary operations 4 Select Close Memory Full Procedure If the hard disk becomes full while reading documents a message asking how to process the data read up to that point is displayed You can predefine a processing method to be performed after the message has been displayed for a specified period If you select Cancel Job the data will be discarded If you select Run Job the data read up...

Page 207: ... Date Position on Side 2 Sets whether to position the date in the same position on each side of the paper when printing on both sides of the paper This is when you use Date in the Annotation feature on the Output Format screen Page Number Position on Side 2 Sets whether to position page numbers in the same position on each side of the paper when printing on both sides of the paper This is when you...

Page 208: ...ll buttons within the ranges of 15 297 mm 0 6 11 7 inches for width and 15 432 mm 0 6 17 0 inches for length Reduce Enlarge Presets Use this feature to preset magnification buttons These are displayed when you select Preset in the Reduce Enlarge feature on the Basic Copying screen If you predefine frequently used magnifications the original can be expanded or reduced quickly and easily The Reduce ...

Page 209: ...mail Address Host Name page 213 POP3 Server Settings page 214 SMTP Server Settings page 215 Domain Filter page 216 Remote Authentication Server Settings page 216 Other Settings page 217 1 Select Network Settings on the System Settings screen 2 Select the required option 3 Select Close Port Settings This feature allows you to set print mode port status communication mode auto eject time for each co...

Page 210: ...tion protocol is in the ASCII format Binary Select this option when the communication protocol is in the binary format Depending on the data the print job may be completed faster than Standard TBCP Select this option to switch the specific control codes when the communication protocols involve both ASCII and binary formats Bi directional Communication Select whether to enable the bi directional co...

Page 211: ... this option to switch the specific control codes when the communication protocols involve both ASCII and binary formats LPD Use this feature to specify whether to enable the LPD port NetWare Use this feature to specify whether to enable the NetWare port SMB Use this feature to specify whether to enable the SMB port IPP Use this feature to specify whether to enable the IPP port EtherTalk Use this ...

Page 212: ... the Internet Services port Internet Services Port Number Specify the port number for Internet Services from 0 80 or any port from 8000 to 9999 Protocol Settings This feature allows you to configure the machine settings that correspond with the protocol being used 1 Select Protocol Settings on the Network Settings screen 2 Perform the necessary operations 3 Select Close Ethernet Setting Specify th...

Page 213: ...unication HTTP SSL TLS Port Number Allows you to enter the port number for the SSL TLS communication within the range of 443 8000 9999 Machine E mail Address Host Name This feature allows you to set e mail address host name or domain name for the machine 1 Select Machine E mail Address Host Name on the Network Settings screen 2 Perform the necessary operations 3 Select Close E mail Address Allows ...

Page 214: ...POP3 Server Name Allows you to enter the POP3 server name in the style of FQDN within a maximum of 64 characters This entry is required only when selecting By Server Name on the POP3 Server Setup screen POP3 Server Port Number Allows you to enter the port number for the POP3 server communication within the range of 1 65535 POP3 Server Check Interval Allows you to enter the interval to poll the POP...

Page 215: ...acters This entry is required only when selecting By Server Name on the SMTP Server Setup screen SMTP Server Port Number Allows you to enter the port number for the SMTP server communication within the range of 1 65535 E mail Send Authentication Allows you to specify the authentication method for the SMTP server communication If you select POP before SMTP the POP server authentication is required ...

Page 216: ...names to be restricted or permitted according to the selection on the Domain Filtering Remote Authentication Server Settings This feature allows you to set up the external authentication server settings 1 Select Remote Authentication Server Settings on the Network Settings screen 2 Perform the necessary operations 3 Select Close Authentication System Allows you to select the remote authentication ...

Page 217: ...ing protocol from either SMTP or POP3 1 Select Other Settings on the Network Settings screen 2 Perform the necessary operations 3 Select Close E mail Receive Protocol Allows you to select the protocol for receiving e mail Print Mode Settings This screen allows you to change the default settings for the printer configuration For more information refer to the following NOTE Key Operator access is re...

Page 218: ... range of 64 1 024 KB in 32 KB increments using the scroll buttons The currently available memory will be displayed at the top of the screen with the following message Memory Available XXX MB Receiving Buffer USB Allows you to change the input buffer memory capacity for USB interface within the range of 64 1 024 KB in 32 KB increments using the scroll buttons The currently available memory will be...

Page 219: ...KB in 32 KB increments using the scroll buttons Memory Allows you to change the memory capacity within the range of 0 50 32 00 MB in 0 25 MB increments using the scroll buttons Hard Disk Specifies the spool location to the hard disk Receiving Buffer IPP Spool Allows you to change the input buffer memory capacity for IPP interface The currently available memory will be displayed at the top of the s...

Page 220: ...you select Normal the printable area excludes a margin 4 1 mm wide along all four edges of paper If you select Extended the printable area is extended to leave about 2 mm of margin along the edges Substitute Tray Sets the substitute tray when the machine cannot detect the paper tray corresponding to the document size with the auto paper selection Display Message A message requesting paper supply i...

Page 221: ...se the DMS Deferred Media Selection feature of PostScript PostScript Font Absence Sets to replace the font automatically and continues the print job when the required font is not found NOTE This feature is available only when PostScript is loaded PostScript Font Substitution Sets whether to use ATCx for font replacement NOTE This feature is available only when PostScript is loaded Scan Mode Settin...

Page 222: ...cify the default file format for saving scanned data Lighten Darken Specify the default density for scanning documents Contrast Specify the default contrast for scanning documents Sharpness Specify the default for the sharpness level of fine lines and edges Auto Exposure Specify the default for suppressing the background color of documents Original Orientation Specify the default orientation of do...

Page 223: ... 0 to 50 mm 0 to 2 0 inches Center Erase Specify the center width to be erased Select the width in the range from 0 to 50 mm 0 to 2 0 inches using the scroll buttons or the numeric keypad on the control panel Image Compression Specify the default for compressing scanned data Scan to FTP SMB Defaults Use this feature to configure or change the default settings for scanning and sending documents to ...

Page 224: ...rds and envelopes Variable Size Specify the height and width using the scroll buttons Output Size Defaults Use this feature to configure or change the output size buttons displayed when Auto is selected on the Reduce Enlarge screen under the Scan Options tab 1 Select Output Size Defaults on the Scan Mode Settings screen 2 Use the scroll buttons to switch between screens 3 Perform the necessary ope...

Page 225: ... from 25 to 400 in 1 increments Other Settings Use this feature to configure or change other machine settings specific to the scan features 1 Select Other Settings on the Scan Mode Settings screen 2 Use the scroll buttons to switch between screens 3 Perform the necessary operations 4 Select Close Scan Service Specify whether to enable the scanner to function Memory Full Procedure If the hard disk ...

Page 226: ...you to change the default settings for the fax mode There are eight main setup options available For more information refer to the following Screen Defaults page 226 Fax Defaults page 227 Fax Control page 228 File Destination Output Destination page 231 Reduce Enlarge Presets page 232 Scan Size Defaults page 232 Local Terminal Information page 233 Internet Fax Control page 234 1 Select Fax Mode Se...

Page 227: ...ult for each fax feature The default set here returns when the power is switched on power saver mode is cancelled or the Reset button is pressed If you set a default for the functions you frequently use you can quickly send documents without changing the settings each time The Fax Defaults screen consists of multiple pages 1 Select Fax Defaults on the Fax Mode Settings screen 2 Use the scroll butt...

Page 228: ...end Options screen NOTE Although TIFF S can be received by any remote machine supporting Internet Fax TIFF F and TIFF J may not be received When you set to TIFF F or TIFF J check the capability of the remote machine in advance Fax Control Use this feature to conduct operational control of the various fax features The Fax Control screen consists of multiple pages 1 Select Fax Control on the Fax Mod...

Page 229: ...time Batch Send Sets whether to send up to four pending documents automatically to an identical destination with a single phone call thereby reducing telephone charges Manual Send Receive Default Sets the default for whether the Manual Receive or Manual Send button is to be selected when you use the On Hook feature on the On Hook Others screen Fax Receiving Mode Sets the default for fax reception ...

Page 230: ...l Border Erase Left Right Sets the margin on the left and right of the received document by cutting off the original image You can set the margins within the range of 0 20 mm 0 0 8 inches using the scroll buttons or the numeric keypad on the control panel Reduce 8 5 11 SEF Original to A4 SEF Sets whether a 8 5 11 0 inches 216 279 mm size document is to be reduced to the A4 size when Reduce Enlarge...

Page 231: ...se the scroll buttons to switch between screens 3 Perform the necessary operations 4 Select Close File Destination Line Setup You can specify the mailbox for storing received documents from this screen By selecting an item and Change Settings you can enter the following screens Up to 200 mailboxes can be registered Line 1 Allows you to enter the mailbox number and its password to specify the mailb...

Page 232: ... Select Close R E Preset 1 7 Allows you to assign your choice of magnifications to each of the seven buttons within the range of 50 400 Preset Allows you to select a magnification ratio from 23 options Variable Allows you to specify a magnification ratio using the scroll buttons within a range of 50 400 Scan Size Defaults Use this feature to set document size presets These are displayed when you u...

Page 233: ... The Local Terminal Information screen consists of multiple pages 1 Select Local Terminal Information on the Fax Mode Settings screen 2 Use the scroll buttons to switch between screens 3 Perform the necessary operations 4 Select Close Local Name Registers the local name so that the remote machine can identify your machine Up to 20 characters can be entered using the screen keyboard on the touch sc...

Page 234: ...ations 4 Select Close Broadcast Internet Fax Profile Sets the default for the profile of Internet Fax for broadcasting For more information on Internet Fax profile refer to Internet Fax Profile on page 228 NOTE Although TIFF S can be received by any remote machine supporting Internet Fax TIFF F and TIFF J may not be received When you set to TIFF F or TIFF J check the capability of the remote machi...

Page 235: ...Internet Fax address of the machine and quantity will be added at the top of each page of the document Fax Transfer Maximum Data Size Sets the maximum data size when you forward a received e mail to remote machines as a fax document You can set the size within the range of 1 to 65535 KB by using the scroll buttons If On is selected and you attempt to forward a received e mail with a larger data si...

Page 236: ...ect just the person or group you want and return just the information you want LDAP servers also provide authentication service so that only authenticated users can access the LDAP server However most LDAP servers do not require authentication Use this feature to configure or change various settings for searching required addresses through the address book saved in a connected directory server 1 S...

Page 237: ...rectory server s up to 256 characters Password Specify a password for accessing the directory server s up to 32 characters Search Root Entry DN Distinguished Name Specify a search start point up to 256 characters Scope of Search from Root Entry Specify how far searching is to be performed relative to the specified start point Options are Root Entry only One level below Root Entry All levels below ...

Page 238: ...dress Book when E mail is selected For more information refer to Address Book on page 247 Attribute Type of Custom Item 2 Specify the attribute type of auxiliary search parameter 2 Attribute Name of Custom Item 2 Specify the attribute name of auxiliary search parameter 2 The name specified here will be displayed on the Address Book when E mail is selected For more information refer to Address Book...

Page 239: ...t to restrict the size of scanned data to be sent as e mail attachments If you select On then select the maximum size of data in the range from 50 to 65535 KB Maximum Address Entries Specify the maximum total number of To Cc and Bcc recipients of a single e mail Select the number in the range from 1 to 100 Auto Print Error Mail Specify whether to print error notification mails automatically when e...

Page 240: ...Select Mailbox Settings on the System Settings screen 2 Perform the necessary operations 3 Select Close Document Expiry Date Use this feature to discard documents from mailboxes when the specified period of time elapses Specify how long documents should be held up to 14 days and at what time they should be discarded Documents Retrieved By Client Use this feature to specify an option for discarding...

Page 241: ... change the status of the SOAP port used to communicate with external applications provided by our company For more information refer to the following SOAP Port Status page 241 1 Select Application Communication Settings on the System Settings screen 2 Select the required option 3 Select Close SOAP Port Status Use this feature to specify whether to enable the SOAP port ...

Page 242: ...ture to create mailboxes for saving confidential incoming fax documents or scanned documents Fax documents in mailboxes can be printed out at a convenient time and scanned documents in mailboxes can be imported to computers 1 Select Mailbox on the Setup Menu screen 2 Select a mailbox number under which a new mailbox is to be registered 3 Select Create Delete 4 Select the required option NOTE If yo...

Page 243: ...to print out or delete any document in the mailbox Delete Document After Retrieval Specify whether or not to discard documents in the mailbox after they are printed out or retrieved or after they are transferred and printed out through a job flow sheet Delete Documents with Expiry Date Specify whether or not to enable the function that discards documents in the mailbox when the preset time or peri...

Page 244: ...s how scanned documents or documents in the mailboxes are to be processed Job flow sheets are categorized by the following created outside and stored on the machine created and stored on the machine and created on the machine and stored on an external server Use this feature to create or modify a job flow sheet You can program job flow sheets with the following processing To fax documents To send ...

Page 245: ...ltering is applied to the job flow sheets When logged in with a particular user ID Job flow sheets owned by users other than the logged in user are not displayed Shared Sheets Administrator Displays all the job flow sheets except for those owned by the logged in user or other users Personal Sheets Displays job flow sheets owned by the logged in user Without log in Job flow sheets owned by particul...

Page 246: ...the settings of registered destinations You can register up to 100 destinations Send as Internet Fax Displays the screen for registering Internet Fax destinations or changing the settings of registered destinations You can register up to 100 destinations Send as E mail Displays the screen for registering e mail destinations or changing the settings of registered destinations You can register up to...

Page 247: ...he previous addresses are replaced by the new ones NOTE Address Numbers registered for the Address Book can be used as speed dial codes NOTE Addresses may be specified in two different modes the User mode may be utilized to allow the general user to add or delete specific addresses To add delete addresses press the All Services button on the control panel scroll down to and select Setup Menu then ...

Page 248: ... Auto F4800 and G4 Auto G3 Auto Resolution Select a resolution level to be used for transmission from among Panel Standard Fine Superfine 400dpi and Superfine 600dpi With Panel selected the resolution level selected on the control panel is used Panel Cover Note Specify whether or not to attach a Cover Note If you select On then select a comment for a recipient and or a sender NOTE Unless registere...

Page 249: ... of user accounts for fax jobs during nighttime No Billing Billing Midnight Specify whether to enable billing of user accounts for fax jobs during midnight No Billing Item Description Default E mail Address Enter an e mail address up to 128 characters Recipient Name Enter a recipient name up to 18 characters Index Enter a single alphanumeric character to use as a keyword for searching the Address ...

Page 250: ... Internet Fax Profile Select an Internet Fax profile from among TIFF S TIFF F and TIFF J An Internet Fax profile is an agreement between transmitting and receiving Internet Fax machines that limit image resolution paper size and other attributes TIFF S Item Description Default ...

Page 251: ...information refer to Attribute Name of Custom Item 1 on page 238 Custom Item 2 Enter supplemental information such as a company or department name up to 40 characters NOTE This item can be renamed on the Address Search Directory Service screen For more information refer to Attribute Name of Custom Item 2 on page 238 Custom Item 3 Enter supplemental information such as an address up to 60 character...

Page 252: ...he numeric keypad on the control panel 5 Select Add NOTE You can use an asterisk to specify multiple Address Numbers at a time If you enter 01 Address Numbers from 010 to 019 are specified If you enter all the Address Numbers are specified NOTE To delete a registered Address Number in a group enter the Address Number and then select Delete Shared Name SMB Only Enter a name assigned for sharing a f...

Page 253: ...m the necessary operations 3 Select Close Tray 1 5 Bypass Sets the paper type loaded in each tray System Administrator Settings This feature allows you to customize many settings on the machine to suit your particular requirements The machine enters the Key Operator mode only when a correct System Administrator Login ID is entered Before shipment the default System Administrator Login ID is set to...

Page 254: ... numeric keypad on the control panel or select Keyboard to display the screen keyboard 4 Select Next 5 Enter the same System Administrator Login ID as you entered in step 3 6 Select Save System Administrator Password Use this feature to change the default System Administrator Password Program a new password between 4 and 12 alphanumeric characters including spaces 1 Select System Administrator Pas...

Page 255: ... the total number of copies faxes scanned pages and prints for each account When the Auditron feature is active users need to enter a correct user ID or both user ID and password in order to use the machine Using entered user IDs the Auditron identifies different accounts and tracks jobs done with each account The Login Setup Auditron Administration screen allows you to start configuring various A...

Page 256: ...reen keyboard You can enter up to 32 alphanumeric characters including spaces as a user ID User Name Allows you to enter a user name using the screen keyboard You can enter up to 32 alphanumeric characters including spaces as a user name Password Allows you to enter a password using the screen keyboard You can enter 4 to 12 alphanumeric characters NOTE The Password button also appears if you have ...

Page 257: ...Account Clears all settings and data for the selected account Reset User Accounts Use this feature to reset the parameters set for all users accounts and clear all data tracked by the machine 1 Select Reset User Accounts on the Login Setup Auditron Administration screen 2 Select the required option 3 Select Close All User Accounts Clears all parameters of all accounts All Account Limits Clears the...

Page 258: ... Details Setup Use this feature to configure the settings for user ID authentication 1 Select User Details Setup on the Login Setup Auditron Administration screen 2 Perform the necessary operations 3 Select Save User ID Characters Displays the screen keyboard Enter a name to be displayed on the touch screen the browsing screen of the CentreWare Internet Services or printed on reports instead of a ...

Page 259: ...tions 3 Select Close Receive Control Allows you to specify the receiving control for externally submitted jobs According to Print Auditron The receiving control depends on the setting made on the machine The Job Login Failure options are displayed Save All Saves all jobs to be received Job Login Failure Specifies how to treat the print jobs with a user ID or password authentication failure If you ...

Page 260: ...nts using the numeric keypad on the screen Remote Login Setup This feature allows you to configure the authentication settings for scan services which utilize the network resources with the exception of the Scan to Mailbox service The available authentication service is Kerberos 1 Select Remote Login Setup on the Login Setup Auditron Administration screen 2 Select the required option 3 Select Save...

Page 261: ...he authentication settings for services requested through a network Off Disables the authentication feature Local Machine Access Enables the authentication feature User registration can be performed using the touch screen or the PC application If authentication is enabled all corresponding services need to be authenticated You can respectively turn off the authentication as required Network Access...

Page 262: ...e Mailbox Access Displays the Mailbox Access screen On this screen you can specify whether to perform authentication when an attempt is made to print out or retrieve documents stored in mailboxes Password Specify whether to require password entry at the time of authentication ...

Page 263: ...ob will be displayed at the top of the list It can also check delete or print various special printings or the documents in the public mailbox of the machine Use the scroll buttons to switch between screens For more information on each button refer to the following Current and Pending Jobs page 264 Completed Jobs page 265 Stored Documents page 266 1 Press the Job Status button on the control panel...

Page 264: ... Terminal Contents Displays the name of the recipient for a fax job the paper size for a copy job or the box number for a scan job etc Progress Displays the current and total number of pages in a job that is printing scanning sending or receiving Job Screen Use this feature to select a job from the list to display detailed information on the job or to promote delete it The content of the screen an...

Page 265: ...to display detailed information on the next screen The contents of each screen may differ depending on the type or status of the job 1 Press the Job Status button on the control panel 2 Select the Completed Jobs tab 3 Use the scroll buttons to switch between screens Doc No Job Type Identifies each job by job number and type Status Displays the status of the job such as completed cancelled shutdown...

Page 266: ...e 268 Delayed Print page 268 Public Mailbox page 269 1 Press the Job Status button on the control panel 2 Select the Stored Documents tab 3 Select the required option Charge Print The print jobs that failed authentication i e a wrong user ID and or password was entered in the print driver when the Authentication feature is enabled are stored or cancelled as specified in Charge Print Settings If th...

Page 267: ...rint or delete the stored document A user ID and a password can be specified from the print driver 1 Select Secure Print on the Stored Documents screen Refresh Brings the information up to date Go to Use this field to specify the Secure Print number to be displayed at the top of the screen You can set the number within the range of 1 to 200 using the scroll buttons Document List Displays the passw...

Page 268: ...the screen You can set the number within the range of 1 to 200 using the scroll buttons Document List You can select a user ID from the list and this option to display the documents for the user ID specified in the print driver Use the following options to output or delete the documents Select All Selects all documents in the list Print Prints a document selected in the list After printing the doc...

Page 269: ...firm output or delete the documents in a public mailbox on the machine For more information refer to Save in Public Mailbox in the Fax Internet Fax chapter on page 101 1 Select Public Mailbox on the Stored Documents screen Refresh Brings the list up to date Select All Selects all the documents in the Public Mailbox Print Prints a document selected in the list Delete Deletes a document selected in ...

Page 270: ...12 Job Status 270 Xerox CopyCentre WorkCentre WorkCentre Pro 123 128 User Guide ...

Page 271: ...279 Faults page 280 1 Press the Machine Status button on the control panel Press the Features or All Services button at any time to exit 2 Select the required option Machine Status This screen allows you to view the general information on the machine and the status of paper trays and the hard disk and change the print mode or fax receiving mode For more information on the features available refer ...

Page 272: ...ersion 1 Select Machine Information on the Machine Status screen Machine Configuration Displays the Machine Configuration screen You can view the status of the machine components Software Version Displays the Software Version screen You can identify the software versions of the components of the machine Paper Tray Allows you to check the status of each paper tray including the bypass tray and the ...

Page 273: ...d their values refer to Emulation Parameters in the Print chapter on page 142 1 Select Print Mode on the Machine Status screen Off line Sets the printer mode to off line On line Sets the printer mode to on line PCL Emulation Displays the PCL Emulation screen PCL Emulation Screen Use this feature to set parameter values for PCL emulation which allows you to print documents without using print drive...

Page 274: ...en 2 Perform the necessary operations 3 Select Close Setup Allows you to set parameter values for PDF direct printing 1 Select Setup on the PDF screen 2 Enter the parameter item number in the Item No field 3 Select Change Value to change the displayed value Select Confirm if no change is required 4 Enter the required value in the New Value field using the numeric keypad on the control panel 5 Sele...

Page 275: ...d also specify the output sequence for various reports and lists For more information refer to the following Billing Meter page 275 User Account Billing Meter page 276 Print Report List page 276 1 Press the Machine Status button on the control panel 2 Select the Billing Meter Print Report tab 3 Select the required option Billing Meter Allows you to view the total number of prints made on the machi...

Page 276: ...ect Print Report List on the Billing Meter Print Report screen Job Status Activity Report Displays the Job Status Activity Report screen Select a report option and press the Start button on the control panel to output the following Job History Report Lists the jobs recorded on the machine Activity Report Lists the results of the fax transmissions Error History Report Lists the errors that occurred...

Page 277: ...ist Displays the list of job templates that can be used on the machine For more information on job templates refer to Services in the CentreWare Internet Services chapter on page 149 and the CentreWare Network Scanning Services Manual Address Book Displays ten Address Book options on the right hand side Each option represents 50 addresses giving 500 in total Select one or more options and press th...

Page 278: ...the Group Send or Select All and press the Start button to output the lists Comments List Select this option and press the Start button to output this list Billing Data List Displays the billing data for fax jobs Select this option and press the Start button to output this list NOTE This option is displayed with Key Operator access ...

Page 279: ...Start button to output this list NOTE This button is displayed with Key Operator access Job Counter Report Auditron Administration Displays the Auditron Administration screen Select the type of service on the left and the required user account numbers and press the Start button on the control panel to output the list The multiple user account numbers can be selected or check the Select All 0001 05...

Page 280: ...ut a report of recent errors the date and time of the errors the error codes and the status of each error The status is either active or cleared 1 Press the Machine Status button on the control panel 2 Select the Faults tab 3 Select Error History Report and press the Start button on the control panel to output the report ...

Page 281: ...e Authentication feature used with the machine Users Controlled by Authentication The following is an explanation about the different user types that are controlled by the Authentication feature Users are classified into the following four types The Authentication feature restricts operations according to the user type Key Operators Entered Users Unentered Users General Users Key Operators These a...

Page 282: ...remote account server is sent to and stored in the machine When the user information on the server is changed that information must be sent from the server to update the machine This authentication method is used to simplify the management of user information on multiple machines Functions Controlled by Authentication The following explains the functions that are restricted by the Authentication f...

Page 283: ...nistration features for copying faxing scanning and printing Print The printing of documents that have been saved to the machine is restricted for the Charge Print feature Remote Access Operation of the machine through a network using CentreWare Internet Services is called Remote Access The functions restricted by Remote Access are as follows Print Printing is limited to print jobs sent from a com...

Page 284: ...job flow sheets associated with the user will also be deleted When using a remote account server to manage authentication use of mailboxes and job flow sheets in the Key Operator mode is recommended Job Flow Sheet Types There are four types of job flow sheets that can be used with the machine NOTE You can create Mailbox Job Flow Sheets with the machine Generally Shared Job Flow Sheet This job flow...

Page 285: ...ature is not enabled The ways to operate job flow sheets vary depending on whether the Authentication feature is enabled The following explains the operations available When the Authentication feature is not enabled When the Authentication feature is enabled When the Authentication Feature is Not Enabled The following table shows the relationship with the job flow sheet for each user type when the...

Page 286: ...changes made to the authentication status are linked to a mailbox you can still use them except for changing copying them If you release the link the job flow sheet will no longer be displayed and will be disabled Created using Job Flow Sheets on the Setup Menu screen O Operation available X Operation not available The owner of a copied job flow sheet becomes a duplicate user Job Flow Operations G...

Page 287: ...b flow sheets are created using Mailbox or Job Flow Sheets on the Setup Menu screen Job Flow Operations Unentered Users General Users Generally Shared Mailbox Shared by Key Operators Personal Create X X X X Display X X X X Edit X X X X Copy X X X X Delete X X X X Select Run X X X X Link to Mailbox X X X X Job Flow Operations Entered Users Generally Shared Mailbox Shared by Key Operators Personal o...

Page 288: ...tor Shared Mailbox The Key Operator Shared Mailbox is a mailbox created by a Key Operator When the Authentication feature is not enabled this mailbox is shared by all users When the Authentication feature is enabled this mailbox is shared by all Entered Users Only a Key Operator can change the settings To create a Key Operator Shared Mailbox operate the machine as a Key Operator Personal Mailbox T...

Page 289: ...s not applicable to the following operations Confidential fax reception Confidential Internet Fax reception Retrieving documents that use scan driver or Mailbox Viewer NOTE When job flow sheets not available for operation depending on changes made to the authentication status are linked to a mailbox you can still use them except for changing copying them If you release the link the job flow sheet ...

Page 290: ... Shared by Key Operators Personal Create X X X Display X O 2 X Delete X X X Change Settings X X X Display Document X O 2 X Delete Document X O 2 X Store Document 1 X O 2 X Print Document 1 X O 2 X Job Flow Sheet Display X X 3 X Link X X X Auto Run X X 3 X Manual Run X X 3 X Mailbox Operations Entered Users Generally Shared Shared by Key Operators Personal own Personal other Create X X O X Display ...

Page 291: ...is permitted in the Authentication feature settings of the Key Operator mode 3 You can perform display auto run and manual run operations for job flow sheets linked to a mailbox Job Flow Sheet Display X O O X Link X X O X Auto Run X O O X Manual Run X O O X Mailbox Operations Unentered Users Generally Shared Shared by Key Operators Personal Create X O X Display O O O Delete O O O Change Settings O...

Page 292: ...re is not enabled When the Authentication feature is enabled NOTE When job flow sheets not available for operation depending on changes made to the authentication status are linked to a mailbox you can still use them except for changing copying them If you release the link the job flow sheet will no longer be displayed and will be disabled When the Authentication Feature is Not Enabled The followi...

Page 293: ... Unentered Users General Users Generally Shared Shared by Key Operators Personal Generally Shared X X X Shared by Key Operators X X X Personal own X X X Personal other X X X Mailbox Operations Entered Users Generally Shared Shared by Key Operators Personal own Personal other Generally Shared X X X X Shared by Key Operators X X O X Personal own X X O X Personal other X X X X Mailbox Operations Key ...

Page 294: ...hine must also be set through the client fax driver For more information refer to Fax Driver On line Help Network Authentication You can perform Auditron Administration using the user information managed by a remote account server This is for unified management of user information and Auditron Administration by multiple devices Manageable Features and Services The following explains the features a...

Page 295: ...tion is managed through a remote account server The features and services that can be managed using the Auditron Administration feature are as follows O Manageable X Not manageable 1 This feature forbids any actions beyond the number of pages specified Services Restricted Use Total Usage Per Account Authentication Account Limit 1 Copy O O O Print O O O Charge Print O O O Scan O O O Fax Internet Fa...

Page 296: ...authenticated when received by the machine 2 Printing available only if Non account Print is enabled in the CentreWare Internet Services Jobs Authentication Required User Type Manageable Items Regular Print Print driver for the machine Yes Entered Pages sheets Other print drivers 2 Unentered Pages sheets Secure Print Store documents Yes Print documents No 1 Entered Pages sheets Sample Print Sample...

Page 297: ... pages sheets Confidenti al Receive Receiving confidential documents No Incoming faxes Receptions pages transmissions Printing confidential documents Yes 1 Entered Printed pages sheets Polling Storing documents for polling Yes 1 Automatic sending confidential No Unentered Sent faxes pages Printing polled documents Yes Entered Polls pages transmissions printed pages sheets Printing documents for po...

Page 298: ...d into pages the machine counts the page numbers received instead of the page numbers printed Fax jobs are not counted in the following cases When dialing a fax number using the numeric keypad on the control panel or the On hook feature When using a speed dial code in which the billing information is not registered When a phone conversation took place including the one before a transmission Intern...

Page 299: ... scan jobs using the Auditron Administration feature are as follows Services Authentication Required User Type Manageable Items E mail Yes Entered Scanned pages sent pages Scan to Mailbox Yes Entered Scanned pages stored pages Scan to FTP SMB Yes Entered Scanned pages uploaded pages Network Scanning Yes Entered Scanned pages sent pages ...

Page 300: ...14 Authentication and Auditron Administration 300 Xerox CopyCentre WorkCentre WorkCentre Pro 123 128 User Guide ...

Page 301: ...may not be at its optimum level Use the drum toner cartridge recommended for this product Cleaning the Machine Proper maintenance is important for the smooth operation of any equipment NOTE When cleaning the machine do not use organic or strong chemical solvents or aerosol cleaners Do not pour fluids directly onto any area Avoid supplies that are not specifically listed as approved in this documen...

Page 302: ...eps the touch screen and control panel free from dust and dirt To remove finger prints and smudges clean the control panel and touch screen with a soft lint free cloth slightly moistened with water NOTE The machine should be switched off before cleaning the control panel to prevent unintended operation The Document Feeder and Output Trays Use a cloth moistened with water to clean the document feed...

Page 303: ...til you can lift the handle on top of the cartridge 4 Hold the handle and remove the cartridge from the machine NOTE When replacing the drum cartridge make sure that the new cartridge is the correct one specified for the machine Recycling the Drum Cartridge The drum cartridge is designed to be re manufactured To recycle used drum cartridges return them to Xerox in the original packaging Return lab...

Page 304: ...w drum cartridge from the box 2 Carefully remove the protective sheet from the cartridge by picking the sealing tape up 3 Place the cartridge in position as shown and slide it into the machine until it clicks 4 Pull out the cartridge tape straight without breaking it 5 Push the cartridge again to ensure it is positioned correctly ...

Page 305: ...Replacing the Drum Cartridge Xerox CopyCentre WorkCentre WorkCentre Pro 123 128 User Guide 305 6 Close the Cover A until it latches and then close the bypass tray 7 Close the front cover ...

Page 306: ...following table to determine the correct reorder code for your machine Removing the Old Toner Cartridge 1 Pull the front cover towards you to open it 2 Pull the toner cartridge out until you can lift the handle on top of the cartridge 3 Hold the handle and remove the cartridge from the machine NOTE Hold the empty cartridge away from you to avoid spilling any toner residue Country Part Number Comme...

Page 307: ...and slide it into the machine until it clicks 3 Close the front cover Loading Staples The finisher contains an automatic stapler The stapler cartridge contains 5 000 staples When the machine runs out of the staples a message is displayed on the touch screen When this message is displayed load a new staple case into the staple cartridge by following the steps below NOTE Load the correct staple case...

Page 308: ... the staple cartridge to the right towards you 3 Lift up to remove the staple cartridge 4 Press in both sides of the staple cartridge marked PUSH so that the cartridge case will rise up NOTE If there are still staples inside the staple case the case will not rise up 5 Insert your fingertip into the round section on the cartridge to remove the staple case ...

Page 309: ...e case into the staple cartridge 7 Push the top of the staple cartridge down as shown in the diagram 8 Remove the tab from the new staple case as shown in the diagram 9 Return the staple cartridge to its original position and push in until it clicks into place 10 Close the front cover of the Finisher ...

Page 310: ...15 Maintenance 310 Xerox CopyCentre WorkCentre WorkCentre Pro 123 128 User Guide ...

Page 311: ...Troubleshooting Tables on page 321 and apply the appropriate solution as described Also refer to the fault codes displayed on the touch screen in the Machine Status mode Refer to Fault Codes on page 325 for an explanation of some of the fault codes and corresponding corrective actions Alternatively contact the Key Operator for assistance In some cases it may be necessary to switch the machine off ...

Page 312: ... the message on the display When you have finished clearing a paper jam printing automatically resumes from the point before the paper jam occurred NOTE When removing jammed paper make sure that no bits of paper are left in the machine since they could cause more jams or even fire If a piece of paper is stuck in a hidden area or wrapped around the fuser unit or rollers do not remove it forcefully ...

Page 313: ...he guidelines below to reduce potential jams in the machine Use only recommended media Refer to Supported Paper Sizes in the Paper and Other Media chapter on page 183 and Machine Specifications in the Specifications chapter on page 337 for a list of recommended media types Protect unused media by storing it in its wrapper on a flat surface The orientation of the media in the paper tray must match ...

Page 314: ...on Green Lever A1 1 Open the bypass tray and then open Cover A while lifting up the release lever 2 If the jammed paper is inside the fuser unit rotate the green lever A1 in the direction of the arrow to feed the paper from the top of the fuser unit 3 Pull out the paper from the machine in the direction of the arrow 4 Close the Cover A until it latches and then close the bypass tray Green Lever A2...

Page 315: ...fuser unit hold the green lever and carefully remove the paper from the machine NOTE Do not touch the fuser unit because it may be hot 4 Close the Cover A until it latches and then close the bypass tray Paper Jams in Cover B Follow the steps below to rectify paper jams in Cover B 1 Open Cover B while lifting up the release lever 2 Remove the jammed paper 3 Close the Cover B until it latches NOTE F...

Page 316: ... clear paper jams in Cover C 1 Open Cover C while lifting up the release lever 2 Remove the jammed paper 3 Close the Cover C until it latches Paper Jams in Cover E Follow the steps below to clear paper jams in Cover E 1 Open the bypass tray and then open Cover A while lifting up the release lever 2 Lift up the handle to open Cover E ...

Page 317: ...Jams in Trays 1 2 and 3 4 Optional Follow the steps below to clear paper jams in Trays 1 to 4 of the machine 1 Pull out Tray 1 2 3 or 4 2 Remove the jammed paper 3 Close the paper tray Paper Jams in the Tandem Tray Module Optional Follow the steps below to clear paper jams in the Tandem Tray Module In Tray 3 1 Pull out Tray 3 of the Tandem Tray Module 2 Remove the jammed paper 3 Close the Tray 3 ...

Page 318: ...ose the Tray 4 Paper Jams in Tray 5 Bypass Follow the steps below to clear paper jams in the bypass tray 1 Remove the jammed paper in the bypass tray Paper Jams in the Duplex Module Cover D Optional Follow the steps below to clear paper jams in the Duplex Module 1 Open the bypass tray 2 Open the Duplex Module Cover D while lifting up the release lever 3 Remove the jammed paper inside the Duplex Mo...

Page 319: ...the Finisher Optional Follow the steps below to clear paper jams in the Finisher Top Cover and Transport Cover F In Finisher Top Cover 1 Press the button on the Finisher Top Cover to open it 2 Remove the jammed paper 3 Close the Finisher Top Cover In Finisher Transport Cover F 1 Open the Finisher Transport Cover F ...

Page 320: ...tructions displayed and then reload the document in the document feeder Follow the steps below to clear document jams in the document feeder 1 Open the document feeder cover and then remove the jammed document If prompted on the touch screen turn the green wheel to feed the jammed document out of the document feeder 2 If a double sided document is jammed underneath the inner cover open it and turn...

Page 321: ... 50 sheets Check that the document is fully inserted into the document feeder The machine does not display the Tandem Tray Module or one of the paper trays as one the Paper Supply selections Check that no paper trays are open If a tray is ajar the machine cannot sense its connection Open and close each paper tray and the Tandem Tray Module If this does not rectify the problem then power the machin...

Page 322: ...om the new drum cartridge Reinstall the drum cartridge and the toner cartridge Replace the drum cartridge Replace the toner cartridge if the screen message for replacement is displayed Streaks solid or dotted lines or spots Clean the document glass the CVT glass the areas under the platen cover the document feeder and the paper guides If the machine has been idle for an extended period of time or ...

Page 323: ...ity of the documents If transparencies are used select Transparency in Paper Type The machine automatically adjusts the quality for transparencies Feed the document SEF Replace the drum cartridge Washout Check the quality of the documents If the image is lighter near the borders select a darker image quality setting on the touch screen Replace the drum cartridge Solid density variations Check the ...

Page 324: ... an output tray is not properly stacked up Flip over the paper stack in the paper tray or rotate it head to toe Paper curls Check that the paper is loaded correctly Load paper in Trays 1 2 3 and 4 seam side up Load paper in the Tandem Tray Module and bypass tray seam side down Load custom media in the bypass tray Refer to the Paper and Other Media chapter for procedures Cannot store a document for...

Page 325: ...uto tray switching differs from the paper size in the tray selected at the tray selection Either change the paper size for the tray or change the paper type priority setting 003 780 Compression of scanned data was unsuccessful Lower the resolution or reduction enlargement ratio to reduce the data size or send the document in smaller chunks 003 795 The reduction enlargement ratio exceeds the settin...

Page 326: ...214 016 215 An error occurred on the software option settings Contact the Xerox Welcome Center 016 450 The SMB host name has been set twice Change the host name 016 454 Could not acquire the IP address from DNS Check the DNS settings and IP address acquisition method setting 016 503 Could not determine the name of the SMTP server when e mail was transmitted Check if the SMTP server is set correctl...

Page 327: ...disk is malfunctioning Delete unnecessary documents from the disk 016 710 Delayed prints cannot be made because the hard disk is malfunctioning Contact the Xerox Welcome Center 016 711 016 985 The e mail size exceeds the maximum value allowed Try one of the following procedures and resend the e mail Reduce the number of pages in the document Lower the resolution in Scan Resolution Reduce the docum...

Page 328: ...ing image processing Set for optimized speed in the print driver and instruct the machine to print again If this does not rectify printing set for highest compatibility to ensure printing and try again 016 762 A print language not supported on the machine was specified Specify the print language in Print Mode under Port Settings 016 764 Could not connect to the SMTP server Contact the System Admin...

Page 329: ...16 782 Could not connect to the server for CentreWare Scan Services Verify that the correct log in user name password and other information are entered 016 783 Could not find the specified server path during file forwarding by CentreWare Scan Services Check the path name of the server currently set to the job template 016 784 A write to server error occurred during file forwarding by CentreWare Sc...

Page 330: ...has been set twice Change the IP address 027 500 Could not determine the name of the SMTP server when reply e mail was transmitted Check from CenreWare Internet Services to see if the SMTP server is set correctly 027 501 Could not determine the name of the POP3 server when using the POP3 protocol Check from CenreWare Internet Services to see if the POP3 server is set correctly 027 502 Could not lo...

Page 331: ...t destination is not correct Specify the correct destination and resend the e mail 034 211 034 212 An error occurred in the fax controller Contact the Xerox Welcome Center 034 501 Is the telephone cable correctly connected Check that the telephone cable is connected correctly and resend the document Refer to Machine Components in the Product Overview chapter on page 31 034 507 036 786 036 787 Comm...

Page 332: ...n specifying features such as relay broadcasting or a remote mailbox ask the other party if their machine supports these features and if the password is correct 035 746 The fax network does not respond Check the following and send the document again Is the telephone line correctly connected to the machine The other party may not be connected to the fax network or there may be some problem with the...

Page 333: ... Use a different paper tray 073 210 073 211 Tray 3 malfunctioned Contact the Xerox Welcome Center Use a different paper tray 074 210 074 211 Tray 4 malfunctioned Contact the Xerox Welcome Center Use a different paper tray 116 701 Double sided printing is not possible due to insufficient memory Add memory 116 702 Printing was performed using a substitute font Check the print data 116 703 An error o...

Page 334: ...changed to the center output tray Contact the Xerox Welcome Center Use a different paper tray Code Description and Remedy Message Description and Remedy A fault has occurred Switch off the machine Ensure that the screen disappears before switching it on If the problem persists call for service xxx yyy A fault has occurred Switch off the machine and wait until the touch screen is turned off complet...

Page 335: ...x Welcome Center For additional help If you need any additional help on using your CopyCentre copier or WorkCentre copier printer you can 1 Refer to this User Guide 2 Contact the Key Operator 3 Visit our Customer Web Site at www xerox com or contact the Xerox Welcome Center Please have your serial number at hand when contacting Xerox The Welcome Center will want to know the following information T...

Page 336: ...ro 123 128 User Guide 3 The serial number will be displayed NOTE The serial number is also found on the metal plate on the left side of the machine behind Cover A For more information refer to Xerox Welcome Center in the Before Using the Machine chapter on page 13 ...

Page 337: ...t prior notice For more information on the specifications contact your Xerox Representative Machine Specifications Hardware Configuration CopyCentre C123 128 Processor Document Feeder Double sided Module or Document Glass Cover Two paper trays and a bypass tray WorkCentre M123 128 Processor Document Feeder Double sided Module or Document Glass Cover Two paper trays and a bypass tray Printer NOTE T...

Page 338: ...imately 12 seconds varies with machine configuration Document Glass Capacity A document within 30 mm of thickness can be copied with the document glass cover feeder closed Document Sizes Standard size A5 LEF to A3 SEF Custom size width 15 to 297 mm 0 6 to 11 7 length 15 to 432 mm 0 6 to 17 0 Document Weights 38 to 128 g m2 50 to 128 g m2 in double sided mode Auto Size Sensing Yes NOTE The standard...

Page 339: ...n be detected vary depending on the paper size table specified by the Key Operator For information on setting the paper size table refer to Paper Size Settings in the Setups chapter on page 198 Trays 1 2 3 4 Two Tray Module Capacity 500 sheets of 80 g m2 20 lb bond paper per tray Paper Weights 60 to 105 g m2 for Tray 1 and 60 to 216 g m2 for Trays 2 3 and 4 Paper Sizes For width 140 to 297 mm 5 5 ...

Page 340: ...is available NOTE Paper Weight must be between 60 to 105 g m2 when using the offset stacking feature Finisher Capacity 1 000 sheets of 80 g m2 20 lb bond Letter A4 210 297 mm 8 5 11 0 or smaller paper Paper Sizes A4 SEF A4 LEF A3 SEF B5 LEF B4 SEF 7 25 10 5 LEF 8 5 11 SEF 8 5 11 LEF 8 5 13 SEF 8 5 14 SEF 17 11 SEF 16K LEF 8K SEF Paper Weight 64 to 128 g m2 Set Size 50 sheets of 90 g m2 or less pap...

Page 341: ...erfine 400 400 dpi 16 15 4 lines mm Superfine 600 600 dpi Resolution Conversion Available for sending and receiving smooth on receiving Image Compression JBIG MH MR MMR Long Page Scan Feature 600 mm 23 6 inches maximum length NOTE This feature is only available when using the document feeder NOTE This feature is not available in double sided mode NOTE When using this feature to scan long documents...

Page 342: ...17 Specifications 342 Xerox CopyCentre WorkCentre WorkCentre Pro 123 128 User Guide ...

Page 343: ...age as Default Language For more information refer to Common Settings on page 188 Country Code for Fax Option When setting up the Fax option users in the following countries may be required to set the country code for the line European countries North American countries Enter the System Settings mode select Common Settings then select Other Settings In the Other Settings screen scroll down to and ...

Page 344: ...d Limitations This section describes the cautions and limitations to observe when using this machine When moving the machine make sure to hold the middle part of the machine not the control panel or document feeder area Excessive pressure on the document feeder may cause machine malfunction ...

Page 345: ...at contains information about jobs sent and received Address Book A list of telephone numbers stored in the machine for easy reference Annotation A note or comment added to a document This feature adds the date page numbers and a comment to the document APS An abbreviation of Auto Paper Selection Auditron A tracking system which is built into the machine You can use Auditron to track overall machi...

Page 346: ... mode used for transmission to a remote fax machine from G3 or F4800 Communication s Communications network which can offer audio data telephone image data fax picture data videotext and PC data PC communication service over the same channel In this guide referred to as transmitting and receiving images as well as speaking with a remote user Contrast The intensity of the display of an image or the...

Page 347: ...ontains a internal drum A printed image is formed on a drum before transferred to paper Dual Tone Multi Frequency DTMF The use of a keypad sequence tones to transmit to or poll from a remote mailbox Duplex Refers to a document that contains an image on both sides of the page ECM An abbreviation of Error Correction Mode An ITU T approved feature for Group 3 facsimile machines ECM transmission sends...

Page 348: ...cond side displays the image with the top of the document at the top of the page You typically turn over the page from the side edge Head to Toe A double sided document where the second side displays the image with the top of the document at the bottom of the page You typically turn over the page from the bottom edge Image Enhancement A feature which makes the border between black and white smooth...

Page 349: ...d when the forward slash key is selected Memory A capacity for storing documents Node A number that identifies on access point on a network It works like an address Non Standard Paper Customized paper sizes within the range of 89 297 mm 3 5 11 7 inches for width and 99 432 mm 3 9 17 0 inches for length for making single sided copies and 89 297 mm for width 127 432 mm for length for making double s...

Page 350: ...ms which is the standard for desktop publishing because it is widely supported by both hardware and software vendors Power Save Modes Energy saver modes that significantly reduce the power consumption during periods of inactivity Print Page Buffer Location where print data is actually processed and stored Printable Area The actual area on paper which can be printed Profile A protocol controlling i...

Page 351: ...paper document and converting the optical image of the document to an electronic image Screen The display on the control panel It provides user information and instructions Send Header A heading printed on the first line of received documents Server Fax A walk up fax service which uses a third party fax server Short Edge Feed SEF The short edge of the paper is positioned to enter the machine first...

Page 352: ...dge which holds toner an electrically charged powder with pigment and plastic for ease of loading into a printer Uncollated Output programming where the specified number of copies for each page in a copy set is delivered in the order the documents were placed in the Document Feeder Example Two copies of a three page document would output as page1 copy1 page1 copy2 page2 copy1 page2 copy2 page3 cop...

Page 353: ...ntication and Auditron Administration 281 Authentication System 216 Auto Clear 190 Auto Clear Alert Tone 192 Auto Job Release 190 Auto Power Saver 190 Auto Print 190 Auto Tray Switching 194 B Base Tone 192 Basic Copying 47 Broadcast Multi Poll Report 196 Bypass Tray 31 C C button 33 CentreWare Internet Services Accessing CentreWare Internet Services 148 CWIS JT 147 Jobs 154 Maintenance 177 Propert...

Page 354: ...t Format Read Status MDN 128 Split Send 128 Sender s Details 112 E mail printing 139 E mail Receive Protocol 217 E mail Send Authentication 215 E mail Internet Fax Settings Auto Print Delivery Confirmation Mail 239 Auto Print Error Mail 239 Maximum Address Entries 239 Maximum E mail Size 239 Page size for Split Send 240 Read Status MDN 239 Response to Read Status MDN 239 Emulation Settings CWIS 17...

Page 355: ...le Repository Setup CWIS JT 154 Finisher 32 307 Front Cover 31 G General 156 General Settings CWIS JT 154 GFI 36 Ground Fault Interrupter 36 I Image Enhancement 195 Initialize Hard Disk 197 Internet Fax 75 Send Options Internet Fax Comment 95 Internet Fax Profile 99 Read Status MDN 96 Send Status DSN 96 Internet Fax Control Broadcast Communication Mode 234 Broadcast Internet Fax Profile 234 Delive...

Page 356: ...onfidential Internet Fax documents 131 Document List 132 Fax documents for confidential polling 131 Job Flow Settings 132 Job Flow Sheets Auto Start 133 Create Change Link 134 Scanned documents 131 Mailbox CWIS 161 Mailbox Documents Report 196 Maintenance 301 Cleaning the Machine Constant Velocity Transport Glass 302 Control Panel 302 Document Feeder 302 Document Glass 302 Output Tray 302 Touch Sc...

Page 357: ...Fault Codes 325 Output Quality 335 Paper Jams 312 Troubleshooting Tables 321 Xerox Welcome Center 335 Properties Features 159 Protocol Settings Ethernet Setting 212 HTTP SSL TLS Communication 213 HTTP SSL TLS Port Number 213 TCP IP Gateway Address 213 TCP IP Get IP Address 212 TCP IP IP Address 212 TCP IP IP Filter 213 TCP IP Subnet Mask 213 Protocol Settings CWIS 168 R Receiving Buffer Ethertalk ...

Page 358: ...Position on Side 2 207 Pseudo Photo Gradation Mode 206 Stamp Position on Side 2 207 Copy Mode Settings 202 Basic Copying Tab 203 Copy Control 206 Copy Defaults 203 Original Size Defaults 207 Reduce Enlarge Presets 208 E mail Internet Fax Settings 235 Address Search Directory Service 236 E mail Defaults 236 Fax Mode Settings 226 Fax Control 228 Fax Defaults 227 File Destination Output Destination 2...

Page 359: ...39 Specifications for the Fax Feature 341 Speed Dial button 33 Stapler 307 Start button 33 Stop button 33 Stop the Scan Job 108 Stored Documents Charge Print 266 Delayed Print 268 Public Mailbox 269 Sample Print 268 Secure Print 267 Stored Programming 35 137 Stored Programming Tone 192 System Controls 33 System Settings Procedure 187 T Tandem Tray Module 32 Template CWIS JT 150 Time 189 Time Zone ...

Page 360: ...20 Index 360 Xerox CopyCentre WorkCentre WorkCentre Pro 123 128 User Guide ...

Reviews: