Maintenance
1224
−
1/A1
Winterthur Gas & Diesel Ltd.
2.
Removal
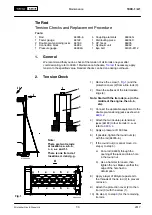
1) Attach the eye bolt (94045
−
) to the gallery.
2) Attach the manual ratchet (94016G) to the eye bolt (94045
−
M16).
3) Remove the bolts and washers (6,
) from the applicable arbor supports (7 and
8, or 9 and 10).
4) Remove the applicable arbor supports (7 and 8, or 9 and 10).
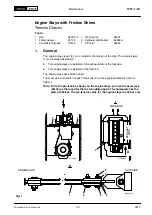
5) Attach the carrier (94155, Fig. 2) the gear wheel as shown.
6) Attach the eye bolt (94045
−
M12) to the thrust pad (1).
WARNING
Injury Hazard: Before you operate the turning gear, make sure that
no personnel are near the flywheel, or inside the engine.
7) Operate the turning gear to turn the crankshaft in the applicable direction.
Note: While the gear wheel turns, the carrier (94155) moves the thrust pads. The
first thrust pad will come out.
8) Keep a light tension on the manual ratchet (94016G) while the thrust pad (1) moves
up.
9) Operate the manual ratchet (94016G) to remove the thrust pad (1).
10) Move the thrust pad (1) to a stable area.
11) Do step
) for the remaining thrust pads that you must remove.
Note: If some of the thrust pads are removed, the remaining thrust pads will
keep the crankshaft in position. If all thrust pads from the same side are
removed, e.g. all the astern pads, the crankshaft can move.
12) To prevent crankshaft movement, do as follows:
a) Get a piece of hardwood that has the same dimensions as a thrust pad.
b) Put the hardwood in the position of the removed thrust pads.
3.
Installation
1) Make sure that the thrust pads are clean.
2) Apply clean engine oil to the thrust pads.
Note: You must install thrust pads that you removed before in the same posi-
tions. Use your recorded notes for the correct positions.
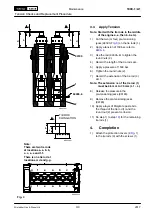
3) Attach the eye bolt (94045
−
M12) to the thrust pad (1).
4) Operate the manual ratchet (94016G) to lift the thrust pad (1).
5) Move the thrust pad (1) into position above the gear wheel.
6) Lower the thrust pad. Make sure that the thrust pad touches the carrier (94155).
WARNING
Injury Hazard: Before you operate the turning gear, make sure that
no personnel are near the flywheel, or in the engine.
7) Operate the turning gear to turn the crankshaft in the applicable direction.
8) Put the subsequent thrust bearing pad in position.
9) Do step
10) Remove the carrier (94155).
11) Install the the applicable arbor supports (7 and 8, or 9 and 10,
bolts and washers (6).
2017
Thrust Bearing Pads
−
Removal and Installation
Summary of Contents for X35-B
Page 12: ...Intentionally blank ...
Page 14: ...Intentionally blank ...
Page 16: ...Intentionally blank ...
Page 34: ...Intentionally blank ...
Page 58: ...Intentionally blank ...
Page 60: ...Maintenance 0352 1 A1 Winterthur Gas Diesel Ltd 2 6 WCH03791 2017 ...
Page 61: ...Maintenance 0352 1 A1 Winterthur Gas Diesel Ltd 3 6 WCH03791 2017 ...
Page 62: ...Maintenance 0352 1 A1 Winterthur Gas Diesel Ltd 4 6 WCH03791 2017 ...
Page 63: ...Maintenance 0352 1 A1 Winterthur Gas Diesel Ltd 5 6 WCH03791 2017 ...
Page 64: ...Maintenance 0352 1 A1 Winterthur Gas Diesel Ltd 6 6 WCH03791 2017 ...
Page 68: ...Intentionally blank ...
Page 72: ...Intentionally blank ...
Page 82: ...Intentionally blank ...
Page 85: ...Intentionally blank ...
Page 92: ...Intentionally blank ...
Page 96: ...Intentionally blank ...
Page 112: ...Intentionally blank ...
Page 120: ...Intentionally blank ...
Page 124: ...Intentionally blank ...
Page 138: ...Intentionally blank ...
Page 154: ...Intentionally blank ...
Page 168: ...Intentionally blank ...
Page 180: ...Intentionally blank ...
Page 182: ...Maintenance 2728 1 A1 Winterthur Gas Diesel Ltd 2 5 6 Lift housing from the valve spindle 4 ...
Page 186: ...Intentionally blank ...
Page 190: ......
Page 204: ...Intentionally blank ...
Page 211: ...Intentionally blank ...
Page 216: ...Intentionally blank ...
Page 224: ...Intentionally blank ...
Page 228: ......
Page 229: ...Intentionally blank ...
Page 264: ...Intentionally blank ...
Page 270: ...Intentionally blank ...
Page 280: ...Intentionally blank ...
Page 294: ...Intentionally blank ...
Page 298: ...Intentionally blank ...
Page 302: ...Intentionally blank ...
Page 318: ...Intentionally blank ...
Page 328: ...Intentionally blank ...
Page 344: ...Intentionally blank ...
Page 368: ...Intentionally blank ...
Page 374: ...Intentionally blank ...
Page 380: ...Intentionally blank ...
Page 396: ...Intentionally blank ...
Page 407: ...Intentionally blank ...
Page 426: ...Intentionally blank ...
Page 442: ...Intentionally blank ...
Page 444: ...Intentionally blank ...


