Maintenance
2751
−
2/A1
Winterthur Gas & Diesel Ltd.
3.
Exhaust Valve
−
Assemble
Assembling is carried out analogously to dismantling but in reverse sequence.
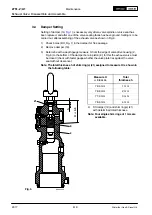
1) Check the dimensions of the valve spindle (11,
Clearance
Table
−
Exhaust Valve.
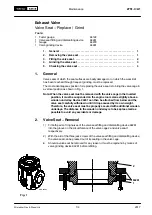
The condition of piston seal ring (5, Fig. 2) is to be examined on every occasion, at the
latest, however, on the occasion of an overhaul of the exhaust valve according to the
maintenance schedule. A damaged piston seal ring must be replaced in any case.
CAUTION
Damage Hazard: Heat the new piston seal rings in boiling water
before fitting them. When fitting proceed with care, to avoid their
damage; do not use any sharp edged utensils for assistance.
2) Check all O-rings of the dismantled parts for damage and replace them if
necessary.
Note: If an exhaust valve is to be fitted with a new seat or spindle, the seats must
be checked according to the instructions given in
.
3.1
Guide Bush
−
Installation
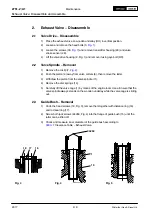
1) Clean the bore in valve cage (1,
2) Oil the guide bush and press it into the valve cage using jack screws (94263).
3.2
Valve Spindle
−
Installation
1) Apply oil to the valve spindle and fit it.
2) Apply oil to a new rod seal ring (17,
), fit it with distance ring (16) and tighten
the latter with head screws (18).
Note: Always fit rod seal ring and distance ring only after fitting the valve spindle,
otherwise the rod seal ring might be damaged.
3.3
Valve Drive
−
Assemble
1) Bring the valve cage to vertical position.
2) Apply oil to all cleaned parts before fitting them.
3) Push the valve spindle (11,
) against valve seat (10) and fit disc springs (14) as
shown.
4) Fit the piston (4), valve cotters (6) and circlip (7).
5) Carefully fit valve drive housing (2) with a new O-ring (33) and position it by means
of dowel pin (31).
6) Fit and tighten head bolts (3, Fig. 2).
Exhaust Valve: Disassemble and Assemble
2017
Summary of Contents for X35-B
Page 12: ...Intentionally blank ...
Page 14: ...Intentionally blank ...
Page 16: ...Intentionally blank ...
Page 34: ...Intentionally blank ...
Page 58: ...Intentionally blank ...
Page 60: ...Maintenance 0352 1 A1 Winterthur Gas Diesel Ltd 2 6 WCH03791 2017 ...
Page 61: ...Maintenance 0352 1 A1 Winterthur Gas Diesel Ltd 3 6 WCH03791 2017 ...
Page 62: ...Maintenance 0352 1 A1 Winterthur Gas Diesel Ltd 4 6 WCH03791 2017 ...
Page 63: ...Maintenance 0352 1 A1 Winterthur Gas Diesel Ltd 5 6 WCH03791 2017 ...
Page 64: ...Maintenance 0352 1 A1 Winterthur Gas Diesel Ltd 6 6 WCH03791 2017 ...
Page 68: ...Intentionally blank ...
Page 72: ...Intentionally blank ...
Page 82: ...Intentionally blank ...
Page 85: ...Intentionally blank ...
Page 92: ...Intentionally blank ...
Page 96: ...Intentionally blank ...
Page 112: ...Intentionally blank ...
Page 120: ...Intentionally blank ...
Page 124: ...Intentionally blank ...
Page 138: ...Intentionally blank ...
Page 154: ...Intentionally blank ...
Page 168: ...Intentionally blank ...
Page 180: ...Intentionally blank ...
Page 182: ...Maintenance 2728 1 A1 Winterthur Gas Diesel Ltd 2 5 6 Lift housing from the valve spindle 4 ...
Page 186: ...Intentionally blank ...
Page 190: ......
Page 204: ...Intentionally blank ...
Page 211: ...Intentionally blank ...
Page 216: ...Intentionally blank ...
Page 224: ...Intentionally blank ...
Page 228: ......
Page 229: ...Intentionally blank ...
Page 264: ...Intentionally blank ...
Page 270: ...Intentionally blank ...
Page 280: ...Intentionally blank ...
Page 294: ...Intentionally blank ...
Page 298: ...Intentionally blank ...
Page 302: ...Intentionally blank ...
Page 318: ...Intentionally blank ...
Page 328: ...Intentionally blank ...
Page 344: ...Intentionally blank ...
Page 368: ...Intentionally blank ...
Page 374: ...Intentionally blank ...
Page 380: ...Intentionally blank ...
Page 396: ...Intentionally blank ...
Page 407: ...Intentionally blank ...
Page 426: ...Intentionally blank ...
Page 442: ...Intentionally blank ...
Page 444: ...Intentionally blank ...


