


Configuration
68
Version 1.0 Rev B - 08/00
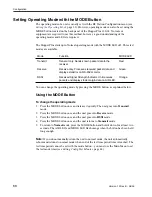
Setting Operating Mode with the MODE Button
The operating mode of a unit is usually set with the RF Station Configuration menu (see
Setting the Operating Mode
, page 33). However, operating mode can also be set using the
MODE button located on the back panel of the Hopper Plus 120-24. No tools or
equipment are required to use this method, however, a good understanding of the
operating modes and LEDs is required.
The Hopper Plus starts up in Normal operating mode with the MODE LED off.. Three test
modes are available.
You can change the operating mode by pressing the MODE button, as explained below.
Using the MODE Button
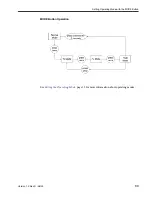
To change the operating mode
1.
Press the MODE button once and release it quickly. The unit goes into
Transmit
mode.
2.
Press the MODE button once and the unit goes into
Receive
mode.
3.
Press the MODE button once and the unit goes into
RSSI
mode.
4.
Press the MODE button once and the unit returns to
Transmit
mode.
5.
To return to
Normal
mode, press the MODE button and hold it down for at least two
seconds. The AIR LED and MODE LED flash orange when the button has been held
long enough.
Note:
If you do not manually return the unit to normal mode, the unit automatically
reboots and returns to normal mode when end of the test time period time is reached. The
test time period cannot be set with the mode button—you must use the Main Menu to set
the test mode timer (see
Setting Config Test Minutes
, page 48).
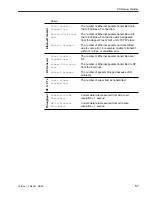
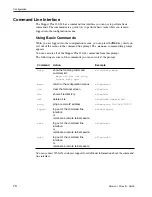
Mode
Function
MODE LED
Transmit
Transmit only. Sends known packet data to the
receiver.
Red
Receive
Receive only. Processes received packet data and
displays statistics on RS-232 monitor.
Green
RSSI
Received Signal Strength Indicator. Unit receives
packets and displays fade margin data on AIR LED.
Orange


