4.6.5
Storage
4.6.5.1 Basic
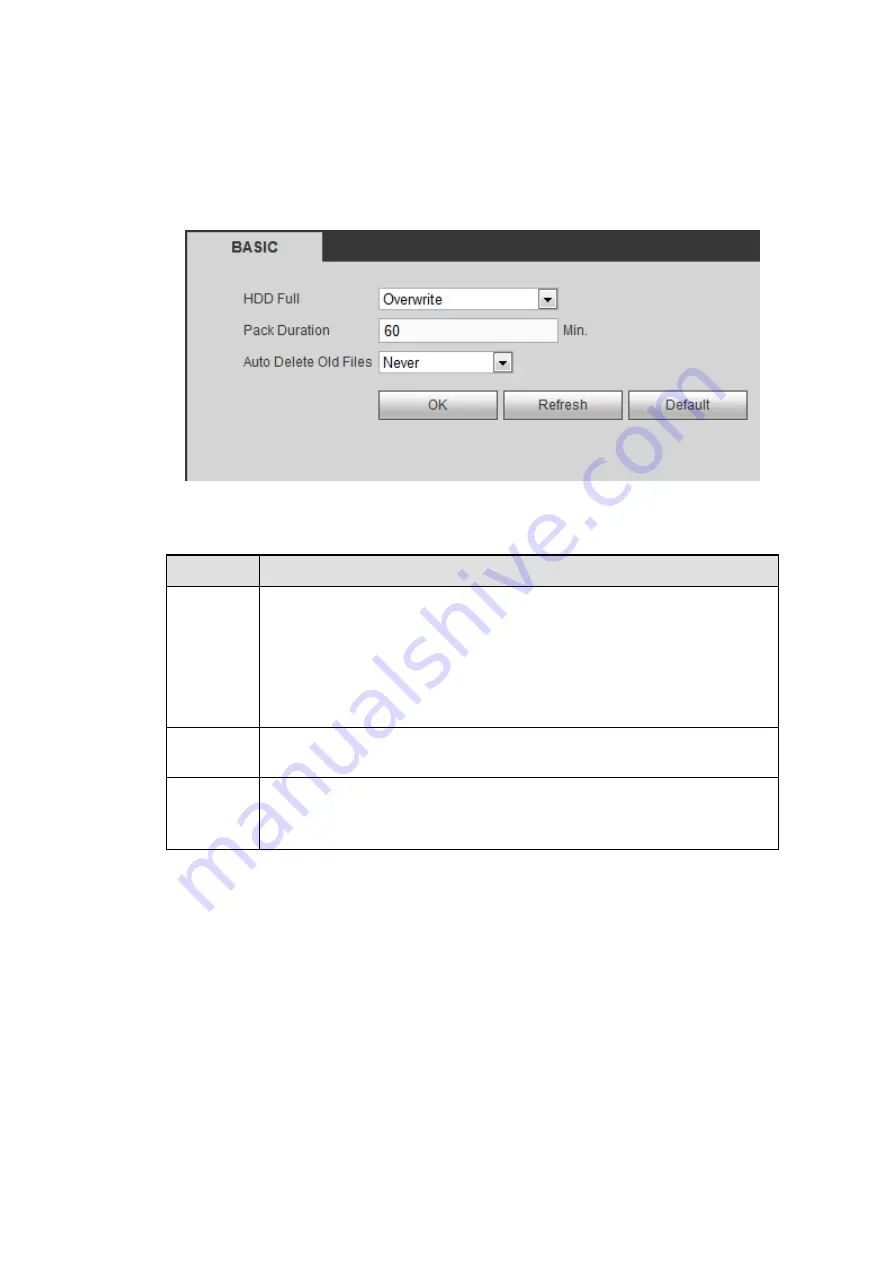
It is to manage HDD storage space.
Step 1 From main menu > Setup > Storage > Basic.
Enter Basic interface. See Figure 4-47.
Figure 4-114
Step 2 Set parameters.
Parameter Function
HDD full
It is to select working mode when hard disk is full. There are two options:
stop recording or rewrite.
Stop: If current HDD is full while there is no idle HDD, then system
stops recording,
Overwrite: If the current HDD is full while there is no idle HDD, then
system overwrites the previous files.
Pack
duration
It is to specify record duration. The max value is 120 minutes.
Auto
delete old
files
Never: Do not auto delete old files.
Customized: input customized period here, system can auto delete
corresponding old files
4.6.5.2 Schedule
4.6.5.2.1 Record
From main menu> Setup>Storage>Schedule>Record, you can go to the record interface. In this
interfaces, you can add or remove the schedule record setup. See Figure 4-115.
There are five record modes: Regular, motion detect, alarm and MD&alarm, and intelligence. There are
six periods in one day.
You can view the current time period setup from the color bar.
Green color stands for the general record/snapshot.
Yellow color stands for the motion detect record/snapshot.
Red color stands for the alarm record/snapshot.
Blue color stands for MD&alarm record/snapshot.
Orange color stands for intelligent record/snapshot.
Summary of Contents for ELITE Network IP Series
Page 1: ...64 Channel 4K Hot Swap NVR NVR ELHS 64 4K DH...
Page 108: ...Figure 3 92 Figure 3 93...
Page 131: ...Figure 3 111 Figure 3 112 Figure 3 113...
Page 144: ...Figure 3 126 Figure 3 127...
Page 146: ...Figure 3 129 Click draw button to draw the zone See Figure 3 130 Figure 3 130...
Page 149: ...Figure 3 133 Click Draw button to draw a zone See Figure 3 134 Figure 3 134...
Page 154: ...Figure 3 139 Click draw button to draw the zone See Figure 3 140...
Page 172: ...Figure 3 157 Figure 3 158...
Page 173: ...Figure 3 159 Figure 3 160...
Page 176: ...Figure 3 164 Figure 3 165...
Page 211: ...Figure 3 199...
Page 234: ...Figure 3 227 Step 2 Click Add group Enter add group interface See Figure 3 228 Figure 3 228...
Page 298: ...Figure 4 56 Figure 4 57...
Page 304: ...Figure 4 62 Figure 4 63...
Page 305: ...Figure 4 64 Figure 4 65...
Page 330: ...Figure 4 101 Figure 4 102...
Page 339: ...Figure 4 115 Figure 4 116...
Page 359: ...Figure 4 144 Note For admin you can change the email information See Figure 4 145...


