Blacklist: In this interface, device triggers an alarm when it detects plate number in the
blacklist.
Whitelist: In this interface, device triggers an alarm when it detects plate number in the
whitelist.
3.10.7.2 B/W List
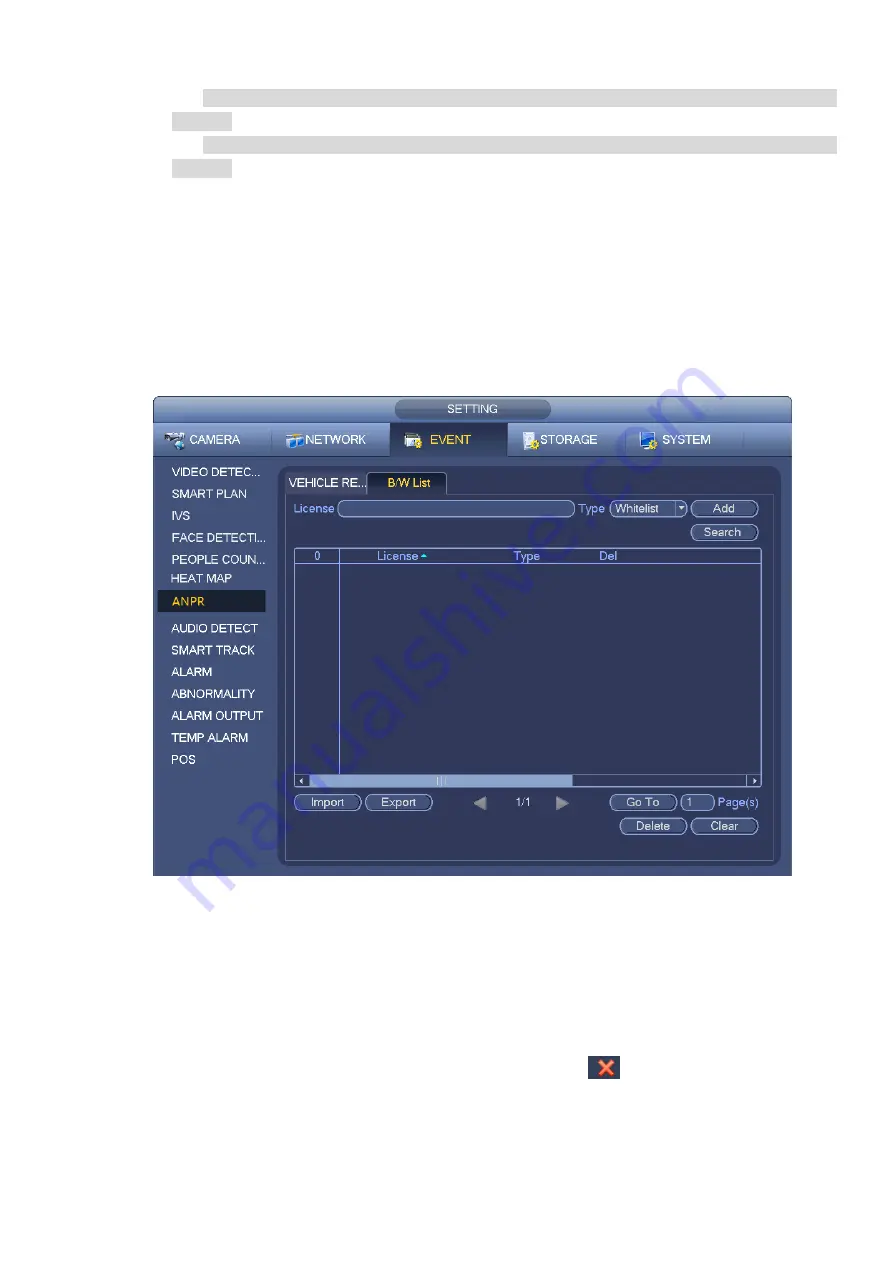
It is to set the blacklist and the whitelist. It includes add, delete, import, export blacklist/whitelist.
After setting the blacklist/whitelist, in the plate snapshot list on the preview interface, the blacklist plate
number is red, the whitelist plate number is green, the regular plate number is white.
Add blacklist/whitelist
Step 1 From main menu->Setting->Event->ANPR->B/W list.
Enter B/W list interface. See Figure 3-148.
Figure 3-148
Step 2 Set plate number and then select type as blacklist or whitelist.
Step 3 Click Add button.
Delete blacklist/whitelist
Set type as blacklist, whitelist or all, click Search button, device displays the corresponding information.
Check the box before the plate number and then click Delete or
to delete a plate number.
Click Clear to delete all plate information in the blacklist/whitelist.
Import/export blacklist/whitelist
Summary of Contents for ELITE Network IP Series
Page 1: ...64 Channel 4K Hot Swap NVR NVR ELHS 64 4K DH...
Page 108: ...Figure 3 92 Figure 3 93...
Page 131: ...Figure 3 111 Figure 3 112 Figure 3 113...
Page 144: ...Figure 3 126 Figure 3 127...
Page 146: ...Figure 3 129 Click draw button to draw the zone See Figure 3 130 Figure 3 130...
Page 149: ...Figure 3 133 Click Draw button to draw a zone See Figure 3 134 Figure 3 134...
Page 154: ...Figure 3 139 Click draw button to draw the zone See Figure 3 140...
Page 172: ...Figure 3 157 Figure 3 158...
Page 173: ...Figure 3 159 Figure 3 160...
Page 176: ...Figure 3 164 Figure 3 165...
Page 211: ...Figure 3 199...
Page 234: ...Figure 3 227 Step 2 Click Add group Enter add group interface See Figure 3 228 Figure 3 228...
Page 298: ...Figure 4 56 Figure 4 57...
Page 304: ...Figure 4 62 Figure 4 63...
Page 305: ...Figure 4 64 Figure 4 65...
Page 330: ...Figure 4 101 Figure 4 102...
Page 339: ...Figure 4 115 Figure 4 116...
Page 359: ...Figure 4 144 Note For admin you can change the email information See Figure 4 145...


