


Setting Up the Detectors
4-70
, or enter a temperature that is 50
°
C higher than the highest
temperature of your oven program.
5.
Close the oven door. Wait for the FPD 1 temperature to become READY.
6.
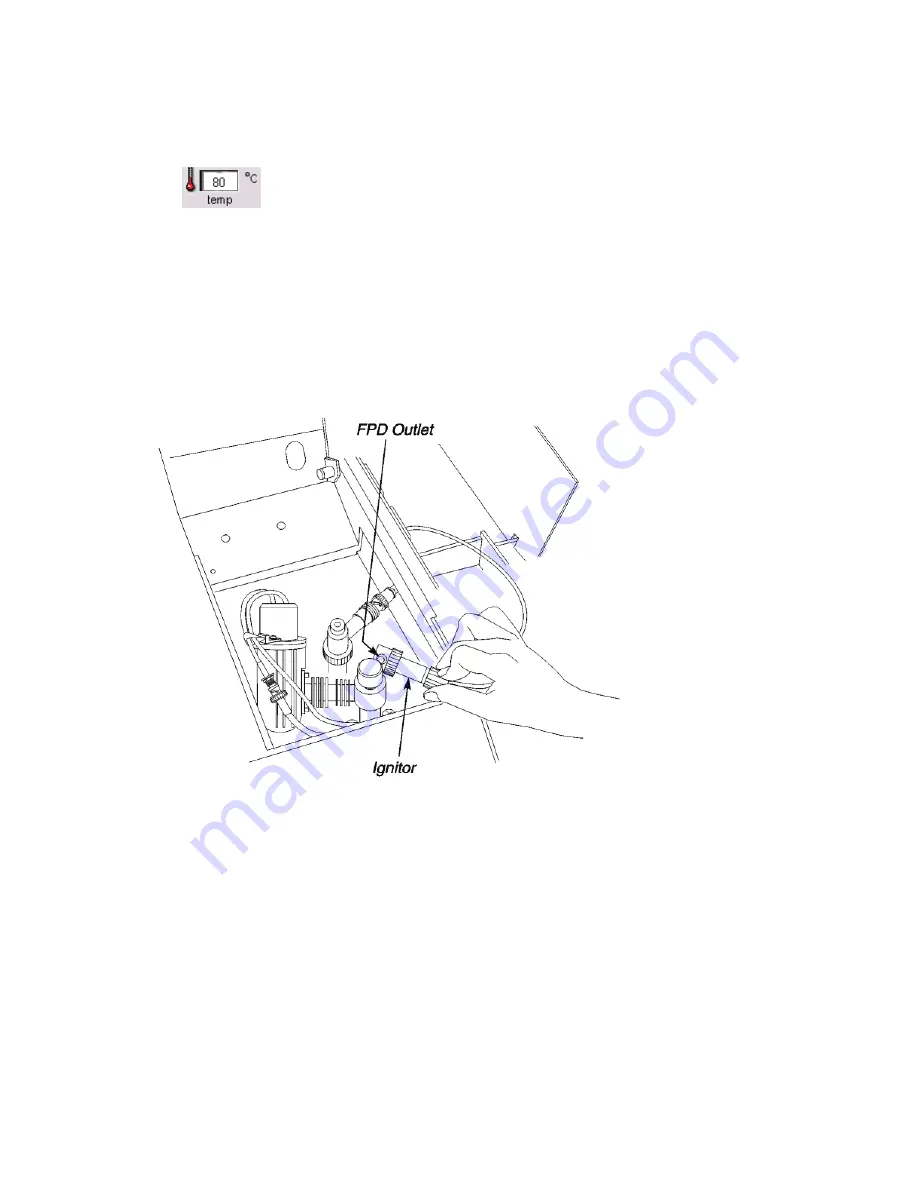
Position the ignitor assembly on the FPD outlet (see the following figure).
7.
You may hear a slight "POP.” This indicates that the flame is lit.
NOTE:
If you find it difficult to light the flame, rotate the FPD cap so that the FPD outlet
faces the front or left side of the instrument.
Figure 4-33. Ignitor assembly positioned on the FPD outlet.
8.
Remove the ignitor assembly from the FPD outlet.
If the flame is lit, the signal on the Autozero screen should increase and remain
greater than the noted amount.
Confirm that the flame is lit by holding a shiny object (such as a mirror or
small wrench) over the FPD outlet. Condensation will appear on the object
if ignition has occurred.
Summary of Contents for CLARUS 600 GC
Page 1: ...CLARUS 600 680 GC User s Guide GAS CHROMATOGRAPHY ...
Page 2: ......
Page 3: ...Clarus 600 680 GC User s Guide ...
Page 10: ...viii ...
Page 11: ...Introduction 1 ...
Page 12: ...Introduction 1 2 ...
Page 23: ...Touch Screen Navigation 2 ...
Page 24: ...Touch Screen Navigation 2 2 ...
Page 73: ...Using the Active Method 3 ...
Page 74: ...Using the Active Method 3 2 ...
Page 87: ...Clarus 600 680 User s Guide 3 15 The injector information displays ...
Page 119: ...Clarus 600 680 User s Guide 3 47 Setting the Timed Events 1 Touch the Events tab ...
Page 137: ...Setting Up the Detectors 4 ...
Page 138: ...Setting Up the Detectors 4 2 ...
Page 194: ...Setting Up the Detectors 4 58 2 The FPD page is now visible ...
Page 199: ...Clarus 600 680 User s Guide 4 63 4 The FPD tab page is now displayed ...
Page 230: ...Setting Up the Detectors 4 94 NOTE When Autozero is Off the output signal is never autozeroed ...
Page 231: ...Using the Method Editor 5 ...
Page 232: ...Using the Method Editor 5 2 ...
Page 248: ...Using the Method Editor 5 18 ...
Page 249: ...Using the Tools Menu 6 ...
Page 250: ...Using the Tools Menu 6 2 ...
Page 272: ...Using the Tools Menu 6 24 PID NPD ...
Page 273: ...Clarus 600 680 GC User s Guide 6 25 FPD Output Configured ...
Page 282: ...Using the Tools Menu 6 34 PPC Configure ...
Page 329: ...Setting up a Typical Analysis 7 ...
Page 330: ...Setting up a Typical Analysis 7 2 ...
Page 333: ...Clarus 600 680 GC User s Guide 7 5 ...
Page 354: ...Setting up a Typical Analysis 7 26 ...
Page 355: ...Index ...
Page 356: ...I 2 ...
Page 361: ......


