PART 3: CX-Server Runtime
OMRON
CHAPTER 2 – Introduction to CX-Server Projects
Revision 2.0
CX-Server Runtime_Page 11
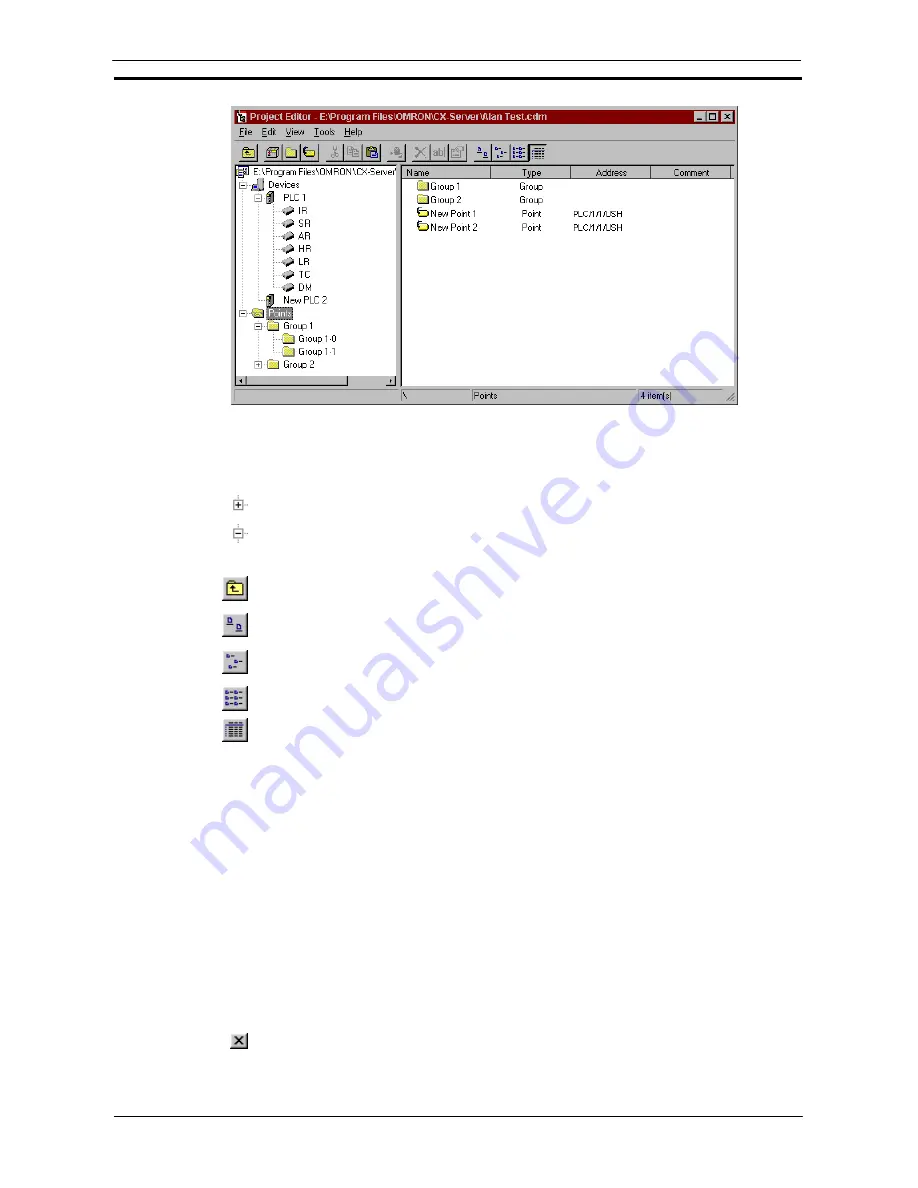
The status bar provides instant help.
The Project Editor can be manipulated in a similar manner to Microsoft Windows Explorer. The left pane
displays the content of the project in terms of Devices Networks and Points. The right pane provides detailed
information on the selected item, such as Name, Type and Address etc.
To expand the hierarchy in the left pane, select this icon.
To collapse the hierarchy in the left pane, select this icon.
To view the content of a particular branch in the hierarchy, double-click on the item in the left pane.
Select the
Up One Level
button from the toolbar to traverse back through the hierarchy
toward the root.
Select the
Large
Icons
button from the toolbar to display the content of the right pane as large
icons.
Select the
Small
Icons
button from the toolbar to display the content of the right pane as small
icons.
Select the
List
button from the toolbar to display the content of the right pane as a list.
Select the
Details
button from the toolbar to display the content of the right pane with
associated details.
The Toolbar and status bar can both be turned on or off. Select
Status Bar
from the
View
menu to control the
display of the status bar. Select
Toolbar
from the
View
menu to control the display of the Project Editor toolbar.
If points are displayed in the right pane, the view can further be modified by setting certain preferences.
♦
Showing invalid points;
♦
Showing open points / PLCs;
♦
Automatic resizing of list column.
Use the following procedure to set point preferences.
1, 2, 3…
1.
Click on the Points icon in the left pane to open the points view of the editor in the right
pane.
2. Select
Options
from the
View
menu. The options dialog is displayed.
3. Amend point preferences from the General tab. Select the
OK
pushbutton to complete
the operation. Select the
Cancel
pushbutton to abort the operation.
For moving, resizing, maximising, minimising and closing windows, refer to Microsoft Windows online help.
To save changes and close the Project Editor, select the
Close
button in the title bar.
Summary of Contents for CX-PROGRAMMER V9
Page 1: ...Cat No W446 E1 12 CX Programmer Ver 9 CXONE AL_C V4 AL_D V4 SYSMAC OPERATION MANUAL...
Page 2: ......
Page 3: ...SYSMAC CX Programmer Ver 9 CXONE AL C V4 AL D V4 Operation Manual Revised July 2010...
Page 4: ......
Page 6: ......
Page 32: ......
Page 33: ...PART 1 CX Programmer...
Page 34: ......
Page 91: ......
Page 111: ......
Page 191: ...PART 1 CX Programmer CHAPTER 4 Reference OMRON CX Programmer _Page 108...
Page 217: ......
Page 233: ......
Page 234: ...PART 2 CX Server PLC Tools...
Page 235: ......
Page 243: ......
Page 249: ......
Page 261: ...PART 2 CX Server PLC Tools CHAPTER 2 PLC Memory Component OMRON CX Server PLC Tools_Page 18...
Page 280: ......
Page 333: ......
Page 377: ......
Page 409: ......
Page 430: ......
Page 431: ...PART 3 CX Server Runtime...
Page 432: ......
Page 476: ......
Page 482: ......
Page 498: ......
Page 524: ......
Page 534: ......
Page 535: ......
Page 536: ......


