System Structure and Assembly/Disassembly
4-8
jitters for about 5s before you can switch the screen.
c)
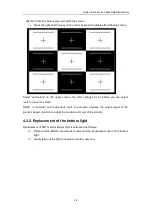
Press the right direction key on the minor keyboard to display the following screen.
Select “autocolour” on the upper screen, the color changes for 5s before you can select
“exit” to leave the screen.
NOTE: in “autojust” and “autocolour” tests, the monitor captures the output signal of the
product, based on which to adjust the position and color of the monitor.
4.3.2 Replacement of the bottom light
Replacement of CRT monitor bottom light is described as follows
:
d)
Remove three M3X8 countersunk screws and the transparent cover of the bottom
light.
e)
Gently take out the light and replace it with a new one.
Summary of Contents for DC-6
Page 1: ...DC 6 DC 6T DC 6Vet Diagnostic Ultrasound System Service Manual...
Page 2: ......
Page 20: ...2 1 2 System Overview 2 1 System Appearance 2 1 1 Complete System with CRT Monitor...
Page 23: ...System Overview 2 4 2 2 LCD Monitor...
Page 26: ...System Overview 2 7 2 2 3 Lever of upper support arm...
Page 66: ...4 1 4 System Structure and Assembly Disassembly 4 1 Exploded View of Complete System...
Page 101: ...System Structure and Assembly Disassembly 4 36 Power boards Card detacher...
Page 191: ...P N 2105 20 40473 V10 0...


