


310
9.9 EVERY 500 HOURS MAINTENANCE
Perform this maintenance along with maintenance every 50/100/250 hours.
[1] REPLACEMENT ENGINE OIL AND ENGINE OIL FILTER CARTRIDGE
• Remember to stop the engine when refilling.
• The drain plug of the engine oil pan is located directly underneath the machine.
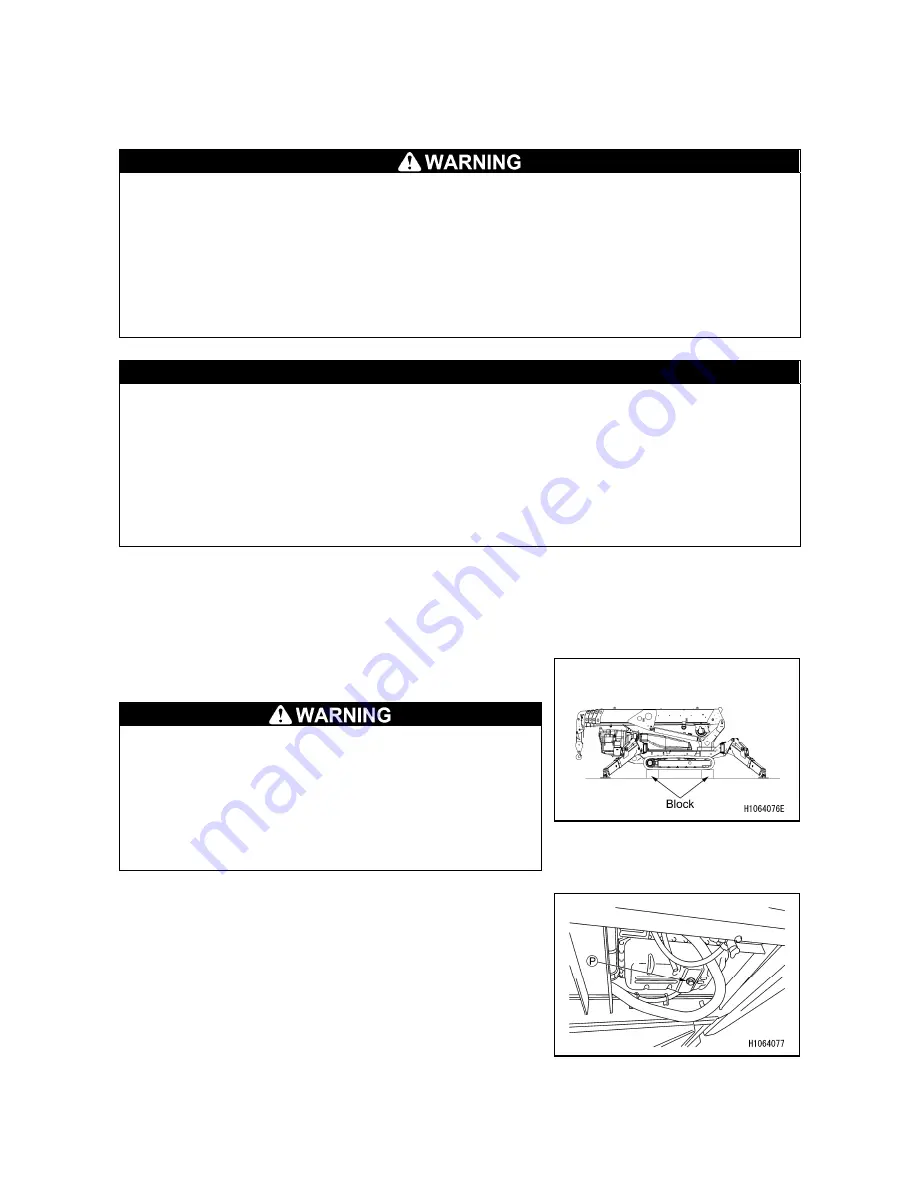
When draining engine oil, install outriggers as necessary to raise the machine.
Always place timbers beneath right and left crawlers and ground for safety.
• Securely tighten the oil level gauge after checking/refilling the oil. If the oil level gauge
falls during the operation, the hot oil may spout out of the pan, causing burns.
• Various parts are at elevated temperatures immediately after engine operation.
Do not proceed with oil or filter cartridge replacement immediately but wait for the
engine to cool to the extent that you can touch it with your hand.
CAUTION
• Make sure that old packing is not stuck to filter base. If it is, it can cause oil leakage.
• See “INSPECTION AND MAINTENANCE 6.1 USE OF LUBRICATING OIL ACCORDING TO
TEMPERATURES” for the oil to be used. Using oil other than those specified may
shorten the life of the engine. Be sure to refill the specified oil.
• Keep the engine oil at an appropriate level.
• When the engine is cold, oil cannot be drained completely. Drain the oil in a condition
in which the engine is warmed up just to the extent that it can be touched by hands.
• Be careful not to let any foreign substance go into the filler opening when refilling the
oil.
• Oil drain pan: Prepare a container for at least 10 liters.
• Volume of oil actually to be replaced in the oil pan: 7.4 L
1. Place the machine on a level surface.
2.
See “OPERATION 2.14 OUTRIGGER SETTING
OPERATION” to set the outriggers to raise the machine
when necessary.
Check the following before you enter under the
machine.
• Using a level, check to make sure that the machine
is installed on a level surface.
• When using the outriggers, place them at their
“maximum extension”.
• Then, place a firm block between the ground and the
crawler to prevent the machine from lowering.
3. Go under the machine and place a container to collect
the drained fuel directly underneath the drain plug
(P)
.
4. Turn the drain plug
(P)
slowly to avoid splashing oil on
yourself, and drain oil.
5. Check the drained oil and if it contains an unacceptable
amount of metal particles or foreign matter, contact us
or our sales service agent.
6. Install and tighten the drain plug
(P)
securely.
Summary of Contents for MC815C
Page 2: ......
Page 30: ...20 This Page Intentionally Left Blank...
Page 73: ...63 3 Total load chart 106 2186300...
Page 75: ...65 9 Precautions when using 106 2186600...
Page 76: ...66...
Page 82: ...72 This Page Intentionally Left Blank...
Page 197: ...187 Remote control menu...
Page 254: ...244 This Page Intentionally Left Blank...
Page 314: ...304...
Page 338: ...328 This Page Intentionally Left Blank...
Page 343: ...333 2 SPECIFICATION DIMENSIONAL DRAWING...
Page 344: ...334 3 DIMENSIONAL DRAWING OF OUTRIGGER WIDTH...
Page 357: ...347 5 WORKING RADIUS LIFTING HEIGHT...
Page 362: ...352 1 Diagram of fly jib working range chart 106 2189200...
Page 397: ...387 9 4 WORKING RADIUS LIFTING HEIGHT...
Page 398: ...388 This Page Intentionally Left Blank...
Page 402: ...392 1 Searcher hook working range diagram 106 2189200...
Page 424: ...414 9 4 WORKING RADIUS LIFTING HEIGHT...
Page 426: ......