background image

SERVICE MANUAL

1-8

 9G9002 – 2011-08-15

Applying Power

[1]

Check that the film supply is closed.

[2]

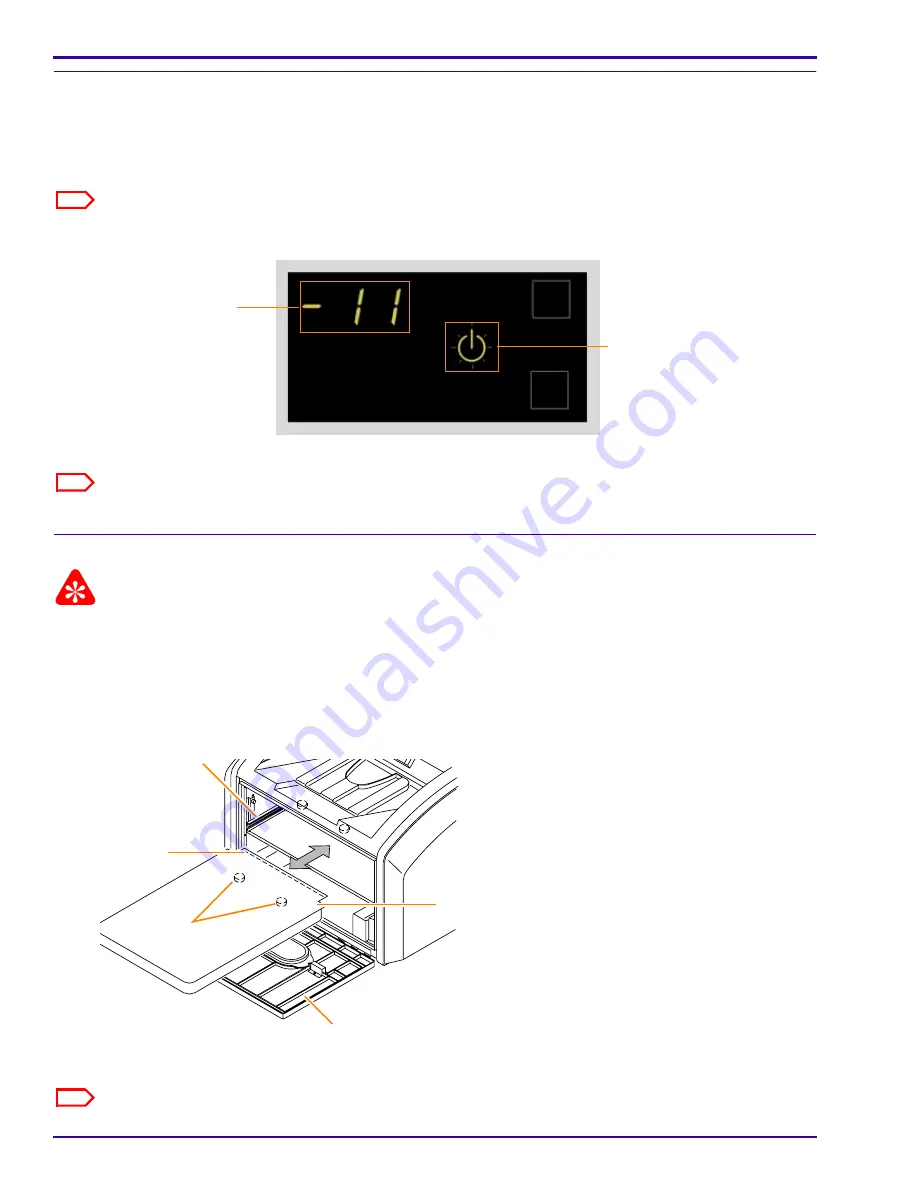
To start the laser imager, press the power switch on the back of the laser imager to on (|). Wait as the laser 
imager warms up. The warm-up period might last up to 30 minutes. The display screen shows the progress as 
the laser imager becomes ready to print.

Note

After the laser imager is energized, it takes approximately 90 seconds before the warm-up countdown is displayed.

Warming up

The warm-up period varies depending on how long the laser imager has been off and the ambient temperature.

Note

If the laser imager does not start, see 

“Troubleshooting”

.

Inserting a Film Cartridge

Important

Make sure that the laser imager is finished energizing before you load film. Opening the film supply before the imager 
is ready causes errors.

[1]

Open the film supply.

[2]

Insert the film cartridge. Align the cartridge with the label facing up and the perforations to the front. Set the 
leading edge on the cartridge guides, then slide the film cartridge into the laser imager to engage the detents 
in the bottom of the cartridge.

[3]

Close the film supply.

[4]

Check that the film count appears on the display screen.

Note

If a film count does not appear, see the Operation Manual for help.

The power symbol is 
yellow and flashing while 
the laser imager warms up

A countdown to zero (0) indicates 
how soon the laser imager will be 
ready to print

Film Supply

Detents

Leading edge

Cartridge Guide

Perforations

Summary of Contents for DRYPRO SIGMA

Page 1: ...Confidential ServiceManual Production Confidential Publication No 9G9002 2011 08 15 Service Manual...

Page 2: ...electronic or mechanical including photocopying typing or information retrieval systems without written permission Important Qualified service personnel must install and repair this equipment When per...

Page 3: ...Processor Fan Assembly 2 19 Felt Pad Assembly 2 20 Film Diverter Assembly 2 22 Processor Cover 2 23 Densitometer Assembly 2 24 Feed Roller Motor 2 26 Feed Roller Nip Drive Belt 2 28 Rollback Motor 2...

Page 4: ...he Logs 4 82 Log Keying Functions 4 84 Contents of the Log 4 85 5 Illustrated Parts List 5 1 Main Assembly 5 1 Cables and Harnesses 5 6 Covers 5 8 Exposure Transport Assembly 5 10 Transport Assembly 5...

Page 5: ...aterials Service laptop with MICROSOFT WINDOWS 98 operating system or higher and MICROSOFT INTERNET EXPLORER Secure Link Client Software version 2 8 1 or higher SecureLink Web Service Portal Software...

Page 6: ...ssories 2 Remove the 2 foam assemblies 3 Remove the side covers from the crate 4 Remove the bag from the laser imager Caution The laser imager weighs less than or equal to 54 kg 120 lb as packaged 5 U...

Page 7: ...x with 1 deodorant filter Publications kit Safety Manual User documentation CD Quick Reference Guides Moving the Laser Imager Caution The laser imager weighs less than or equal to 54 kg 120 lb as pack...

Page 8: ...the laser imager again you must return the shipping brackets to the shipping locations 1 To move the back shipping brackets remove the a Back cover see Adjustments and Replacements Back cover b 4 scre...

Page 9: ...of laser imager 6 Use 2 of the screws to reattach the shipping bracket in the alternate set of holes on the left side of the rail 7 Retain the other 2 bracket screws Install the screws into any of th...

Page 10: ...ts and Replacements Right Cover 9 Cut and remove the tie wrap from the exposure transport belt The tie wrap removes tension from the belt during shipping 10 Install the right cover 11 Install the deod...

Page 11: ...ocation Contact your dealer if you need assistance 2 Check that the voltage on the label over the power cord inlet matches the AC voltage at your site Caution If the voltage on the label does not matc...

Page 12: ...ting Inserting a Film Cartridge Important Make sure that the laser imager is finished energizing before you load film Opening the film supply before the imager is ready causes errors 1 Open the film s...

Page 13: ...tly save configuration information Setting Up Your Computer to Communicate with the Laser Imager Do this procedure at your computer 1 Select Start Settings Network Connections Note Depending on your o...

Page 14: ...Remove the laser imager top cover 2 Using a crossover cable connect your computer to the service port on the laser imager 3 Route the crossover cable so that it does not interfere with the top cover w...

Page 15: ...ton This corrects some potential viewing issues with IE8 If the icon is not on the toolbar select Tools Compatibility View from the browser menu 4 Select Wizards Installation Assistant 5 Click at the...

Page 16: ...parameters will not be saved Wait for the laser imager to restart The laser imager requires approximately 30 minutes to warm up After completing the warm up cycle the laser imager may print a calibra...

Page 17: ...all print jobs are printed c Under Optimization Steps click d Send an image from the modality and then click Note The image does not print until you click the button e View the test print and visually...

Page 18: ...4 Log off from the service tool see Additional Service Procedures Logging Off the Service Tool 5 Remove the top cover 6 Disconnect the crossover cable and restore the settings to your computer if nece...

Page 19: ...n in the table the same code appears as a 3 digit number on the display screen and as a 5 digit number at the Web Portal See Diagnostics Condition Codes for more information Display Screen Web Portal...

Page 20: ...SERVICE MANUAL 1 16 9G9002 2011 08 15 This page is intentionally blank...

Page 21: ...ed again The temperature meter must be at room temperature during this procedure If the meter has been in a hot or cold vehicle allow it to adjust to room temperature before using Purpose To set the c...

Page 22: ...and let it warm to operating temperature 2 Prepare the meter a Install the block on the probe 140 0 mm 5 5 in from the probe sensor b Clean the probe with alcohol wipes c Set the meter to display in...

Page 23: ...ifficult to detect movement 5 Allow the temperature reading on the meter to stabilize This requires approximately 90 seconds 6 Check that the temperature at the processor drum is between 123 5 124 5 C...

Page 24: ...ndicates the offset value between the Set Point field and the Temperature field 5 Click Set Temperature 6 Allow approximately 10 minutes for the temperature of the processor drum to become stable 7 Us...

Page 25: ...menu select Diagnostics DRE Advanced Test Print 3 Select Smpte8Bit from the Test Profile drop down list 4 Click Run 5 Check the test print to verify the left and right borders are equal Purpose To adj...

Page 26: ...row the number must be decreased If the left border as viewed on a light box is too wide the number must be increased 3 To decrease or increase the left border on the test print do one of the followin...

Page 27: ...Advanced Test Print 3 Select Smpte8Bit from the Test Profile drop down list 4 Click Run Purpose To adjust Start of Page timing to obtain a 2 00 mm 0 08 in half tone density border at the leading edge...

Page 28: ...m the number must be decreased If the half tone density as viewed on a light box is greater than 2 mm the number must be increased 3 To decrease or increase the half tone density border on the test pr...

Page 29: ...remove it The top cover is not secured with any screws but rests on channels Installation Reverse the steps in the removal procedure Note For best results set the pins on the front edge of the cover i...

Page 30: ...captive thumb screw located under the exit tray 5 Remove the left cover Installation Reverse the steps in the removal procedure Prerequisites Close the film cartridge Touch the Pause button on the di...

Page 31: ...attach to the right cover standoffs 1 screw accessible from the top 1 screw located underneath the exit tray 3 Remove the right cover from the laser imager Installation Reverse the steps in the remova...

Page 32: ...r 2 Remove the back cover Installation Reverse the steps in the removal procedure Note For best results set the lower edge of the cover into the lip of the imager frame first Prerequisites Close the f...

Page 33: ...ay screen 2 Remove 4 screws that hold the electronics board to the mounting bracket Installation Reverse the steps in the removal procedure Prerequisites Close the film cartridge Touch the Pause butto...

Page 34: ...the 2 screws from the interlock 3 Separate the interlock switch from the housing 4 Disconnect the connector Installation Reverse the steps in the removal procedure Make sure that the switch is seated...

Page 35: ...removing the processor drum Caution Be sure to loosen the correct screws Loosening the wrong screws will cause the bearings or the springs in the retainer to become loose and difficult to reset Prere...

Page 36: ...by pivoting it forward on its front screws 3 Open the wire saddle that secures the connector to the partition near the DRE motherboard 4 Disconnect the processor connector from the bulkhead 5 Disengag...

Page 37: ...ly slide the tensioner with the motor off the stand off screw and then unhook the spring 4 Set the tensioner and motor aside Prerequisites Close the film cartridge Touch the Pause button on the displa...

Page 38: ...the 2 bracket screws 4 Connect the drum drive connector 5 Hold the tensioner in position and place the belt over the exit pulley and the tensioner pulley The bottom of the belt sits on the top of the...

Page 39: ...filter mount Deodorant filter mount 3 Disconnect the connector from the fan assembly that you want to remove 4 Remove the 2 screws from the fan assembly that you want to remove Fan assembly Installat...

Page 40: ...r 2 Loosen the 2 captive thumb screws on the heat shield and then lift the heat shield open 3 Remove the 2 screws that hold the felt pad assembly to the cooling plate Felt pad assembly Prerequisites C...

Page 41: ...1 Fit the edge of the felt pad into the channel of the film diverter assembly 2 Install and tighten the 2 screws 3 Close the heat shield and tighten the captive screws 4 Install the top cover and the...

Page 42: ...he cooling plate 2 Remove the film diverter assembly Installation 1 Clean any residue in the area before you install the film diverter 2 Install the new film diverter assembly with the 3 screws 3 Inst...

Page 43: ...of the processor cover Note The front retaining rod is held in place by the front screws and is free after you remove them 2 Remove the processor cover Installation Reverse the steps in the removal p...

Page 44: ...Disconnect the connector on the bottom of the cooling assembly from the main wiring harness Prerequisites Close the film cartridge Touch the Pause button on the display screen De energize the laser im...

Page 45: ...and left cooling assembly bracket 2 screws and right cooling assembly bracket Lower 2 screws of the cooling assembly 5 Remove the cooling assembly and densitometer and pull the attached cable harness...

Page 46: ...1 Disconnect the connector from the motor Prerequisites Close the film cartridge Touch the Pause button on the display screen De energize the laser imager Disconnect the power cord Remove Top cover Ri...

Page 47: ...eep the remaining connectors free of tension and then remove the 2 screws that attach the motor 4 If you need to keep the gear to use with the new motor remove the a E ring b Gear from the shaft Insta...

Page 48: ...ulleys 1 Remove the a E rings from the 2 nip drive belt pulleys b 2 pulleys from their shafts c Nip drive belt Installation Reverse the steps in the removal procedure Prerequisites Close the film cart...

Page 49: ...the back of the motor as you untighten the lower screw to keep the nut from falling down when the motor is released 2 Remove the a 2 screws b Motor Installation Reverse the steps in the removal proce...

Page 50: ...e transport can be scratched easily while working in that area To protect the roller cover the roller opening with a sheet of used film 2 For better access to the sensor remove the front and top film...

Page 51: ...tor position is tight You might need to use a small flathead screwdriver to remove the connector 4 Remove the sensor screw and then remove the film cartridge detect sensor Installation Reverse the ste...

Page 52: ...stallation 1 Connect the a Tubing b Connector 2 Place the loop clamp around the vacuum pump 3 Insert the screw through the ends of the loop clamp 4 Install the screw with clamp and pump onto the frame...

Page 53: ...the imager disconnect the tubing at the interconnect joint Prerequisites Close the film cartridge Touch the Pause button on the display screen De energize the laser imager Disconnect the power cord T...

Page 54: ...ob and then remove the knob This allows more clearance to remove the pickup assembly 6 Remove 2 screws each on the left and right side of the imager 7 Pull the film pickup assembly through the slot on...

Page 55: ...s 9G9002 2011 08 15 2 35 Suction Cup Removal Pull the suction cup straight from the shaft Installation Push the cup onto the shaft until it is fully seated Prerequisites Remove the pickup assembly H22...

Page 56: ...tor gear to extend the pickup assembly to full length 2 Disconnect the connector 3 Remove the a Screw b Pickup home sensor Installation Reverse the steps in the removal procedure Prerequisites Remove...

Page 57: ...15 2 37 Film Contact Sensor Removal 1 Disconnect the connector 2 Remove the a Screw b Film contact sensor Installation Reverse the steps in the removal procedure Prerequisites Remove the pickup assemb...

Page 58: ...racket Prerequisites Close the film cartridge Touch the Pause button on the display screen De energize the laser imager Disconnect the power cord Remove Top cover Right cover Left cover To support the...

Page 59: ...guide rail 6 Carefully remove the imaging assembly and place it on a flat stable surface Installation Important You must make a calibration print after installing the new imaging assembly 1 Reverse th...

Page 60: ...he optics and exposure transport are joined 2 Carefully separate the optics from the transport Installation Reverse the steps in the removal procedure Note Use the alignment pins near the screw holes...

Page 61: ...Exposure transport cover 2 Push down on the tensioner to release pressure on the belt 3 Slide the belt off the lower shaft and remove the belt Installation Reverse the steps in the removal procedure...

Page 62: ...ssary use a small flathead screwdriver to remove the connector 2 Remove the a 4 screws b Exposure transport motor Installation Reverse the steps in the removal procedure Prerequisites Remove the Imagi...

Page 63: ...input and output connectors 1 on each side of the power supply board 3 Remove the 4 screws that secure the power supply board to the standoffs Power supply board Installation Reverse the steps in the...

Page 64: ...sconnect all connectors 2 Remove 6 screws Machine Control System MCS board Installation Reverse the steps in the removal procedure Note If necessary perform Restoring the Configuration Prerequisites P...

Page 65: ...e from electrostatic discharge 1 Remove the 5 tie wraps that hold the cables in place near the DRE motherboard bracket 2 Disconnect the connector and 3 network cables from the DRE motherboard Prerequi...

Page 66: ...46 9G9002 2011 08 15 3 Remove 4 nuts Bracket with DRE motherboard Installation Reverse the steps in the removal procedure Note If necessary perform Restoring the Configuration Nut 1 of 4 Bracket with...

Page 67: ...h circuit boards always use a wrist strap to prevent damage from electrostatic discharge 1 Disconnect the connector and 3 network cables from the DRE motherboard Prerequisites Perform Making a Configu...

Page 68: ...b DRE motherboard from the bracket c If you are replacing the motherboard remove the USB keylock to install on the new motherboard 3 Slide the flash drive out from the port on the back of the DRE mot...

Page 69: ...n Important If replacing the motherboard remove the USB keylock from the old motherboard and install it on the new motherboard 1 Reverse the steps of the removal procedure 2 Energize the imager 3 Afte...

Page 70: ...SERVICE MANUAL 2 50 9G9002 2011 08 15 This page is intentionally blank...

Page 71: ...M call must be made every 20 000 film cycles To consistently produce high quality images the imager must receive periodic routine maintenance Perform PM procedures Every Emergency Maintenance Call EM...

Page 72: ...all checklist 1 Repair the print problem that caused the EM call 2 Touch the Pause icon on the display screen to close the film cartridge 3 De energize the laser imager and then disconnect the power c...

Page 73: ...to clean the processor drum and processor cover rollers Note After cleaning place the used wipes in a bag close the bag with a tie wrap and dispose of it according to local ordinances 8 If you instal...

Page 74: ...the film supply and remove the film cartridge Leave the film supply open 4 De energize the imager and then disconnect the power cord 5 Remove the Top cover see Adjustments and Replacements Top Cover...

Page 75: ...On the left side of the imager vacuum the Processor drum exhaust port Filter duct 10 Vacuum the 2 exhaust holes on the left cover H221_6024HC Deodorant Filter area Exhaust Plenum Filter Duct Processo...

Page 76: ...over the imaging roller to cover it 14 Clean the processor drum Wipe the processor drum with alcohol wipes in one direction with an even steady pressure Rotate the processor drum while wiping Check th...

Page 77: ...d assembly with 2 screws see Adjustments and Replacements Felt Pad Assembly 22 Carefully remove the film you inserted over the imaging roller and discard it 23 Close the heat shield 24 Install the 2 r...

Page 78: ...rints To Filter Replacement 3 Perform Completing the PM Completing the PM 1 Wait while the processor warms to Ready 2 Check the temperature of the drum see Adjustments and Replacements Processor Drum...

Page 79: ...en to close the film cartridge 2 De energize the laser imager and then disconnect the power cord 3 Remove the Top cover see Adjustments and Replacements Top Cover Right cover see Adjustments and Repla...

Page 80: ...ser imager on off 4 Calibration symbol When lit this symbol indicates that a calibration is in process 5 Status Ready symbol Indicates that the laser imager is ready to print or if it is blinking that...

Page 81: ...lm cartridge or the loaded film size Displays the height and width of the loaded film size Calibrate When steady blue press this symbol to initiate calibration When blinking blue calibration is in pro...

Page 82: ...ge If more than one 1 error exists when a printer N GET request is received a status message is sent in response according to an established priority The following table shows the DICOM printer status...

Page 83: ...d Code will vary Failed See error tables An error occurred that prevents printing Self test Self test WARNING PRINTER INIT This occurs when power is first applied to the MCS Warming up Warming xx WARN...

Page 84: ...0 The film cartridge is inserted but the sheet count is 0 Insert a new film cartridge Manual Mode AIQC Off with normal tray information The film in this cartridge does not meet AIQC standards However...

Page 85: ...ymbol turns off and you can remove the film cartridge Job Manager Status Display Screen Web Portal Display Description Active Not applicable Shows how many jobs having this status are queued The laser...

Page 86: ...plays 20 209 while the error log displays 20209 Subsystem IDs Subsystem ID Subsystem Component Name Error ID MIM Core Components 01 Configuration and Control Subsystem 01 xxx 04 DICOM Input Print Serv...

Page 87: ...er Connection lost SCU to SCP Yes Yes No recovery needed 3 Notify An event occurred but was automatically recovered Communication retries Film pickup retry Approaching warning sidebands or limits of a...

Page 88: ...fic details User Action None Show at DS False DICOM Printer Status NORMAL Unique Symb ID ERR_CONFIG_CONTROL Web Portal Message Log Message DICOM Printer StatusInfo Severity None Maximum Number of Rest...

Page 89: ...ute correctly User Action None Show at DS False DICOM Printer Status NORMAL Unique Symb ID ERR_READING_CONFIG Web Portal Message Log Message DICOM Printer StatusInfo Severity MIM Core Internal Softwar...

Page 90: ...ote Rationale for not reporting to user The user requests shutdown of the entire laser imager not just a subsystem The OS will eventually shut down regardless of whether all subsystems shut down succe...

Page 91: ...e will not be sent as a message System Impact None The system will function normally SI 0 User Action None Show at DS False DICOM Printer Status NORMAL Unique Symb ID ERR_ALL_START_COM Web Portal Mess...

Page 92: ...available until it is restarted by the Configuration and Control subsystem Depending on the subsystem it may cause associations to be rejected or printing to be delayed User Action None Show at DS Fal...

Page 93: ...cannot correct this from the imager Additional DICOM information There is a specific result reason code available for this circumstance Rejected transient 3 Local limit exceeded Web Portal Message Log...

Page 94: ...CU will not be able to open an association and therefore will not be able to deliver a print job User Action None Show at DS False DICOM Printer Status NORMAL Unique Symb ID ERR_INVALID_ASSOCIATION No...

Page 95: ...is error means that the SCU did not reply to the SCP s Are You There packet System Impact The SCP will abort the association tied to this connection User Action None Show at DS False DICOM Printer Sta...

Page 96: ...rational error The user cannot correct this from the imager This problem likely occurs only on first time SCU setup Web Portal Message Log Message DICOM Printer StatusInfo Severity None Required attri...

Page 97: ...m session or film box the requested page s will not print User Action None Show at DS False DICOM Printer Status NORMAL Unique Symb ID ERR_INVALID_ATTRIBUTE Note Rationale for not reporting to user Th...

Page 98: ...M Printer Status NORMAL Unique Symb ID ERR_CONFIG_READ Web Portal Message Log Message DICOM Printer StatusInfo Severity None High water mark reached Scheduled study reclamation time reached NORMAL 3 N...

Page 99: ...OW_WATER_NOT_REACHED Web Portal Message Log Message DICOM Printer StatusInfo Severity None Low water mark reached NORMAL 3 Notify Description Study reclamation has been completed because the low water...

Page 100: ...ot possible to document specific details User Action None Show at DS False DICOM Printer Status NORMAL Unique Symb ID ERR_GENERAL_DELIVERY Web Portal Message Log Message DICOM Printer StatusInfo Sever...

Page 101: ...d set of causes Web Portal Message Log Message DICOM Printer StatusInfo Severity None General job processing error Startup error Bad or missing configuration data Resource allocation error Mode switch...

Page 102: ...rinter StatusInfo Severity None Invalid Media NORMAL 1 Alert Description An error occurred while reading the Delivery subsystem configuration information System Impact The submitted job will not be de...

Page 103: ...COM Printer StatusInfo Severity None Job delivery success NORMAL 3 Notify Description Notification that a job was successfully delivered this is not an error condition System Impact None User Action N...

Page 104: ...Rationale for not reporting to user This error should be recoverable Web Portal Message Log Message DICOM Printer StatusInfo Severity MIM Core Image Page Error General page builder error NORMAL 1 Aler...

Page 105: ...re xxxx is the name of the icon General error with algorithm parameters NORMAL 1 Alert Description The page builder component has encountered a rendering error System Impact The current page will not...

Page 106: ...Resend the print job from the image source 2 If the error persists call for service Show at DS True DICOM Printer Status NORMAL Unique Symb ID ERR_IMAGE_DATA Note The log entry reflects the specific...

Page 107: ...the following data error The specified page width and or height is less than zero The number of page bands is neither 1 nor 3 and each of the bands does not have the same type Icon x1 y1 and or x2 y2...

Page 108: ...hile building the image processing chain General chain building error Tonescaling error usually an error in the transfer function tables TFT preference look up table PLUT or curve shape Error forming...

Page 109: ...nfo Severity None sendPage myMPageBuilder Render Page call has high bits masked out NORMAL 2 Warning Description The 12 bit image data had pixels that were greater than 12 bits System Impact None The...

Page 110: ...wing internal errors occurred Binding error Staging error Printing error Exposure error Unknown internal error System Impact The job may not be delivered due to an internal error communicating with th...

Page 111: ...Web Portal Message Log Message DICOM Printer StatusInfo Severity None Media xxx requires calibration where xxx is the requested media NORMAL 2 Warning Description The requested media is not calibrate...

Page 112: ...Symb ID ERR_CALIBRATION Web Portal Message Log Message DICOM Printer StatusInfo Severity None Media xxx is empty where xxx is the requested media NORMAL 2 Warning Description The requested media is e...

Page 113: ...ssage Log Message DICOM Printer StatusInfo Severity MIS Internal Software Error MIS Internal Error PRINTER DOWN 0 Fatal Description This represents any of a number of errors that indicate that interna...

Page 114: ...ge DICOM Printer StatusInfo Severity MIS Database Error MIS Database Error CHECK PRINTER 1 Alert Description This represents any of a number of errors indicating that database software functionality o...

Page 115: ...to cover all common problems between the MIS and MCS software module No hardware connection is involved Web Portal Message Log Message DICOM Printer StatusInfo Severity None General Error in Service...

Page 116: ...nternal Communications Failure MCS failed to read write to the storage media ELEC DOWN 0 Fatal Description This error occurs when the Machine Control System MCS detects an error while attempting to re...

Page 117: ...aser imager 2 If the error persists call for service Show at DS True DICOM Printer Status FAILURE Unique Symb ID ERR_MCS_INCOMPATIBLE_HARDWARE Web Portal Message Log Message DICOM Printer StatusInfo S...

Page 118: ...laser imager then restart the laser imager 3 If the error persists call for service FE Action 1 Check that the following are closed and secured Top cover Film supply front and back covers 2 De energi...

Page 119: ...tem Impact None The system will function normally SI 0 User Action None FE Action Perform the PM Show at DS True DICOM Printer Status NORMAL Unique Symb ID ERR_PM_REQUIRED Web Portal Message Log Messa...

Page 120: ...DS True DICOM Printer Status N A Unique Symb ID ATTEN_PRINTERINFO_DOOROPEN Note This is a printer status indication not an error condition Web Portal Message Log Message DICOM Printer StatusInfo Seve...

Page 121: ...ID ATTEN_PRINTERINFO_RESTART Note This is a printer status indication not an error condition Web Portal Message Log Message DICOM Printer StatusInfo Severity None None N A 4 Auxiliary Description This...

Page 122: ...scription This notification occurs when the wrong number of pixels is transferred between the DRE and the DPB in the allotted timeframe The faulty image prints The job fails and the imager attempts to...

Page 123: ...The spooler isstill able to accept and queue jobs but new films will not be initiated Films downstream of the affected subsystem will be completed All other films will be reprinted SI 1 User Action 1...

Page 124: ...the actions below in sequence If an action provides a resolution do not continue with the other actions 1 Close the film cartridge 2 De energize then energize the laser imager 3 Install a new DRE to...

Page 125: ...misplaced films take the cartridge to a dark room and remove the cartridge cover Remove any misplaced films and reapply the cartridge cover 5 Re insert the cartridge FE Action Perform the actions bel...

Page 126: ...ortal Message Log Message DICOM Printer StatusInfo Severity None Film pickup retry Film did not lift successfully NORMAL 3 Notify Description This notification occurs if the imager fails to pick up a...

Page 127: ...is cleared when a film cartridge is removed and then re inserted System Impact Cannot print from the loaded film cartridge The spooler is still able to accept and queue jobs SI 2 User Action 1 Close...

Page 128: ...l able to accept and queue jobs SI 2 User Action 1 Close the film cartridge 2 Remove the film cartridge from the laser imager 3 Re insert the cartridge 4 If the error persists call for service FE Acti...

Page 129: ...t from the loaded film cartridge The spooler is still able to accept and queue jobs SI 2 User Action 1 Close the film cartridge 2 Remove the film cartridge from the laser imager 3 Re insert the cartri...

Page 130: ...nt film cartridge 2 If the error persists call for service Show at DS True DICOM Printer Status WARNING Unique Symb ID ERR_UP_CANTREAD_RFTAG Web Portal Message Log Message DICOM Printer StatusInfo Sev...

Page 131: ...ice Show at DS True DICOM Printer Status WARNING Unique Symb ID Unique Symb ID ERR_UP_WRONG_MEDIA_SIZE Logged for RMS CartridgeInfo bbeeee cjj d iii FilmSize size Web Portal Message Log Message DICOM...

Page 132: ...S2x failure is the most likely cause but the error can also occur from rollback motor M6x failure The error is cleared when the film supply is closed as indicated by the supply drawer interlock switch...

Page 133: ...the error persists call for service Show at DS True DICOM Printer Status WARNING Unique Symb ID ERR_UP_ROLLBACK_NOT_LEAVE Logged for RMS CartridgeInfo bbeeee cjj d iii FilmSize size Web Portal Messag...

Page 134: ...in achievable densities A new calibration will be attempted when this cartridge is re inserted System Impact None The system will function normally SI 0 User Action The minimum density of the film is...

Page 135: ...ting but with reduced range in achievable densities A new calibration will be attempted when this cartridge is re inserted System Impact None The system will function normally SI 0 User Action The max...

Page 136: ...True DICOM Printer Status WARNING Unique Symb ID ERR_RFTAG_DIAG_FAIL Web Portal Message Log Message DICOM Printer StatusInfo Severity Film Jam in Area 2 Sensor S6 detected initial film leading edge b...

Page 137: ...mely manner The error is cleared when either film cartridge is removed and re inserted or when the top cover is opened and then closed System Impact The imager can only print jobs that were in process...

Page 138: ...imely manner The error is cleared when either a film cartridge is removed and re inserted or when the top cover is opened and then closed System Impact The imager can only print jobs that were in proc...

Page 139: ...ssor The error is cleared when the film supply is opened then closed When this error occurs the processor stops rotating and the heater is turned off All jobs in the imager will fail and then automati...

Page 140: ...ess when the error occurred The spooler can still accept jobs but the jobs will not print until the error is resolved All jobs that were in process when the error occurred will reprint completely when...

Page 141: ...letely when the error is resolved SI 1 User Action Clear the jam see Film Jam in Area 3 Error Code 543 Web Portal code 26543 Show at DS True DICOM Printer Status WARNING Unique Symb ID ERR_DENSITOMETE...

Page 142: ...FAILURE Unique Symb ID ERR_INVALID_POWER_MONITOR _OFFSET Logged for RMS TriggerValues x TriggerRange y z TriggerNotes Power Monitor Offset value limits Web Portal Message Log Message DICOM Printer Sta...

Page 143: ...that were in process when the error occurred will reprint completely when the error is resolved SI 1 User Action 1 Shut down the laser imager and then restart the imager 2 If the error persists call...

Page 144: ...ty Optics Internal Hardware Failure Optics calibration laser power gain adjustment failed ELEC DOWN 0 Fatal Description The laser power gain is measured using a voltage on the laser driver This error...

Page 145: ...e error occurred will reprint completely when the error is resolved SI 1 User Action 1 Shut down the laser imager and then restart the imager 2 If the error persists call for service Show at DS True D...

Page 146: ...Internal Hardware Failure Short in RTD circuit PROC DOWN 0 Fatal Description This error can occur for many electromechanical reasons Resistance Temperature Detector RTD and connector leads touching d...

Page 147: ...hould be set Either the solid state relay SSR or mechanical power relay has failed Resolution Replace the board 3 The environment may be too cold or the power source underrated Resolution Repeat the w...

Page 148: ...r clears only when imager power is cycled System Impact The imager can only print jobs that were in process when the error occurred The spooler can still accept jobs but the jobs will not print until...

Page 149: ...et Either the solid state relay SSR or mechanical power relay has failed Resolution Replace the board 3 The environment may be too cold or the power source underrated Resolution Repeat the warm up cyc...

Page 150: ...mager 2 If the error persists call for service Show at DS True DICOM Printer Status FAILURE Unique Symb ID ERR_OVER_TEMP_ERRORS Logged for RMS TriggerValues a b TriggerNotes RTD zone number temperatur...

Page 151: ...hat were in process when the error occurred will reprint completely when the error is resolved SI 1 User Action 1 Shut down the laser imager and then restart the imager 2 If the error persists call fo...

Page 152: ...screen will not display correct data User Action 1 Shut down the laser imager and then restart the imager 2 If the error persists call for service Show at DS True DICOM Printer Status FAILURE Unique...

Page 153: ...en attempts to invoke communications from the MCS After an additional 10 seconds if the display screen has not received MCS communications this error displays on the display screen The error clears wh...

Page 154: ...lm Jams Film Jam Areas and Interlocks Film Path Jam Clear Area Description A1 Film supply A2 Film path A3 Processor densitometer Interlocks Description I1 Film supply I2 Left cover I3 Top cover A1 A2...

Page 155: ...02 2011 08 15 4 77 Sensors Sensor Description S1 Film cartridge S2 Rollback home S3 Pickup home S4 Film contact Pickup S5 Feed roller open S6 Start of Page SOP Exposure Transport S7 Densitometer S6 S1...

Page 156: ...ont of the imager through the film supply Note If the film is not accessible from the film supply continue with Step 4 4 Remove the top cover 5 Remove the left cover 6 Remove any jammed films in the p...

Page 157: ...film in the pickup access area 8 Install the left cover 9 Install the top cover Film Jam in Area 2 or 3 Error Code 326 Web Portal code 26326 1 Remove the top cover 2 Rotate the exit roller handle clo...

Page 158: ...f Cartridge detected On No cartridge LED6 Pickup home On pickup at home position LED7 Film contact Off sensor actuated by film detected On sensor did not detect any film LED8 Nip home On film transpor...

Page 159: ...Unblocked Pickup not home S4 Film contact sensor also used for Film out detect Blocked Pickup not contacting film Unblocked Pickup contacting film S2 Rollback home sensor Blocked Rollback home Unbloc...

Page 160: ...occurred Search the application log or a subsystem log for data at the time of the error View the data in the log before the error Log Function Application Log Records the events controlled and monit...

Page 161: ...Time To view the log of an event when the event is occurring select View Active Log 3 Click OK The retrieved log displays 4 Click Options to display a screen of the columns of the log You can use thi...

Page 162: ...op Stop the loading process while a log is loading Load Loads a log from a saved xml or KFC log file on your computer Save Saves a log to a folder to your computer Opens the Help screen Options Displa...

Page 163: ...ering Column Title Function Event Type Provides the same information in the Level column the level provided for the event The levels from highest to lowest are Trace Level 6 Debug 5 Diag 4 Info 3 Warn...

Page 164: ...Access the application log and use the Log Retrieval window to select the time within which the laser imager problem occurred 2 Click OK to capture the log data 3 Click Display Filter 4 Under the Bas...

Page 165: ...time period by selecting the appropriate parameter in the next drop down list and then type the date and time in the box Use yyyy mm dd space space hh mm format with hours in 24 hour time 10 Click OK...

Page 166: ...change log levels for subsystems 1 From the service tool select Configuration System Log Level 2 Click Modify 3 From the drop down list for the each subsystem select the log level you want and then cl...

Page 167: ...Main Assembly Figure 1 Main Assembly Front view H221_6054DC H221_6054DCA 1 5 23 17 4 10 13 14 16 15 12 20 21 25 28 27 37 36 18 8 9 7 6 19 24 30 31 32 33 34 11 2 3 35 26 22 29 1 2 3 6 7 8 9 10 12 13 1...

Page 168: ...nc M4 0 7 mm RoHS compliant 13 A4A97F2484 Pulley 1 1 Pulley transport 3 mm GT 16 groove 14 A4A99G1676 Belt timing 1 1 Belt timing 6 mm W 48 tooth 144 mm L 3 mm W pitch 15 A4A95F4586 Retaining ring 1 7...

Page 169: ...11 0 mm shaft dia 0 9 mm T carbon steel Trivalent Zinc Plus sealer RoHS compliant 32 A4A98H5592 Roller drive 1 1 Roller drive processor 33 A4A97F2391 Knob roller 1 1 Knob roller transport 34 A4A99G40...

Page 170: ...SERVICE MANUAL 5 4 9G9002 2011 08 15 Figure 2 Main Assembly Rear view H221_6055DC H221_6055DCA 2 1 3 4 10 12 9 8 7 11 5 6 1 2 3 4 5 6 7 8 10 11 12 9...

Page 171: ...Circuit breaker single pole 15 A 32 V DC 250 V AC black bezel black button through hole 5 A4A99G0777 Power supply 2 1 Power supply switching single 24 V 65 W RoHS compliant 6 A4A95F7220 Pump 2 1 Pump...

Page 172: ...SERVICE MANUAL 5 6 9G9002 2011 08 15 Cables and Harnesses Figure 3 Cables and Harnesses H221_6056DC H221_6056DCA 1 2 3 4 5 6 7 8 9 10 11 12 13 14 15 16 1 2 3 4 5 6 7 8 9 10 11 12 13 14 15 16...

Page 173: ...port RoHS compliant 7 A4A99G0727 Harness 3 1 Harness MCS to rollback RoHS compliant 8 A4A99G0720 Cable 3 1 Cable MCS to processor motor RoHS compliant 9 A4A99G0728 Harness 3 1 Harness power switchto M...

Page 174: ...SERVICE MANUAL 5 8 9G9002 2011 08 15 Covers Figure 4 Covers H221_6053DC H221_6053DCA 6 10 1 3 8 5 4 13 7 16 15 2 14 9 11 12 1 2 3 5 6 7 8 9 10 11 12 13 14 15 16 4...

Page 175: ...panel 7 A4A99G2724 Gasket 4 2 Gasket vertical back panel RoHS compliant 8 A4A99G7516 Assembly Right panel 4 1 Assembly Right panel 9 A4A99G2946 Cover interlock 4 1 Cover interlock RoHS compliant 10 A4...

Page 176: ...A4A99G2919 Assembly Piezo start of page5 1 Assembly Piezo start of page 4 A4A99G0062 Spring extension 5 1 Spring extension 0 028 in wire dia 1 516 in free length stainless steel 5 A4A99G4828 Assembly...

Page 177: ...etailed Description 1 A4A99G1383 Assembly Guide top front 6 1 Assembly Guide top front film transport 2 A4A99G1284 Assembly Guide back 6 1 Assembly Guide back film transport 3 A4A99G1425 Assembly Guid...

Page 178: ...ANUAL 5 12 9G9002 2011 08 15 Pickup Assembly Figure 7 Pickup Assembly H221_6046DC 16 5 2 H221_6046DCA 3 4 6 7 8 9 10 11 12 14 15 17 18 19 20 21 22 13 1 1 2 3 4 5 6 7 8 9 10 11 12 13 14 15 16 17 18 19...

Page 179: ...0 77 mm H 9 A4A99G0893 Screw 7 8 Screw machine M3 10 mm L steel ZPCC 10 A4A99G0894 Screw 7 5 Screw machine SEMS pan head Torx T20 M4 0 7 mm 8 0 mm clear zinc 11 A4A99H0087 Sleeve bearing 7 2 Bearing s...

Page 180: ...le start transport RoHS compliant 4 A4A99G5064 Screw 8 4 Screw machine SEMS pan head Torx T10 M3 0 5 6 0 clear zinc 5 A4A99G4876 Motor stepper 8 1 Motor stepper transport 6 A4A98E1025 Switch 8 2 Switc...

Page 181: ...t 4 A4A99G0195 Insulation drum back 9 1 Insulation drum back processor 5 A4A99G4093 Insulation end plate right 9 1 Insulation end plate right processor RoHS compliant 6 A4A99G0027 Insulation drum fron...

Page 182: ...ging Assembly Figure 10 Imaging Assembly Item Part No Part Name 10 Quantity Detailed Description 1 A4A99G6742 Assembly optics 10 1 Assembly Optics RoHS compliant 2 A4A99G6964 Assembly Exposure transpo...

Page 183: ...creen Assembly Figure 11 Local Panel Display Screen Assembly Figure 11 Local Panel Display Screen Assembly Item Part No Part Name 11 Quantity Detailed Description 1 A4A99G1217 Assembly local panel 11...

Page 184: ...ics Assembly Item Part No Part Name 12 Quantity Detailed Description 1 A4A99G0249 Assembly MCS 12 1 Assembly MCS 2 A4A99G4842 Assembly Compact flash 12 1 Compact flash CF 4 MLC 4 GB 3 A4A99G4716 Assem...

Page 185: ...Illustrated Parts List 9G9002 2011 08 15 5 19 Rollback Assembly Figure 13 Rollback Assembly H221_6052HC H221_6052HCA 17 10 7 16 5 6 8 13 12 1 3 15 4 14 9 11 2 1 2 3 4 5 6 7 8 9 10 11 12 13 14 15 16 17...

Page 186: ...ey 13 1 Pulley processor 3 mm GT 18 groove RoHS compliant 8 A4A99G1413 Flag home 13 1 Flag home rollback 9 A4A99G5064 Screw 13 6 Screw machine SEMS pan head Torx T10 M3 0 5 6 0 clear zinc 10 A4A92G163...

Page 187: ...necting Your Computer to the Laser Imager 2 Energize the laptop computer 3 Launch Secure Link from the Start menu 4 Type your password 5 Click OK 6 Type the IP address of the Service Port 192 168 000...

Page 188: ...e Values for the DICOM Source Communications 1 Connect the laptop computer to the laser imager see Installation Instructions Connecting Your Computer to the Laser Imager 2 Select Configuration DICOM S...

Page 189: ...the name by which the modalities recognize the laser imager 2 Check with the customer to determine the AE Title to use 3 Click Modify 4 Type the selected AE Title in the window 5 Click the Media tab...

Page 190: ...imager is installed in some other time zone When you reset the time zone value the time and date should display correctly 2 Will the clock be set manually or does the customer use a time server for sy...

Page 191: ...e key from the Technical Support Center 10 Click Save Note You will have Level 5 access for 24 hours 11 Return to the Clock Configuration screen 12 Click Modify and then set the correct date 13 If day...

Page 192: ...of the time server to be used for synchronization 19 Select the synchronization period how often the clock is synchronized from the Period drop down list 20 Select the correct time zone from the Time...

Page 193: ...r 2 Select Configuration System Network 3 Click Modify Important The Host Name is the network name for this laser imager It can be a maximum of 14 characters and a minimum of one The first character m...

Page 194: ...ber can be changed if not correct Service Phone Number should be populated but can be changed if not correct Service Code set at the factory and cannot be changed 3 Type or select from the drop down l...

Page 195: ...Units Checking the Installed Hardware and Display Units 1 Select Configuration Hardware Installed Hardware 2 Click Modify 3 Under Additional Configuration select Yes from the Use Metric Units drop dow...

Page 196: ...s and AE Title of the SCU that will send the image and AE Title of the destination The parameter values on the screen apply to the modality identified in the SCU list 4 At the top of the screen select...

Page 197: ...send the image and AE Title of the destination The parameter values on the screen apply to the modality identified in the SCU list Perform Image Optimization and Other Options for each SCU in the drop...

Page 198: ...Always Apply the parameter on the screen overrides the parameter the SCU sends If you select No the SCU parameter is applied Normally you should selectNo to allow the SCU to override the default selec...

Page 199: ...e History Log 1 Select System Information Service History 2 Click Add Note The Date Time Product Service Code and your User Name and User ID for Secure Tunnel fields are filled in automatically 3 Type...

Page 200: ...configuration parameters to the hard drive click the Backup tab 4 To download the backup data to your laptop computer a Click Download Backup b Click Save in the File Download window c Select a destin...

Page 201: ...a Important You must restart the imager from the service tool 6 Select Utilities Session Restart 7 Click Restart Wait for the imager to restart 8 If you are finished with the service tool a Disconnect...

Page 202: ...e USB port 1 Energize your laptop computer 2 Insert the Portable flash drive into the USB port on your laptop computer Ghost CD into the CD ROM drive of your laptop computer 3 Copy the software from t...

Page 203: ...into one of the USB ports on the DRE board Note The USB ports are located behind the lower 2 network connections 6 Install the back cover and then attach the power cord 7 Energize the imager to begin...

Page 204: ...rocontrollers Condition code 20 156 is generated 1 Log on to the service tool see Logging On to the Service Tool 2 Select Diagnostics Scripts 3 Select MicroUpdate_WithAutoRestart_ST vbs from the Scrip...

Page 205: ...Publication History Publication Date Revision ECO No Changed Pages File Name Notes 2011 08 15 30 N A N A 9G9002 A pdf New Publication 2011 10 19 p 1 13 A4A9YG220B_111019_Fix pdf Added a Note to the s...

Page 206: ...ica Minolta Medical Graphic Inc 1 Sakura machi Hino shi Tokyo 191 8511 JAPAN Konica Minolta Medical Graphic Inc 2011 KONICA MINOLTA and DRYPRO are trademarks of Konica Minolta Medical Graphic Inc Pub...

Reviews: