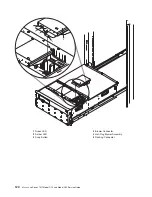
D10
I/O
Backplane
Assembly
Before
performing
the
following
procedure,
read
the
“Safety
Considerations”
on
page
41.
Note:
The
I/O
backplane
and
the
SPCN
riser
card
are
replaced
as
a
pair.
Removal
1.
Turn
off
the
system
power.
2.
Put
the
I/O
subsystem
into
the
service
position
as
described
in
“D10
Service
Position”
on
page
43.
3.
Label
and
remove
the
PCI
adapters.
(See
“PCI
Adapters”
on
page
45).
4.
Remove
the
service
access
cover.
(See
“D10
Covers”
on
page
44).
5.
Disconnect
the
fan
cable
from
the
I/O
backplane.
6.
Remove
the
power
supplies.
(See
“D10
Power
Supply”
on
page
111).
7.
Remove
the
RIO
bus
adapter.
(See
“D10
RIO
Bus
Adapter
Assembly”
on
page
109).
8.
Remove
the
two
screws
that
hold
the
SPCN
connector
card,
and
remove
it
from
the
I/O
backplane.
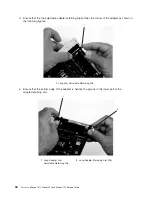
9.
Remove
the
screws
that
hold
the
PCI
adapter
mounting-guide,
and
remove
the
guides
from
the
I/O
backplane.
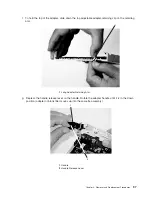
10.
Remove
the
screws
that
secure
the
I/O
backplane
to
the
subsystem
chassis.
11.
Lift
the
I/O
subsystem
backplane
straight
up
and
out
of
the
subsystem
chassis.
Note:
If
you
are
replacing
the
I/O
subsystem
backplane,
mark
and
remove
the
VPD
module
(see
“Model
D10
I/O
Backplane
Locations”
on
page
12
for
VPD
module
location)
from
the
old
backplane
and
move
it
to
the
replacement
I/O
subsystem
backplane.
Replacement
Note:
If
the
power
supplies
are
not
removed
from
the
I/O
subsystem
chassis,
remove
them
before
replacing
the
I/O
subsystem
backplane.
1.
Place
the
I/O
subsystem
backplane
assembly
into
the
chassis.
Align
the
backplane
with
the
mounting
screw
holes.
Note:
If
you
are
replacing
an
I/O
subsystem
backplane
with
a
new
one,
remove
the
VPD
module
from
the
old
backplane
and
move
it
to
the
replacement
I/O
subsystem
backplane.
For
VPD
module
location,
see
“Model
D10
I/O
Backplane
Locations”
on
page
12.
Put
the
module
from
the
new
backplane
onto
the
old
backplane.
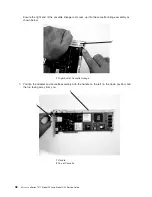
2.
Position
the
PCI
adapter
mounting-guides
on
the
I/O
backplane,
and
install
the
screws
to
secure
the
mounting-guides.
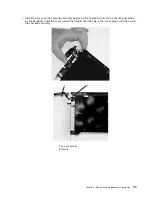
3.
Secure
the
backplane
with
the
remaining
mounting
screws
removed
earlier.
4.
Reconnect
the
fan
cable
to
the
I/O
backplane.
5.
Install
the
new
SPCN
connector
card
on
the
new
I/O
subsystem
backplane
using
the
screws
that
you
removed
earlier.
Note:
The
I/O
backplane
and
the
SPCN
connector
card
are
replaced
as
a
pair.
6.
Reinstall
the
RIO
bus
adapter
card.
(See
“D10
RIO
Bus
Adapter
Assembly”
on
page
109).
7.
Reinstall
the
power
supplies.
(See
“D10
Power
Supply”
on
page
111).
8.
Reinstall
the
cover.
(See
“D10
Covers”
on
page
44).
9.
Reinstall
all
PCI
adapters.
(See
“PCI
Adapters”
on
page
45).
10.
Return
the
I/O
subsystem
to
the
operating
position
(see
“D10
Operating
Position”
on
page
43)
and
connect
RIO,
SPCN,
and
adapter
cables.
11.
Connect
the
power
cables.
12.
Power
the
system
on.
110
Eserver
pSeries
7311
Model
D10
and
Model
D20
Service
Guide
Summary of Contents for eserver pSeries 7311 D10
Page 1: ...pSeries 7311 Model D10 and Model D20 Service Guide SA38 0627 01 ERserver...
Page 2: ......
Page 3: ...pSeries 7311 Model D10 and Model D20 Service Guide SA38 0627 01 ERserver...
Page 8: ...vi Eserver pSeries 7311 Model D10 and Model D20 Service Guide...
Page 12: ...x Eserver pSeries 7311 Model D10 and Model D20 Service Guide...
Page 14: ...xii Eserver pSeries 7311 Model D10 and Model D20 Service Guide...
Page 25: ...1 Processor Subsystem 2 I O Subsystem Chapter 1 Reference Information 9...
Page 89: ...Chapter 3 Removal and Replacement Procedures 73...
Page 99: ...2 1 1 Top of Cassette 2 Handle Chapter 3 Removal and Replacement Procedures 83...
Page 179: ...D10 I O Subsystem Parts continued 1 2 3 4 5 6 7 Chapter 4 Parts Information 163...
Page 207: ......

