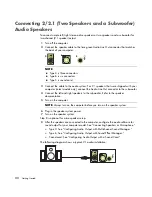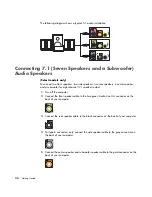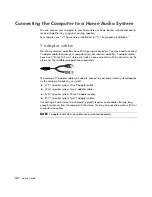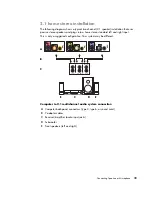
Connecting Speakers or Microphone
25
3
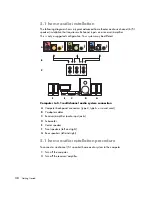
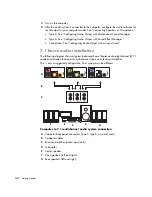
Connect the rear speaker cable to the black connector that matches the back of
your computer.
For type 3-connector systems, the blue Audio Line In connector functions as a Rear Line
Out when a multichannel audio configuration is activated.
4
Connect the center/subwoofer speaker cable to the gold (or pink Mic) connector that
matches the back of your computer.
For type 3-connector systems, the pink Mic connector functions as a center/subwoofer
speaker Line Out when a multichannel audio configuration is activated.
5
Connect the cables to the audio system.
6
Connect the front, rear, and center speakers to the subwoofer. Refer to the speaker
documentation.
7
Turn on the computer.
8
Plug in the speaker system power.
9
Turn on the speaker system.
10
After the speakers are connected to the computer, configure the audio software for
sound output for your computer model. See “Configuring Speaker and Sound
Options.”
Type 3: See “Configuring Audio Output with Multichannel Sound Manager.”
Type 6: See “Configuring Audio Output with Sound Effect Manager.”
Type 6 — multi-streaming: See “Configuring Audio Output with Sound Effect
Manager.”
Sound card: See “Configuring Audio Output with a Sound Card.”
NOTE:
Always turn on the computer before you turn on the speaker system.
3
6
S
3
6
S
Summary of Contents for A1710n - Pavilion - 1 GB RAM
Page 1: ...Getting Started ...
Page 10: ...x Getting Started ...
Page 26: ...16 Getting Started ...
Page 66: ...56 Getting Started ...
Page 74: ...64 Getting Started ...
Page 84: ...74 Getting Started ...
Page 102: ...92 Getting Started ...
Page 108: ...98 Getting Started ...
Page 134: ...124 Getting Started ...
Page 156: ...146 Getting Started ...
Page 188: ...178 Getting Started ...
Page 194: ...Part Number 5991 6837 ...

