


Product Mark
39
Notice:
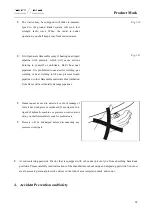
When a trailers is hitched to the tractor, before you leave the driving seat remember to put all the controls
in neutral, apply the handbrake, shut off the engine, engage first gear (if the tractor has a mechanical
transmission) and remove the key from the starter switch. If the tractor is not parked on level ground,
ALWAYS place chocks under the wheels of both the tractor and the trailer. For further information on
safe working procedures, refer to the chapter “Parking the tractor” in the safety section of this manual.
●
●
When trailers are hitched to the tractor, before you leave the driving seat remember to put all the controls in
neutral, apply the handbrake, shut off the engine, engage first gear (with mechanical transmissions) and remove
the ignition key. ALWAYS chock both the tractor and the trailer wheels.
●
The best way to transport a tractor that has broken down is to tow it away on a flat bed truck. Always secure
the tractor to the truck with chains. Before transporting the tractor on a flat bed truck or on a railway wagon,
make sure that the engine hood, doors, openable roof (if present) and windows are all closed and securely
fastened. Never tow the tractor at speeds in excess of 10 kph. An operator must stay in the driving position to
steer and brake the tractor.
5.6.
Driving on highway
●
Comply with the highway code, including regulations concerning speed limits, correct use of lights, hazard
warning lights and slow moving vehicle warning signs.
●
When driving the tractor on the road, insert the connecting bolt to lock the two brake pedals together. This is
to ensure effectiveness and bilateral braking.
●
Speed will be reduced adequately in advance to avoid accident, overturning and collision when steering and
making a turn. The tractor cannot make sudden turn when driving at high speed and it cannot make sudden turn
by using lateral braking to avoid overturning danger.
●
Lift all implements to their lowest transportation positions and lock at their positions.
●
Disengage the power take-off and the differential lock.
●
Use the correct pin for the towing hitch and secure with its locking cotter.
●
Make sure that all necessary outline markings and the hazard warning lights (if required by local regulations)
are in place and in working order.
●
Clean all lights required for road use, front and rear, and make sure they are under normal operation state.
●
The SMV (Slow Moving Vehicle) sign, the rotating beacon, flashing lights or other high-visibility equipment
must be used in compliance with the statutory rules of the highway code.
●
Fix the swinging towing hitch in a fixed position using the safety locks. If required by the rules of the highway
code, affix the appropriate safety warnings to the load.
Summary of Contents for FL35-70HP Series
Page 21: ...Product Mark 20 1 Security Considerations ...
Page 57: ...Product Mark 56 Fig 1 35 Fig 1 36 ...
Page 58: ...Product Mark 57 Fig 1 37 Fig 1 38 ...
Page 70: ...69 2 Product Mark ...
Page 74: ...73 Page Left Intentionally Blank ...
Page 75: ...Product Description 74 3 Product Description ...
Page 77: ...Product Description 76 Fig 3 2 3 1 2 Appearance of tractor equipped with cab ...
Page 81: ...Product Description 80 ...
Page 113: ...Product Description 112 ...
Page 124: ...Electrical system 123 4 Operation Instructions ...
Page 157: ...Electrical system 156 ...
Page 162: ...Electrical system 161 Fig 4 32 Three point linkage Model 2 ...
Page 189: ...Electrical system 188 5 Wheels ...
Page 208: ...Electrical system 207 6 Electrical System ...
Page 230: ...Electrical system 229 requirements 6 6 Electrical Schematic Diagram ...
Page 235: ...234 7 On board Spare Parts Tools and Quick wear Parts ...
Page 241: ...240 ...
Page 242: ...241 8 Maintenance Specification ...
Page 288: ...287 Fig 8 35 ...
Page 338: ...Operation Instructions 337 9 Troubleshooting ...
Page 353: ...352 10 Tractor Storage and Unpack ...
Page 358: ...Tractor Storage and Unpack 357 11 Delivery Acceptance and Transportation ...
Page 361: ...360 ...
Page 362: ...361 12 Disassembly and Disposal ...
Page 365: ...Warranty Contents 364 13 Warranty Contents ...
Page 411: ...Appendix 410 15 Appendix ...