295
Notice:
If skin or eye is injured by high pressure fuel and oil, it may cause serious burning, blindness and
even death. Leakage of high pressure liquid may not be seen. When seeking for leakage, one piece
of hard cardboard or wood will be used. It is prohibited to use both hands! Safety glasses will be
worn to protect your eyes! If any liquid is permeated into skin, please immediately seek for treatment
from medical workers with experience for handling special problems.
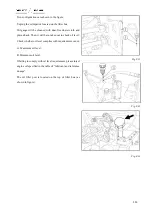
Hydraulic oil need be replaced after the tractor has been
worked for 800 hours. Specific steps are as below:
●
Open the tank filler cap
①
of the oil tank and take out
filter element in the oil tank for cleaning.
●
Loosen inlet and outlet oil tubes of steering oil
cylinder of the tractor
②
, manually revolve steering
wheel under parking state of the tractor to release
steering hydraulic oil when it is heated.
●
Add suitable hydraulic oil pressure after it has been
discharged.
●
Oil way will be deflated after oil has been injected.
Fig. 8-45
Air bleeding method for oil lines:
Manually rotate steering wheel to one side, loosen corresponding steering oil tube if it is hard to steer. Oil tube will
be locked tightly after bubble has been discharged completely, the other side will also be exhausted as per the same
method.
Oil level of steering fuel tank will be checked after exhaust. If it is not enough, oil will be added to the middle of
the oil level scale.
8.9.2.Maintenance and repair of fuel tank
Fuel tank can store oil plants and subside moisture and impurity, which shall be regularly cleaned to remove dirt
when being used.
Park the tractor on a level surface. Turn off the engine. Remove the drain plug at the bottom of the fuel tank to drain
deposits from the fuel tank.
Summary of Contents for FL35-70HP Series
Page 21: ...Product Mark 20 1 Security Considerations ...
Page 57: ...Product Mark 56 Fig 1 35 Fig 1 36 ...
Page 58: ...Product Mark 57 Fig 1 37 Fig 1 38 ...
Page 70: ...69 2 Product Mark ...
Page 74: ...73 Page Left Intentionally Blank ...
Page 75: ...Product Description 74 3 Product Description ...
Page 77: ...Product Description 76 Fig 3 2 3 1 2 Appearance of tractor equipped with cab ...
Page 81: ...Product Description 80 ...
Page 113: ...Product Description 112 ...
Page 124: ...Electrical system 123 4 Operation Instructions ...
Page 157: ...Electrical system 156 ...
Page 162: ...Electrical system 161 Fig 4 32 Three point linkage Model 2 ...
Page 189: ...Electrical system 188 5 Wheels ...
Page 208: ...Electrical system 207 6 Electrical System ...
Page 230: ...Electrical system 229 requirements 6 6 Electrical Schematic Diagram ...
Page 235: ...234 7 On board Spare Parts Tools and Quick wear Parts ...
Page 241: ...240 ...
Page 242: ...241 8 Maintenance Specification ...
Page 288: ...287 Fig 8 35 ...
Page 338: ...Operation Instructions 337 9 Troubleshooting ...
Page 353: ...352 10 Tractor Storage and Unpack ...
Page 358: ...Tractor Storage and Unpack 357 11 Delivery Acceptance and Transportation ...
Page 361: ...360 ...
Page 362: ...361 12 Disassembly and Disposal ...
Page 365: ...Warranty Contents 364 13 Warranty Contents ...
Page 411: ...Appendix 410 15 Appendix ...


