Adjusting the Copier (Adjustment/Cleaning)
2-40
2
Cus
to
mis
ing S
etti
ng
s t
o Y
ou
r
Need
s
4
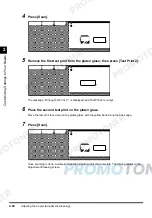
Press [Scan].
5
Remove the first test print from the platen glass; then press [Test Print 2].
The message “Printing Test Print 2..”. is displayed, and Test Print 2 is output.
6
Place the second test print on the platen glass.
Place the test print face down on the platen glass, with the yellow band along the back edge.
7
Press [Scan].
Once scanning is done, Automatic Gradation Adjustment is also complete. The display returns to the
Adjustment/Cleaning screen.
Summary of Contents for imageCLASS 1100
Page 1: ...COLOUR LASER COPIER 1100 Reference Guide...
Page 56: ...Universal Functions 1 34 1 Before You Start Using This Copier...
Page 104: ...Checking the Counter 2 48 2 Customising Settings to Your Needs...
Page 134: ...Consumables and Options 3 30 3 Loading Paper and Refilling Consumables...
Page 172: ...Touch Panel Display Messages 4 38 4 Troubleshooting...
Page 174: ...5 Handling Options 5 2 5 Handling Options Before Copying 5 72 After Copying 5 73...
Page 246: ...Control Card 5 74 5 Handling Options...
Page 247: ...CHAPTER 6 1 6 Appendix Copier Specifications 6 2 Index 6 4...
Page 260: ......

