background image

Configuring the Mannequin

20

*When in the Vaginal Delivery Operating Mode, if the user selects 

Proceed To Postpartum

 after the baby 

is marked as delivered, do not stop the SCE. However, it is necessary to reconfigure the mannequin for 
postpartum configuration prior to proceeding.

**This process may be completed before installing the blood tank or after installing the blood tank, 
depending on which filling method is chosen (internal or external).

For more information on selecting an SCE, see the 

Using Müse

 section of this user guide.

For more information on processes such as priming the genitourinary system, epidural site or IV system, 
see 

Using Lucina 

section of this user guide.

P

REPARTUM

Removing the Rotation Ring

To remove the rotation ring from inside the mannequin’s torso:  

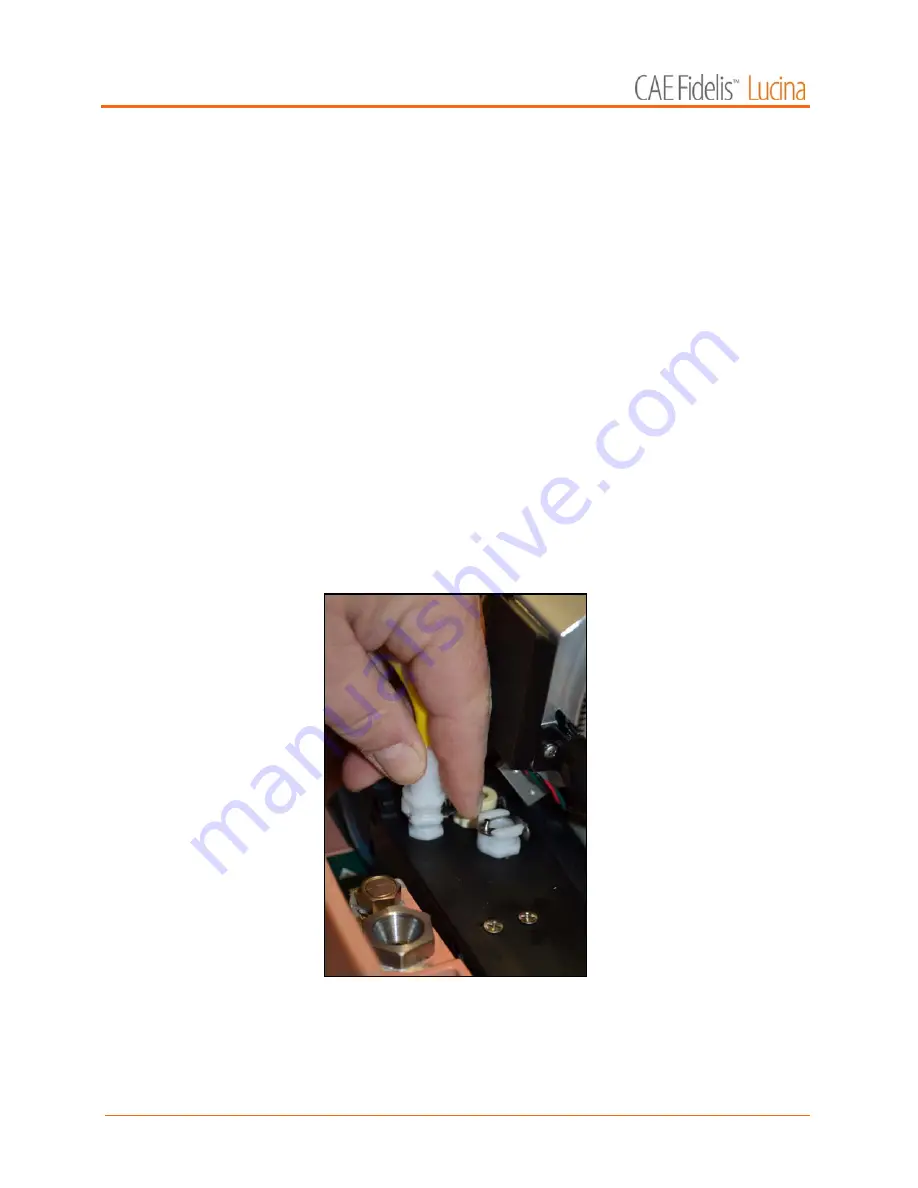
1. Unfasten the yellow air compression tube at the baffle by pressing the 

metal release clip.

The Mannequin’s Torso - Rotation Ring Compressor Connection

Summary of Contents for Fidelis Lucina

Page 1: ...User Guide Maternal Fetal Simulator...

Page 2: ...2015 CAE Healthcare 905K470052 v2 1...

Page 3: ...s contained herein Consequently please be sure to read the terms of this License carefully If you do not accept these terms conditions and other provisions in their entirety without modification of an...

Page 4: ...ealthcare s copyright and any other proprietary notices indicated on the Embedded Software and Data ghost export or produce any derivative works from the Product or any part thereof not network the Pr...

Page 5: ...d shall remain in effect until terminated as provided hereafter 4 2 This License terminates immediately upon termination of the MEPGTC 4 3 CAE Healthcare may terminate this License immediately upon wr...

Page 6: ...ee agrees to be responsible for enforcing the terms of this Section 5 and to take such action legal or otherwise to the extent necessary to cause anyone having access to the Confidential Information t...

Page 7: ...njunctive proceedings to preserve confidentiality obligations or intellectual property rights then it is entitled to seek relief before the competent court body of any jurisdiction 9 MISCELLANEOUS 9 1...

Page 8: ...ct the construction or interpretation of this Agreement 9 7 Severability If any one or more of the provisions of this License shall be held to be invalid illegal or unenforceable the validity legality...

Page 9: ...d must meet the following minimum requirements Macintosh Operating System Mac OS X10 6x minimum Firefox 24 ESR minimum Adobe Flash Player 16 x x x minimum Adobe Reader 11 x or higher Windows Operating...

Page 10: ...2 11b g n Ethernet card 100BASE T Ethernet Adapter Standard DVD R Drive NOTE Macintosh Quicktime are registered trademarks of Apple Inc Windows Media and Internet Explorer are registered trademarks of...

Page 11: ...cm x 22 7cm Weight Mannequin Simulator 111lbs 50 kg Fetus Simulator 5 5 lbs 2 5 kg Instructor Workstation 4 5lbs 2 1kg Environmental Requirements Ambient Temperature Range Mannequin Simulator Operatio...

Page 12: ...ging Internal Battery 10 8V 60 watt hour lithium polymer rechargeable Run Time 2 to 4 hours Typical TouchPro Computer Please see the product s user guide for power specifications Communications Simula...

Page 13: ...defibrillator paddles and the electrodes may cause injury to the user and damage to the equipment Always use the supplied power cords Do not substitute Operate the system from a power source with the...

Page 14: ...to flow on or into electronic parts Bleeding System DO NOT modify the tank or any assembly component ALWAYS protect eyes skin and clothing against accidental exposure ALWAYS read and follow instructio...

Page 15: ...mmunications x Electrotherapy x Air Supply x Cautions and Warnings xi Electrical Safety xi Latex Warning xi General Use Warnings xii Table of Contents xiii Introduction 1 Contained in this User Guide...

Page 16: ...e Wireless Network Laptop or Tablet Instructor Workstation Windows 16 Step 6 Connect a TouchPro Workstation to the Wireless Network Optional 17 Configuring The Mannequin 19 Prepartum 20 Removing the R...

Page 17: ...Installing the Postpartum Invertible Uterus 54 Postpartum Backplate Installation 59 Using M se 61 Starting the Application 61 Navigating the Home Page 63 The SCE Selection Panel 64 The SCE Operating M...

Page 18: ...Modifying Scenario States 128 Deleting Scenario States 133 Deleting Parameters and Transitions 133 Saving the Scenario 134 Emptying the Trash 135 Saving States to the State Library 136 Administrative...

Page 19: ...Setting CTG Alarm Thresholds 185 Setting CTG Alarm Suspension Time 186 Adjusting Audio Settings 188 Muting CTG Alarms 190 MNIBP Cycling and Manual MNIBP 190 Resetting Tocography Noise 192 Viewing the...

Page 20: ...Synchronized Vocal Clip 234 Neonate Cry Selection 235 Fetal Heart Sound Location 236 Bowel Sounds Non Gravid Only 237 Care and Maintenance 239 CAE Healthcare Assurance Programs 239 General Information...

Page 21: ...ion from the Simulator 256 Replacing the Standard Birth Canal 258 Respiratory Desaturation 271 Cardiovascular Blood Pressure 272 Cardiovascular Heart Rate 273 Respiratory Respiratory Rate 274 M se Par...

Page 22: ...PEEP 284 O2 Consumption 284 CO2 Production Factor 284 PaCO2 Set point 284 PaO2 Set point 285 I to E Ratio 1 X 285 PetCO2 PaCO2 Factor 285 Respiratory Gain Factor 286 Respiratory Quotient 286 Volume R...

Page 23: ...r 295 Pulmonary Artery PA Catheter 296 Pulmonary Artery PA Balloon 296 Defibrillation Defib 296 Pacing Current 297 Pacing Rate 297 Pacing Capture Threshold 297 Cold Fluid Inject 297 Cardiovascular Add...

Page 24: ...State 306 Contraction Frequency 307 Contraction Amplitude 307 Contraction Duration 307 Patient Pushing 307 Early Deceleration Magnitude 307 Late Deceleration Amplification Factor 308 Shoulder Dystoci...

Page 25: ...cal Flow Factor 314 Cardiotocograph CTG Configuration Parameters 315 FHR Probe 316 UA Probe 316 MHR Probe 317 MSPO2 Probe 317 MNIBP Probe 318 Temp Probe 318 FHR Signal Loss 319 UA Signal Loss 319 TOCO...

Page 26: ...ns 327 M se Patient Status Display 327 Waveform Widget Displays 327 Numeric Widget Displays 328 Volume Widget Displays 330 Other Widget Displays 330 CPR Monitor 330 Traction Feedback 332 TouchPro Pati...

Page 27: ...7 Fidelis Lucina Medication Information 349 M se Mannequin Setup Screens 351 Mannequin Setup Screen for a Prepartum SCE 352 Mannequin Setup Screen for an Active Phase Breech SCE 353 Mannequin Setup Sc...

Page 28: ...Table Of Contents xxvi This page intentionally blank...

Page 29: ...station provides the instructor with scenario development tools and programmable patient physiology to create an immersive realistic training environment The Fidelis Lucina simulator provides all the...

Page 30: ...tions in the M se software The Using TouchPro Patient Monitor and Using the TouchPro CTG sections describe how to setup and utilize the TouchPro Patient Monitor and TouchPro CTG software The Using the...

Page 31: ...9 kg Fidelis Lucina is fully operational in the supine lateral prone and seated positions The simulator offers features such as arm pronation and supination breath and heart sounds palpable pulses pat...

Page 32: ...simulator Gown A gown is provided for the maternal mannequin to enhance the reality of the simulation Prepartum Early Labor Kit The Prepartum Early Labor Kit contains the following items Prepartum bir...

Page 33: ...ay bottle Postpartum Kit The Postpartum Kit contains the following items Postpartum Birth Canal with Boggy Contracted Uterus Blood Tank Trauma Fill Tank Accessories The accessories for the Fidelis Luc...

Page 34: ...2 cm dilated and 80 effaced soft intermediate 3 cm dilated and 80 effaced soft intermediate 5 cm dilated and 90 effaced soft anterior Operation Supplemental Accessories The operation supplemental acce...

Page 35: ...equipment Arm skin Delivery birth canal including perineum and vulva Delivery fetus Hand skin left or right Leopold fetus Lubricant spray cottonseed oil Non Gravid Abdomen Roll of hook and loop fasten...

Page 36: ...Equipment Overview 8 This page intentionally blank...

Page 37: ...nce of the steps carefully Complete all steps in order Do not power on any components until instructed in the text Keep all original shipping materials including boxes Warranty and repair items must b...

Page 38: ...thin the workspace to recharge the simulator and its powered components Before placing the simulator on a surface be certain that surface can easily support 200 pounds NEVER lift the simulator by the...

Page 39: ...Lucina mannequin s torso c Press and release the power button The button illuminates when the mannequin is powered on The Mannequin Power Button and Power Cord IMPORTANT Wait three 3 minutes while the...

Page 40: ...ing to the Home position press and hold the upward arrow button until the rotation ring returns to the Home position e g the highest position of the Birthing Mechanism rotates and locks in place The G...

Page 41: ...this user guide b Locate and press the power button on the back of the fetus The Back of the Fetus A green light will begin blinking in the umbilical indicating the fetus is powering up When the umbil...

Page 42: ...us with its designated maternal mannequin at all times For more information on charging the fetus batteries see the Care and Maintenance section of this user guide Step 4 Power on the Instructor Works...

Page 43: ...pened the M se software launches If the auto connect does not occur perform the following steps a Click once on the AirPort icon located at the top right hand corner of the screen The Airport Icon b S...

Page 44: ...launches If the auto connect does not occur perform the following steps a Click or tap on the Wireless Network icon in the task bar b Select the simulator wireless network The network is called mfsxxx...

Page 45: ...r Workstation MUST be connected to the simulator network prior to performing the steps below See the previous setup step for more information To connect the TouchPro software to a different computer t...

Page 46: ...een j Choose the TouchPro CTG or the TouchPro Patient Monitor to launch the software NOTE If you experience poor waveform quality or connection dropouts consider relocating the simulator to a position...

Page 47: ...Vaginal Vertex Vaginal Breech Postpartum Boggy Contracted Uterus Installing the Rotation Ring No No Yes Yes No Removing the Rotation Ring Yes Yes No No Yes Installing the Support Tub Yes Yes No No No...

Page 48: ...e blood tank depending on which filling method is chosen internal or external For more information on selecting an SCE see the Using M se section of this user guide For more information on processes s...

Page 49: ...out of the torso and place the rotation ring in a secure location for later use The Mannequin s Torso Rotation Ring Removed The mannequin s torso is empty and ready for the next piece of equipment to...

Page 50: ...out of the mannequin s pelvis The Uterine Funnel with Delivery Cervix Removal 2 Install the prepartum birth canal NOTE The prepartum birth canal is installed within the standard birth canal To install...

Page 51: ...standard birth canal The Prepartum Birth Canal c Tuck the skin shorts over the extended flaps To install the static cervix lubricate the anterior part of the selected cervix and insert at the posterio...

Page 52: ...o the grooves located in the center of the backplate The Backplate 2 Install the backplate with the cervix retention plate The retention plate should be flush against the static cervix NOTE Ensure the...

Page 53: ...moved Loading the Fetus Prepartum Prepartum and Latent To load the Leopold fetus 2 Ensure the Leopold support tub is installed in the mannequin s torso 3 Place empty placenta pouch on top of the suppo...

Page 54: ...ed prior to running a delivery SCE To install the rotation ring inside the mannequin s torso 1 Align the rotation ring tab located on the side opposite of the CAE Fidelis logo with the rotation ring g...

Page 55: ...Torso Rotation Ring Clip 3 Connect the yellow compression tubing on the rotation ring to the compressor connection on the baffle The Mannequin s Torso Rotation Ring Compressor Connection 4 Use the upw...

Page 56: ...mic cervix slide the uterine funnel with delivery cervix into the grooves located on each side of the mannequin s pelvis The Uterine Funnel with Dynamic Cervix Installed NOTE Lightly lubricate the dyn...

Page 57: ...position 3 Ensure there are no kinks in the yellow tubing on the rotation ring NOTE If the SCE does not require loading a fetus ensure the descent mechanism is retracted to the most superior position...

Page 58: ...to the Fetus 5 Lubricate the fetus buttocks legs and lower torso using cottonseed oil DO NOT lubricate under the fetus arms IMPORTANT Wipe off remove any lubrication from the fetus head 6 Insert the...

Page 59: ...cing the mother s right side when placed into the rotation ring For Right Sacrum breech presentation the fetal head should be facing the mother s left side when placed into the rotation ring NOTE Ensu...

Page 60: ...livery The Breech Fetus in the Rotation Ring Vaginal Delivery Vertex To load the delivery fetus for a vaginal delivery in a vertex presentation 1 Ensure the rotation ring from inside the mannequin s t...

Page 61: ...lical Cord Attached to the Fetus 5 Lubricate the fetus head neck and upper torso using cottonseed oil DO NOT lubricate under the fetus arms 6 Insert the fetus by placing the head against the delivery...

Page 62: ...to the rotation ring up to the two dimples near the umbilical cord area The Fetus in the Rotation Ring Vertex Presentation 8 Bend the legs at the knees and tuck the feet into the rotation ring up to t...

Page 63: ...us is now installed for a vertex vaginal delivery Installing the Placenta NOTE For active and vaginal delivery configurations prior to installing the placenta the fetus and placenta should be connecte...

Page 64: ...seed oil spray If the placenta and umbilical cord connection or the umbilical cord and fetus connection detaches too easily use rubbing alcohol to clean the blue tube of the cord and remove the cotton...

Page 65: ...e the Placenta Pouch Vaginal Delivery Placenta Pouch Placement For a vaginal delivery configuration 1 Cover the fetus with the placenta pouch 2 Ensure that the front of placenta pouch closest to the u...

Page 66: ...or may become obstructed and begin to make a clicking or knocking sound If the noise does not stop right away on its own open the abdomen and ensure the placenta and umbilical cord are not jammed Once...

Page 67: ...on system cord inside the abdomen shell The Abdomen Contraction and Speaker Cables 2 Plug the cables into the corresponding connections inside the mannequin s torso The Abdomen Contraction and Speaker...

Page 68: ...speaker cable is not pinched or constricted The Abdomen Placement The abdomen is ready for use IMPORTANT Use only the lift straps attached to the abdomen to lift and remove the abdomen from the manne...

Page 69: ...n is at the highest position and the Leopold Tub is installed for support 1 Locate the speaker system cable inside the abdomen shell The Non Gravid Abdomen Speaker Cable 2 Plug the cable into the corr...

Page 70: ...speaker cable is not pinched or constricted The Abdomen Placement The abdomen is ready for use IMPORTANT Use only the lift straps attached to the abdomen to lift and remove the abdomen from the manne...

Page 71: ...tion ring and pull the blue tubing out of the connection port The Umbilical Cord Placenta Disconnection To disconnect the umbilical cord from the fetus push down on the gray disconnection ring and pul...

Page 72: ...tank needs to be prepared prior to starting a simulation to decrease the time spent changing the configuration from delivery to postpartum Internal Filling To fill the blood tank after it is installe...

Page 73: ...the reclaim bottle will start dripping slowly first then accelerate to an almost constant flow this may take a few minutes A constant flow into the reclaim bottle indicates the blood tank is full 5 Di...

Page 74: ...ill tank BLOOD OUT port blue tube 5 Connect the white connector to the trauma fill tank overflow port yellow tube 6 Fill tank as per above instruction for internal filling steps 3 and 4 When the tank...

Page 75: ...o Rotation Ring Removed 2 Ensure no other birth canal is installed within the standard delivery birth canal NOTE The standard birth canal is installed by default 3 Connect the clear blue tube located...

Page 76: ...postpartum boggy contracted uterus whether or not the bleeding function is used The postpartum boggy contracted uterus with bag is placed inside the abdominal cavity over the blood tank NOTE The uter...

Page 77: ...pouch is placed on top of the blood tank 4 Thread the cable tie completely through the bag opening NOTE The cable tie may also be threaded through the bag after installing the bag on the uterus The Bo...

Page 78: ...h of cable tie can be cut off The Boggy Contracted Uterus Bag Installation 6 Place the boggy contracted uterus with bag in the abdominal cavity over the placenta pouch Ensure the bag is pulled snug wi...

Page 79: ...e bag per instructions above The Boggy Contracted Uterus NOTE The bag style and color may vary 7 Connect the uterus inflation port clear blue tubing labeled BOGGY to the mannequin UTERUS pneumatic por...

Page 80: ...in BLOOD UTERUS port clear tube The Uterus Bleed Port and BLOOD UTERUS Port 9 Lightly lubricate the birth canal and the mannequin s external genitalia using the cottonseed oil provided 10 Lubricate th...

Page 81: ...thly over the standard birth canal 13 Tuck the edge skin of the uterus under the torso skin around the genitalia opening 14 Push the external genitalia flap under the buttocks and attach it to the rec...

Page 82: ...the blood tank and has two connections A manual pneumatic connection to inflate the uterus and help with inversion syringe attachment A reversion lock collar pneumatic line connection that prevents r...

Page 83: ...yringe plunger until uterus inflates to a rounded shape approximately 10 times 3 Lubricate the inside of the vaginal canal with cottonseed oil 4 Use one hand to gently squeeze the uterus Use the other...

Page 84: ...he highest position and the rotation ring is removed from the mannequin s torso 7 Ensure the blood tank is installed with the placenta pouch placed on top of the blood tank 8 Place the invertible uter...

Page 85: ...l genitalia fully inside the mannequin s torso and push the skin through the birth canal until the genitalia is completely on the outside 13 Tuck in the labia and position the uterus external genitali...

Page 86: ...he Invertible Uterus Installed In Mannequin 16 Remove the syringe allowing uterus to slowly deflate Empty any air from the inverted portion and ensure correct positioning IMPORTANT The clear end fitti...

Page 87: ...ming the backplate installation 1 Remove the cervix retention plate located in the center of the backplate by lifting and sliding the retention plate out of the backplate The Backplate 2 Install the b...

Page 88: ...uin 60 IMPORTANT The boggy contracted uterus bag should be installed and used with the boggy postpartum uterus at all times The Boggy Contracted Uterus Installed With Bag The backplate is now installe...

Page 89: ...ORTANT Only one M se application window or tab and one TouchPro window or tab can be used per Instructor Workstation at a time IMPORTANT Do NOT use any of the browser s navigational tools i e back and...

Page 90: ...se software version the type of simulator and the serial number Select User Guide to download the user guide English version To access the User Guide in other languages please visit www caehealthcare...

Page 91: ...rint SCEs The Home page can be accessed by clicking the Home button in the upper right corner of the M se software or on any screen without a Home button by clicking the Return button in the upper lef...

Page 92: ...vorites and All Running Now tab Lists the SCEs that are currently running and is only available when at least one SCE is running Recent tab Lists all the recently run or edited SCEs Favorites tab List...

Page 93: ...an SCE in the Search field and click the Search button Click the page arrows to view additional pages of installed SCEs Click any SCE to select it Once an SCE is selected it appears in the SCE Summary...

Page 94: ...ing the SCEs icon reveals the SCEs menu which lists all user created SCEs Clicking the Learning Modules icon again reveals the Learning Modules menu To open an SCE click the name of the SCE Click Clos...

Page 95: ...le for selection The SCE Operating Mode Icon The icon next to each SCE name in the SCE Selection Panel indicates the operating mode of the SCE The operating mode determines the state of the maternal s...

Page 96: ...used to generate a printable PDF of the selected SCE The Add to Favorites button adds the SCE to your Favorites list Clicking the Review button accesses the SCE Editor which can be used to review and...

Page 97: ...int from another computer OR To print from the Instructor Workstation consult your network administrator for assistance connecting to a printer 4 When finished saving or printing the PDF close the bro...

Page 98: ...nformation on mannequin configuration see the Configuring the Mannequin section of this user guide IMPORTANT You MUST set up the mannequin as directed in the Mannequin Setup window before clicking Con...

Page 99: ...ivery button only appear on SCEs that use the vaginal delivery operating mode From the Run screen users can manage the SCE perform interventions view physiological status and events save events as sta...

Page 100: ...uin Setup screen as a popup screen Click Close to exit the Mannequin Setup Window and return to the Run screen Select SCE Details to access the SCE Editor screen where the baseline setup SCE Content a...

Page 101: ...NOTE When running an SCE using Norma L Female the Patient Status Display widgets will show the ECG Waveform HR BP MAP RR SpO2 and Lung Volume The Patient Status Display Widgets Use the Mute All butto...

Page 102: ...rom the Widget Configuration Menu and dropping it over the Patient Status Display The new widget type replaces the old The Graphic Widget Display cannot be changed This widget displays the fetal posit...

Page 103: ...cannot be changed The Event Logs During an SCE all software operations sensed by the simulator or entered manually e g virtual defibrillation setting a physiological parameter value are recorded by an...

Page 104: ...ructor Workstation and any TouchPro workstations Consult the web browser s help menu for assistance NOTE The web browser window containing the patient record may be minimized initially If the window i...

Page 105: ...o close the Patient Records list click the Patient Records button The list closes If a patient record is being displayed the Patient Records button remains red until the list is re opened and Stop Dis...

Page 106: ...unning 1 Click the Add Scenario button on the Run screen The Add Scenario Button The Choose Scenario dialog box appears The Choose Scenario Dialog Box 2 Select a scenario from the Choose Scenario Dial...

Page 107: ...meters and labor can be paused using the Pause Labor button Using the Physiological Views From the Run screen users can select from six different views representative of various body systems and featu...

Page 108: ...0 From each view various parameters can be viewed and adjusted The Physiological Views To change a patient s physiology using the physiological views Brain Heart Lung Fluids Control icon Sound Control...

Page 109: ...include a Basic Additional switch that can be used to toggle between basic and advanced parameters Basic parameters are always shown by default 3 Select the parameter and set the new value Parameters...

Page 110: ...r e g Heart Rate Factor 2 0 is two times the baseline Heart Rate or a coefficient that affects a physiological value in a non linear way e g FHR Variability Coefficient Numeric parameters are changed...

Page 111: ...ht side is also automatically applied to the other side The Apply to Both Eyes Parameter NOTE Not all changes to parameters affect the patient s physiology but all are logged Using the Conditions Medi...

Page 112: ...while creating or editing an SCE Or to apply a condition that is not set up as a Quick Link in the Conditions palette 1 Click the Conditions button The Conditions menu appears Conditions are organized...

Page 113: ...ysiology but all are logged The Medications Palette NOTE Quick Links can only be added while creating or editing an SCE Or to apply a medication that is not set up as a Quick Link in the Medications p...

Page 114: ...dication Dose Menu 4 Select a dose option This can be done one of two ways a Choose a pre defined dose The Medication Dose Menu The dose is applied and appears in the patient s physiology The medicati...

Page 115: ...d and appears in the patient s physiology The medication selected also appears in the Medication Monitor NOTE Not all medications affect the patient s physiology but all are logged Using the Intervent...

Page 116: ...d The Interventions Palette Once an Intervention is selected a menu appears with available options for the selected Intervention Click the desired option to select it The intervention is applied and a...

Page 117: ...ENTIONS 2 Navigate through the menus to find the desired intervention 3 Once the desired intervention has been located click the intervention s name from the list The Intervention Options menu appears...

Page 118: ...d scenario A Scenario The Scenario Management pop up menu appears and all available states are listed The Scenario Management Pop Up Menu 2 Select the desired state The scenario proceeds to the select...

Page 119: ...From the menu select Show Scenario The Scenario screen appears displaying the scenario The Scenario Screen At the top of this screen the Scenario Time and State Time are visible Additionally users can...

Page 120: ...button in the upper right corner of the M se screen The Delivery Controls When a vaginal delivery labor is in progress the delivery clock counts down to delivery NOTE The delivery time is an estimate...

Page 121: ...e Delivery button Marking the Baby Delivered When the baby is delivered vaginally during simulation the instructor or facilitator must log this event in M se To mark the baby delivered 1 From the Run...

Page 122: ...rd blood sample for pH PO2 and PCO2 The APGAR scores and blood sampling are generated automatically based on maternal physiology and events leading up to delivery The Neonate Status Window From this w...

Page 123: ...ection M se automatically detects delivery However the Show Neonate Status icon is enabled throughout the simulation and can be used to display APGAR score and control neonatal crying IMPORTANT The pl...

Page 124: ...ion as outlined in the Mannequin Setup window For detailed information on each step in the Mannequin Setup window see the Configuring the Mannequin section of this user guide IMPORTANT You MUST set up...

Page 125: ...postpartum phase begins Selecting CTG Monitor Options CTG monitor options such as which probes are attached loss of signals and noise offset can be selected using the CTG monitor parameters To access...

Page 126: ...E The bookmark can be used later to reset the patient s physiology to what it was when the bookmark was created Clicking the Fast Forward button once accelerates the SCE time at a 4 1 ratio Clicking t...

Page 127: ...forward and does not reset to the bookmarked time The Battery Status Icon To view the battery charge status of the maternal or fetal mannequin click the respective battery status icon in the lower le...

Page 128: ...edback window appears The Traction Feedback Window The Traction Feedback window displays current force peak force and force over time To activate a two level warning tone when traction force nears or...

Page 129: ...sed to monitor the efficacy of CPR interventions To use the CPR monitor click the CPR Monitor button at the bottom of the Run screen The CPR Monitor Button The CPR Monitor appears displaying the live...

Page 130: ...n volume and compression ventilation ratio CPR data is recorded in the Event Logs To close the CPR Monitor click the Close button Using the Event Recorder to Save States The Event Recorder can be used...

Page 131: ...aved a Click Edit A Delete button appears next to each recorded event The Event Recorder b Click the Delete button next to each event to be removed The events are removed from the Event Recorder c Cli...

Page 132: ...physiological characteristics is needed for repeated use a new patient can be created from the Run screen To create a new Patient 1 From the Home page run an SCE that has a Patient with the same gende...

Page 133: ...o save in the Enter the duration of CTG data to save field The duration entered represents the amount of time from the current time e g entering 30 saves the most recent 30 minutes of CTG data 7 Click...

Page 134: ...M se 106 NOTE If the newly created base patient is used in a new SCE SCE patient any changes made to the newly created base patient at a later date will not affect that SCE patient The New Patient Di...

Page 135: ...nt Button The Patient pop up menu appears The Patient Pop Up Menu 2 Click Reset The Reset the Patient dialog box appears stating that the patient s physiology will be reset to its state at load time a...

Page 136: ...he Medication Monitor To close the Medication Monitor press the Close button in the upper right corner of the medication Monitor window Resetting a Medication To reset a medication from the Medication...

Page 137: ...nues running and the Home page appears To return to the SCE from the Home page click the Continue button in the SCE summary panel of the running SCE The SCE Summary Panel Stopping the SCE Running SCEs...

Page 138: ...To stop an SCE from the Home page 1 Click the Stop button in the bottom left corner of the SCE Summary Panel The Stop Button The Stop the Simulation dialog box appears The Stop The Simulation Dialog...

Page 139: ...Use the New SCE button to create a new SCE The New SCE Button The minimal requirements for creating a new SCE include selecting a Patient naming the SCE and saving the SCE Once the new SCE is created...

Page 140: ...or 3 Enter the name for the SCE NOTE The name of the SCE may NOT exceed 80 characters Additionally SCE file names CANNOT contain any special characters such as 4 Click Save Once the SCE is saved it is...

Page 141: ...SCE Editor provide options for running the SCE generating a printable PDF or returning to the Home page The Content Management SCE Configuration and Preloaded Scenarios links in the left side panel a...

Page 142: ...ion click Edit The SCE Editor Screen The Profile Editor appears The Profile Editor 2 Set the Patient s name age gender and weight by filling in the appropriate fields 3 Click the Change Picture button...

Page 143: ...PORTANT No part of the patient s profile can contain any special characters such as Setting a Patient s Baseline The patient baseline is the patient s initial physiology at the beginning of an SCE To...

Page 144: ...l station and fetal presentation can be selected To access labor and delivery options from the Patient Baseline screen click the Childbirth Configuration icon The Patient Baseline Screen The labor and...

Page 145: ...he desired CTG data to create a new SCE a Select SCE with desired CTG data b Run the SCE for two minutes c From the Patient menu click Save The Save a copy of the Patient window appears d Enter a new...

Page 146: ...f Enter the duration of CTG data to be included g Click Save h Stop the SCE The SCE now includes the CTG data collected while running the SCE and this CTG data will be present when running the SCE Con...

Page 147: ...ditions the TouchPro software and the Patient Status Display is achieved by clicking the buttons under the SCE Configuration heading in the SCE Editor The SCE Configuration Buttons Condition Setup Scr...

Page 148: ...rventions palette to the list of Quick Links Click the minus sign to remove a Quick Link from the SCE Modifying the TouchPro Setup Use the TouchPro Setup link to access the TouchPro Setup panel From t...

Page 149: ...uchPro Setup Panel Patient Status Display To configure the Patient Status Display displayed on the Run screen click Patient Status Display under the SCE Configuration heading on the SCE Editor The Pat...

Page 150: ...incorporate scenarios that contain preprogrammed physiology Scenarios can be added to SCEs to enhance patient physiology When a scenario is added to an SCE from the SCE Editor the scenario becomes ass...

Page 151: ...ario Designer create a new scenario or choose an existing scenario to edit Creating a New Scenario To create a new scenario 1 From the SCE Editor under the Pre Loaded Scenarios heading click the Add S...

Page 152: ...ggle between Scenario Designer views The New State button is used to add new states Once created states are displayed on the Scenario Designer canvas Editing a Scenario To edit a scenario 1 From the S...

Page 153: ...ld can be used to search for a scenario to select 3 Click Add The scenario is added to the SCE and is listed on the SCE Editor beneath the Pre Loaded Scenarios heading 4 Click the scenario s name unde...

Page 154: ...lize the Graphical View The Graphical View From the Graphical View double click on any state to expand it and view all its components Click the Collapse State button to collapse an expanded state Clic...

Page 155: ...Designer Canvas Or a new empty state can be added using the New State button To add a new state using the New State button 1 Click the New State button on the upper left side of the Scenario Designer...

Page 156: ...ve The state is renamed Modifying Scenario States Once a scenario state has been placed on the canvas it can be modified Additional parameters transitions and notes can be added Each state can contain...

Page 157: ...in the state Drag and drop to reorder as needed Click Complete to save and exit the State Parameters screen or click Back to exit without saving NOTE If the physiology of any of the parameters conflic...

Page 158: ...ation from the list Once a medication is selected The Medication Transition menu appears asking for the comparison type and transition value The Medication Transition Menu Follow the same steps to mak...

Page 159: ...GOTO arrow beneath the new transition variable The Scenario Designer The Available States menu appears listing all the available states 5 Select a state from the menu An orange connector line appears...

Page 160: ...state the state must first contain at least one other transition To add an ELSE transition click ELSE in the original state The ELSE menu appears listing all the available states The Scenario Designer...

Page 161: ...or transition from an active state drag and drop the desired parameter or transition into the Trash To drag a parameter click anywhere within the parameter To drag a transition click the yellow select...

Page 162: ...a modified scenario click Save OR To save a modified scenario as a new scenario leaving the original scenario intact a Click Save As When Save As is clicked the Save Scenario dialog box appears The S...

Page 163: ...ng M se 135 Emptying the Trash To empty the Trash click the Trash icon in the lower left corner of the Scenario Designer The Scenario Designer The Trash List appears The Trash List The Empty Trash but...

Page 164: ...PORTANT Items emptied from the Trash cannot be retrieved Saving States to the State Library Users can save states to the State Library for later use To access the State Library click the States button...

Page 165: ...Using M se 137 The State Library appears listing all saved states The State Library To exit the State Library click Conditions The Conditions Button The Conditions button...

Page 166: ...ssion logs Each simulation session is listed with the Start Time the title of the SCE and the Patient s name In addition the SCE Events Physiological Data CTG data Traction data and CPR data are avail...

Page 167: ...istration From the System Administration screen users can control and access Content Management User Accounts Groups and System Settings To access the System Administration screen click the System Adm...

Page 168: ...anel has been selected return to the Learning Modules panel by clicking the Learning Modules link The Learning Modules Panel To install a learning module 1 Click Install Learning Module The Select fil...

Page 169: ...d all its SCEs are deleted NOTE Preconfigured learning modules cannot be deleted If a user attempts to delete them a failure message appears SCEs From the Content Management options click SCEs to acce...

Page 170: ...t Click Import Patient to import a Patient file from an external device or the hard drive location where the SCE file is saved Use the Rename button next to a patient to give the patient a different n...

Page 171: ...ective buttons within each scenario Locked scenarios can only be reviewed Users can also create new scenarios from the Scenarios screen by clicking the Create New Scenario button Click Import to impor...

Page 172: ...ndition Name dialog box appears 4 Enter a name for the condition in the New Condition Name dialog box 5 Click Save The condition is added to the selected Condition category and group 6 From the Condit...

Page 173: ...images GIF images PNG images XPS images PDF documents MPEG videos MOV videos MP3 audio files A single patient record file cannot exceed 20MB To upload a patient record 1 From Patient Records panel cl...

Page 174: ...el on the Content Management tab of the System Administration screen The Vocalization List Panel The following vocalization file types can be uploaded to M se wav A single vocalization file cannot exc...

Page 175: ...on List panel select the vocalization to delete 2 Click Delete The vocalization is deleted and is no longer available to use during simulation Individual vocalization files can also be previewed or re...

Page 176: ...Creating a User To create a new user 1 From the User Accounts panel click New The New Account Creation panel appears 2 In the New Account Creation panel enter the user s personal data and choose a pas...

Page 177: ...ative user deleting the account becomes the owner of any SCEs scenarios or patients created by the user being deleted i e the SCEs scenarios and patients created by the deleted user are moved to the d...

Page 178: ...group has privileges assigned Maintenance The Maintenance panel is used to flush fluids from the simulator To access the Maintenance panel from the System Administration screen click Maintenance The...

Page 179: ...sers with the User Management privilege can manage all users and groups Content Management Users with the Content Management privilege can create and manage all SCEs Creating a New Group To create a n...

Page 180: ...users placing each user in the Content Only group System Settings From the System Settings panel users can manage the System Configuration Data Management Product Licensing Language CTG Configuration...

Page 181: ...he System Settings panel click the Back Up Data button The Back Up Data Button A Save dialog box appears 2 Select a location to save the backed up data 3 Click Save Restoring Data Users can restore da...

Page 182: ...e click License Manager Language To change the language of the M se software 1 From the System Settings panel under the Localization heading Click Change Language The Change Language dialog box appear...

Page 183: ...ept The CTG strip is configured to the selected settings Performance Metrics Acceptable limits for fetal traction and key CPR parameters can be set from the System Settings panel To set the maximum ac...

Page 184: ...w appears The CPR Settings Window 2 Adjust the settings as desired 3 Click OK The settings are saved Error Log The Error Log is available for technicians and is used when diagnosing the M se software...

Page 185: ...view update and reset personal profile information Users can also view and add favorite SCEs from this screen Click the Account Profile button to access the Account Profile features The Account Profi...

Page 186: ...To change profile information enter the new information in the appropriate fields and click Update Profile when finished To reset a password enter the new password in the New Password field and re en...

Page 187: ...orite SCEs panel The Account Profile Screen To add SCEs to the Favorite SCEs panel click Add Favorites The SCE Library appears Select the desired SCE and it automatically appears in the Favorite SCEs...

Page 188: ...eferences on the Account Profile screen The Medication Preferences panel appears The Account Profile Screen To import medication response files click the Set button The Select File dialog box appears...

Page 189: ...ick Profile Preferences on the Account Profile screen The Profile Preferences panel appears The Account Profile Screen To change the font size click on the Font size selection The Font size drop down...

Page 190: ...Using M se 162 This page intentionally blank...

Page 191: ...Patient Monitor software is compatible with computers that have touch screen capabilities To run the TouchPro Patient Monitor software the Instructor Workstation must be connected to the simulator s...

Page 192: ...onitor software launches the simulated patient monitor appears The TouchPro Display NOTE The capnogram waveform is not displayed on the TouchPro Patient Monitor software from the Instructor Workstatio...

Page 193: ...P Pleth and a numeric readout for Body Temperature EMS ED Telemetry preconfigured with a waveform and numeric readout for ECG Lead II and numeric readouts for SpO2 and noninvasive blood pressure NIBP...

Page 194: ...ct a layout from the Layouts panel 3 Click the Close Settings button The Settings menu closes and the selected layout appears NOTE Preconfigured layouts must be enabled in the M se TouchPro Setup for...

Page 195: ...al Selection menu appears displaying all the available waveforms or numerics The Wave Vital Selection Menu 2 Select the desired waveform or numeric The new waveform or numeric is reflected on the scre...

Page 196: ...bottom right corner of the TouchPro display The Settings Button The Settings menu opens and the AddWaveform and RemoveWaveform buttons appear The TouchPro Display 2 Click the Add Waveform button in th...

Page 197: ...o Patient Monitor 169 3 Click the empty waveform field The Wave Vital Selection menu appears The Wave Vital Selection Menu 4 Select the desired waveform from the Wave Vital Selection menu The new wave...

Page 198: ...eneath the waveform displays When fewer than four numeric readouts are being displayed the remaining fields are blank To add a numeric to a blank display field 1 Click a blank numeric display field Th...

Page 199: ...m or Numeric Display Waveforms and numerics can be moved on the screen to suit the user s needs To move a waveform or numeric click the desired waveform or numeric and drag and drop the display to a d...

Page 200: ...4 In the Save Layout window in the Layout Name field enter a name for the layout The Save Layout Window 5 Click Save 6 Click the Close button to exit the Settings menu Saved layouts can be deleted fr...

Page 201: ...the TouchPro display The Settings Button The TouchPro Settings menu appears 2 From the Settings menu click Audio Setup The Audio Setup window appears The Audio Setup Window From the Audio Setup window...

Page 202: ...g the Print button in the bottom right corner of the 12 lead ECG report To close the report click the Close button IMPORTANT Prior to saving the report as a PDF or printing to a network printer the pr...

Page 203: ...om the Print window click the PDF drop down menu in the lower left corner 6 From the drop down menu select the Save as PDF option The Save window appears 7 In the Title field enter the 12 lead report...

Page 204: ...CG report The 12 Lead Report Title Window 2 Enter a title for the 12 lead report The Print window appears 3 From the Printer drop down menu select the appropriate network printer NOTE A network printe...

Page 205: ...utton NIBP Cycling can be used to set the patient s NIBP to be updated at regular intervals To set NIBP cycling 1 Click the Settings button in the bottom right corner of the TouchPro display The Setti...

Page 206: ...78 To display the patient s current NIBP click the Manual NIBP button The TouchPro Display The current NIBP is displayed NOTE Manual NIBP can be used at any time during cycling However this turns off...

Page 207: ...utton in the bottom right corner of the TouchPro display The Settings Button The TouchPro Settings menu appears 2 From the Settings menu click the Patients button The current Patients window appears T...

Page 208: ...nel 1 Click the Settings button in the bottom right corner of the TouchPro screen The Settings Button The Settings menu appears 2 From the Settings menu click the Configure button The Configure window...

Page 209: ...the bottom right corner of the TouchPro screen The Settings Button The Settings menu appears 2 From the Settings menu click the Language Selection button The Language Selection window appears 3 From...

Page 210: ...1 Click the Settings button from the bottom right corner of the TouchPro screen The Settings Button The Settings menu appears 2 From the Settings menu click Shutdown A warning box appears asking if yo...

Page 211: ...screen From the TouchPro CTG Configuration settings users can select which probes are connected to the patient modify the signal status for fetal heart rate and uterine activity and make changes to th...

Page 212: ...TouchPro CTG Monitor 184 The TouchPro CTG Monitor software opens displaying simulated TouchPro CTG monitor readings and a simulated CTG paper strip The CTG Monitor CTG monitor readings The simulated p...

Page 213: ...rameter falls outside the acceptable range the CTG alarm sounds NOTE The fetal heart rate FHR alarm only sounds when FHR has been below the acceptable range for at least 30 of the last 60 seconds or a...

Page 214: ...rm to sound 3 Click anywhere outside the Alarm Thresholds window to close the window and return to viewing the CTG Monitor Setting CTG Alarm Suspension Time The alarm suspension time determines how lo...

Page 215: ...Using the TouchPro CTG Monitor 187 The CTG Monitor Settings menu appears The CTG Monitor Settings Menu 2 Click the Alarm Suspension Time button The Alarm Suspension Time button...

Page 216: ...dow or the Mute button in the bottom left corner of the CTG monitor When all alarms are muted using these methods they remain muted until the user manually un mutes them using the Audio Setup window o...

Page 217: ...The CTG Monitor Settings Menu 2 Click the Audio Setup button The Audio Setup window appears The Audio Setup Window 3 Select the desired alarm sound 4 Click the Close button The window closes and the...

Page 218: ...s them by clicking the Mute button again MNIBP Cycling and Manual MNIBP When maternal non invasive blood pressure MNIBP is displayed the MNIBP can be updated at specified intervals using MNIBP Cycling...

Page 219: ...ears The CTG Monitor Settings Menu 2 From the Settings menu click MNIBP Cycling The MNIBP Cycling window appears The Manual NIBP Window 3 From the MNIBP Cycling window select the desired interval for...

Page 220: ...layed NOTE Manual MNIBP can be used at any time during cycling However this turns off auto cycling Resetting Tocography Noise The tocography information displayed on the CTG Monitor can be adjusted to...

Page 221: ...he lower left corner of the CTG strip The CTG Strip Navigation Buttons The Back to Beginning button skips back to the very beginning of the strip The Skip Back button skips back one screen The Rewind...

Page 222: ...Forward button moves the strip steadily forward so the user can view the strip as it moves along the monitor The Skip Forward button skips forward one screen The Skip to End button skips to the end o...

Page 223: ...language of the CTG Monitor 1 Click the Settings button from the bottom right corner of the CTG Monitor The Settings Button The CTG Monitor Settings menu appears The CTG Monitor Settings Menu 2 From t...

Page 224: ...r 196 The Language Selection window appears The Language Selection Window 3 From the Language Selection window select a language 4 Click Accept The TouchPro CTG Monitor software changes to the selecte...

Page 225: ...he bottom right corner of the CTG Monitor The Settings Button The CTG Monitor Settings menu appears The CTG Monitor Settings Menu 2 From the Settings menu click Shutdown A warning box appears asking i...

Page 226: ...Using the TouchPro CTG Monitor 198 This page intentionally blank...

Page 227: ...ries Fetal and Labor Neurological Respiratory Cardiovascular Fluids and Sounds The Physiological Views To access each view click the appropriate organ icon or button For Fetal and Labor click the uter...

Page 228: ...logical clinical indicators such as seizures and reactive eyes Neurological features are controlled from the Neurological view in M se To access the Neurological view from the Run screen click the bra...

Page 229: ...n must be controlled by the instructor VIEW Neurological PARAMETER S Sei zures None required Intracranial Pressure Intracranial pressure value can be set and displayed on the Patient Status Display or...

Page 230: ...control the baseline diameter of the pupils in both eyes Pinpoint Blown or a Fixed Pupil Size from 3 mm to 8 mm Temperature Body and blood tem perature can be set using the temperature parameters Body...

Page 231: ...peeds Normal the default Slow Fast and Rapid Setting the Reactive pupils option to Yes causes the pupils to re size from the baseline in response to changes in light Light Reactivity Speed can be set...

Page 232: ...ilation and a variety of other airway management techniques The simulator also demonstrates exhalation and chest excursion Respiratory features are controlled from the Respiratory view in M se To acce...

Page 233: ...us Display None required but adjustable VIEW Respiratory PARAMETER S O2 Consumption CO2 Production Factor None required Articulated Mandible Allows for jaw thrust when sensors in the lower jaw are gra...

Page 234: ...reathing Normal tidal breath ing and pathophysio logical conditions such as atelectasis pneu mothorax asthma and COPD None required but adjustable VIEW Respiratory PARAMETER S Respi ratory Rate Respir...

Page 235: ...m intubation For supported airway adjunct and clinical supply sizes see Recommended Clinical Supply Sizes Venous Blood Gases PvO2 and PvCO2 are continuously calcu lated and displayed when selected for...

Page 236: ...ECG and audible with a standard stethoscope Cardiovascular features are controlled from the Cardiovascular view in M se To access the Cardiovascular view from the Run screen click the heart on the hum...

Page 237: ...equired but adjustable VIEW Cardiovascular PARAMETER S Baro receptor Maximum Pressure Barorecep tor Minimum Pres sure None required Cardiac Pacing A transthoracic car diac pacemaker can be used with L...

Page 238: ...a supports opera tion with a variety of manual and automatic external defibrillators Defibrillation can be simulated by the instructor VIEW Cardiovascular PARAMETER S Defib See Defibrillation on thefo...

Page 239: ...ed bilaterally and are syn chronous with the car diac cycle A pulse deficit automatically occurs if the systolic arterial blood pressure falls below specified thresholds The inten sity of the pulse re...

Page 240: ...the Events Log Pulses are visible and can be controlled from any physiological view All pulses unless altered by an SCE are palpable by default When a pulse is palpated the event is recorded on the E...

Page 241: ...by accessing the pulse menu and clicking the Pulse Enable switch to turn the pulse On A pulse deficit occurs when the systolic arterial blood pressure falls below the default threshold indicated in t...

Page 242: ...orrect Myocardial oxygen balance and cardiac ischemia automatically influence the cardiac rhythm resulting in a realistic and automatic response of the rhythm to hypoxemia The degree of influence can...

Page 243: ...to the pressure gauge 2 Insert one of the supplied adapter fittings into each of the open ends of the cut hose Use a female fitting on one end and a male fitting on the remaining end 3 Insert the T f...

Page 244: ...sounds 1 Wrap the sphygmomanometer cuff around the arm on the same side as the connected NIBP port 2 Place the stethoscope just above the brachial pulse 3 Pump up the blood pressure cuff and let the...

Page 245: ...r of consecutive discharges as may damage the simulator Leave at least 30 minutes recovery period after a sequence of more than nine consecutive discharges Do NOT provide more than nine consecutive di...

Page 246: ...sic and Biphasic defibrillators can be used with either paddles or hands free connectors For paddle placement on the chest the simulator comes with two anterior defibrillation disks provided in the ac...

Page 247: ...maker Pacing Rate determines the cardiac rate when the Pacing Current is at or above the Pacing Capture Threshold All three parameters are located on the Cardiovascular view Fluids Lucina is capable o...

Page 248: ...following pages IV Access The simulator s right and left hands and arms pro vide intravenous access locations None required See IV Access on the fol lowing pages IV Medication Administration Bolus in...

Page 249: ...IMPORTANT If any fluid gets under the skin during a vaginal bleed follow these cleaning instructions immediately to prevent damage to the simulator 1 Ensure the abdomen is installed on the torso whene...

Page 250: ...he area where fluid is located 7 Reattach the skin and return the mannequin to supine position 8 Clean any remaining liquid in the front of the vaginal opening For instructions on filling the blood ta...

Page 251: ...equilibrates immediately and homogeneously throughout the entire circulation This Hematology Model does not distinguish between the differing clinical effects of colloids and crystalloids For example...

Page 252: ...istilled water and clinically appropriate food coloring if desired 2 Connect the syringe to the GU filling tool 3 Plug the GU filling tool into the Urinary port colored yellow located on the torso baf...

Page 253: ...the IV system to avoid any fluid overflow The vein tubing must be replaced after a certain number of punctures to avoid any fluid leakage within the simulator arms Leakage will occur when the IV syste...

Page 254: ...he desire IV access site If administering more than 300 mL connect an external empty IV bag and tubing to the IV DRAIN port located on the left side of the mannequin s torso to prevent overfilling the...

Page 255: ...RTANT Use only clear distilled water distilled water tinted with food coloring or distilled water mixed with white vinegar 50 50 inside the mannequin Administration of any other type of fluid is NOT s...

Page 256: ...illed water 3 Connect the filled syringe to the epidural port and slowly depress the syringe until no water remains in the syringe 4 Reconnect the luer access split septum to the epidural port Adminis...

Page 257: ...features in M se can be used to make the mannequin vocalizations such as pain ratings various phrases and utterances such as screaming and panting Custom vocalizations recorded by the user and uploade...

Page 258: ...on with Play Button Wireless Voice Capability In addition to the pre programmed speech any response can be transmitted through the mannequin speakers using the Wireless Voice Link For detailed instruc...

Page 259: ...n screen When the Sounds panel appears select Breath Sounds The Breath Sounds menu appears The Breath Sounds Menu Use the Anterior Posterior switch to toggle between anterior and posterior breath soun...

Page 260: ...By default heart sounds are set to the Normal sound Heart sounds can be adjusted by clicking the Sound Control icon on the Run screen When the Sounds panel appears select Heart Sounds The Heart Sound...

Page 261: ...ppears select Audible Breathing Sounds The Audible Breathing Sounds menu appears The Audible Breathing Sounds Menu Click the Audible Breath Sounds drop down menu to change the type of sound Click and...

Page 262: ...e UA Synchronized Vocal Clip can be adjusted by clicking the Sound Control icon on the Run screen When the Sounds panel appears select UA Synchronized Vocal Clip The UA Synchronized Vocal Clip menu ap...

Page 263: ...g sounds If Modeled is selected the neonate cry is directly related to the fetal physiology at the time of birth The Neonate Cry Selection can be adjusted by clicking the Sound Control icon on the Run...

Page 264: ...priate location based on the current fetal position The Fetal Heart Sound Location is adjusted by clicking the Sound Control icon on the Run screen When the Sounds panel appears select Fetal Heart Sou...

Page 265: ...unds The Bowel Sounds menu appears The Bowel Sounds Menu Independent control of the type and volume of bowel sounds may be selected in each anatomical region To affect the bowel sounds simultaneously...

Page 266: ...Using Lucina 238 This page intentionally blank...

Page 267: ...n To place an out of plan unit under a support and maintenance plan CAE Healthcare reserves the right to have the patient simulator inspected by a CAE Healthcare approved technician at the customer s...

Page 268: ...from state to state Return Materials Authorization RMA No product may be returned directly to CAE Healthcare without first contacting CAE Healthcare for an RMA number If it is determined that the pro...

Page 269: ...time zone Holiday and non business days excluded Support outside principal period is billed at the premium rate hourly rate x 1 5 A minimum of 48 hours notice is required for scheduling an on site su...

Page 270: ...rvice caehealthcare com CAE Healthcare Customer Service United Kingdom and Ireland Monday Friday from 9 00 a m to 5 00 p m GMT Phone 44 0 800 917 1851 Email uk service caehealthcare com Principal hour...

Page 271: ...rinary fluids the fluid must be drained from the simulator and the fluid systems used must be cleaned For more information on cleaning the fluids see Cleaning the Internal Systems on page 250 Step 2 S...

Page 272: ...s asking if you want to exit c Click Shutdown To shut down the TouchPro CTG software a Click the Settings button in the bottom right hand corner of theTouchPro CTG screen b From the Settings menu clic...

Page 273: ...he application of a very light coating of petroleum jelly followed by a light dusting of baby powder to the simulator s skin This application makes cleaning the skin easier If any of the bleeding geni...

Page 274: ...uch damage may be readily apparent manifested as a leak in the breathing circuit when the simulator is connected to a ventilator it may not be obvious during spontaneous or bag and mask ventilation Be...

Page 275: ...ts are illuminated and not blinking the maternal mannequin s batteries have less than 50 power remaining When one indicator light is illuminated and not blinking the maternal mannequin s batteries hav...

Page 276: ...h Cover The cover is removed and the batteries are visible in the mannequin 3 Remove the batteries from the simulator by pulling on the tabs and lifting the batteries out of the battery compartment NO...

Page 277: ...The Back of the Fetus 2 Connect the other end of the USB charger cord to a USB power source The USB Charger Cord NOTE A USB AC power adapter may be used to plug the USB cord into a power outlet Batter...

Page 278: ...fluid was injected in the IV system complete the Priming the IV System instructions in the Using Lucina section with clear fluids and complete the Cleaning the IV system instructions for a second tim...

Page 279: ...absorbent pads under the buttocks and the vaginal opening 7 From the Instructor Workstation click on the System Administration icon in the upper right corner of the M se home screen The System Adminis...

Page 280: ...removed from within the vaginal canal 15 Wipe the external area particularly the buttocks and under the skin surrounding the vaginal opening The food color will stain more readily if left on for an e...

Page 281: ...ocks f Clean the area where fluid is located g Reattach the skin and return the mannequin to supine position h Clean any remaining liquid in the front of the vaginal opening Draining the Blood Tank To...

Page 282: ...od tank output line When air bubbles have stopped moving the tank is empty 8 Click the Finished button 9 Disconnect the trauma fill tank from the mannequin 10 Empty the trauma fill tank 11 Rinse thoro...

Page 283: ...6 Disconnect tank and empty and clean the overflow bottle Cleaning the Epidural System To clean the epidural system 1 Remove the split septum adapter from the epidural port and connect an empty 50 mL...

Page 284: ...air through the GU filling tool connected to the Urinary port until no more water drains into the basin 4 Disconnect the GU filling tool from the Urinary port and remove the urinary catheter Cleaning...

Page 285: ...al compressor to pressurize the system The pump will turn off automatically 5 Power off the simulator 6 Place the tubing end of the Condensation Drain Hose into the small bucket and then connect the g...

Page 286: ...ation of the Standard Birth Canal It is recommended that at least two people perform the procedure Please read these steps completely prior to beginning procedure The Standard Birth Canal Front and Ba...

Page 287: ...he GU tank from the torso and pull tubing completely out of birth canal The GU Tank and Tube NOTE GU tube outline is for reference only The GU tube is inserted into the top left side of the birth cana...

Page 288: ...away from the torso to allow room for birth canal removal The Birth Canal Top Grooves 5 Locate the ischial spine posts on the bottom left and right sides of mannequin torso squeeze and pull the birth...

Page 289: ...nside bottom of birth canal leaving bladder attached to mannequin torso The Mannequin Torso 7 Twist and remove the rectal plug from back of lower torso NOTE Lift mannequin to one side for access to pl...

Page 290: ...bottom center of the birth canal from the rectal groove The Mannequin Torso 9 Lift and remove the birth canal NOTE Ensure rectal extension is completely removed from the rectal groove before removing...

Page 291: ...th canal removed The Mannequin Torso To install the birth canal 1 Position the birth canal inside the mannequin torso ensure exterior of birth canal is facing towards feet and rectal extension is at b...

Page 292: ...equin torso squeeze and slide one side only of the birth canal completely onto post The Mannequin Torso 3 Insert squeeze and push the rectal extension located on the bottom center of the birth canal c...

Page 293: ...l extension must fit completely into the rectal groove The Mannequin Torso 4 Squeeze and slide the remaining side of the birth canal completely onto ischial spine post The Mannequin Torso The rectal e...

Page 294: ...equin to one side for access to plug The Mannequin Torso Back 6 Insert the birth canal top grooves into the left and right sides of mannequin NOTE Gently stretch the mannequin skin away from the torso...

Page 295: ...GU tank and tubing left side of mannequin torso Ensure tubing is fully inserted into birth canal The GU Tank and Tube NOTE GU tube outline is for reference only The GU tube is inserted into the top l...

Page 296: ...ate exterior of tubing to help ensure full insertion into birth canal The GU Tank Tube Insertion NOTE The end of the GU tubing should be visible from exterior of birth canal at vaginal opening The Bir...

Page 297: ...Care and Maintenance 269 9 Align the GU tank to the mannequin torso and insert screw The GU Tank Ensure the birth canal is completely and securely attached to all fittings The GU screw...

Page 298: ...Care and Maintenance 270 This page intentionally blank...

Page 299: ...ate The M se software is physiologically driven When using multiple conditions e g Desaturation Hypertension Tachycardia Tachypnea physiological regulatory mechanisms such as the baroreceptor reflex a...

Page 300: ...0s Reset 110s 70s Increased 120s 80s Decreased 100s 70s Pre Borderline 130s 80s Pre Borderline 100s 60s Borderline 140s 90s Borderline 90s 50s Mild 150s 90s Mild 80s 40s Moderate 160s 100s Moderate 70...

Page 301: ...High 70s Decreased Mid 60s Elevated 80s Pre Borderline Low 60s Pre Borderline 90s Borderline Mid 50s Borderline 100s Intermediate Low 50s Intermediate 110s Mild High 40s Mild 120s Moderate Mid 40s Mod...

Page 302: ...ratory Respiratory Rate Tachypnea Bradypnea Reset 11 Reset 11 Increased 15 Increased 10 Elevated 18 Intermediate 9 Borderline 20 Mild 7 Intermediate 22 Moderate 6 Mild 25 Severe 5 Moderate 28 Profound...

Page 303: ...meter of the pupils in the eyes Each eye has reactive pupils and functional eyelids that blink Currently there are three pupil options that are used to control the diameter of the pupils in both eyes...

Page 304: ...id Presently blinking frequency is not linked to the physiological models However the response can be done on the fly or scripted using the Scenario Designer Default Normal Reactive Pupils The Reactiv...

Page 305: ...80 NMB causes the simulator to set the degree of NMB to 80 regardless of the presence or absence of neuromuscular blocking drugs Clinically the spontaneous tidal volume is markedly reduced If NMB is s...

Page 306: ...tinue to influence other components of the physiological models The patient continues to breathe at the set number of breaths per minute regardless of the arterial oxygen or carbon dioxide levels For...

Page 307: ...parameter is frequently used to assist in desaturating a patient This parameter creates a physiologic bypass of the normal pulmonary circulation resulting in changes in O2 CO2 and anesthetic gases at...

Page 308: ...when in the Auto mode Default Modeled Range 0 100 Tidal Volume The Tidal Volume parameter is used to set the tidal volume to a given volume per breath Once Tidal Volume is set to a numeric value arte...

Page 309: ...arameters Additional Respiratory Rate Tidal Volume Tidal Volume Factor pH Shift PEEP O2 Consumption CO2 Production Factor PaCO2 Set point PaO2 Set point I to E Ratio 1 X PetCO2 PaCO2 Factor Respirator...

Page 310: ...set to 10 breaths per minute the respiratory rate remains at 10 breaths per minute regardless of arterial oxygen or carbon dioxide levels In such situations the patient can only respond to arterial ox...

Page 311: ...me before the control of breathing and drug influences are taken into account A value of 2 doubles the baseline tidal volume A value of 0 5 decreases the baseline tidal volume by 50 Default 1 Range 0...

Page 312: ...2 doubles the CO2 production while a value of 0 5 decreases the CO2 production by 50 Default 1 Range 0 50 4 00 PaCO2 Set point The PaCO2 Set point parameter is a set point for PaCO2 The control of br...

Page 313: ...2 reaches the new set point the simulator s respiratory rate and tidal volume are again controlled to maintain PaCO2 at the PaCO2 set point Also see PaCO2 Set point Default 100 00 mmHg Range 20 0 mmHg...

Page 314: ...erial carbon dioxide or decreased arterial oxygen may take the form of increased tidal volume increased respiratory rate or both The Volume Rate Control Factor determines these relative changes At a v...

Page 315: ...lation Also see Chest Wall Compliance Factor The Distended Chest Wall Compliance Factor parameter must be set to a low value for increased intrapleural volumes to result in elevated inspiratory pressu...

Page 316: ...copy Default 0 mmHg Range 0 0 mmHg 60 0 mmHg Bronchial Resistance Factor Left and Right The Bronchial Resistance Factor parameter can be used to set the rate of left and right bronchial resistance ind...

Page 317: ...els to achieve the expected pharmacodynamic effects e g respiratory depression Using this parameter bypasses pharmacokinetics real and instructor specified inspired fractions venous content lung perfu...

Page 318: ...e parameter is used to simulate the amount of isoflurane set in the anesthetic vaporizer and is used to calculate alveolar isoflurane This parameter has a faster effect on physiology than anesthesia m...

Page 319: ...drug models to achieve the expected pharmacodynamic effects e g respiratory depression Using this parameter bypasses pharmacokinetics real and instructor specified inspired fractions venous content lu...

Page 320: ...mHg Heart Rate The Heart Rate parameter is used to set the heart rate to a given fixed number of beats per minute Once the heart rate is set to a numeric value administered drugs or intravascular volu...

Page 321: ...hythm parameter and select the desired rhythm from the available list If a number appears following the cardiac rhythm on the list this overrides the heart rate to the rate indicated For cardiac rhyth...

Page 322: ...r Myocardial Infarction Lateral Myocardial Infarction Posterior Myocardial Infarction Septal Myocardial Ischemia Mild Myocardial Ischemia Moderate Myocardial Ischemia Moderate with PVCs 10 Myocardial...

Page 323: ...e arterial pressure waveform if desired The Left Ventricle position is useful for simulating cardiac catheterization procedures or for demonstrating left ventricular end diastolic pressure and its rel...

Page 324: ...phere Intrathoracic Vein Right Atrium Right Ventricle Pulmonary Artery Pulmonary Artery PA Balloon Inflation of the pulmonary artery catheter balloon is simulated by switching to the Inflated option o...

Page 325: ...old Also see Pacing Current and Pacing Capture Threshold Default 80 beats per minute Range 0 beats per minute 119 beats per minute Pacing Capture Threshold The Pacing Capture Threshold parameter deter...

Page 326: ...nd this maximum pressure is defined as the baroreceptor maximum pressure Cardiovascular Parameters Additional Baroreceptor Maximum Pressure Baroreceptor Minimum Pressure Left Ventricle Contractility F...

Page 327: ...ts inhibitory controls on the MAP e g increase in heart rate in an attempt to return the MAP to the patient s baseline pressure However these controls have a lower limit and this minimum pressure is d...

Page 328: ...ture Under such conditions the arterial blood pressure ABP increases and the heart rate may decrease due to feedback from the physiological control mechanisms Default 1 Range 0 10 10 00 Venous Capacit...

Page 329: ...the simulated patient s pulmonary blood pressure Increases in the compliance factor decrease narrow the pulse pressure while smaller values increase the pulse pressure Additionally when the pulse pre...

Page 330: ...ure changes The degree of increase in heart rate or vascular response is influenced by the baroreceptor gain overall factor For example when blood pressure falls the heart rate increases the arteries...

Page 331: ...eflex depression e g less systemic vascular resistance response to MAP changes A value greater than 1 leads to a stronger response to MAP changes Default 1 Range 1 00 10 00 Chest Compression Efficacy...

Page 332: ...ardial ischemia develops in the presence of an unfavorable oxygen supply demand ratio or how rapidly it resolves when myocardial oxygenation becomes favorable By decreasing the averaging time i e valu...

Page 333: ...The Mitral Valve Resistance Factor parameter is used to adjust the resistance to blood flow across the mitral valve Increasing the value to greater than 1 corresponds to increased resistance to blood...

Page 334: ...te The Fetal State parameter determines the state of the fetus during labor and can be set to Calm Sleep Active Sleep or Active Vigilance Default Active Sleep Fetal and Labor Parameters Basic Rate of...

Page 335: ...ariability is determined by the Contraction AmplitudeVariability parameter found in the Fetal Labor Additional Parameters Default 50 mmHg Range 0 mmHg 120 mmHg Contraction Duration The Contraction Dur...

Page 336: ...ted that will resolve the shoulder dystocia Default Disabled Shoulder Dystocia Resolution The Shoulder Dystocia Resolution parameter determines what maneuver if any will resolve shoulder dystocia Six...

Page 337: ...anterior shoulder is rotated counter clockwise at least 35o In LOT position rotating the anterior shoulder clockwise is prevented The Zavanelli option activates the automatic resolution of shoulder d...

Page 338: ...arrested labor condition resolved the fetus can be pulled during contractions through the birth canal until reaching the final position At the final position the fetus is released from the birthing me...

Page 339: ...that need to be manually set are Hands and Knees Squatting Sitting Default Auto NOTE Ensure the abdomen is installed on the torso whenever the mannequin is positioned upright Fetal and Labor Paramete...

Page 340: ...ariability present in the amplitude of uterine contractions This parameter is defined as a percentage Default 100 Range 0 100 UA Noise The UA Noise parameter determines the noise present in the uterin...

Page 341: ...on Amplitude parameter determines the amplitude of the accelerations in the fetal heart rate signal When set to modeled it is dependent on the fetus oxygen levels and the fetal state The acceleration...

Page 342: ...terine contractions Default 1 0 Range 0 10 Umbilical Flow Factor The Umbilical Flow Factor parameter determines how easily blood flows into and out of the fetal side of the placenta Lowering this fact...

Page 343: ...ulated Cardiotocograph CTG The effect of a change is immediate and global if there is more than one instance running all change CTG Configuration Parameters FHR Probe MHR Probe MSPO2 Probe MNIBP Probe...

Page 344: ...be no UA graph generated US An external probe is in use FECG An internal probe is in use Default US UA Probe The UA Probe parameter determines the type of probe used for uterine activity Possible sel...

Page 345: ...e MHR widget is displayed but displays to indicate no data is being received Default Connected MSPO2 Probe The MSPO2 Probe parameter indicates if the emulated CTG has the capability to monitor the mat...

Page 346: ...rnal blood pressure but no probe is connected The MNIBP widget is displayed but displays to indicate no data is being received Default Connected Temp Probe The Temp Probe parameter indicates if the em...

Page 347: ...No TOCO Offset The TOCO Offset parameter is applicable only if the UA probe selected is TOCO This parameter is used to shift the uterine activity signal by adding removing a fixed pressure offset to...

Page 348: ...of operation for the mannequin Operating modes are mutually exclusive and govern the mannequin hardware configuration and operation for the complete execution of a given SCE Migration from one operat...

Page 349: ...artum Non delivery operating mode that supports the management of the postpartum uterus Non Gravid Non delivery operating mode that supports the management of a non pregnant patient Default Vaginal De...

Page 350: ...dilated 5cm 90 effacement soft anterior Default Closed NOTE Only the italic bolded cervices comes standard with the mannequin the others can be purchased separately as an optional kit Presentation The...

Page 351: ...parameter is relevant only for the Vaginal Delivery operating mode This parameter specifies the initial fetal position for breech presentation There is no spontaneous rotation with breech presentation...

Page 352: ...operating mode This parameter indicates which type of uterus to use for postpartum There are two different types of uterus the revertible uterus used for inverted uterus condition and the boggy contr...

Page 353: ...s active Mild Moderate Severe or Profuse each massage will produce a gush of blood in addition to the bleeding enabled by the vaginal bleeding severity parameter see Vaginal Bleeding in the Using Fide...

Page 354: ...erted The Inverted Uterus Can Be Reverted parameter is relevant only for the postpartum inverted uterus When set to Yes manual reversion of the inverted uterus is possible Default No Postpartum Additi...

Page 355: ...Patient Status Display consists of waveform numeric and volume widgets along with other special widgets for the maternal fetal simulator Waveform Widget Displays Display Physiological Variable ABP Art...

Page 356: ...R Cardiotocography Fetal Heart Rate CVP Central Venous Pressure EtCO2 End Tidal Carbon Dioxide FHR IUP Fetal Heart Rate Intrauterine Pressure FHR TUA Fetal Heart Rate Transabdominal Uterine Activity H...

Page 357: ...TRectal Rectal Temperature UA BE Umbilical Arterial Base Excess UA CaO2 Umbilical Arterial Oxygen Content UA PCO2 Umbilical Arterial Partial Pressure Carbon Dioxide UA pH Umbilical Arterial pH UA PO2...

Page 358: ...re TUA Transabdominal Uterine Activity UA CTG Uterine Activity CTG FHR CTG Fetal Heart Rate CTG UA CTG Uterine Activity 1 minute APGAR 1minute 5 minutes APGAR 5 minutes Display Definition Hand Positio...

Page 359: ...xide CPR Live Data Compression Depth Compression Depth inches Ventilation Volume Ventilation Volume mL CPR Summary Chest Compression Rate Compression Rate per minute Chest Compression Depth Average Co...

Page 360: ...k Traction Force in Newton N Peak Force Maximum Neck Traction Force in Newton N Force Neck Traction Force graph UA Uterine Activity graph Display Physiological Variable ECG I ECG Lead I ECG II ECG Lea...

Page 361: ...Pressure MAP Mean Arterial Pressure NIBP Non Invasive Blood Pressure PACO2 Alveolar Partial Pressure Carbon Dioxide PaCO2 Arterial Partial Pressure Carbon Dioxide PAO2 Alveolar Partial Pressure Oxyge...

Page 362: ...ECG Report Parameters Parameter Physiological Variable I ECG Lead I II ECG Lead II III ECG Lead III aVR ECG Lead aVR aVL ECG Lead aVL aVF ECG Lead aVF V1 ECG Lead V1 V2 ECG Lead V2 V3 ECG Lead V3 V4...

Page 363: ...the underlying physiological models and cannot be measured clinically Favorable supply demand ratios slower heart rates higher blood oxygenation levels generally result in a higher Ischemic Index val...

Page 364: ...ient less sensitive to ischemia lower the value below the default setting To make the patient more sensitive increase the value above the default setting Model Driven ECG Rhythm Ischemic Index I I Nor...

Page 365: ...erence 2 This device must accept any interference including interference that may cause undesired operation of the device Cet appareil est conforme aux normes d Industrie Canada exempts de licence RSS...

Page 366: ...other devices such as Wi Fi microwave ovens or Bluetooth radios operating in the 2 4 GHz band as well Therefore two channels are used to transmit the audio stream redundantly to avoid interference In...

Page 367: ...dset device is battery powered and carried by the user The handset transmits voice input through a microphone to the base station receiver where it is transmitted to the speakers in the simulator s he...

Page 368: ...and the DIP switch DC power jack Accommodates a 5VDC 0 2A power source ON OFF switch Turns WVL handset power on or off Line out jack Connects the WVL to the simulator s audio amplifier Volume mute dia...

Page 369: ...e base station 1 Set the base station DIP switch positions 6 and 7 to OFF and 8 to ON 2 Turn the power off and on using the power switch on the outside of the base station to ensure the DIP switch cha...

Page 370: ...taneously to 20 channels However this method diminishes the channel to channel noise immunity All of the WVL pairs in the same vicinity must use channels from RF Channel Group 1 or RF Channel Group 2...

Page 371: ...in the on position by default Power on the handset by setting the power switch to the on position The red power light on each unit blinks when the unit is on Once both units are powered on and commun...

Page 372: ...position 6 is set to ON Special Handset Settings Advanced settings for the handset DIP switch are available Advanced DIP Switch Settings DIP switch settings are only refreshed when the handset is powe...

Page 373: ...red power light on my base station is not flashing when the simulator is powered on Check that the cables from the simulator are installed in the base station correctly Audio Problems The sound output...

Page 374: ...e reduction feature by setting the handset DIP switch position 8 to ON The simulator voice output is cut off when the speaker is speaking quietly In this case there are three possible options Attempt...

Page 375: ...471 4 2 414 2 468 5 2 417 2 465 6 2 420 2 462 7 2 423 2 459 8 2 426 2 456 9 2 429 2 453 10 2 432 2 450 11 2 435 2 447 12 2 402 2 480 13 2 404 2 478 14 2 406 2 476 15 2 408 2 474 16 2 410 2 472 17 2 4...

Page 376: ...Wireless Voice Link 348 28 2 434 2 448 29 2 436 2 446 30 2 438 2 444 31 2 440 2 442 RF Channel Frequency 1 GHz Frequency 2 GHz...

Page 377: ...to stimulate fetal lung maturity Carboprost tromethamine L Uterine stimulants Used in management of postpartum hemorrhage PPH due to uterine atony Dinoprostone L Cervical Ripeningf Used to ripen the...

Page 378: ...timulants Labor induction and augmentation Used in management of postpartum hemorrhage PPH due to uterine atony 1st line treatment for PPH Ritodrine L Tocolytics Used to suppress preterm labor Not ava...

Page 379: ...the individual type of SCE The Mannequin Setup screen can also be accessed from the SCE Information drop down menu by clicking the SCE Title and Patient name in the upper left corner of the M se Run...

Page 380: ...prepartum latent phase SCE is selected the mannequin must be manually configured prior to beginning the simulation The configuration will correspond with the diagrams presented on the Mannequin Setup...

Page 381: ...breech SCE is selected the mannequin must be manually configured prior to beginning the simulation The configuration will correspond with the diagrams presented on the Mannequin Setup screen in the M...

Page 382: ...Once an active phase SCE is selected the mannequin must be manually configured prior to beginning the simulation The configuration will correspond with the diagrams presented on the Mannequin Setup s...

Page 383: ...nal delivery breech left sacrum SCE is selected the mannequin must be manually configured prior to beginning the simulation The configuration will correspond with the diagrams presented on the Mannequ...

Page 384: ...nal delivery breech right sacrum SCE is selected the mannequin must be manually configured prior to beginning the simulation The configuration will correspond with the diagrams presented on the Manneq...

Page 385: ...a vaginal delivery vertex SCE is selected the mannequin must be manually configured prior to beginning the simulation The configuration will correspond with the diagrams presented on the Mannequin Set...

Page 386: ...nce a Cesarean breech SCE is selected the mannequin must be manually configured prior to beginning the simulation The configuration will correspond with the diagrams presented on the Mannequin Setup s...

Page 387: ...nce a Cesarean vertex SCE is selected the mannequin must be manually configured prior to beginning the simulation The configuration will correspond with the diagrams presented on the Mannequin Setup s...

Page 388: ...vid SCE Once a Non Gravid SCE is selected the mannequin must be manually configured prior to beginning the simulation The configuration will correspond with the diagrams presented on the Mannequin Set...

Page 389: ......

Page 390: ...1 866 462 7920 Email customerservice caehealthcare com Customer Service Canada Monday Friday from 8 00 a m to 5 00 p m ET Phone 1 877 223 6273 Email can service caehealthcare com Customer Service Euro...

Reviews: