151
Chapter 6 Cloud Services and Remote Access
5
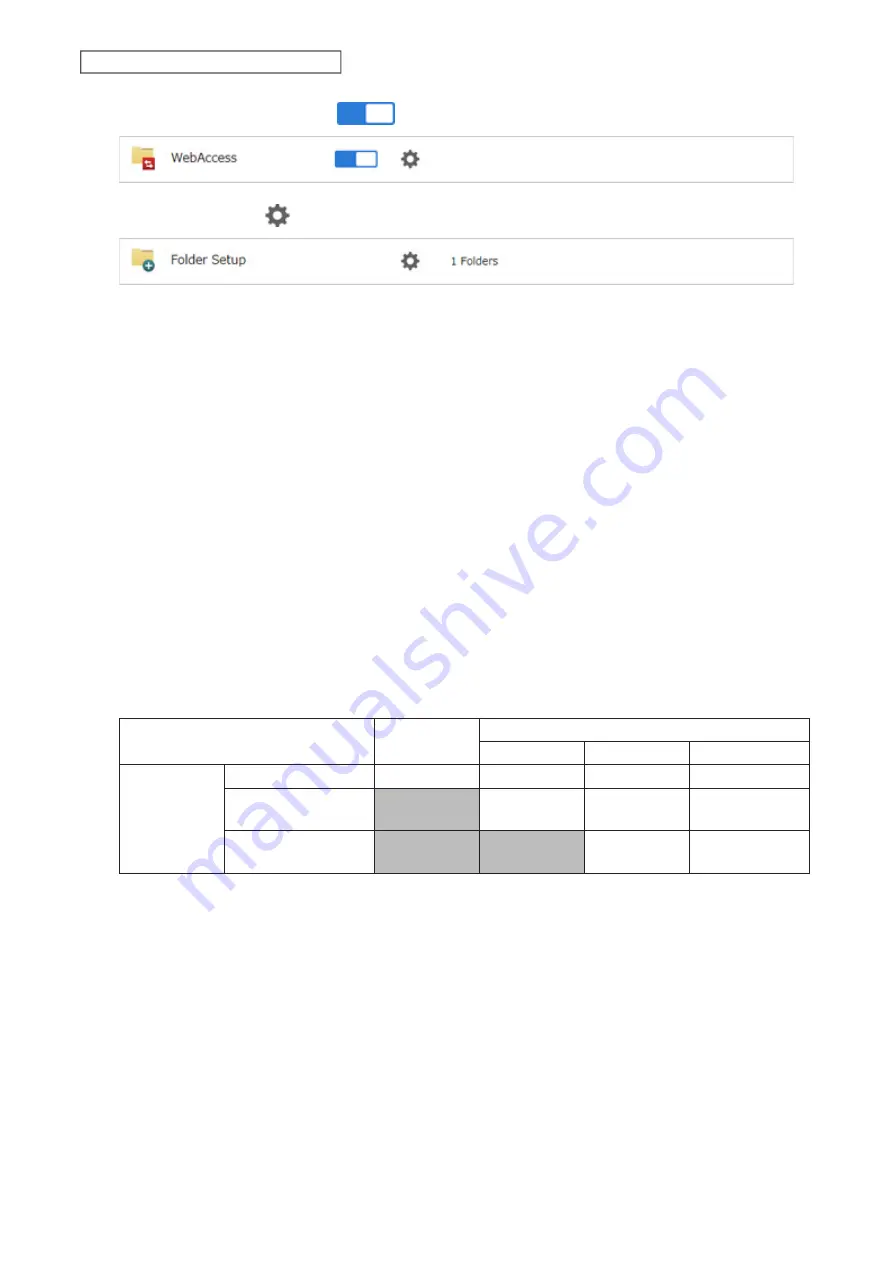
Move the WebAccess switch to the
position to enable WebAccess.
6
Click the settings icon (
) to the right of “Folder Setup”.
7
Select a shared folder to publish.
Notes:
• For best results, create a new dedicated share for WebAccess.
• When accessing shared folders through WebAccess from a remote location, a username and password
may be required for certain operations. For best results, create a user account with permissions on the
WebAccess share before using WebAccess.
8
Under “LAN Protocol Support”, select the “WebAccess” checkbox on the
Basic
tab.
9
Click the
Option 2
tab.
10
Select the desired WebAccess security level for “WebAccess Permissions”.
Allow anonymous
: Anyone can access (view) shared folders. (Access restrictions configured for shared folders
will not work.)
Allow all groups and users
: All groups and users registered on the Buffalo NAS device can use WebAccess.
(Access restrictions configured for shared folders will not work.)
Use inherited folder permissions
: Users and groups have the same access permissions with WebAccess that
they do locally. If access restrictions are not set for the shared folder, then this option will not be shown.
Whether a user or group can access a folder through WebAccess depends on a combination of WebAccess
settings and the shared folder’s settings.
Not logged in
Access restrictions for the logged-in users
No access
Read-only
Read and write
WebAccess
permissions
Allow anonymous
R
R/W
R/W
R/W
Allow all groups and
users
-
R/W
R/W
R/W
Use inherited folder
permissions
-
-
R
R/W
R/W: Read and write, R: Read-only, -: No access
11
Click
OK
.
There are many ways to access WebAccess folders depending on your device:
• Use a web browser on a computer, supported browsers include Microsoft Edge, Firefox, Google Chrome, Internet
Explorer 9 or later, Safari 9 or later. Refer to the help guide at the BuffaloNAS.com website after connecting with
your BuffaloNAS.com name for more detailed information.
• To access from an iOS device, install the “WebAccess i” application from the App Store. Refer to the help guide for
the app for more detailed information.
• To access from an Android device, install the “WebAccess A” application from Google Play. Refer to the help guide
for the app for more detailed information.
Summary of Contents for TeraStation 3010
Page 29: ...28 Chapter 3 File Sharing 3 Click Create User...
Page 32: ...31 Chapter 3 File Sharing 3 Click Add Group...
Page 71: ...70 Chapter 4 Storage Management 6 Click Edit under NAS Volume 7 Click Create Volume...
Page 88: ...87 Chapter 5 Backup 4 Enter the backup device access key and click OK 5 Click Add...
Page 111: ...110 Chapter 5 Backup 3 Click Select Backup Disk 4 Select the shared folder then click Use Disk...
Page 113: ...112 Chapter 5 Backup 7 Time Machine will count down from 120 seconds then backup will begin...
Page 125: ...124 Chapter 6 Cloud Services and Remote Access 5 Click Edit...
Page 137: ...136 Chapter 6 Cloud Services and Remote Access 4 Click the Options tab 5 Click Edit...
Page 147: ...146 Chapter 6 Cloud Services and Remote Access 4 Click the Options tab...
Page 148: ...147 Chapter 6 Cloud Services and Remote Access 5 Click Edit...
Page 176: ...175 Chapter 7 Advanced Features 11Click the NFS Rules tab 12Click Add...
Page 205: ...204 Chapter 7 Advanced Features 3 Click FQDN Mapping 4 Click Add...


