

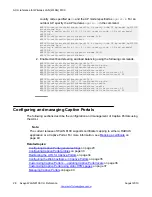


WC8180(config)#wireless
WC8180(config-wireless)#captive-portal tftp-server 172.16.1.11
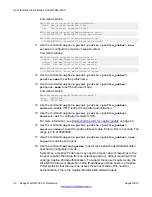
Procedure
1. Create the constituent HTML files:
• captive_portal_custom.html — which Captive Portal users see on first time
login.
• cp_custom_error.html — which captive-portal users see when authentication
error happens.
• cp_custom_refresh.html — which captive-portal users see when waiting for
authentication results.
Note:
Ensure that you retain the
exact
names of the HTML files. Otherwise the controller
cannot recognize these files and the Captive Portal service will not work.
2. Create a package (
.zip
) file containing the HTML files. If you want to embed images
in your portal page, add appropriate HTML tags (for example,
<img src =
“<filename>”
) in the HTML files and include the graphics files in the zipped
file.
Important:
Ensure the following rules when you create a .zip file.
• The package file must be a zipped file with an extension of
.zip
.
• The length of package filename must not exceed 31 characters.
• The number of files in the package must not exceed 32.
• The filenames of the files included in the package file must not exceed 31
characters.
• Total package file size does must not exceed 4 Mb and each profile size
must not exceed 8 Mb.
• The zipped file must not contain any directory.
• All files must be in the same directory.
• The image file format is one of
.jpg
,
.gif
,
.png
,
.tif
and
.bmp
.
• The size of custom images (logo, background, logout image) must not
exceed 1Mb each.
• The image filename does not exceed 31 characters.
3. After creating the
.zip
file, copy the file to a TFTP server to upload it to the AMDC
of the domain.
ACLI reference for Wireless LAN (WLAN) 8100
38 Avaya WLAN 8100 CLI Reference
August 2013