Software control: Microscope Control
3-11
C O N F I D E N T I A L
– limited rights
User Manual
Revision A
Feb 2018
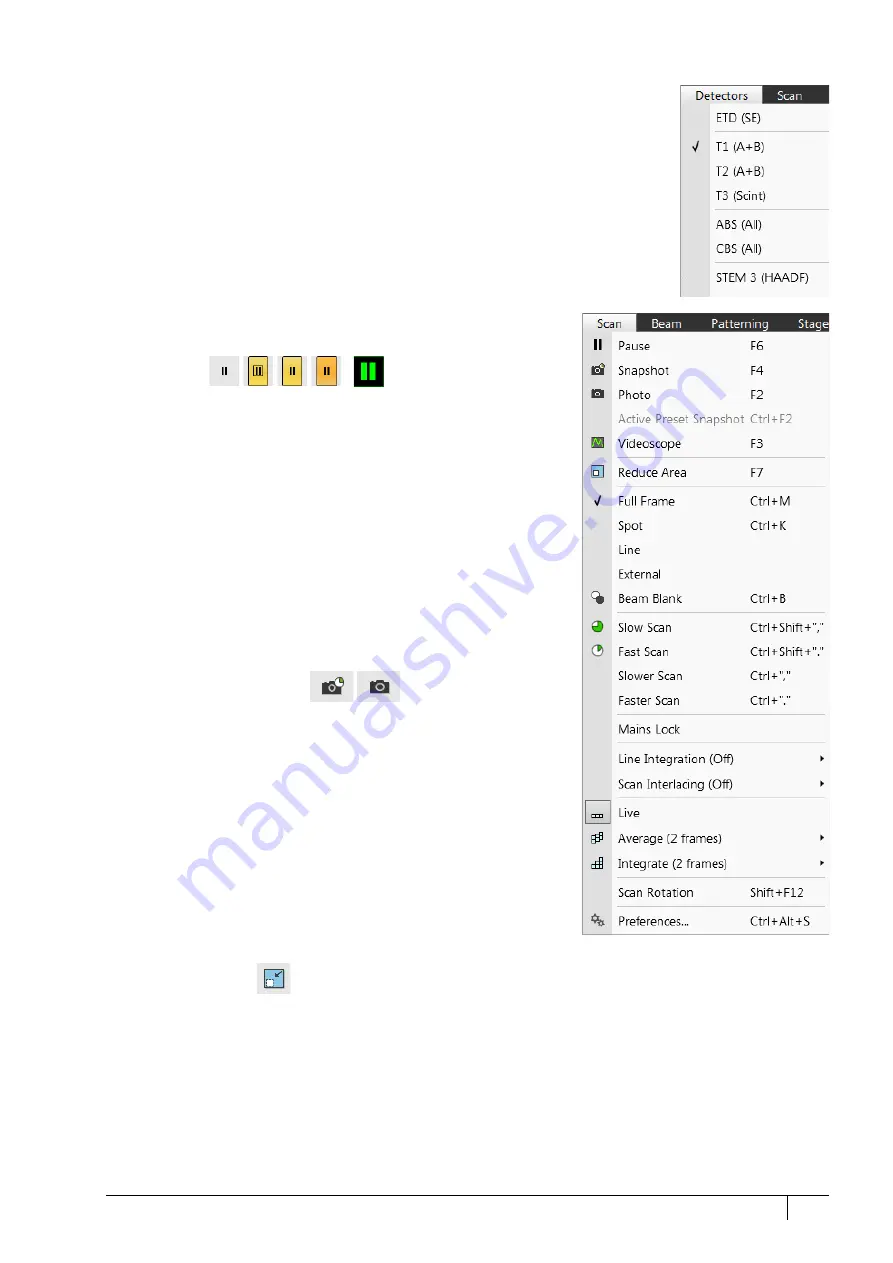
Detectors menu
opens the choice of all installed Detectors (see Chapters 5 and 7).
Detector list
contains various detectors for the microscope’s operation. Detectors not mounted or
not serviceable under actual microscope conditions are disabled (grayed out). The
selected detector is remembered for the display. A tick shows next to its label, and its
mode acronym is shown beside it in brackets.
•
The 3rd party detector / video signal is indicated as “
External
”.
Contact an Thermo Scientific service person about connection details.
•
The
CCD
camera reflects the inner space of the specimen chamber.
•
Mix
sets the possibility of interfusing signals from 2 or 3 detectors.
Scan menu
opens the scanning control functions:
Pause (F6)
pauses imaging. This function is used automatically with Snapshot and
Photo functions.
Select the
Scan
menu /
Pause
, or press the
F6
button, or click on /
double-click on the toolbar pause icon, to stop scanning at the end of
the actual frame / immediately.
When the imaging is going to be paused at the end of a frame, the
toolbar pause icon becomes highlighted (orange background) and there
is a frame around it. When the imaging is paused, the icon is highlighted
(orange background) and the green pause icon appears in the
corresponding display.
Select
Scan
menu /
Pause
item, or press
F6
button, or click on the pause
icon on the toolbar or in the display to release the pause function (the
icon background becomes gray), returning the scanning to the previous
state.
Shift + clicking on the toolbar
pause
icon pauses / activates all displays
at once if the detectors in different displays are mutually compatible.
Snapshot (F4) / Photo (F2)
activates a preset scan (see the
Preferences / Scanning
section) to
acquire an image.
Active Preset Snapshot (Ctrl + F2)
This item starts acquiring a snapshot with parameters corresponding to
the active (highlighted by orange background) toolbar
Scanning Preset
button (labeled
s#)
(see further).
Note
Shift + clicking on the Photo (Snapshot) icon / Scanning Preset button, or
pressing Shift + F2 (F4) / Ctrl + Shift + F2 key immediately takes a Photo
(Snapshot) / Scanning preset snapshot from all displays with the same
beam.
Videoscope (F3)
This function shows the video signal intensity along the actually
scanned horizontal line for correcting the contrast and brightness.
Reduced Area (F7)
This mode is useful when focusing and correcting astigmatism, as the imaging update is faster in the smaller area.
When a Reduced area is chosen, the green frame appears at the last used place onscreen. It can be adjusted by
clicking on it & dragging. It is also possible to adjust the scan parameters independently in the full-frame setting.
•
Moving:
Place the mouse cursor over the selected area. The cursor changes to a 4-ended arrow. Click on & drag
the selected area to the desired position and release the mouse button.
•
Changing the size:
Place the mouse cursor over the edge of the selected area. The cursor changes to a 2-ended
arrow, either horizontal or vertical. A corner can also be used to move two sides. Click on & drag the side out or
in to obtain the desired size and release the mouse button.
When the Reduced area frame is being manipulated, it turns yellow until released. It then reverts back to green.


