background image

Storing the Scanned Documents to a USB Flash Memory or SC Card 


Insert a removable memory device in the media slot. 

You can connect only one removable memory device at a time. The media slot cannot be 

used if both an SD card and a USB flash memory are inserted into it at the same time. 

Make sure that no previous settings remain. 

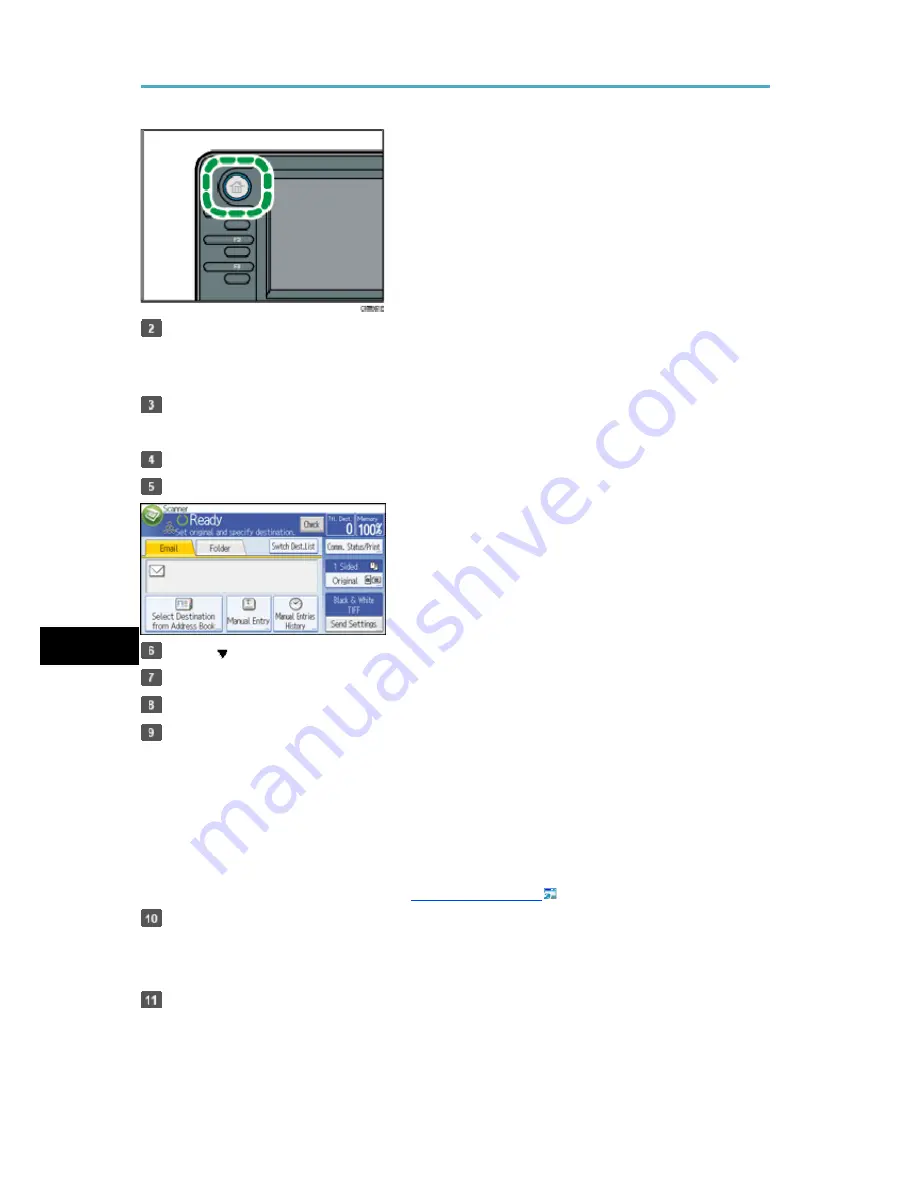
If a previous setting remains, press the [Reset] key. 

Place originals. 

Press [Send Settings]. 


Press [ ] three times, and then press [Store File]. 

P

ress [Store to Memory Device]. 

Press [OK] twice. 

If necessary, select [Send Settings] or [Original], and specify the scan settings 

according to the original to be scanned. 

Example: Scanning the document in color/duplex mode, and saving as a PDF file. 


Press [Original], and then press [2 Sided]. 


Press [Send Settings]. Select [Type of Original], and then press [Full Colour]. 


Press [Send Settings]. Select [File Type], and then press [PDF]. 

For information about other settings, see 

Various Scan Settings

Press the [Start] key. 

When scanning batches, place subsequent originals after the scan files have been sent. 

When writing is complete, a confirmation message appears. 

Press [Exit]. 


126B 

Содержание Aficio MP C3002

Страница 1: ...u use this machine and keep it handy for future reference For safe and correct use be sure to read the Safety Information in this manual before using the machine For information not in the printed manual refer to the HTML PDF files on the supplied CD ROM Appendix Information for This Machine Safety Information Manuals Provided with This Machine Read This First ...

Страница 2: ...n 15 Safety Precautions to Be Followed 16 Environments where the machine can be used 16 Handling power cords and power cord plugs 17 Handling the main machine 19 Handling the machine s interior 21 Handling the machine s supplies 22 Safety Labels of This Machine 24 Positions of WARNING and CAUTION labels for Users of Types 1 and 2 24 Positions of WARNING and CAUTION labels for Users of Types 3 and ...

Страница 3: ...IMPORTANTES MESURES DE SÉCURITÉ de l unité Fax 44 Notes to Canadian Users of Facsimile Unit 45 Remarques à l attention des utilisateurs canadiens de l unité Fax 45 ENERGY STAR Program 46 Energy Saving Functions 47 Notes to users in the state of California Notes to Users in USA 49 4 Appendix Trademarks 51 2 ...

Страница 4: ...duction Read this manual carefully before you use this machine and keep it handy for future reference For safe and correct use be sure to read the Safety Information in this manual before using the machine 3 ...

Страница 5: ...le on a provided CD ROM mainly Europe and Asia mainly North America Differences in the functions of Region A and Region B models are indicated by two symbols Read the information indicated by the symbol that corresponds to the region of the model you are using For details about which symbol corresponds to the model you are using see Model Specific Information Getting Started Disclaimer Contents of...

Страница 6: ...g the manuals Type 1 MP C3002 Aficio MP C3002 MP C3002G Aficio MP C3002G Type 2 MP C3502 Aficio MP C3502 MP C3502G Aficio MP C3502G Type 3 MP C4502 MP C4502A Aficio MP C4502 Aficio MP C4502A MP C4502G Aficio MP C4502G Type 4 MP C5502 MP C5502A Aficio MP C5502 Aficio MP C5502A MP C5502G Aficio MP C5502G Certain types might not be available in some countries For details please contact your local dea...

Страница 7: ...6 ...

Страница 8: ...afety Information It also describes each regulation and environmental conformance Easy Search You can search for a description by what you want to do or by keyword Also this machine s distinctive functions are explained Getting Started Describes preparations for using the machine operating instructions character input methods and how to install the included CD ROM Paper Specifications and Adding P...

Страница 9: ... using the control panel or Web Image Monitor Security Guide This manual is for administrators of the machine It explains security functions that you can use to prevent unauthorized use of the machine data tampering or information leakage For enhanced security we recommend that you first make the following settings Install the Device Certificate Enable SSL Secure Sockets Layer Encryption Change th...

Страница 10: ...ssian The following software products are referred to using general names Product name General name ScanRouter EX Professional 1 and ScanRouterEX Enterprise 1 the ScanRouter delivery software 1 The ScanRouter EX Professional and ScanRouterEX Enterprise are no longer available for sale Manuals for This Machine 9 ...

Страница 11: ...No Yes No Copy Document Server No Yes No Fax No Yes No Print No Yes No Scan No Yes No Connecting the Machine System Settings No Yes No Security Guide No No Yes PostScript 3 No Yes No VM Card Extended Feature Settings No Yes No Driver Installation Guide No No Yes UNIX Supplement No No Yes 1 1 For UNIX Supplement please visit our Web site or consult an authorized dealer Driver Installation Guide and...

Страница 12: ...is section describes how to read the HTML manuals on the supplied manual CD ROM 1 Insert the CD ROM in the CD ROM drive of your computer 2 Select a language and a product and then click OK 3 Click Read HTML manuals 4 Click the title of manual you want to read The browser opens and then the manual appears Recommended browsers Internet Explorer 6 or later Firefox 3 5 or later Safari 4 0 or later If ...

Страница 13: ... administrator permissions to install the manuals Log in as an Administrators group member The system requirements for installing the manuals are as follows Operating system Windows XP Vista 7 Windows Server 2003 2003 R2 2008 2008 R2 Minimum display resolution 800 600 pixels If you cannot install a manual copy the MANUAL_HTML folder to your computer s hard drive and then run Setup exe To delete an...

Страница 14: ...e PDF manuals you need to have Adobe Acrobat Reader Adobe Reader installed on your computer If you want to read the PDF manuals on a Macintosh insert the CD ROM in the CD ROM drive and then click Read PDF manuals Driver Installation Guide is available in English German French Italian Spanish Dutch and Russian On screen Operating Instructions 13 ...

Страница 15: ...1 Manuals Provided with This Machine 14 ...

Страница 16: ...he following important symbols are used Indicates a potentially hazardous situation which if instructions are not followed could result in death or serious injury Indicates a potentially hazardous situation which if instructions are not followed may result in minor or moderate injury or damage to property 15 ...

Страница 17: ... from spillage or if such objects or substances fall inside this machine Keep the machine away from humidity and dust Otherwise a fire or an electric shock might occur Do not place the machine on an unstable or tilted surface If it topples over an injury might occur Do not place heavy objects on the machine Doing so can cause the machine to topple over possibly resulting in injury Make sure the ro...

Страница 18: ...ire or electric shock Do not use any frequencies other than those that match the specifications shown Doing so could result in fire or electric shock Do not use multi socket adaptors Doing so could result in fire or electric shock Do not use extension cords Doing so could result in fire or electric shock Do not use power cords that are damaged broken or modified Also do not use power cords that ha...

Страница 19: ...conditions exist do not use the plug and consult your dealer or service representative Use of the plug could result in fire or electric shock Be sure to disconnect the power cord from the wall outlet at least once a year The power cord s inner wires are exposed broken etc The power cord s coating has a crack or dent When bending the power cord the power turns off and on Part of the power cord beco...

Страница 20: ...out handling the main machine Be sure to locate the machine as close as possible to a wall outlet This will allow easy disconnection of the power cord in the event of an emergency If the machine emits smoke or odours or if it behaves unusually you must turn off its power immediately After turning off the power be sure to disconnect the power cord plug from the wall outlet Then contact your service...

Страница 21: ... If you have to move the machine when the optional paper tray unit is attached do not push on the main unit s top section Doing so can cause the optional paper tray unit to detach possibly resulting in injury After you move the machine use the caster fixture to fix it in place Otherwise the machine might move or come down to cause an injury Contact your service representative if you need to lift t...

Страница 22: ...e s internal components get very hot For this reason take care when removing misfed paper Not doing so could result in burns The inside of the machine could be very hot Do not touch the parts with a label indicating the hot surface Otherwise an injury might occur When removing jammed paper make sure not to trap or injure your fingers When loading paper take care not to trap or injure your fingers ...

Страница 23: ...luding used toner Sucked toner may cause firing or explosion due to electrical contact flickering inside the cleaner However it is possible to use the cleaner designed for dust explosion proof purpose If toner is spilled over the floor sweep up spilled toner slowly and clean remainder with wet cloth The following explains the warning messages on the plastic bag used in this product s packaging Kee...

Страница 24: ...er or replacing toner avoid getting toner new or used on your clothing If toner comes into contact with your clothing wash the stained area with cold water Hot water will set the toner into the fabric and make removing the stain impossible When removing jammed paper or replacing toner avoid getting toner new or used on your skin If toner comes into contact with your skin wash the affected area tho...

Страница 25: ... Users of Types 1 and 2 This machine has labels for WARNING and CAUTION at the positions shown below For safety please follow the instructions and handle the machine as indicated Main unit CJZ001 1 2 1 CJZ003 High temperature parts Wait a while to allow the Fusing Unit to cool down before removing misfed paper 2 2 Safety Information 24 ...

Страница 26: ...CJZ004 Do not touch the parts a label indicates The inside of the machine could be very hot Caution should be taken when removing misfed paper Safety Labels of This Machine 25 ...

Страница 27: ...ine could be very hot Do not touch the parts which a label is put on Otherwise an injury might occur 4 CKA025 The inside of the machine could be very hot Do not touch the parts which a label is put on Otherwise an injury might occur 2 Safety Information 26 ...

Страница 28: ...e paper revolve Take care not to touch rollers during operation Otherwise an injury might occur 6 CJZ002 Do not touch the parts a label indicates The inside of the bridge unit could be very hot Caution should be taken when removing misfed paper Safety Labels of This Machine 27 ...

Страница 29: ...booklet finisher tray when pulling out or pushing in the finisher s staple unit or removing paper jam You might trap your fingers if you do not Take care not to touch the booklet finisher tray during operation Otherwise an injury might occur 8 CJZ029 2 Safety Information 28 ...

Страница 30: ...e unit or removing paper jam You might trap your fingers if you do not Finisher SR3090 9 CJZ010 9 CJZ011 During operation rollers for transporting the paper revolve Take care not to touch rollers during operation Otherwise an injury might occur Finisher SR3070 CJZ027 10 Safety Labels of This Machine 29 ...

Страница 31: ... It may fall off the machine and cause an injury External tray CJZ031 11 11 CKA023 During operation rollers for transporting the paper revolve Take care not to touch rollers during operation Otherwise an injury might occur 2 Safety Information 30 ...

Страница 32: ...w the instructions and handle the machine as indicated Main unit CJZ012 2 1 3 1 CJZ013 Do not touch the parts a label indicates The inside of the machine could be very hot Caution should be taken when removing misfed paper 2 CJZ003 High temperature parts Wait a while to allow the Fusing Unit to cool down before removing misfed paper 3 Safety Labels of This Machine 31 ...

Страница 33: ...CJZ004 Do not touch the parts a label indicates The inside of the machine could be very hot Caution should be taken when removing misfed paper 2 Safety Information 32 ...

Страница 34: ...ould be very hot Do not touch the parts which a label is put on Otherwise an injury might occur 5 CKA025 The inside of the machine could be very hot Do not touch the parts which a label is put on Otherwise an injury might occur Safety Labels of This Machine 33 ...

Страница 35: ...26 6 CKA023 During operation rollers for transporting the paper revolve Take care not to touch rollers during operation Otherwise an injury might occur 7 CJZ002 Do not touch Surface may be very hot 2 Safety Information 34 ...

Страница 36: ...let Finisher SR3110 9 8 10 CJZ022 8 CJZ011 During operation rollers for transporting the paper revolve Take care not to touch rollers during operation Otherwise an injury might occur 9 CJZ008 Safety Labels of This Machine 35 ...

Страница 37: ...rs if you do not Take care not to touch the booklet finisher tray during operation Otherwise an injury might occur 10 CJZ009 Keep your hands clear of the booklet finisher tray when pulling out or pushing in the finisher s staple unit or removing paper jam You might trap your fingers if you do not Finisher SR3090 11 CJZ016 11 CJZ011 2 Safety Information 36 ...

Страница 38: ...ight occur External tray CJZ032 12 12 CKA023 During operation rollers for transporting the paper revolve Take care not to touch rollers during operation Otherwise an injury might occur Power Switch Symbols The meanings of the symbols for the switches on this machine are as follows POWER ON STANDBY Safety Labels of This Machine 37 ...

Страница 39: ...2 Safety Information 38 ...

Страница 40: ...ue stamps bonds stock certificates bank drafts checks passports driver s licenses The preceding list is meant as a guide only and is not inclusive We assume no responsibility for its completeness or accuracy If you have any questions concerning the legality of copying or printing certain items consult with your legal advisor This machine is equipped with a function that prevents making counterfeit...

Страница 41: ...es other than those specified in the manuals might result in hazardous radiation exposure Laser Safety for Types 3 and 4 CDRH Regulations This equipment complies with requirements of 21 CFR subchapter J for class I laser products This equipment contains eight AlGaInP laser diodes 9 milliwatts 648 663 nanometer wavelength for each emitter The beam divergence angle is 28 degrees minimum and 35 degre...

Страница 42: ...C5502 MP C5502A Aficio MP C5502A MP C4502G Aficio MP C4502G MP C5502G Aficio MP C5502G Note This equipment has been tested and found to comply with the limits for a Class B digital device pursuant to Part 15 of the FCC Rules These limits are designed to provide reasonable protection against harmful interference in a residential installation This equipment generates uses and can radiate radio frequ...

Страница 43: ... of devices that may be connected to a telephone line Excessive RENs on a telephone line may result in the devices not ringing in response to an incoming call In most but not all areas the sum of RENs should not exceed five 5 0 To be certain of the number of devices that may be connected to a line as determined by the total RENs contact the local telephone company The REN for this product is part ...

Страница 44: ...urs such as early morning hours or late evenings The Telephone Consumer Protection Act of 1991 makes it unlawful for any person to use a computer or other electronic device including FAX machines to send any message unless such message clearly contains in a margin at the top or bottom of each transmitted page or on the first page of the transmission the date and time it is sent and an identificati...

Страница 45: ...ns IMPORTANTES MESURES DE SÉCURITÉ de l unité Fax Certaines mesures de sécurité doivent être prises pendant l utilisation de material téléphonique afin de réduire les risques d incendie de choc électrique et de blessures En voici quelques unes Ne pas utiliser l appareil près de l eau p ex près d une baignoire d un lavabo d un évier de cuisine d un bac à laver dans un sous sol humide ou près d une ...

Страница 46: ...the devices does not exceed five Remarques à l attention des utilisateurs canadiens de l unité Fax Le présent matériel est conforme aux spécifications techniques applicables d Industrie Canada L indice d équivalence de la sonnerie IES sert à indiquer le nombre maximal de terminaux qui peuvent être raccordés à une interface téléphonique La terminaison d une interface peut consister en une combinais...

Страница 47: ...y promoting energy efficient computers and other office equipment The program backs the development and dissemination of products that feature energy saving functions It is an open program in which manufacturers participate voluntarily Targeted products are computers monitors printers facsimiles copiers scanners and multi function devices Energy Star standards and logos are internationally uniform...

Страница 48: ...the machine waits before entering Sleep mode is 1 minute This default time can be changed The machine can print jobs from computers and receive faxes while in Sleep mode Specification for types 1 and 2 Type 1 Type 2 Reduced electrical consumption in Low Power mode 79 W 79 W Time of switch into Low Power mode Off Off Time of switch out from Low Power mode 9 9 seconds 9 9 seconds Reduced electrical ...

Страница 49: ...h into Low Power mode Off Off Time of switch out from Low Power mode 10 seconds 10 seconds Reduced electrical consumption in Sleep mode 1 0 W 1 0 W Time of switch into Sleep mode 1 minute 1 minute Time of switch out from Sleep mode 15 seconds 20 seconds Specifications can vary depending on which options are installed on the machine For details about how to change the default interval see Timer Set...

Страница 50: ...rs in the state of California Notes to Users in USA Perchlorate Material special handling may apply See www dtsc ca gov hazardouswaste perchlorate Notes to users in the state of California Notes to Users in USA 49 ...

Страница 51: ...3 Information for This Machine 50 ...

Страница 52: ...er 6 is Microsoft Internet Explorer 6 The proper names of the Windows operating systems are as follows The product names of Windows XP are as follows Microsoft Windows XP Professional Edition Microsoft Windows XP Home Edition Microsoft Windows XP Media Center Edition Microsoft Windows XP Tablet PC Edition The product names of Windows Vista are as follows Microsoft Windows Vista Ultimate Microsoft ...

Страница 53: ...crosoft Windows Server 2008 Standard Microsoft Windows Server 2008 Enterprise The product names of Windows Server 2008 R2 are as follows Microsoft Windows Server 2008 R2 Standard Microsoft Windows Server 2008 R2 Enterprise Other product names used herein are for identification purposes only and might be trademarks of their respective companies We disclaim any and all rights to those marks 4 Append...

Страница 54: ...Cover Paper Thickness 0 10 Body Paper Thickness 0 08 Pages in Book 0 Spine Width 0 2011 ...

Страница 55: ...nter the password after the message Confirm Password appears on the screen and then press OK Print Printing Stored Documents Storing Documents in the Hard Disk Drive and Printing them Hold Print Changing the print time of a Hold Print file You can specify the time in 24 hour format To cancel the print time press Cancel For users mainly in Europe and Asia You can specify the time in 24 hour format ...

Страница 56: ...work Security Level Status of Functions under Each Network Security Level TCP IP Encryption Strength Set ting Function ssh Encryption Algo rithm Level 0 DES 3DES AES 128 AES 192 Blowfish Arcfour Level 0 DES 3DES AES 128 AES 192 AES 256 Blowfish Arcfour Security Guide 7 Managing the Machine Configuring the Browser Functions Restricting User Browser Functions Step 3 Press Settings par Users Step 3 P...

Страница 57: ... printed manually The amount of free memory space becomes less than 100 or the number of received documents reaches the maximum If the number of transmission logs reaches the maximum further communica tion may not be possible depending on the settings Received documents cannot be deleted and Reception File Erased Report can not be printed even though On is set with the User Parameter switch 10 bit...

Страница 58: ...MAGE SPX IPX Copyright c 1995 Mike Mitchell Copyright c 1984 1985 1986 1987 1993 The Regents of the University of California All rights reserved Redistribution and use in source and binary forms with or without modification are permitted provided that the following conditions are met 1 Redistributions of source code must retain the above copyright notice this list of conditions and the fol lowing ...

Страница 59: ...re to read the Safety Information in Read This First before using the machine For information not in this manual refer to the HTML PDF files on the supplied CD ROM Appendix Troubleshooting Adding Paper and Toner Web Image Monitor Document Server Scan Print Fax Copy Getting Started What You Can Do with This Machine User Guide ...

Страница 60: ......

Страница 61: ...t 19 You Can Send and Receive Faxes by Using the Machine without Fax Unit Installed 21 You Can Use the Facsimile and the Scanner in a Network Environment 22 You Can Prevent Information Leakage Security Functions 23 You Can Monitor and Set the Machine Using a Computer 24 You Can Prevent an Unauthorized Copy 25 2 Getting Started Guide to Names and Functions of Components 27 Guide to Components of Ty...

Страница 62: ...aper from the Bypass Tray 78 Copying onto Envelopes 79 Copying onto Envelopes from the Bypass Tray 79 Copying onto Envelopes from the Paper Tray 80 Finishing 81 Staple 81 Punch 83 Storing Data in the Document Server 86 4 Fax Basic Procedure for Transmissions Memory Transmission 87 Registering a Fax Destination 89 Deleting a Fax Destination 90 Transmitting while Checking Connection to Destination I...

Страница 63: ... Print File 108 Printing a Stored Print File Using the Control Panel 109 6 Scan Basic Procedure When Using Scan to Folder 111 Creating a Shared Folder on a Computer Running Windows Confirming a Computer s Information 112 Registering an SMB Folder 114 Deleting an SMB Registered Folder 117 Entering the Path to the Destination Manually 118 Basic Procedure for Sending Scan Files by E mail 119 Register...

Страница 64: ...Paper 156 Envelopes 157 Adding Toner 161 Sending Faxes or Scanned Documents When Toner Has Run Out 162 Disposing of Used Toner 163 10 Troubleshooting Indicators 165 When an Indicator for the Check Status Key Is Lit 166 Panel Tone 168 When You Have Problems Operating the Machine 169 When Messages Are Displayed on the Control Panel 176 Messages Displayed When Using the Copy Document Server Function ...

Страница 65: ...INDEX 235 5 ...

Страница 66: ...This symbol is located at the end of sections It indicates where you can find further relevant information Indicates the names of keys on the machine s display or control panels Indicates instructions stored in a file on a provided CD ROM mainly Europe and Asia mainly North America Differences in the functions of Region A and Region B models are indicated by two symbols Read the information indica...

Страница 67: ... Read the information under the symbol that corresponds to the region of your machine mainly Europe and Asia If the label contains the following your machine is a region A model CODE XXXX 27 29 67 69 220 240 V mainly North America If the label contains the following your machine is a region B model CODE XXXX 17 51 57 120 127 V Dimensions in this manual are given in two units of measure metric and ...

Страница 68: ...ures of the machine are referred to as follows Auto Reverse Document Feeder ARDF Auto Document Feeder ADF in this manual ADF refers to the ARDF and the one pass duplex scanning ADF Large capacity tray LCT Envelope Feeder EF3020 Small size paper tray 8 ...

Страница 69: ...ine Copier Fax See Combined Copying Copy Document Server See Combine Two Originals Fax Printing received faxes on both sides of sheets 2 Sided Print See Two Sided Printing Fax Converting received faxes to electronic formats Paperless Fax See Confirming Printing Deleting Received and Stored Documents Fax Sending files from the computer without printing them LAN Fax See Sending Fax Documents from Co...

Страница 70: ... Basic Procedure When Using Scan to Folder Scan Storing scan files on media See Basic Procedure for Saving Scan Files on a Removable Memory Device Scan Converting transmitted faxes to electronic formats and sending them to a computer See Overview of Folder Transmission Function Fax Managing and using documents converted to electronic formats Document Server See Relationship between Document Server...

Страница 71: ...ring an E mail Address Manually Scan Using Web Image Monitor to register destinations from a computer See Registering Internet Fax Destination Information Using Web Image Monitor Fax Downloading destinations registered in the machine to the LAN Fax driver destination list See Using the machine s Address Book as the LAN Fax destination list Fax I Want to Register Destinations 11 ...

Страница 72: ...enient Functions Registering frequently used printing settings to the printer driver See Using One Click Presets Print Changing the initial settings of the printer driver to frequently used printing settings See Displaying the Printing Preferences Dialog Box Print Adding shortcuts to frequently used programs or Web pages See Adding Icons to the Home Screen Convenient Functions Changing the order o...

Страница 73: ...o the Home screen The programs or Web pages can be recalled easily by pressing the shortcut icons You can display only the icons of functions and shortcuts that you use You can change the order of the function and shortcut icons For details about the features on the Home screen see How to Use the Home Screen Getting Started You Can Customize the Home Screen as You Like 13 ...

Страница 74: ...lly detects the original size and then selects an appropriate reproduction ratio based on the paper size you select If the orientation in which your original is placed is different from that of the paper you are copying onto the machine rotates the original image by 90 degrees and fits it on the copy paper Copier functions such as Duplex Combine Booklet and Magazine allow you to save on paper by c...

Страница 75: ...types of print jobs can be selected Sample Print Locked Print Hold Print and Stored Print The finisher allows you to collate staple and punch holes in your prints If the PictBridge card is installed you can connect a PictBridge compatible digital camera to this machine using a USB cable This allows you to print the photographs stored on the camera using the camera s own interface You can print fil...

Страница 76: ...g the file format converter you can download documents stored in copier Document Server or printer mode to your computer For details about the Document Server in copier mode and how to use the Document Server see Storing Data in the Document Server and Document Server Copy Document Server For details about the Document Server in printer mode see Saving and Printing Using the Document Server Print ...

Страница 77: ...ge Monitor to check print delete retrieve or download documents using your computer Storing received documents See Confirming Printing Deleting Received and Stored Documents Fax Transmission You can send a fax from your computer over the network Ethernet or wireless LAN to this machine which then forwards the fax via its telephone connection LAN Fax You Can Send and Receive Faxes without Paper 17 ...

Страница 78: ... printer and then specify the destination You can also check the sent image data For details about the machine s settings see Network Settings Requirements Connecting the Machine System Settings For details about how to use the function see Fax via Computer Fax 1 What You Can Do with This Machine 18 ...

Страница 79: ...m computers Internet Fax Reception and Mail to Print Internet Fax compatible machines and computers that have e mail addresses can receive e mail messages via Internet Fax IP Fax The IP Fax function sends or receives documents between two facsimiles directly via a TCP IP network To send a document specify an IP address or host name instead of a fax number IP Fax Transmission This machine can recei...

Страница 80: ... For details about how to transmit and receive documents over the Internet see Transmission and Reception Fax 1 What You Can Do with This Machine 20 ...

Страница 81: ... and remote machine The procedure for sending faxes is as same as that of for the machine with the fax unit When a job has finished confirm results displayed on sending history or printed on reports You can forward the received documents from the remote machine with facsimile function to the client side machine For details see Sending Receiving Documents Using a Remote Machine Remote Fax Fax You C...

Страница 82: ...can use this machine as a delivery scanner for the ScanRouter delivery software 1 Network delivery scanner You can save scan files in the delivery server or send them to a folder in a computer on the same network You can use Web Services on Devices WSD to send scan files to a client computer 1 The ScanRouter delivery software is no longer available for sale See Fax Scan or Connecting the Machine S...

Страница 83: ...machine as well as prevent machine settings from being changed without authorization By setting passwords you can prevent unauthorized access via the network You can erase or encrypt the data on the hard disk to prevent the information from leaking out You can limit the volume of the usage of the machine for each user See Security Guide You Can Prevent Information Leakage Security Functions 23 ...

Страница 84: ... You can check which tray is running out of paper register information in the Address Book specify the network settings configure and change the system settings manage jobs print the job history and configure the authentication settings See Connecting the Machine System Settings or Web Image Monitor Help 1 What You Can Do with This Machine 24 ...

Страница 85: ... a machine that is equipped with the Copy Data Security unit the machine beeps to notify users that unauthorized copying is being attempted If the document is copied on a machine without the Copy Data Security Unit the hidden text becomes conspicuous in the copy showing that the copy is unauthorized Using the printer driver you can embed text in the printed document for unauthorized copy preventio...

Страница 86: ...1 What You Can Do with This Machine 26 ...

Страница 87: ...holes by placing objects near them or leaning things against them If the machine overheats a fault might occur Front and left view 4 1 2 3 5 6 7 8 9 CJS001 1 ARDF Lower the ARDF over originals placed on the exposure glass If you load a stack of originals in the ARDF the ARDF will automatically feed the originals one by one The ARDF scans both sides of an original one side at a time 27 ...

Страница 88: ...he cover and turn the switch on 5 Control panel See p 45 Guide to the Names and Functions of the Machine s Control Panel 6 Internal tray 1 Copied printed paper and fax messages are delivered here 7 Front cover Open to access the inside of the machine 8 Paper trays trays 1 2 Load paper here 9 Lower paper trays Load paper here Front and right view 1 2 3 4 5 CJS002 2 Getting Started 28 ...

Страница 89: ...oading paper in the bypass tray align the paper guides flush against the paper 4 Extender Pull this extender out when loading sheets larger than A4 81 2 11 in the bypass tray 5 Lower right cover Open this cover when a paper jam occurs Rear and left view 1 1 1 CJS003 1 Ventilation holes Prevent overheating Guide to Names and Functions of Components 29 ...

Страница 90: ...scanning ADF The illustration shows the ARDF Lower the ADF over originals placed on the exposure glass If you load a stack of originals in the ADF the ADF will automatically feed the originals one by one The ARDF scans both sides of an original one side at a time The one pass duplex scanning ADF scans both sides of an original simultaneously 2 Exposure glass Place originals face down here 3 Ventil...

Страница 91: ...6 Internal tray 1 Copied printed paper and fax messages are delivered here 7 Front cover Open to access the inside of the machine 8 Paper trays trays 1 2 Load paper here 9 Lower paper trays Load paper here Front and right view 1 2 3 4 5 CJS005 1 Ventilation holes Prevent overheating 2 Bypass tray Use to copy or print on OHP transparencies and label paper adhesive labels Guide to Names and Function...

Страница 92: ...es flush against the paper 4 Extender Pull this extender out when loading sheets larger than A4 81 2 11 in the bypass tray 5 Lower right cover Open this cover when a paper jam occurs Rear and left view 1 1 1 CJS006 1 Ventilation holes Prevent overheating 2 Getting Started 32 ...

Страница 93: ...sheets of paper or envelopes To use the small size paper tray install it in trays 2 4 For details about how to install the small size paper tray see Installing the Small Size Paper Tray Getting Started 2 Lower paper tray Holds up to 550 sheets of paper 3 Caster table for lower paper tray To use the lower paper tray attach the caster table 4 Tray 3 LCT Holds up to 2 000 sheets of paper Guide to Fun...

Страница 94: ...ou select this as the output tray copied printed paper and fax messages are delivered here face down 11 Booklet Finisher SR3100 Sorts stacks staples and punches multiple sheets of paper The saddle stitch function can staple multiple sheets of paper in the center and fold them into booklets Consists of the following paper trays Finisher upper tray Finisher shift tray Finisher booklet tray 12 Finish...

Страница 95: ...ll size sheets of paper or envelopes To use the small size paper tray install it in trays 2 4 For details about how to install the small size paper tray see Installing the Small Size Paper Tray Getting Started 3 Lower paper tray Holds up to 550 sheets of paper 4 Caster table for lower paper tray To use the lower paper tray attach the caster table 5 Tray 3 LCT Holds up to 2 000 sheets of paper 6 La...

Страница 96: ...ray copied printed paper and fax messages are delivered here face down 12 Booklet Finisher SR3100 Sorts stacks staples and punches multiple sheets of paper The saddle stitch function can staple multiple sheets of paper in the center and fold them into booklets Consists of the following paper trays Finisher upper tray Finisher shift tray Finisher booklet tray 13 Finisher SR3090 Sorts stacks and sta...

Страница 97: ...using the control panel on the machine 2 Small size paper tray Holds small size sheets of paper or envelopes To use the small size paper tray install it in trays 2 4 For details about how to install the small size paper tray see Installing the Small Size Paper Tray Getting Started 3 Tray 3 LCT Holds up to 2 000 sheets of paper 4 Large capacity tray LCT Holds up to 1 200 sheets of paper Guide to Fu...

Страница 98: ...e delivered here face down 10 Finisher SR3120 Sorts stacks staples and punches multiple sheets of paper Consists of the following paper trays Finisher upper tray Finisher shift tray 11 Booklet Finisher SR3110 Sorts stacks staples and punches multiple sheets of paper The saddle stitch function can staple multiple sheets of paper in the center and fold them into booklets Consists of the following pa...

Страница 99: ... a receiver when a fax unit is installed Allows you to use the On Hook Dial and Manual Dial functions It also allows you to use the machine as a telephone 3 Small size paper tray Holds small size sheets of paper or envelopes To use the small size paper tray install it in trays 2 4 For details about how to install the small size paper tray see Installing the Small Size Paper Tray Getting Started 4 ...

Страница 100: ...inted paper and fax messages are delivered here face down 11 Finisher SR3120 Sorts stacks staples and punches multiple sheets of paper Consists of the following paper trays Finisher upper tray Finisher shift tray 12 Booklet Finisher SR3110 Sorts stacks staples and punches multiple sheets of paper The saddle stitch function can staple multiple sheets of paper in the center and fold them into bookle...

Страница 101: ... how to install the small size paper tray see Installing the Small Size Paper Tray Getting Started 2 Tray 3 LCT Holds up to 2 000 sheets of paper 3 Large capacity tray LCT Holds up to 1 200 sheets of paper 4 Lower paper trays Consists of two paper trays Holds up to 1 100 sheets of paper Each paper tray holds 550 sheets 5 Internal tray 2 If you select this as the output tray copied printed paper or...

Страница 102: ... following paper trays Finisher upper tray Finisher shift tray 10 Booklet Finisher SR3110 Sorts stacks staples and punches multiple sheets of paper The saddle stitch function can staple multiple sheets of paper in the center and fold them into booklets Consists of the following paper trays Finisher upper tray Finisher shift tray Finisher booklet tray 11 Finisher SR3090 Sorts stacks and staples mul...

Страница 103: ...nctions It also allows you to use the machine as a telephone 2 Small size paper tray Holds small size sheets of paper or envelopes To use the small size paper tray install it in trays 2 4 For details about how to install the small size paper tray see Installing the Small Size Paper Tray Getting Started 3 Tray 3 LCT Holds up to 2 000 sheets of paper 4 Large capacity tray LCT Holds up to 1 200 sheet...

Страница 104: ...e delivered here face down 10 Finisher SR3120 Sorts stacks staples and punches multiple sheets of paper Consists of the following paper trays Finisher upper tray Finisher shift tray 11 Booklet Finisher SR3110 Sorts stacks staples and punches multiple sheets of paper The saddle stitch function can staple multiple sheets of paper in the center and fold them into booklets Consists of the following pa...

Страница 105: ... the function keys as a factory default You can register often used functions programs and Web pages For details see Configuring function keys Getting Started 3 Display panel Displays keys for each function operation status or messages See How to Use the Screens on the Control Panel Getting Started 4 Reset key Press to clear the current settings 5 Program key copier Document Server facsimile and s...

Страница 106: ...ur requirements See Accessing User Tools Connecting the Machine System Settings Counter Press to check or print the counter value See Counter Maintenance and Specifications You can find out where to order expendable supplies and where to call when a malfunction occurs You can also print these details See Checking Enquiry Using the User Tools Maintenance and Specifications 11 Simple Screen key Pres...

Страница 107: ...ontinuously during data transmission and reception Fax Received indicator Lights continuously while data other than personal box or Memory Lock file is being received and stored in the fax memory See Substitute Reception Fax Confidential File indicator Lights continuously while personal box data is being received Blinks while Memory Lock file is being received See Personal Boxes and Printing a Fil...

Страница 108: ...ion see Copy Document Server 2 Facsimile Press to send or receive faxes For details about how to use the fax function see Fax 3 Scanner Press to scan originals and save images as files For details about how to use the scanner function see Scan 4 Printer Press to make settings for using the machine as a printer For details about how to make settings for the printer function see Print 5 Home screen ...

Страница 109: ...ure for registering Web pages to Favorites see Specifying the Settings for Favorites Convenient Functions Shortcuts to Web pages that are registered to Favorites by User cannot be registered to the Home screen To register the shortcuts register Web pages to Common Favorites For details about kinds of Favorites see Specifying the Settings for Favorites Convenient Functions For details about the pro...

Страница 110: ...dd and then click Add 6 Select the function or shortcut icon you want to add 7 Click OK four times Adding icons to the Home screen using the User Tools In the following procedure a shortcut to a copier program is registered to the Home screen 1 Register a program 2 Press the User Tools Counter key CJS039 3 Press Edit Home 2 Getting Started 50 ...

Страница 111: ...4 Press Add Icon 5 Press the Program tab 6 Make sure that Copier Program is selected 7 Select the program you want to add How to Use the Home Screen 51 ...

Страница 112: ... Specify the position where Blank is displayed 9 Press OK 10 Press the User Tools Counter key Press on the upper right corner of the screen to check the position on the simple screen 2 Getting Started 52 ...

Страница 113: ... to Top 2 Sided Copy Top to Bottom Booklet Magazine Finishing Cover Slip Sheet except for Designate Copy Designate Blank Chapter and Main Sheet Tray in Designate Chapter Edit Stamp number of prints Facsimile Scan Settings density Original Feed Type File Type Store File except for User Name and Password Preview transmission type destinations except for folder destinations Select Line Adv Features m...

Страница 114: ...icon on the Home screen CJS113 2 Edit the copy settings so all functions you want to store in a program are selected 3 Press the Program key CJU601 4 Press Program 5 Press the program number you want to register 6 Enter the program name 7 Press OK 8 Press Exit 2 Getting Started 54 ...

Страница 115: ...elected first For details see System Settings Connecting the Machine System Settings Programs are not deleted by turning the power off or by pressing the Reset key unless the program is deleted or overwritten Program numbers with next to them already have settings made for them Programs can be registered to the Home screen and can be recalled easily For details see Registering a Shortcut to a Prog...

Страница 116: ...registered in the machine Thumbnail copy Specify Combine 1 Side in Dup Combine Series You can copy up to eight pages onto one side of a sheet so that you can you to save paper Scanner mode Program name Program description Easy PDF scan Select Full Colour Text Photo in Scan Settings In Send File Type Name select PDF under File Type and enter the business details such as London branch daily report u...

Страница 117: ...nned data in TIFF format Also specify a higher resolution in Scan Settings Scanned documents maintain much of the detail of the originals but the size of the data may be quite large Batch document scan Select Batch in Original Feed Type You can apply multiple scans to a large volume of originals and send the scanned originals as a single job Facsimile mode Program name Program description Transmis...

Страница 118: ...uiring Optional Configurations Getting Started The names of programs given above are just examples You can assign any name to a program according to your objectives Depending on your business details or the type of documents to be scanned registering a program cannot be recommended 2 Getting Started 58 ...

Страница 119: ...tions 1 Make sure the power cord is firmly plugged into the wall outlet 2 Open the main power switch cover and turn on the main power switch The main power indicator goes on CJS041 Turning Off the Main Power When disconnecting the power cord from the wall outlet always pull the plug not the cord Pulling the cord can damage the power cord Use of damaged power cords could result in fire or electric ...

Страница 120: ...ug Not doing so may result in damage to the hard disk or memory leading to malfunctions Do not turn off the power while the machine is in operation 1 Open the main power switch cover and then turn off the main power switch The main power indicator goes out 2 Getting Started 60 ...

Страница 121: ...r administrator for the Login User Name Login Password and User Code For details about user authentication see Security Guide User Code to enter on User Code Authentication is the numerical value registered in the Address Book as User Code User Code Authentication Using the Control Panel This section explains the procedure for logging in to the machine using the control panel while User Code Authe...

Страница 122: ...ing Out Using the Control Panel This section explains the procedure for logging out the machine when Basic Authentication Windows Authentication LDAP Authentication or Integration Server Authentication is set To prevent use of the machine by unauthorized persons always log out when you have finished using the machine 1 Press the Login Logout key CJS040 2 Press Yes 2 Getting Started 62 ...

Страница 123: ... on the exposure glass The original should be aligned to the rear left corner Start with the first page to be copied CJW001 1 1 1 Positioning mark 3 Lower the ADF Placing Originals in the Auto Document Feeder Be sure not to block the sensor or load the original untidily Doing so may cause the machine to detect the size of the original incorrectly or display a paper misfeed message Also be sure not...

Страница 124: ... scanning ADF Types 3 and 4 CJW005 1 1 Sensors 1 Adjust the original guide to the original size 2 Set the aligned originals squarely face up in the ADF Do not stack originals beyond the limit mark The first page should be on the top ARDF Types 1 and 2 2 Getting Started 64 ...

Страница 125: ...CJW006 1 2 ARDF Types 3 and 4 CJW007 1 2 One pass duplex scanning ADF Types 3 and 4 CJW008 2 1 1 Limit mark 2 Original guide Placing Originals 65 ...

Страница 126: ...2 Getting Started 66 ...

Страница 127: ...lain paper specify the paper type in User Tools according to the weight of the paper you are using For details see System Settings Connecting the Machine System Settings 1 Make sure Copier appears on the screen If any other function is displayed press the Home key on the top left of the control panel and press the Copier icon on the Home screen 2 Make sure no previous settings remain When there ar...

Страница 128: ...7 When the copy job is finished press the Reset key to clear the settings 3 Copy 68 ...

Страница 129: ... and fits it on the copy paper Rotate Copy For example to reduce A3 11 17 originals to fit onto A4 81 2 11 paper select a paper tray containing A4 81 2 11 paper and then press Auto Reduce Enlarge The image is automatically rotated For details about Rotate Copy see Rotate Copy Copy Document Server The original sizes and orientations you can use with this function are as follows mainly Europe and As...

Страница 130: ...ginal size and orientation Exposure glass 11 17 81 2 14 81 2 11 51 2 81 2 ADF 11 17 81 2 14 81 2 11 51 2 81 2 10 14 71 4 101 2 A3 A4 1 Press Auto Reduce Enlarge 2 Select the paper size 3 Place the originals and then press the Start key 3 Copy 70 ...

Страница 131: ...page 2 Sided 2 Sided Copies one 2 sided page on one 2 sided page The resulting copy image will differ according to the orientation in which you place your originals or Original orientation and completed copies To copy on both sides of the paper select the original and copy orientation according to how you want the printout to appear Original Placing originals Original Orientation Orientation Copy ...

Страница 132: ... Series 2 Make sure that Duplex is selected If Duplex is not selected press Duplex 3 Select 1 Sided 2 Sided or 2 Sided 2 Sided according to how you want the document to be output To change the original or copy orientation press Orientation 4 Press OK 5 Place the originals and then press the Start key 3 Copy 72 ...

Страница 133: ...mage by 90 degrees to make copies properly Orientation of the original and image position of Combine The image position of Combine differs according to original orientation and the number of originals to be combined Portrait originals CKN015 Landscape originals CKN016 Placing originals originals placed in the ADF The default value for the copy order in the Combine function is From Left to Right To...

Страница 134: ...ine 1 Sided 2 Originals Combine 1 Side Copies two 1 sided originals to one side of a sheet 1 Sided 4 Originals Combine 1 Side Copies four 1 sided originals to one side of a sheet 1 Sided 8 Originals Combine 1 Side Copies eight 1 sided originals to one side of a sheet 2 Sided 2 Pages Combine 1 Side Copies one 2 sided original to one side of a sheet 3 Copy 74 ...

Страница 135: ...Combine Series 2 Press Combine 3 Select 1 Sided or 2 Sided for Original If you selected 2 Sided you can change the orientation 4 Press Combine 1 Side 5 Select the number of originals to combine 6 Press OK 7 Select the paper size 8 Place the originals and then press the Start key Two Sided Combine Combines various pages of originals onto two sides of one sheet Combined Copying 75 ...

Страница 136: ...1 Sided 16 Originals Combine 2 Sides Copies 16 1 sided originals to one sheet with eight pages per side 2 Sided 4 Pages Combine 2 Sides Copies two 2 sided originals to one sheet with two pages per side 2 Sided 8 Pages Combine 2 Sides Copies four 2 sided originals to one sheet with four pages per side 2 Sided 16 Pages Combine 2 Sides Copies eight 2 sided originals to one sheet with eight pages per ...

Страница 137: ...2 Sides 5 Press Orientation 6 Select Top to Top or Top to Bottom for Original and or Copy and then press OK 7 Select the number of originals to combine 8 Press OK 9 Select the paper size 10 Place the originals and then press the Start key Combined Copying 77 ...

Страница 138: ...nisher Horizontal length 148 0 457 2 mm 5 83 18 00 inches vertical length 100 0 305 0 mm 3 94 12 00 inches When prints are delivered to the internal tray 2 Horizontal length 148 0 432 0 mm 5 83 17 00 inches vertical length 93 0 297 0 mm 3 67 11 69 inches 1 Load the paper face down in the bypass tray Bypass is automatically selected 2 Press the key 3 Press Paper Size 4 Press Custom Size 5 Enter the...

Страница 139: ...pe types and how to load envelopes see p 157 Envelopes The Duplex function cannot be used with envelopes If the Duplex function is specified press 1 sided 2 sided TtoT to cancel the setting To copy onto custom size envelopes you must specify the envelope s dimensions Specify the horizontal and vertical length of the envelope CJF005 Horizontal Vertical Be sure to include the fully open flap in the ...

Страница 140: ...aper Size 5 Specify the envelope size and then press OK twice 6 Press the Start key Copying onto Envelopes from the Paper Tray Before using this function specify the paper size and type under Tray Paper Settings in User Tools For the paper type select Envelope For details see System Settings Connecting the Machine System Settings 1 Select the paper tray where the envelopes are loaded 2 Place the o...

Страница 141: ...p the same orientation but place the original facing downwards When the paper that is loaded is the same size and orientation as the original the relationship between the orientation in which you place the original and the staple positions is as follows You can confirm the staple positions that can be selected on the screen that appears when Finishing is pressed Placing the original on the exposur...

Страница 142: ...he orientation of the paper does not indicate orientation of delivery 2 You cannot staple at this position when copying onto B4 JIS 8 13 or larger 3 If you want to staple at this position select unreadable orientation in Original Orientation and then select Top 2 4 If Bottom Slant is displayed on your machine you can staple onto B4 JIS 8 13 or larger 1 Press Finishing 3 Copy 82 ...

Страница 143: ... copies CKN022 The available number of punch holes is shown below mainly Europe and Asia 2 holes 4 holes mainly North America 2 holes 3 holes You cannot use the bypass tray with this function Original orientation and punch hole position Place all the originals in the ADF in the orientation in which they can be read normally When placing the original on the exposure glass keep the same orientation ...

Страница 144: ... the exposure glass Placing the original in the ADF Punch hole position 1 2 hole left 2 2 hole top 3 2 3 3 hole left 2 3 hole top 3 2 3 4 hole left 2 4 hole top 3 2 3 1 The above table shows punch hole positioning Punched sheets might not be delivered in the orientation shown in this table 2 You cannot punch holes in this position when copying onto B4 JIS 8 13 or larger or 51 2 81 2 3 If you want ...

Страница 145: ...1 Press Finishing 2 Select one of the punch hole positions 3 Press OK 4 Enter the number of copy sets with the number keys 5 Place the originals and then press the Start key Finishing 85 ...

Страница 146: ...he stored documents from the Document Server screen For details about the Document Server see p 127 Storing Data 1 Press Store File 2 Enter a file name user name or password if necessary 3 Press OK 4 Place the originals 5 Make the scanning settings for the original 6 Press the Start key Stores scanned originals in memory and makes one set of copies If you want to store another document do so after...

Страница 147: ...simultaneously It is recommended that you call the receivers and confirm with them when sending important documents If there is a power failure the main power switch is turned off or the machine is unplugged for about one hour all the documents stored in memory are deleted As soon as the main power switch is turned on the Power Failure Report is printed to help you check the list of deleted files ...

Страница 148: ...ion settings such as TX Mode as necessary 7 Specify a destination You can enter the destination s number or address directly or select from the Address Book by pressing the destination key If you make a mistake press the Clear key and then enter again 8 When sending the same original to several destinations broadcasting specify the next destination 4 Fax 88 ...

Страница 149: ...s Change under Name The name entry display appears 6 Enter the name and then press OK 7 Press the key for the classification you want to use under Select Title The keys you can select are as follows Frequent Added to the page that is displayed first AB CD EF GH IJK LMN OPQ RST UVW XYZ 1 to 10 Added to the list of items in the selected title You can select Frequent and one more key for each title 8...

Страница 150: ...rsonal Box for example cannot be delivered Be sure to check the settings in the fax function before deleting any destinations 1 Press the User Tools Counter key 2 Press Address Book Management 3 Check that Program Change is selected 4 Select the name whose fax destination you want to delete Press the name key or enter the registered number using the number keys You can search by the registered nam...

Страница 151: ...7 Press Delete All and then press OK 8 Press OK 9 Press Exit 10 Press the User Tools Counter key Basic Procedure for Transmissions Memory Transmission 91 ...

Страница 152: ...tinations and group or multiple destinations the transmission mode is automatically switched to Memory Transmission It is recommended that you call the receivers and confirm with them when sending important documents 1 Press the Home key on the top left of the control panel and press the Facsimile icon on the Home screen CJS113 2 Make sure Ready appears on the screen 3 Press Immed TX 4 Place the o...

Страница 153: ...6 Specify a destination If you make a mistake press the Clear key and then enter again 7 Press the Start key Transmitting while Checking Connection to Destination Immediate Transmission 93 ...

Страница 154: ...e Reset key CJN023 Canceling a Transmission While the Original Is Being Scanned Use this procedure to cancel scanning or transmitting of the original while it is being scanned If you cancel a transmission using the standard memory transmission function you need to follow a different procedure to cancel the transmission See p 95 Canceling a Transmission After the Original Is Scanned 1 Press the Sto...

Страница 155: ... transmit All the scanned data is deleted from memory 1 Press the Stop key CJN024 You can also press TX RX Status Print and then Check Stop Transmission File 2 Press Standby File List To cancel transmission of a file stored in the memory press the File List tab 3 Select the file you want to cancel If the desired file is not shown press or to find it 4 Press Stop Transmission To cancel another file...

Страница 156: ...x documents stored in memory are lost If documents are lost for this reason a Power Failure Report is automatically printed when the main power switch is turned on Use this report to check the list of lost documents See Turning Off the Main Power In the Event of Power Failure Troubleshooting 1 Press TX Mode 2 Press Send Later 3 Enter the time and then press mainly Europe and Asia Enter the time 24...

Страница 157: ...cuments will be automatically assigned names such as FAX0001 or FAX0002 Password You can set this function so as not to send to unspecified people A four to eight digit number can be specified as a password You can also change the file information after storing files 1 Place the original and then specify the scan settings you require Specify the Original Orientation setting correctly If you do not...

Страница 158: ...OK Re enter the password for confirmation and then press OK 5 Press OK 6 If you have selected Send Store specify the receiver 7 Press the Start key Sending Stored Documents The machine sends documents stored with the facsimile function in the Document Server The documents stored in the Document Server can be sent again and again until they are deleted The stored documents are sent with the scan se...

Страница 159: ...nails key to switch the screen to thumbnail display 3 If you select a document with a password enter the password using the number keys and then press OK 4 When you want to add your originals to stored documents and send them all at once press Original Stored File or Stored file Original When Original Stored File is pressed the machine sends the originals and then stored files When Stored file Ori...

Страница 160: ...of communications specified by file number Print per User Prints the results of communications by individual senders 1 Press TX RX Status Print 2 Press Print Journal 3 Select the printing method 4 If you selected Print per File No in step 3 enter a 4 digit file number using the number keys 5 If you selected Print per User in step 3 select a user from the list and then press OK 6 Press the Start ke...

Страница 161: ...g box appears click Run AUTORUN EXE 3 Select an interface language and then click OK 4 Click Quick Install 5 The software license agreement appears in the License Agreement dialog box After reading the agreement click I accept the agreement and then click Next 6 Select the machine model you want to use in the Select Printer dialog box For network connection via TCP IP select the machine whose IP a...

Страница 162: ...equired to change the printer settings Log on as an Administrators group member You cannot change the machine default settings for individual users Settings made in the printer properties dialog box are applied to all users 1 On the Start menu click Devices and Printers 2 Right click the icon of the printer you want to use 3 Click Printer properties 5 Print 102 ...

Страница 163: ... select the size of the original to be printed 6 In the Orientation list select Portrait or Landscape as the orientation of the original 7 In the Input Tray list select the paper tray that contains the paper you want to print onto If you select Auto Tray Select in the Input Tray list the source tray is automatically selected according to the paper size and type specified 8 In the Paper Type list s...

Страница 164: ...5 Click Details 6 Enter a User ID in the User ID box and then enter a password in the Password box 7 Click OK 8 Change any other print settings if necessary 9 Click OK 10 Start printing from the application s Print dialog box Printing a Locked Print File Using the Control Panel When printing is completed the stored file will be deleted 1 Press the Home key on the top left of the control panel and ...

Страница 165: ... Print files at once by pressing Select All Jobs after selecting a file 5 Press Print 6 Enter the password using the number keys and then press OK 7 To change the print settings of the document press Detailed Settings 8 Enter the number of copies using the number keys if necessary and then press Print Locked Print 105 ...

Страница 166: ... name of a Hold Print file 7 To specify the print time of the document select the Set Print Time check box and then specify the time You can specify the time in 24 hour format 8 Click OK 9 Change any other print settings if necessary 10 Click OK 11 Start printing from the application s Print dialog box Printing a Hold Print File Using the Control Panel When printing is completed the stored file wi...

Страница 167: ...nt You can select all the Hold Print files at once by pressing Select All Jobs after selecting a file 5 Press Print 6 To change the print settings of the document press Detailed Settings 7 Enter the number of copies using the number keys if necessary and then press Print Hold Print 107 ...

Страница 168: ...le in the machine and prints it later using the control panel Store and Print Prints the file at once and also stores the file in the machine Stored Print Shared Stores the file in the machine and allows any user who has print privileges to print the file later using the control panel Store and Print Shared Prints the file immediately and also stores the file in the machine Any user who has print ...

Страница 169: ...int You can select all the Stored Print files at once by pressing Select All Jobs after selecting a file 5 Press Print If you set the password in the printer driver enter the password If multiple print files are selected and some of these require a password the machine prints files that correspond to the entered password and files that do not require a password The number of files to be printed is...

Страница 170: ...connect removable memory devices USB flash memory and SD cards to the machine and directly print the files stored on them Files in the following formats can be printed JPEG TIFF and PDF This function is useful for printing files without using a computer 5 This feature is available only if the optional hard disk is installed on the machine Large PDF files might not be printable using the PDF direct...

Страница 171: ... removable memory device is being accessed check that the data on the removable memory device has not been corrupted It is possible that any data stored in the removable memory device will be damaged or lost by user error during operation or software error Be sure to back up of all data beforehand The manufacturer shall not be liable to you for damages or loss of any data produced by using this fu...

Страница 172: ...e selected at a time Select the file you want to print You can simultaneously select multiple files of the same file type in the current folder If necessary press Detailed Sett to configure detailed print settings Note that certain settings cannot be selected simultaneously If necessary press Preview to check the print image of the document Press Start Printing or the Start key to start printing I...

Страница 173: ...e If you need to make sure that the data is printed in black and white specify black and white for the print job Paper size is not automatically selected when a JPEG file is selected If you insert another removable memory device while following the procedure above a list of files and folders in the root directory on that removable memory device will appear If the removable memory device is partiti...

Страница 174: ...to select the file you want to print or the folder you want to open Press or to scroll through the list if necessary Depending on the number of files up to 999 pages might be shown The formats names and sizes of files are displayed If multiple files are selected the order in which the files were selected will also be displayed 5 3 dev slct Press to display the removable memory device selection scr...

Страница 175: ...annot display correctly JPEG format files can be displayed as thumbnails when they are in Exif or DCF format An icon will be shown for any other type of file Following sizes of JPEG files can be printed Standard sizes 8 10 Letter 81 2 11 A4 A5 A6 B5 B6 Custom sizes 2L 5 7 Postcard 100 mm 150 mm 4 6 Custom size PDF files may not be printed using this function Print settings are effective for the fo...

Страница 176: ...at one time depends on the digital camera that you are using For details see the manual provided with the digital camera 5 Since printing conditions are specified on the digital camera specifiable parameters depend on the particular digital camera For details see your digital camera s manual PictBridge Printing Check the machine and the digital camera are both switched on Using a USB cable connect...

Страница 177: ...can perform the following functions using its PictBridge feature The settings available for these functions are as follows Single image printing Selected image printing All image printing Index printing Trimming Date and file name printing Paper size Image print size 5 Multi Image Layout Duplex printing Printing quality Color matching Paper type specification Form printing Toner saving Camera memo...

Страница 178: ...can to Folder Scan and confirm the details of the destination computer Also refer to Registering Folders Connecting the Machine System Settings and register the address of the destination computer to the address book 1 Press the Home key on the top left of the control panel and press the Scanner icon on the Home screen CJS113 2 Make sure that no previous settings remain If a previous setting remai...

Страница 179: ...s and how to confirm the computer s information In these examples Windows 7 Professional is the operating system and the computer is a member in a network domain Write down the confirmed information Step 1 Confirming the user name and computer name Confirm the user name and the name of the computer you will send scanned documents to 1 On the Start menu point to All Programs then Accessories and th...

Страница 180: ...e on the computer 2 Right click the folder and then click Properties When using Windows XP right click the folder and then click Sharing and Security 3 On the Sharing tab select Advanced Sharing When using Windows XP on the Sharing tab select Share this folder Proceed to step 5 4 Click Share this folder 5 Click Permissions 6 In the Group or user names list select Everyone and then click Remove 7 C...

Страница 181: ...t of results select the groups and users you want to grant access to and then click OK 7 In the Select Users or Groups window click OK 8 In the Groups or user names list select a group or user and then in the Allow column of the permissions list select either the Full Control or Change check box 9 Press OK twice Registering an SMB Folder 1 Press the User Tools Counter key 2 Press Address Book Mana...

Страница 182: ... Send of File Transfer settings are applied 10 Press Change under Login User Name 11 Enter the login user name of the destination computer and then press OK 12 Press Change under Login Password 13 Enter the password of the destination computer and then press OK 14 Enter the password again to confirm and then press OK 15 Press Folder 16 Check that SMB is selected 17 Press Change or Browse Network a...

Страница 183: ...omputer s IP address in the path For example if the IP address of the destination computer is 192 168 0 191 and the folder name is Share the path will be 192 168 0 191 Share 3 Press OK If the format of the entered path is not correct a message appears Press Exit and then enter the path again Locating the SMB folder using Browse Network 1 Press Browse Network The client computers sharing the same n...

Страница 184: ...4 Select the name whose folder you want to delete Press the name key or enter the registered number using the number keys You can search by the registered name user code fax number folder name e mail address or IP Fax destination 5 Press Folder 6 Press the protocol which is not currently selected A confirmation message appears 7 Press Yes 8 Press OK 9 Press Exit 10 Press the User Tools Counter key...

Страница 185: ...n the destination setting enter the user name for logging in to the computer Press Manual Entry to the right of the user name field to display the soft keyboard 7 Depending on the destination setting enter the password for logging in to the computer Press Manual Entry for the password to display the soft keyboard 8 Press Connection Test A connection test is performed to check whether the specified...

Страница 186: ...the Scanner icon on the Home screen CJS113 2 Make sure that no previous settings remain If a previous setting remains press the Clear Modes key 3 Press the E mail tab 4 Place originals 5 If necessary specify the scan settings according to the original to be scanned Basic Procedure for Sending Scan Files by E mail 119 ...

Страница 187: ...ce the selected e mail sender will receive e mail notification when the e mail recipient has opened the e mail 9 Press the Start key Registering an E mail Destination 1 Press the User Tools Counter key 2 Press Address Book Management 3 Check that Program Change is selected 4 Press New Program 5 Press Change under Name The name entry display appears 6 Enter the name and then press OK 7 Press the ke...

Страница 188: ...dress display and E mail address display on the fax function screen and in the address display on the scanner function screen If Internet Fax Destination Only is specified registered e mail addresses only appear in the internet fax display on the fax function screen 13 If you want to use Internet fax specify whether or not to use Send via SMTP Server 14 Press OK 15 Press Exit 16 Press the User Too...

Страница 189: ...sing the number keys You can search by the registered name user code fax number folder name e mail address or IP Fax destination 5 Press E mail 6 Press Change under E mail Address 7 Press Delete All and then press OK 8 Press OK 9 Press Exit 10 Press the User Tools Counter key Entering an E mail Address Manually 1 Press Manual Entry 2 Enter the e mail address 3 Press OK 6 Scan 122 ...

Страница 190: ... supplier shall not be responsible for any damage that may result from the loss of files For long term storage of files we recommend the use of DeskTopBinder For details contact your local dealer or see the documentation for DeskTopBinder 1 Press the Home key on the top left of the control panel and press the Scanner icon on the Home screen CJS113 2 Make sure that no previous settings remain If a ...

Страница 191: ...ress OK Re enter the password for confirmation and then press OK 7 Press OK 8 If necessary press Scan Settings to specify scanner settings such as resolution and scan size 9 Press the Start key Checking a Stored File Selected from the List This section explains how to preview a file selected from the list of stored files 1 Press Select Stored File 2 From the list of stored files select the file yo...

Страница 192: ...u select a single page file type when scanning multiple originals one file is created for each single page and the number of files sent is the same as the number of pages scanned Multi page TIFF PDF High Compression PDF PDF A If you select a multi page file type when scan multiple originals scanned pages are combined and sent as a single file Selectable file types differ depending on the scan sett...

Страница 193: ...Specifying Scan Settings 1 Press Scan Settings 2 Specify resolution scan size and other settings as required 3 Press OK 6 Scan 126 ...

Страница 194: ...is FAT16 or FAT32 6 Saving might fail if the USB flash memory features password protection or other security features Connect only USB flash memory to the USB slot not any other form of USB device Do not use a USB extension cable to connect a USB memory to the machine Insert the USB memory directly into the media slot Do not remove the media while data is being written Doing so will result in corr...

Страница 195: ...tore File Press Store to Memory Device Press OK twice If necessary select Send Settings or Original and specify the scan settings according to the original to be scanned Example Scanning the document in color duplex mode and saving as a PDF file Press Original and then press 2 Sided Press Send Settings Select Type of Original and then press Full Colour Press Send Settings Select File Type and then...

Страница 196: ...e removable media device cannot be sent from the machine s control panel Depending on the security settings Store to Memory Device may not be displayed Consult your administrator You cannot specify where the data is saved Files are saved in the root directory of the removable memory device If the removable memory device is partitioned files are saved on the first partition You cannot configure fil...

Страница 197: ...Storing the Scanned Documents to a USB Flash Memory or SC Card 6 126D ...

Страница 198: ...x transmission or scanning by the scanner make sure that all other operations are ended File Name A file name such as COPY0001 and COPY0002 is automatically attached to the scanned document You can change the file name User Name You can register a user name to identify the user or user group that stored the documents To assign it select the user name registered in the Address Book or enter the nam...

Страница 199: ...nter a user name 5 Press File Name 6 Enter a file name and then press OK 7 Press Password 8 Enter a password with the number keys and then press OK You can use four to eight digits for the password 9 For double check enter the password again and then press OK 10 Place the original 11 Specify the original scanning conditions 12 Press the Start key The original is scanned The document is saved in th...

Страница 200: ...Adj Stamp 2 Sided Copy Top to Top 2 Sided Copy Top to Bottom Booklet Magazine For details about each function see Copy Document Server 1 Select a document to be printed 2 When printing two or more documents at a time repeat step 1 Up to 30 documents can be printed 3 When specifying printing conditions press To Printing Screen 4 Configure print settings 5 Enter the number of print copies with the n...

Страница 201: ...7 Document Server 130 ...

Страница 202: ...rowser 2 Enter http machine s IP address or host name in your Web browser s URL bar Top Page of Web Image Monitor appears If the machine s host name has been registered on the DNS or WINS server you can enter it When setting SSL a protocol for encrypted communication under environment which server authentication is issued enter https machine s IP address or host name Web Image Monitor is divided i...

Страница 203: ...on Click the Web browser s Refresh button to refresh the entire browser screen Help Use Help to view or download Help file contents 4 Basic Information area Displays the basic information of the machine 5 Work area Displays the contents of the item selected in the menu area 8 Web Image Monitor 132 ...

Страница 204: ...ndicating incorrect user code entry appears If this is the case reprogram a user code 4 Click the property icon of the desired fax document 5 View the content of the fax document 6 To download the received fax document select PDF PDF A or Multi page TIFF and then click Download When you select PDF make the necessary PDF File Security Settings before clicking Download Adobe Acrobat Reader Adobe Rea...

Страница 205: ...8 Web Image Monitor 134 ...

Страница 206: ...1 paper only If you want to print on A4 A5 or B5 JIS from tray 1 contact your service representative If a paper tray is pushed vigorously when putting it back into place the position of the tray s side fences may slip out of place Check the paper edges are aligned at the right side When loading a low number of sheets be sure not to squeeze the side fences in too tightly If the side fences are sque...

Страница 207: ... 4 by adjusting the positions of side fences and end fence For details see Changing the Paper Size in Trays 2 4 Paper Specifications and Adding Paper You can load envelopes in trays 2 4 Envelopes must be loaded in a specific orientation For details see p 157 Envelopes 9 Adding Paper and Toner 136 ...

Страница 208: ...ed Paper Sizes and Types 1 Open the bypass tray CJW013 2 Insert the paper face down until you hear the beep 3 While pressing down the release lever align the paper guides to the paper size If the guides are not flush against the paper images might be skewed or paper misfeeds might occur CJW014 When you use the bypass tray it is recommended to set the paper direction to When copying from the bypass...

Страница 209: ...ded in a specific orientation See Loading Orientation Fixed Paper or Two Sided Paper Paper Specifications and Adding Paper You can load envelopes into the bypass tray Envelopes must be loaded in a specific orientation For details see p 157 Envelopes Settings to Use the Bypass Tray under the Printer Function If you select Machine Setting s in Bypass Tray under Tray Setting Priority in System of the...

Страница 210: ...ey CJS039 2 Press Tray Paper Settings 3 Press Printer Bypass Paper Size 4 Select the paper size 5 Press OK 6 Press the User Tools Counter key When loading thick paper thin paper or OHP transparencies specify the paper size and the paper type Loading Paper into the Bypass Tray 139 ...

Страница 211: ...e User Tools Counter key When loading thick paper thin paper or OHP transparencies specify the paper size and the paper type Setting thick paper thin paper or OHP transparencies using the control panel Certain types of OHP transparencies for color printing cannot be used For details about types that can be used contact your sales or service representative Use A4 or 81 2 11 size OHP transparencies ...

Страница 212: ...Type area when loading OHP transparencies To load thin or thick paper press Do not Display on the Paper Type area and then select the appropriate paper thickness in the Paper Thickness area 6 Press OK 7 Press the User Tools Counter key We recommend that you use specified OHP transparencies For details about paper thickness see System Settings Connecting the Machine System Settings Loading Paper in...

Страница 213: ...ide fences in too tightly If the side fences are squeezed too tightly against the paper the edges may crease thin paper may wrinkle or the paper may be misfed 1 Carefully pull out the paper tray until it stops CJW027 2 Square the paper and load it print side up Do not stack paper over the limit mark CJW028 3 Carefully push the paper tray fully in For details about how to install the small size pap...

Страница 214: ... end fence For details see Changing the Paper Size in the Small Size Paper Tray Paper Specifications and Adding Paper You can load envelopes into the small size paper tray When loading envelopes place them in the correct orientation For details see p 157 Envelopes Loading Paper into the Small Size Paper Tray 143 ...

Страница 215: ...t stack align the left edge of the paper to the left edge of the tray mainly Europe and Asia Tray 3 LCT can hold A4 paper only If you want to print on 81 2 11 from Tray 3 LCT contact your service representative mainly North America Tray 3 LCT can hold 81 2 11 paper only If you want to print on A4 from Tray 3 LCT contact your service representative 1 Carefully pull out Tray 3 LCT until it stops CJW...

Страница 216: ...ray pulled out CJW017 3 Carefully push the paper tray fully in You can load paper even if Tray 3 LCT is in use It is okay to pull out the left half of the tray while Tray 3 LCT is in use Loading Paper into Tray 3 LCT 145 ...

Страница 217: ...The large capacity tray LCT can hold 81 2 11 paper only If you want to print on A4 or B5 JIS from the large capacity tray LCT contact your service representative 1 Open the right cover of the large capacity tray LCT CJW018 2 Load paper into the paper tray with the print side down and place it against the left side of the tray Do not stack paper over the limit mark CJW019 3 Press the Down key The b...

Страница 218: ...CJW020 4 Load paper by repeating steps 2 and 3 5 Close the right cover of the large capacity tray LCT Loading Paper into the Large Capacity Tray LCT 147 ...

Страница 219: ... or a misfeed might occur For details about and recommendations concerning thick paper see p 156 Thick Paper For details about various details about and recommendations concerning envelopes see p 157 Envelopes Tray 1 Paper type and weight Paper size Paper capacity 52 256 g m2 14 lb Bond 140 lb Index Thin Paper Thick Paper 3 A4 81 2 11 550 sheets 52 256 g m2 14 lb Bond 140 lb Index Thin Paper Thick...

Страница 220: ...2 11 A4 A5 B5 JIS 11 17 81 2 14 81 2 11 71 4 101 2 550 sheets 52 256 g m2 14 lb Bond 140 lb Index Thin Paper Thick Paper 3 Select the paper size using the System Settings menu 11 17 81 2 14 81 2 13 81 2 11 81 4 14 81 4 13 8 13 8 10 71 4 101 2 8K 16K 11 15 10 14 A3 A4 B4 JIS B5 JIS 81 2 13 81 4 14 81 4 13 8 13 8 10 71 4 101 2 8K 16K 11 15 10 14 550 sheets Recommended Paper Sizes and Types 149 ...

Страница 221: ...91 2 C5 Env 50 sheets 2 1 When loading paper with a vertical length of more than 279 mm 11 0 inches in trays 2 4 use paper that has a horizontal width of 420 mm 16 6 inches or less 2 Load envelopes with their flaps fully open Small size paper tray trays 2 4 Paper type and weight Paper size Paper capacity 52 256 g m2 14 lb Bond 140 lb Index Thin Paper Thick Paper 3 Select the paper size using the S...

Страница 222: ... Env C6 Env DL Env 50 sheets 1 Double flap 15 sheets 2 Single flap 25 sheets 2 1 Load envelopes with their flaps opened 2 Load envelopes with their flaps closed Bypass tray Paper type and weight Paper size Paper capacity 52 300 g m2 14 lb Bond 110 lb Cover Thin Paper Thick Paper 4 Paper sizes that can be detected automatically A3 A4 A5 A6 11 17 81 2 11 51 2 81 2 Thin Paper Middle Thick 100 sheets ...

Страница 223: ... Cover Thin Paper Thick Paper 4 Custom size 2 Vertical 90 0 305 0 mm Horizontal 148 0 457 2 mm 3 4 Vertical 3 55 12 00 Inches Horizontal 5 83 18 00 inches 3 4 Thin Paper Middle Thick 100 sheets Thick Paper 1 40 sheets Thick Paper 2 Thick Paper 3 20 sheets Thick Paper 4 16 sheets OHP transparencies A4 81 2 11 50 sheets Translucent paper A3 A4 B4 JIS B5 JIS 1 sheet Label paper adhesive labels B4 JIS...

Страница 224: ... Paper capacity 52 256 g m2 14 lb Bond 140 lb Index Thin Paper Thick Paper 3 A4 81 2 11 1 000 sheets 2 52 256 g m2 14 lb Bond 140 lb Index Thin Paper Thick Paper 3 1 81 2 11 A4 1 000 sheets 2 1 To load paper any of the sizes specified above contact your service representative Large capacity tray LCT Paper type and weight Paper size Paper capacity 60 216 g m2 16 lb Bond 80 lb Cover Plain Paper Thic...

Страница 225: ...P transparencies can produce noise when delivered The paper capacity described in the tables above is an example Actual paper capacity might be lower depending on the paper type When loading paper make sure the stack height does not exceed the limit mark of the paper tray If multiple sheet feeding occurs fan sheets thoroughly or load sheets one by one from the bypass tray Flatten out curled sheets...

Страница 226: ...rver When printing on OHP transparencies from the computer see p 140 Setting thick paper thin paper or OHP transparencies using the control panel Fan OHP transparencies thoroughly whenever you use them This prevents OHP transparencies from sticking together and from feeding incorrectly Remove copied or printed sheets one by one The copy print speed may be slower than usual When loading translucent...

Страница 227: ... the side fences flush against the paper stack Jams and misfeeds can occur when printing on thick glossy sheets To prevent such problems be sure to fan glossy sheets thoroughly before loading them If sheets continue to become jammed or feed in together even after they are fanned load them one by one from the bypass tray When loading thick paper set the paper direction according to its grain as sho...

Страница 228: ...en Otherwise they might not feed into the machine Before loading envelopes press down on them to remove any air from inside flatten out all four edges If they are bent or curled flatten their leading edges the edge going into the machine by running a pencil or ruler across them In copier mode The way to load envelopes varies depending on the orientation of the envelopes When copying onto envelopes...

Страница 229: ...ndscape orientation in Trays 2 4 When loading envelopes specify the envelope type and thickness For details see p 79 Copying onto Envelopes In printer mode The way to load envelopes varies depending on the orientation of the envelopes When printing onto envelopes load them according to the applicable orientation shown below How to load envelopes Types of envelopes Paper trays 2 4 Small size paper ...

Страница 230: ...commended envelopes For information about recommended envelopes contact your local dealer The size of envelopes that you can load depends on the tray in which you load them For details see p 148 Recommended Paper Sizes and Types Load only one size and type of envelope at a time The Duplex function cannot be used with envelopes To get better output quality it is recommended that you set the right l...

Страница 231: ...n the environment copying or printing on envelopes may wrinkle them even if they are recommended Certain types of envelopes might come out creased dirtied or misprinted If you are printing a solid color on an envelope lines may appear where the overlapped edges of the envelope make it thicker 9 Adding Paper and Toner 160 ...

Страница 232: ... possible to use the cleaner designed for dust explosion proof purpose If toner is spilled over the floor sweep up spilled toner slowly and clean remainder with wet cloth Do not crush or squeeze toner containers Doing so can cause toner spillage possibly resulting in dirtying of skin clothing and floor and accidental ingestion Store toner new or used toner containers and components that have been ...

Страница 233: ...n a flat surface Do not shake the toner cartridge with its mouth down after removing it Residual toner may scatter Do not repeatedly install and remove toner cartridges This will result in toner leakage Follow the instruction on the screen regarding how to replace a toner cartridge If Toner Cartridge is almost empty appears the toner has almost run out Have a replacement toner cartridge at hand If...

Страница 234: ... used toner Toner cannot be re used Pack used toner containers in the container s box or a bag to prevent the toner from leaking out of the container when you dispose of it mainly Europe and Asia If you want to discard your used toner container please contact your local sales office If you discard it by yourself treat it as general plastic waste material mainly North America Please see our local c...

Страница 235: ...9 Adding Paper and Toner 164 ...

Страница 236: ...r details about loading paper see Loading Paper Paper Specifications and Adding Paper Add Toner indicator Appears when toner runs out For details about adding toner see Adding Toner Maintenance and Specifications Add Staple indicator Appears when staples run out For details about adding staples see Adding Staples Maintenance and Specifications Waste Toner Full indicator Appears when the waste tone...

Страница 237: ... function being used Or the function cannot be used because an error has occurred on the machine 3 Messages Displays a message that indicates the status of the machine and each function 4 Check If an error occurs in the machine or a function press Check to view details Pressing Check displays an error message or the corresponding function screen Check the error message displayed on the function sc...

Страница 238: ...76 When Messages Are Displayed on the Control Panel You can use other functions normally The machine is unable to connect to the network A network error has occurred Press Check in the function which error is occurred And then check the displayed message and take appropriate action For details about error messages and their solutions see p 176 When Messages Are Displayed on the Control Panel Check...

Страница 239: ... long beeps Soft alert An auto reset was performed through the simple screen of the Copier Document Server function the Facsimile function or the Scanner function Five long beeps repeated four times Soft alert An original has been left on the exposure glass or paper tray is empty Five short beeps repeated five times Strong alert The machine requires user attention because paper has jammed the tone...

Страница 240: ...ot yet ready Time required varies by function Functions appear in the User Tools menu when they become ready for use Wait a little longer The lamp remains lit and the machine does not enter Sleep mode even though the Energy Saver key was pressed This occurs in the following cases The ADF is open The machine is communicating with external equipment The hard disk is active Close the ADF Check if the...

Страница 241: ...sage appears when you change the toner cartridge Wait for a while If the message does not disappear in five minutes contact your service representative Memory is full Do you want to store scanned file appears The scanned originals exceed the number of sheets pages that can be stored on the hard disk Press Yes to store pages that have been scanned Delete unnecessary files by pressing Delete File Pr...

Страница 242: ...chine cannot perform authentication For details about authentication see Security Guide You do not have the privileges to use this function continues to be displayed even though you have entered a valid user name The logged in user name does not have permission for the selected function For details about how to set permissions see Security Guide An error message remains even if misfed paper is rem...

Страница 243: ...ly you need to specify the paper size with the control panel For details about specifying paper size with the control panel see Changing to a Size That Is Not Automatically Detected Paper Specifications and Adding Paper Misfeeds occur frequently There is a foreign object on the finisher tray Remove misfed paper For details about removing jammed paper see Removing Jammed Paper Troubleshooting Do no...

Страница 244: ...the Machine System Settings Cannot print in duplex mode You have selected a paper type that cannot be used for duplex printing In Tray Paper Settings select a paper type that can be used for duplex printing For details about the paper types that can be used see Duplex Copying Copy Document Server Following output tray is full Remove paper appears The output tray is full Remove paper from the outpu...

Страница 245: ... Server When print volume limits are specified users cannot print beyond their print volume limit Print jobs selected by users who have reached their print volume limits will be canceled For details about specifying print volume limits see Security Guide To view the status of a print job see Print Job History In Web Image Monitor click Job on the Status Information menu And then click Print Job Hi...

Страница 246: ... image again If you cannot make copies as you want because of paper type paper size or paper capacity problems use the recommended paper For details about recommended paper see p 148 Recommended Paper Sizes and Types Using curled paper often causes misfeeds soiled paper edges or slipped positions while performing staple or stack printing When using curled paper take the stiffness out of the paper ...

Страница 247: ...al placed on the exposure glass is a non standard size Place the original on the exposure glass again Face the original down If the machine cannot detect the size of the original specify the size manually do not use Auto Paper Select mode or the Auto Reduce Enlarge function For details about specifying the settings see Sizes Detectable with Auto Paper Select Paper Specifications and Adding Paper C...

Страница 248: ...lean the scanning glass Located next to the exposure glass The scanning glass or guide plate of the ADF is dirty Clean them See Maintaining Your Machine Maintenance and Specifications Duplex is not available with this paper size A paper size not available in Duplex mode has been selected Select a proper paper size For details about paper see Duplex Copying Copy Document Server Exceeded max number ...

Страница 249: ...l color mode and black white mode Make sure originals for the Magazine or Booklet function are stored using the same color mode Magazine or Booklet mode is not available due to mixed colour modes You selected the Magazine or Booklet function for originals stored using printer function with different color mode such as full color mode and black white mode Make sure originals for the Magazine or Boo...

Страница 250: ...rom the network using Web Image Monitor Wait until the message disappears Do not switch off the power while this message is displayed Depending on the number of destinations to be updated there may be some delay before you can resume operation Operations are not possible while this message is displayed Rotate Sort is not available with this paper size A size of paper for which Rotate Sort is not a...

Страница 251: ... number of pages that can be stored in memory Press Print to copy scanned originals and cancel the scanning data Press Clear Memory to cancel the scanning data and not copy Press Continue to scan and copy remaining originals The machine checked if the remaining originals should be copied after the scanned originals were printed Remove all copies and then press Continue to continue copying Press St...

Страница 252: ...ntered as the destination is wrong Check that the computer name and the folder name for the destination are correct Check whether there are any network problems 13 10 The alias telephone number you entered is already registered on the gatekeeper by another device Check that the correct alias phone number is listed in H 323 Settings of Facsimile Features For details about H 323 Settings see Initial...

Страница 253: ...tact your administrator Check whether there are any network problems 13 24 The password registered for the SIP server is not the same as the password registered for this machine For details about network problems contact your administrator Check whether there are any network problems 13 25 In Effective Protocol the IP address is not enabled or an incorrect IP address has been registered Check that...

Страница 254: ...ot found or the destination for Internet Fax around not through the SMTP server could not be found Check that the following settings in System Settings are listed correctly DNS server Server name and IP address for the SMTP Server For details about these settings see Interface Settings or File Transfer Connecting the Machine System Settings Check that the folder for transfer is correctly specified...

Страница 255: ...eck that the user ID and password for the computer with the folder for forwarding are correctly specified Check that the folder for forwarding is correctly specified Confirm that the computer with the folder for forwarding is properly working For details about network problems contact your administrator Check whether there are any network problems 14 33 E mail addresses for the machine and the adm...

Страница 256: ...OP3 IMAP4 server Check that the correct User Name and Password are listed in Fax E mail Account of System Settings For details about Fax E mail Account see File Transfer Connecting the Machine System Settings For details about network problems contact your administrator Check whether there are any network problems 15 03 No machine e mail address is programmed Check that the correct machine e mail ...

Страница 257: ... Connecting the Machine System Settings Check that the LAN cable is correctly connected to the machine For details about network problems contact your administrator Check whether there are any network problems 15 12 Cannot log in to the POP3 IMAP4 server Check that the following settings in System Settings are listed correctly the user name and password for Fax E mail Account the user name and pas...

Страница 258: ...ration again If the message is still shown the network may be busy Check the settings for LDAP server in System Settings For details about settings for LDAP server see Programming the LDAP server Connecting the Machine System Settings Error occurred and transmission was cancelled Original jammed during Immediate Transmission A problem occurred in the machine or noise occurred on the telephone line...

Страница 259: ...the main power switch back on immediately depending on the mail server the machine might not be able to resume reception of the Internet Fax if the timeout period has not expired Wait until the mail server s timeout period has expired and then resume reception of the Internet Fax For details about reception of the Internet Fax contact your administrator Functional problems with facsimile Data will...

Страница 260: ...key Original jammed during Memory Transmission Press Exit and then send the documents again Remove the paper from Internal Tray 1 Internal Tray 1 is full Remove the paper If the other tray is also full the tray name shown on the screen changes Remove paper from the tray indicated on the display Some invalid destination s contained Do you want to select only valid destination s The specified group ...

Страница 261: ...stination list is being updated from the network using Web Image Monitor Wait until the message disappears Do not switch off the power while this message is displayed Depending on the number of destinations to be updated there may be some delay before you can resume operation Operation is not possible while this message is displayed You do not have the privileges to use this function The logged in...

Страница 262: ...hine For details about network problems contact your administrator Connection with the remote machine has failed Check the remote machine status User Code Authentication is set on the device connected via the remote fax function The remote fax function does not support User Code Authentication Disable the User Code Authentication on the remote machine Connection with the remote machine has failed ...

Страница 263: ...or has occured Check the status of the remote machine A network error occurred during transfer Check that the correct IP address or host name is set for the remote machine in System Settings For details about these settings see Interface Settings Connecting the Machine System Settings Check that the remote machine is working correctly Check that the LAN cable is correctly connected to the machine ...

Страница 264: ...The program contains a destination s with a certificate that is not currently valid The destination s cannot be recalled The user certificate destination certificate has expired A new user certificate must be installed For details about the user certificate destination certificate see Security Guide The specified destination for E mail TX Result which is registered to the program has a certificate...

Страница 265: ...y valid The user certificate destination certificate has expired For details about the user certificate destination certificate see Security Guide The program contains a destination s that does not have a certificate There is no user certificate destination certificate For details about the user certificate destination certificate see Security Guide The specified destination for E mail TX Result w...

Страница 266: ...the device certificate S MIME see Security Guide XXX cannot be recalled because there is a problem with the device certificate used for the S MIME signature XXX indicates the e mail destination s or destination s for E mail TX Result There is no device certificate S MIME or the certificate is invalid For details about the device certificate S MIME see Security Guide The PDF Digital Signature s dev...

Страница 267: ...gnature s device certificate There is no device certificate PDF with digital signature or the certificate is invalid A new device certificate PDF with digital signature must be installed For details about how to install a device certificate PDF with digital signature see Security Guide If Check whether there are any network problems appears the machine is not correctly connected to the network or ...

Страница 268: ... Dump mode the machine receives data in hexadecimal format Press Job Reset to cancel Hex Dump mode Job Suspended Printing was temporarily stopped by SmartDeviceMonitor for Client You can resume printing via My Job List in SmartDeviceMonitor for Client or via the Web Image Monitor To resume printing via Web Image Monitor ask your system administrator first Offline The machine is offline Please wait...

Страница 269: ... was pulled out after the machine was turned on The settings are not updated although the unit is detected Turn off the main power switch and then confirm the wireless LAN board is inserted correctly And then turn on the main power switch again If the message appears again contact your service representative Cannot connect with the Bluetooth interface Check the Bluetooth interface The Bluetooth in...

Страница 270: ... turn on the main power switch again If the message appears again contact your service representative Hardware Problem Wireless Card A wireless LAN board or Bluetooth interface unit is referred to as a wireless card The Bluetooth interface unit was connected while the machine was turned on The Bluetooth interface unit was removed while the machine was turned on Turn off the main power switch and t...

Страница 271: ...ay from the following and press Continue Paper type can also be changed in User Tools A tray name is placed at n The size of the paper in the tray does not match the paper size specified in the printer driver You have printed on small size paper from a tray that is not specified as the small size tray Select a tray containing paper that is the same size as the specified paper size Change the setti...

Страница 272: ...sing Web Image Monitor Wait until the message disappears Do not switch off the power while this message is displayed Depending on the number of destinations to be updated there may be some delay before you can resume operation Operations are not possible while this message is displayed You do not have the privileges to use this function The logged in user name does not have permission for the sele...

Страница 273: ...the selected file exceeds 1GB The total size of the selected files exceeds 1GB Files or groups of files larger than 1GB cannot be printed When the total size of the multiple files that are selected exceeds 1GB select files separately When the size of selected file exceeds 1GB print by using a function other than the Direct printing function from removable memory devices You cannot select files of ...

Страница 274: ...orized Copy Prevention job The job was cancelled You tried to store a file in the Document Server when the Unauthorized Copy Prevention was specified On the printer driver select a job type other than Document Server in the Job Type or deselect Unauthorized Copy Prevention An error occurred while processing an Unauthorized Copy Prevention job The job was cancelled The Enter User Text field on the ...

Страница 275: ...ered incorrectly Enter the correct classification code Classification Code is incorrect The classification code is not supported with the printer driver Select Optional for classification code For details about how to specify classification code settings see Configuring Classification Codes Print Collate has been cancelled Collate was canceled Turn off the main power switch and then back on again ...

Страница 276: ...istrator For details about how to set permissions see Security Guide Duplex has been cancelled Duplex printing was canceled Select the proper paper size for the duplex function For details about paper see Specifications for the Main Unit Maintenance and Specifications Change the setting for Apply Duplex in System Settings to enable duplex printing for the paper tray For details about setting the A...

Страница 277: ...e Exceeded max number of pages of Document Server Cannot store The maximum page capacity of the Document Server was exceeded Delete some of the files stored in the Document Server or reduce the number of pages that you want to send Exceeded max number of pages to print for temporary stored jobs While printing a Sample Print Locked Print Hold Print or Stored Print file the maximum page capacity was...

Страница 278: ...Sample Print Locked Print Hold Print or Stored Print file Delete unneeded files stored in the machine Alternatively reduce the data size of the Sample Print Locked Print Hold Print or Stored Print file HDD is full When printing with the PostScript 3 printer driver the hard disk capacity for fonts and forms has been exceeded Delete unneeded forms or fonts registered in the machine HDD is full Auto ...

Страница 279: ...he printer driver s Detailed Settings tab click Print Quality in the Menu and then select Raster in the Vector Raster list In some cases it will take a long time to complete a print job PostScript 3 Select a lower resolution on the printer driver For details about how to change the resolution setting see the printer driver Help Memory Retrieval Error A memory allocation error occurred Turn off the...

Страница 280: ...ument Punch has been cancelled Punch printing was canceled Check the paper orientation print orientation and then punch position Certain settings can produce print results that might not be as expected Receiving data failed Data reception was aborted Resend the data Selected ppr size is not supported Job was cancelled Job reset is automatically performed if the specified paper size is incorrect Sp...

Страница 281: ...e the number of pages that you want to send The selected paper type is not supported This job has been cancelled Job reset is automatically performed if the specified paper type is incorrect Specify the correct paper type and then print the file again You do not have a privilege to use this function This job has been cancelled The entered login user name or login password is not correct Check that...

Страница 282: ...ge see List Test Print Print Messages Displayed When Using the Scanner Function This section describes likely causes of and possible solutions for the error messages that appear on the control panel If a message not described here appears act according to the message Message Causes Solutions Authentication with the destination has failed Check settings To check the current status press Scanned Fil...

Страница 283: ...tings An antivirus program or a firewall is preventing the machine connecting to your computer Antivirus programs and firewalls can prevent client computers from establishing connection with this machine If you are using anti virus software add the program to the exclusion list in the application settings For details about how to add programs to the exclusion list see the anti virus software Help ...

Страница 284: ...t might be unformatted or its format might be incompatible with this machine Check the file name set at the time of scanning For details about the characters that can be used in file names see Specifying the File Name Scan Cannot write on the memory storage device because remaining free space is insufficient The memory device is full and scan data cannot be saved Even if the memory device appears ...

Страница 285: ...or Tools of System Settings For details about LDAP server see Programming the LDAP server Connecting the Machine System Settings Could not send the data because the PC timed out before it was sent A time out occurred when using WSD Scanner Time outs occur when too much time passes between scanning an original and sending its data The followings are likely causes of time outs Too many originals per...

Страница 286: ...acity Specify the scan size and resolution again Note that it may not be possible to scan very large originals at a high resolution For details about the settings for scan function see Relationship between Resolution and Scan Size Scan Exceeded max data capacity Check the scanning resolution then reset original s The scanned original exceeded maximum data capacity Specify the scan size and resolut...

Страница 287: ...ng Stored Documents Copy Document Server Exceeded max number of pages per file Do you want to store the scanned pages as 1 file The file being stored has exceeded the maximum number of pages for one file Specify whether to store the data or not Scan the pages that were not scanned and then store them as a new file For details about storing files see Saving and Storing the Scanned Documents Scan Ex...

Страница 288: ... may be busy Check that the correct settings for LDAP server are listed in Administrator Tools of System Settings For details about LDAP server see Programming the LDAP server Connecting the Machine System Settings LDAP server authentication has failed Check the settings The user name and password differ from those set for LDAP Authentication For details about LDAP Authentication see Security Guid...

Страница 289: ... Memory is full Scanning has been cancelled Press Send to send the scanned data or press Cancel to delete Because there is not enough free hard disk space in the machine for delivering or sending by e mail while storing in the Document Server only some of the pages could be scanned Specify whether to use the data or not Memory storage device not detected Insert the device There is no memory device...

Страница 290: ... in standby state and sending was canceled Retry sending after sending jobs in standby state completes SMTP authentication E mail address and Administrator E mail address mismatch The SMTP authentication e mail address and the administrator s e mail address do not match For details about how to set SMTP authentication see File Transfer Connecting the Machine System Settings Scanner journal is full...

Страница 291: ... s The specified group contains e mail destinations and Scan to Folder destinations either of which are incompatible with the specified transmission method In the message that appears at each transmission press Select Some of selected files are currently in use They could not be deleted You cannot delete a file which is waiting to be transmitted Waiting status displayed or whose information is bei...

Страница 292: ...on for stored documents or to delete a document you do not have permission to delete see Security Guide Transmission has failed Insufficient memory in the destination hard disk To check the current status press Scanned Files Status Transmission has failed There was not enough free space on the hard disk of the SMTP server FTP server or client computer at the destination Allocate sufficient space T...

Страница 293: ...list Please wait Specified destination s or sender s name has been cleared A specified destination or sender s name was cleared when the destination list in the delivery server was updated Specify the destination or sender s name again Updating the destination list Please wait Specified destination s or sender s name has been cleared The destination list is being updated from the network using Web...

Страница 294: ...entire image is not necessary press the Start key to start scanning with the current scaling factor Not all of the image will be scanned Using Specify Reproduction Ratio to scale down a large document may cause part of the image to be lost Specify a large size in Specify Size and then try to scan the original again If displaying the entire image is not necessary press the Start key to start scanni...

Страница 295: ...e Check the device certificate XXX and YYY indicate the user action There is no device certificate PDF with digital signature or the certificate is invalid A new device certificate PDF with digital signature must be installed For details about how to install a device certificate PDF with digital signature see Security Guide XXX cannot be YYY because there is a problem with the device certificate u...

Страница 296: ... about the user certificate destination certificate see Security Guide The group destination cannot be selected because it contains a destination with a certificate that is not currently valid The user certificate destination certificate has expired A new user certificate must be installed For details about the user certificate destination certificate see Security Guide Transmission cannot be perf...

Страница 297: ...s about login user name login password and driver encryption key see Security Guide Authentication succeeded However the access privileges for scanner function has been denied The logged in user name does not have permission for scanner function For details about how to set permissions see Security Guide Call Service Please call your service representative An unrecoverable error has occurred in th...

Страница 298: ...not find XXX scanner used for the previous scan YYY will be used instead XXX and YYY indicate scanner names The machine is not connected to the network correctly Check that the previously used scanner is connected to the network correctly Cancel the personal firewall of the client computer For details about firewall see Windows Help Use an application such as telnet to make sure SNMPv1 or SNMPv2 i...

Страница 299: ...client computer Check whether the Ethernet board of the client computer is recognized correctly by Windows Check whether the client computer can use the TCP IP protocol Error has occurred in the scanner The application specified scan conditions have exceeded the setting range of the machine Check whether the scanning settings made with the application exceed the setting range of the machine Fatal ...

Страница 300: ...again Invalid Winsock version Please use version 1 1 or higher You are using an invalid version of Winsock Install the operating system of the computer or copy Winsock from the operating system CD ROM No User Code is registered Consult your system administrator Access is restricted with user codes For details about user code authentication see Security Guide No response from the scanner The machin...

Страница 301: ...he Stop key has been pressed copying and also other print jobs that were being processed and which could be stopped have been suspended To continue copying and printing press Continue to cancel copying press Cancel Copying To delete other suspended jobs press Job List appears press Cancel Copying Scanner is not available on the specified device The TWAIN scanner function cannot be used on this mac...

Страница 302: ... Help Use an application such as telnet to make sure SNMPv1 or SNMPv2 is set as the machine s protocol For details about how to check this see Remote Maintenance Using telnet Connecting the Machine System Settings Scanner is not ready Check the scanner and the options The ADF cover is open Check whether the ADF cover is closed The name is already in use Check the registered names You tried to regi...

Страница 303: ...10 Troubleshooting 232 ...

Страница 304: ...e Windows operating systems are as follows The product names of Windows XP are as follows Microsoft Windows XP Professional Edition Microsoft Windows XP Home Edition Microsoft Windows XP Media Center Edition Microsoft Windows XP Tablet PC Edition The product names of Windows Vista are as follows Microsoft Windows Vista Ultimate Microsoft Windows Vista Business Microsoft Windows Vista Home Premium ...

Страница 305: ...2008 Standard Microsoft Windows Server 2008 Enterprise The product names of Windows Server 2008 R2 are as follows Microsoft Windows Server 2008 R2 Standard Microsoft Windows Server 2008 R2 Enterprise Other product names used herein are for identification purposes only and might be trademarks of their respective companies We disclaim any and all rights to those marks 11 Appendix 234 ...

Страница 306: ...copying 25 Destination 118 Display panel 45 Document Server 10 16 48 86 127 Duplex 14 71 Duplex Copy 9 E E mail address 122 E mail destination 120 121 E mail transmission 19 Energy Saver key 45 Enter key 45 Envelope 79 80 157 Envelope feeder 8 Exposure glass 27 30 63 Extender 27 30 External options 33 External tray 33 35 37 39 41 43 F Facsimile 48 87 180 197 Fax destination 89 90 Fax Received indi...

Страница 307: ...ed Combine 74 Options 33 Original orientation 71 P Paper capacity 148 Paper grain 156 Paper guides 27 30 Paper size 139 148 Paper thickness 148 Paper tray 27 30 135 Paper type 148 Path 118 Placing originals 63 Preventing information leakage 23 Printer 48 103 197 198 Printer driver 101 102 Problem 169 Program 12 53 55 Program key 45 Punch 83 Q Quick install 101 R Rear and left view 27 30 Region A 7...

Страница 308: ...a 86 Storing received documents 17 Symbols 6 T Thick paper 140 156 Thin paper 140 Toner 161 162 Trademark 233 Tray 1 27 30 Tray 2 27 30 Tray 3 33 35 37 39 41 43 144 Turning On Off the Power 59 Two Sided Combine 75 U Unauthorized copy prevention 25 Used toner 163 User code authentication 61 User Tools Counter key 45 V Ventilation holes 27 30 W Web Image Monitor 24 131 133 237 ...

Страница 309: ...MEMO 238 ...

Страница 310: ...MEMO 239 ...

Страница 311: ...MEMO 240 EN GB EN US EN AU D143 ...

Страница 312: ... 2011 ...

Страница 313: ...GB EN D143 7003 US EN AU EN ...

Страница 314: ...ged on are disconnected Be sure to do this when it will create the least interference with other users After installing a printer driver you must restart the computer Available operating systems are as follows Windows XP Vista 7 Windows Server 2003 2003 R2 2008 2008 R2 If the plug and play function is started click Cancel in the Found New Hard wareWizard dialog box and then insert the CD ROM The F...

Страница 315: ... you should uninstall that of former version if any If you want to cancel Auto Run hold down the Shift key while inserting the CD ROM Keep the Shift key held down until the computer has finished ac cessing the CD ROM Close all applications that are running Insert the CD ROM into the CD ROM drive Auto Run will start the installer Select a language to change the interface language and then click OK ...

Страница 316: ...set up options by accessing the printer properties dialog box from an application The following procedure is based on Windows 7 as an example On the Start menu click Devices and Printers The Devices and Printers window appears In Windows Vista or Windows Server 2008 on the Start menu click Control Panel and then click Printer in Hardware and Sound In Windows XP on the Start menu click Printers and...

Страница 317: ...soft Windows Vista Ultimate Microsoft Windows Vista Business Microsoft Windows Vista Home Premium Microsoft Windows Vista Home Basic Microsoft Windows Vista Enterprise The product names of Windows 7 are as follows Microsoft Windows 7 Home Premium Microsoft Windows 7 Professional Microsoft Windows 7 Ultimate Microsoft Windows 7 Enterprise The product names of Windows Server 2003 are as follows Micr...

Страница 318: ...misfeeds damage to originals or loss of data Be sure to read these explanations Indicates supplementary explanations of the machine s functions and instruc tions on resolving user errors Indicates the names of keys that appear on the machine s display panel Indicates the names of keys on the machine s control panel EN GB EN US D650 6770 Copyright 2011 ...

Страница 319: ...Operating Instructions Driver Installation Guide For safe and correct use be sure to read the Safety Information in Read This First before using the machine ...

Страница 320: ......

Страница 321: ...or a Local Connection 27 USB Connection 27 Parallel Connection 31 Bluetooth Connection 31 Configuring Option Settings for the Printer 35 Conditions for Bidirectional Communication 35 If Bidirectional Communication is Disabled 36 Installing Font Manager 37 Using Adobe PageMaker Version 6 0 6 5 or 7 0 38 3 Installing the Scanner Driver Installing the TWAIN Driver 39 Installing a TWAIN Compliant Appl...

Страница 322: ...oting Messages Displayed When Installing the Printer Driver 49 If USB Connection Fails 51 6 Installing the Printer Driver Under Mac OS X Installing the PPD Files 53 Registering the Printer 54 USB Connection 54 Network Connection 55 Configuring Option Settings for the Printer Under Mac OS X 57 7 Appendix Updating or Deleting the Driver 59 Updating the Driver 59 Deleting the Driver 60 Trademarks 63 ...

Страница 323: ...k Install PCL Printer Drivers Installs the PCL 6 and or PCL 5c printer drivers For details about installing the driver see p 14 Installing the Printer Driver for a Network Connection or p 27 Installing the Printer Driver for a Local Connection PostScript 3 Printer Driver Install the PostScript 3 printer driver For details about installing the driver see p 14 Installing the Printer Driver for a Net...

Страница 324: ...dministrators group member Auto Run might not work automatically with certain OS settings If this is the case double click SETUP EXE located on the CD ROM root directory or click Run SETUP EXE in the AutoPlay dialog box If you want to cancel Auto Run hold down the left Shift key while inserting the CD ROM Keep the Shift key held down until the computer stops reading the CD ROM 1 Introduction 4 ...

Страница 325: ...X 7 OK 1 Microsoft Windows XP Professional Edition Microsoft Windows XP Home Edition Microsoft Windows XP Media Center Edition Microsoft Windows XP Tablet PC Edition 2 Microsoft Windows Vista Ultimate Microsoft Windows Vista Enterprise Microsoft Windows Vista Business Microsoft Windows Vista Home Premium Microsoft Windows Vista Home Basic 3 Microsoft Windows 7 Home Premium Microsoft Windows 7 Prof...

Страница 326: ...n the machine you are using PostScript 3 unit must be installed PPD files PPD files allow the printer driver to enable specific printer functions Some applications may require installation of the PCL 5c printer driver In this case you can install PCL 5c without having to install PCL 6 For details about installing the driver see p 14 Installing the Printer Driver for a Network Connection or p 27 In...

Страница 327: ... your operating system However the PostScript 3 printer will be displayed in English if your operating system uses one of the following languages Finnish Hungarian Czech Polish Portuguese Russian Catalan Turkish Brazilian Portuguese Greek TWAIN Driver This driver is required to scan an original using a scanner To use the machine as a network TWAIN scanner this driver must be installed File path Th...

Страница 328: ...required to use LAN Fax functions File path The driver is included in the following folder on the CD ROM 32 bit driver X86 DRIVERS LAN FAX XP_VISTA 64 bit driver X64 DRIVERS LAN FAX X64 System requirements Hardware PC AT compatible machines that support the following operating system properly Operating systems Windows XP Vista 7 Windows Server 2003 2003 R2 2008 2008 R2 Display VGA 640 480 pixels o...

Страница 329: ...y in the system For details about Font Manager see the manual on the CD ROM File path The software is included in the following folder on the CD ROM FONTMAN DISK1 For details about installing the software see p 37 Installing Font Manager Software and Utilities Included on the CD ROM 9 ...

Страница 330: ...function When using the scanner function the TWAIN driver cannot be used When using the fax function the LAN Fax driver cannot be used When using the printer function use the printer driver for Mac OS X For details see p 53 Installing the Printer Driver Under Mac OS X 1 Introduction 10 ...

Страница 331: ...ed as a Windows printing port or network printer Using the Windows printing port Network connections can be established through Ethernet and Wireless LAN Available ports are determined based on the combination of Windows operating system version and connection method used Windows XP Windows Server 2003 2003 R2 Connection Method Available Ports Ethernet Wireless LAN Standard TCP IP port IPP port LP...

Страница 332: ...are print server using IPv4 only NetWare file server using IPv4 only Windows Vista Windows 7 Windows Server 2008 2008 R2 Windows 2000 print server Windows XP print server Windows Vista print server Windows 7 print server Windows Server 2003 2003 R2 print server Windows Server 2008 2008 R2 print server For details about how to install the printer driver to print server see p 22 Using as a Network P...

Страница 333: ...ent dialog box After reading the agreement click I accept the agreement and then click Next 6 Select the machine model you want to use in the Select Printer dialog box For network connection via TCP IP select the machine whose IP address is displayed in Connect To For parallel connection select the machine whose printer port is displayed in Connect To 7 Click Install 8 Configure the user code defa...

Страница 334: ...p 49 Messages Displayed When Installing the Printer Driver Installing the Printer Driver for the Selected Port Describes the driver installation procedure for each printer port See the installation procedure for the printer port you are using To use the SmartDeviceMonitor for Client port you must first download SmartDeviceMonitor for Client from the manufacturer s Web site and install it on your c...

Страница 335: ...nufacturer and machine model you want to use 8 Double click the machine name to display the printer settings 9 Click Port and then click Add in the Change settings for Port box 10 Click Standard TCP IP Port and then click OK If Standard TCP IP Port does not appear see Windows Help and then configure the settings 11 Click Next 12 Enter the machine name or IP address and then click Next When the dev...

Страница 336: ...Do not close this manual 2 On the Start menu click Devices and Printers 3 Click Add a printer 4 Click Add a network wireless or Bluetooth printer 5 Click The printer that I want isn t listed 6 In the Select a shared printer by name box enter http machine s IP address or host name printer or ipp as the printer s address and then click Next 7 Click Have Disk 8 Insert the provided CD ROM into the com...

Страница 337: ...t dialog box After reading the agreement click I accept the agreement and then click Next If installing the PostScript 3 printer driver proceed to step 7 6 Select a printer driver you want to use and then click Next 7 Select the check box of the machine model you want to use 8 Double click the machine name to display the printer settings 9 Click Port and then click Add in the Change settings for P...

Страница 338: ... Browse and then specify the location of the INF file If the CD ROM drive is D the source files of the printer driver are stored in the following locations PCL 5c 32 bit driver D X86 DRIVERS PCL5C XP_VISTA Language DISK1 64 bit driver D X64 DRIVERS PCL5C X64 Language DISK1 PCL 6 32 bit driver D X86 DRIVERS PCL6 XP_VISTA MUI DISK1 64 bit driver D X64 DRIVERS PCL6 X64 MUI DISK1 PostScript 3 32 bit d...

Страница 339: ...f the INF file If the CD ROM drive is D the source files of the printer driver are stored in the following locations PCL 5c 32 bit driver D X86 DRIVERS PCL5C XP_VISTA Language DISK1 64 bit driver D X64 DRIVERS PCL5C X64 Language DISK1 PCL 6 32 bit driver D X86 DRIVERS PCL6 XP_VISTA MUI DISK1 64 bit driver D X64 DRIVERS PCL6 X64 MUI DISK1 PostScript 3 32 bit driver D X86 DRIVERS PS XP_VISTA MUI DIS...

Страница 340: ...inter drivers see p 6 Supported languages 4 Click PCL Printer Drivers or PostScript 3 Printer Driver 5 The software license agreement appears in the License Agreement dialog box After reading the agreement click I accept the agreement and then click Next If installing the PostScript 3 printer driver proceed to step 7 6 Select a printer driver you want to use and then click Next 7 Select the check ...

Страница 341: ...ck OK 18 Check that the port of the selected printer is displayed in Port 19 Configure the user code default printer and shared printer as necessary 20 Click Continue The installation starts 21 Click Finish Select one of the options to restart the computer either now or later and then click Finish Changing the port settings for SmartDeviceMonitor for Client Follow the procedure below to change the...

Страница 342: ...n procedure for each print server See the installation procedure for the print server you are using When using NetWare an optional NetWare unit is required Server OS Client OS Printer Driver Type Reference Windows Server Windows p 22 Using Windows print server NetWare Windows p 23 Using NetWare print server Using Windows print server 1 Quit all applications Do not close this manual 2 Insert the pr...

Страница 343: ...the options to restart the computer either now or later and then click Finish If you print with a print server connected to the machine using the SmartDeviceMonitor for Client port Recovery Printing and Parallel Printing cannot be used from the client computer If you print under Windows Vista 7 or Windows Server 2008 print server notification functions of SmartDeviceMonitor may not be used with th...

Страница 344: ...inish Restart the computer to complete installation 17 After restarting the computer open the printer window Windows XP Windows Server 2003 2003 R2 On the Start menu select Printers and Faxes Windows Vista Windows Server 2008 On the Start menu select Control Panel and then click Printers in Hardware and Sound category Windows 7 Windows Server 2008 R2 On the Start menu select Devices and Printers 1...

Страница 345: ...NetWare Settings tab in the printer properties dialog box When using the PostScript 3 Printer Driver Follow the procedure below to set up the PostScript 3 printer driver 1 Open the printer window Windows XP Windows Server 2003 2003 R2 On the Start menu select Printers and Faxes Windows Vista Windows Server 2008 On the Start menu select Control Panel and then click Printers in Hardware and Sound ca...

Страница 346: ...r the printer is reset During this period jobs may be accepted depending on NetWare specifications but not printed To print after resetting the printer as the remote printer check on the print server that the remote printer is disconnected or wait for two minutes before trying to print 2 Installing the Printer Driver 26 ...

Страница 347: ... When Installing the Printer Driver USB Connection This section explains how to install the printer drivers using USB Before installing check that only the operating system is running on the computer and no print jobs are in progress If the printer driver has already been installed and plug and play is enabled the icon of the printer connected to the USB port is added to the Printers Printers and ...

Страница 348: ...D the source files are stored in the following locations PCL 5c 32 bit driver D X86 DRIVERS PCL5C XP_VISTA Language DISK1 64 bit driver D X64 DRIVERS PCL5C X64 Language DISK1 PCL 6 32 bit driver D X86 DRIVERS PCL6 XP_VISTA MUI DISK1 64 bit driver D X64 DRIVERS PCL6 X64 MUI DISK1 PostScript 3 32 bit driver D X86 DRIVERS PS XP_VISTA MUI DISK1 64 bit driver D X64 DRIVERS PS X64 MUI DISK1 For details ...

Страница 349: ...CL5C XP_VISTA Language DISK1 64 bit driver D X64 DRIVERS PCL5C X64 Language DISK1 PCL 6 32 bit driver D X86 DRIVERS PCL6 XP_VISTA MUI DISK1 64 bit driver D X64 DRIVERS PCL6 X64 MUI DISK1 PostScript 3 32 bit driver D X86 DRIVERS PS XP_VISTA MUI DISK1 64 bit driver D X64 DRIVERS PS X64 MUI DISK1 For details about the languages supported in the printer drivers see p 6 Supported languages 8 Click Next...

Страница 350: ...he CD ROM drive is D the source files of the printer driver are stored in the following locations PCL 5c 32 bit driver D X86 DRIVERS PCL5C XP_VISTA Language DISK1 64 bit driver D X64 DRIVERS PCL5C X64 Language DISK1 PCL 6 32 bit driver D X86 DRIVERS PCL6 XP_VISTA MUI DISK1 64 bit driver D X64 DRIVERS PCL6 X64 MUI DISK1 PostScript 3 32 bit driver D X86 DRIVERS PS XP_VISTA MUI DISK1 64 bit driver D ...

Страница 351: ...stalling the PostScript 3 printer driver proceed to step 7 6 Select a printer driver you want to use and then click Next 7 Select the check box of the machine model you want to use 8 Double click the machine name to display the printer settings 9 Click Port 10 Select LPT1 in the Change settings for Port drop down list 11 Configure the user code default printer and shared printer as necessary 12 Cl...

Страница 352: ...tScript 3 see the manual provided with the printer Only one Bluetooth adaptor or Bluetooth equipped computer can be connected via BIP Only JPEG images can be printed using BIP User codes are disabled for BIP You cannot print if print functions are restricted Some printers do not support BIP Instructions in this manual relate to printing via HCRP To print using SPP or BIP see the Help supplied with...

Страница 353: ...e Help supplied with your Bluetooth device and or Bluetooth equipped computer After printing the test page check it and then click Close to close the window If there is a problem with the test page click Troubleshooting in the test print window Windows Vista Windows Server 2008 1 Quit all applications Do not close this manual 2 On the Start menu click Control Panel 3 In the Hardware and Sound area...

Страница 354: ...erver 2008 R2 1 Quit all applications Do not close this manual 2 On the Start menu click Devices and Printers 3 Click Add a printer 4 Click Add a network wireless or Bluetooth printer The computer begins searching for available Bluetooth devices 5 From the list of discovered devices select the machine you want to use and then click Next 6 If you want to change the printer name enter the new name i...

Страница 355: ...P port must be used In addition to the above one of the following conditions must also be met The TCP IP protocol or the IPP protocol is used When using the IPP protocol the IPP port name must include the IP address When connected with USB The machine must be connected to the computer s USB port using the USB interface cable The computer must support bidirectional communication Enable bidirectiona...

Страница 356: ...ick the machine s icon and then click Properties Windows 7 Windows Server 2008 R2 Right click the machine s icon and then click Printer properties 3 Click the Accessories tab If options in the Accessories tab are disabled bidirectional connection is enabled In this case no change is necessary for option settings 4 Select options installed from the Options area and then make the necessary settings ...

Страница 357: ...mpatible with Font Manager are Windows XP Vista 1 Quit all applications Do not close this manual 2 Insert the provided CD ROM into the computer s CD ROM drive If the AutoPlay dialog box appears click Run AUTORUN EXE 3 Select an interface language and then click OK 4 Click Font Manager 5 Follow the instructions on the display Installing Font Manager 37 ...

Страница 358: ...s C PM65 RSRC USENGLISH PPD4 The USENGLISH may vary depending on your language selection For PageMaker 7 0 default installation The directory is C PM7 RSRC USENGLISH PPD4 The USENGLISH may vary depending on your language selection If the driver is not set correctly after copying the ppd file printing may not be performed properly When using PageMaker the optional features that can be selected by t...

Страница 359: ...For details about the system requirements see p 5 Software and Utilities Included on the CD ROM When the installation is complete a message about restarting the client computer may appear In this case restart the client computer After the installation is complete a folder with the name of the machine in use is added in Programs or All Programs on the Start menu Help can be displayed from here Note...

Страница 360: ...3 Installing the Scanner Driver 40 ...

Страница 361: ...r Prompt user to reenter the destination number multiple times Prompt user to confirm that the destination number is correct Allow user to select the destination from the destination list only and prohibit the destination from being manually entered For details see p 44 Enabling the Function to Prevent Transmission to the Wrong Destination Specifying the same port as the printer driver If a port n...

Страница 362: ...river when installing the LAN FAX driver see the installation procedure of the printer driver If places where the procedure or description differs depending on the driver to be installed replace the corresponding procedure or description accordingly and install the driver Installation procedures Corresponding items to replace p 15 Using the Standard TCP IP port 1 2 4 p 15 Using the IPP port 3 p 17...

Страница 363: ... name to display the printer settings Double click Printer Name LAN Fax M number 3 The destination folder in which the driver files are stored The destination folder is written in the description The LAN FAX driver is installed in the following folder 32 bit driver X86 DRIVERS LAN FAX XP_VISTA DISK1 64 bit driver X64 DRIVERS LAN FAX X64 DISK1 4 Availability of the User Code setting Can be specifie...

Страница 364: ...not copy the files to the desktop or a directory whose path name contains multi byte characters 32 bit driver D X86 DRIVERS LAN FAX 64 bit driver D X64 DRIVERS LAN FAX 4 Open the file IfxShLnk ini that has been copied to your computer using a text editor 5 Edit the items that are related to the prevention function Edit the following three items ConfirmFAXNo Syntax ConfirmFAXNo 0 1 2 3 4 5 6 7 8 9 ...

Страница 365: ... the printer drive 1 Click Use an existing port 2 Select the same port as the one selected in the printer driver from the Use an existing port list 3 Click Next To use another Standard TCP IP port 1 Click Create a new port 2 Select Standard TCP IP Port in the Type of port list 3 Click Next 4 Enter the machine name or IP address in the Hostname or IP address box 5 Click Next 5 Select the manufactur...

Страница 366: ...8 Click Finish When you are prompted to restart your computer restart it by following the instructions that appear 4 Installing the Facsimile Driver 46 ...

Страница 367: ...003 R2 On the Start menu select Printers and Faxes Windows Vista Windows Server 2008 On the Start menu select Control Panel and then click Printers in Hardware and Sound category Windows 7 Windows Server 2008 R2 On the Start menu select Devices and Printers 2 Open the printer properties dialog box Windows XP Vista Windows Server 2003 2003 R2 2008 Right click the LAN Fax M number icon and then clic...

Страница 368: ...e settings for the option configuration 4 Select the check boxes for the installed optional units 5 Click Apply Option configuration settings are complete 6 Click OK Accessories tab The Accessories tab contains the following items besides option configuration items Enable E mail Check this when using Internet Fax with the LAN Fax function IP Fax Check this option when using IP Fax After checking t...

Страница 369: ... Windows Server 2008 On the Start menu select Control Panel and then click Printers in Hardware and Sound category Windows 7 Windows Server 2008 R2 On the Start menu select Devices and Printers 2 Click Add a printer 3 Follow the instructions in Add Printer Wizard If the CD ROM drive is D the source files of the printer driver are stored in the following locations PCL 5c 32 bit driver D X86 DRIVERS...

Страница 370: ... Available ports vary according to your Windows operating system or the type of interface For details see p 11 Confirming the Connection Method 5 Troubleshooting 50 ...

Страница 371: ...puter has identified the machine as an unsupported device Open Windows Device Manager and then under Universal Serial Bus controllers remove any conflicting devices Conflicting devices have a or icon by them Take care not to accidentally remove required devices For details see Windows Help The machine does not recognize the USB connection even when a USB cable is inserted If the USB cable is conne...

Страница 372: ...5 Troubleshooting 52 ...

Страница 373: ...not close this manual 2 Insert the provided CD ROM into the computer s CD ROM drive 3 Double click the CD ROM drive icon 4 Double click the Mac OS X folder 5 Double click the brand name folder 6 Double click the Mac OS X 10 2 or later or Mac OS X 10 5 or later folder depending on your operating system 7 Double click the MacOSX PPD Installer folder 8 Double click the package file icon 9 Follow the ...

Страница 374: ... procedure described in this manual and make the necessary settings according to the manual of each version USB Connection Make sure the computer and the machine are connected using the USB cable and the power of the devices are turned on beforehand USB2 0 can be used only with Mac OS X 10 3 3 or higher Mac OS X 10 2 10 3 1 Start Print Center or Printer Setup Utility in Applications Utilities 2 Cl...

Страница 375: ...inter Software in the pop up menu and then select the PPD file of the machine For the location of the PPD files see p 53 Installing the PPD Files 7 Click Add If the option settings need to be configured click Configure in the dialog box that appears and then configure the option settings 8 Quit System Preferences Network Connection Mac OS X 10 2 10 3 1 Start Print Center or Printer Setup Utility i...

Страница 376: ...ck Default Browser or Default 5 Select the machine that has Bonjour indicated in the Connection or Kind column If the machine name is not displayed select the icon that corresponds to your network environment TCP IP etc 6 Select the machine you are using from the Print Using pop up menu If the machine you are using is not selected in Print Using select its manufacturer Select a driver to use or Se...

Страница 377: ...rinter Setup Mac OS X 10 4 1 Start System Preferences 2 Click Print Fax 3 Select the machine you are using and then click Printer Setup 4 Select Installable Options in the pop up menu and then configure settings as needed 5 Click Apply Changes and then close the Printer Info dialog box 6 Quit System Preferences Mac OS X 10 5 10 6 1 Start System Preferences 2 Click Print Fax 3 Select the machine yo...

Страница 378: ...6 Installing the Printer Driver Under Mac OS X 58 ...

Страница 379: ...following procedure 1 Open the printer window Windows XP Windows Server 2003 On the Start menu select Printers and Faxes Windows Vista Windows Server 2008 On the Start menu select Control Panel and then click Printers in Hardware and Sound category Windows 7 Windows Server 2008 R2 On the Start menu select Devices and Printers 2 Open the printer properties dialog box Windows XP Vista Windows Server...

Страница 380: ...rinters and Faxes 2 Right click the icon of the machine you want to delete and then click Delete 3 Click Server Properties on the File menu 4 Click the Drivers tab 5 Select the driver you want to delete and then click Remove 6 Click Yes 7 Click Close to close the print server properties window Windows Vista Windows Server 2008 1 On the Start menu select Control Panel and then click Printers in Har...

Страница 381: ... 9 Click Yes 10 Click Delete 11 Click OK 12 Click Close to close the print server properties window TWAIN driver 1 Start uninstaller Windows XP Windows Server 2003 2003 R2 On the Start menu select Control Panel and then click Add or Remove Programs Windows Vista 7 Windows Server 2008 R2 On the Start menu select Control Panel and then click Uninstall a program Windows Server 2008 On the Start menu ...

Страница 382: ...3 Quit uninstaller 7 Appendix 62 ...

Страница 383: ...ompany Other product names used herein are for identification purposes only and might be trademarks of their respective companies We disclaim any and all right to those marks The proper names of the Windows operating systems are as follows The product names of Windows 2000 are as follows Microsoft Windows 2000 Professional Microsoft Windows 2000 Server Microsoft Windows 2000 Advanced Server The pr...

Страница 384: ...Windows Server 2003 R2 are as follows Microsoft Windows Server 2003 R2 Standard Edition Microsoft Windows Server 2003 R2 Enterprise Edition The product names of Windows Server 2008 are as follows Microsoft Windows Server 2008 Standard Microsoft Windows Server 2008 Enterprise The product names of Windows Server 2008 R2 are as follows Microsoft Windows Server 2008 R2 Standard Microsoft Windows Serve...

Страница 385: ...re print server 23 Network connection 11 14 55 Network printer 12 22 O Option settings 35 48 57 P PageMaker 38 Parallel connection 13 31 PCL 5 13 14 22 PostScript 3 5 14 22 PPD 5 Prevent Transmission to the Wrong Destination 44 Printer driver 5 14 27 Printer port type 14 Q Quick Install 13 R Registering the printer 54 S Scanner 39 Setting print properties 47 SmartDeviceMonitor for Client port 20 2...

Страница 386: ...MEMO 66 ...

Страница 387: ...MEMO 67 ...

Страница 388: ...MEMO 68 EN GB EN US EN AU D143 7038 ...

Страница 389: ......

Страница 390: ...EN GB EN US EN AU D143 7038 2011 ...

Страница 391: ...Operating Instructions UNIX Supplement For safe and correct use be sure to read the Safety Information in Read This First before using the machine ...

Страница 392: ......

Страница 393: ... Installation Shell Script 9 After Executing the Installation Shell Script 12 Printing Method 17 Printing with lpr lp 17 Printing with rsh rcp ftp 17 Printer Status 20 Viewing the Print Job Status with lpq and lpstat 20 Viewing the Printer Status with rsh and ftp 20 Copying Information to a File 21 Specifying the Device Option 22 Configuring the Device Option 22 Printer Language 26 Text Printing 2...

Страница 394: ...Binding 34 Orientation 34 Image Direction 35 Resolution 35 Gradation Quality 36 Billing Code 37 Fold 37 Staple 38 Punch Punchhole 39 Usercode 41 Symbol Set 41 Trademarks 45 INDEX 47 2 ...

Страница 395: ...result of handling or operating the machine For good output quality the manufacturer recommends that you use genuine toner from the manufacturer The manufacturer shall not be responsible for any damage or expense that might result from the use of parts other than genuine parts from the manufacturer with your office products 3 ...

Страница 396: ... loss of data Be sure to read these explanations Indicates supplementary explanations of the machine s functions and instructions on resolving user errors This symbol is located at the end of sections It indicates where you can find further relevant information Indicates the names of keys on the machine s display or control panels Notes Contents of this manual are subject to change without prior n...

Страница 397: ...hecks passports driver s licenses The preceding list is meant as a guide only and is not inclusive We assume no responsibility for its completeness or accuracy If you have any questions concerning the legality of copying or printing certain items consult with your legal advisor This machine is equipped with a function that prevents making counterfeit bank bills Due to this function the original im...

Страница 398: ...6 ...

Страница 399: ...tion shell script to register the device option as well as the printer host name and the IP address For details see p 8 Using the Installation Shell Script 2 Start printing For details see p 17 Printing Method Using the rsh rcp ftp Commands 1 Edit the host file to register the printer host name and the IP address For details see p 12 After Executing the Installation Shell Script 2 Start printing F...

Страница 400: ...le with Red Hat 7 1 or later Change the security level to allow use of rsh rcp telnet For details about how to change the setting see the operating instructions for Red Hat When you use NIS Network Information Service or DNS you should configure the server before running the installation shell script Installation shell script does not support CUPS When you use Solaris and HP UX you can set UNIX co...

Страница 401: ...e host name and IP address to the file make sure that the configuration is correct by pinging the host ping host_name If the host name is registered with an IP address the server can access the printer using its host name instead of its IP address Executing the Installation Shell Script Having configured the printer IP address follow the procedure below to execute the installation shell script and...

Страница 402: ...e etc hosts file 5 Enter the printer s host name Enter Printer host name nphost If no IP address was entered in step 4 nothing is added to the etc hosts file 6 Configure the printer name Enter logical printer name default nphost_prn If you want to use the default name press the RETURN ENTER key Enter a new name if you want to use a different one The host name entered in step 5 followed by _prn app...

Страница 403: ...bout how to download the installation shell script contact your sales or service representative For details about lpr and lp see p 17 Printing Method For details about the device option see p 22 Specifying the Device Option Deleting the printer To print using the lp or lpr command the option specified when the installation shell script is executed is used Change the option in accordance with the w...

Страница 404: ...ame from to the end of the line is the comment The etc hosts file contains a list of the IP addresses and host names of all hosts communicating on the network Each entry is delimited with a space or a tab and each line is separated with a return If you do not use NIS or DNS you must manually enter the IP address and host name of each workstation using the network printer in the etc hosts file Addi...

Страница 405: ... by two character names referred to as capabilities For details about capabilities see the following table Capability Explanation Value required for the network printer rm Host name of the printer The host name that was registered with the etc hosts file rp Optional specification lp will be assigned if the option is not used Select options for printing For details about available options see p 22 ...

Страница 406: ...created in the var log directory The log file name is the printer name followed by d errs The log file is used for logging errors or warning messages by the UNIX workstation The log file should be made for every network printer entry listed in the etc printcap file The log file should normally be made under var log directory and the name should match that listed under the lf capability in etc prin...

Страница 407: ...nting with the lp command use _ instead of and instead of for operating systems that cannot use and such as Solaris 2 5 or later 3 If your workstation is Solaris 2 5 1 set the print job to active so it can be accepted by the print queue usr lib accept np 4 If your workstation is Solaris 2 5 1 set the print job to active to print usr lib enable np HP UX Adding the IP address and host name to the et...

Страница 408: ... v dev null mrmodel ormnphost orpoption ob3 np is the printer name nphost is the host name For details about option see p 22 Specifying the Device Option lp will be assigned if the option is not used 3 Set the printer so the print job is listed in the print queue usr lib accept np 4 Set the printer to perform the print job usr lib enable np 5 Restart the scheduler usr lib lpsched 1 UNIX Configurat...

Страница 409: ...stallation shell script You can use wild cards or for the file name The message print session full appears when the maximum number of print requests has been reached max 5 sessions Job Spool setting available You should try to print again when the number of requests is less than five You can check the number of print requests using telnet For details about using telnet see the manual that comes wi...

Страница 410: ...cuting the installation shell script If you are using HP UX use the remsh command instead of rsh rcp To specify and print the file rcp file_name file_name host_name For example host name is nphost file names are file1 and file2 rcp file1 file2 nphost To print all of the files in a directory rcp r directory_name host_name For example host name is nphost directory name is directory rcp r directory1 ...

Страница 411: ...e IP address or host name of the printer ftp IP_address 2 Enter the user name and password and then press the RETURN ENTER key For details about the user name and password consult your administrator Name Password 3 Set the file transfer mode to binary ftp bin If the file transfer mode is not set to binary the image may not be printed correctly 4 Print the file For example to print the file named f...

Страница 412: ...name is np lpq Pnp System V UNIX Solaris HP UX lpstat o printer_name For example Printer name is np lpstat o np If you are using HP UX do not put a space between o and printer name Viewing the Printer Status with rsh and ftp Use the rsh or ftp command to display printer status or information about print jobs using specified parameters You can use these commands for BSD and System V UNIX If your wo...

Страница 413: ...inistrator indicates standard output Display will be displayed on screen if standard output has not been specified Copying Information to a File Use the rcp or ftp command to copy information about specified parameters to a file You can use these commands for BSD and System V UNIX The same parameters are used as those above rcp rcp host_name parameter file_name ftp ftp host_name User user_name pas...

Страница 414: ...ost name file_name is the file name you want to print The device option is specified in the form of option value For details about types of device options and values see the following explanations For example the following settings are for printing with rsh rcp and ftp switch to PostScript feed paper from paper feed tray 1 set the printing amount to 3 sets and print with the resolution set to 600 ...

Страница 415: ...the option is specified using the cd command it becomes available whenever the put or mput command is used ftp cd option The pwd command shows the current option settings ftp pwd List of the device options Device option Value Function summary filetype pcl postscript rps pdf pictbridge Specifies the printer language for printing filter text Specifies the text printing tray tray1 tray4 lct bypass al...

Страница 416: ...ionaloutputbin3 optionaloutputbin4 optionaloutputbin5 optionaloutputbin6 optionaloutputbin7 optionaloutputbin8 optionaloutputbin9 optionaloutputbin10 Specifies the output tray copies Number of copies 1 999 Specifies the number of copies to print qty Number of collated sets 1 999 Specifies the number to collate duplex on off Specifies whether duplex printing is on or off binding longedge shortedge ...

Страница 417: ...slantport lefttopslantland lefttopvertport lefttopvertland lefttophorizport lefttophorizland left2port left2land righttopslantport righttopslantland righttopvertport righttopvertland righttophorizport righttophorizland right2port right2land top2port top2land booklet lefttop righttop Specifies the staple position punch off leftport leftland rightport rightland topport topland Specifies the punch po...

Страница 418: ...inbaltic win30 winarb wincyr wingrk winl1 winl2 winl5 Specifies the set of print characters Printer Language Select a printer language to be used filetype printer language fil printer language Printer language Value PCL 5c or PCL 5e pcl PostScript 3 postscript or rps PDF pdf PictBridge pictbridge The following sample shows how to print with PostScript 3 host name nphost file name file1 rsh rsh nph...

Страница 419: ...o print text files directly rsh rsh nphost print filter text file1 rcp rcp file1 nphost filter text ftp ftp put file1 filter text Input Tray Select a default input tray Only installed input trays are available tray value of input tray Input tray Value Tray 1 tray1 Tray 2 tray2 Tray 3 tray3 Tray 4 tray4 Large Capacity Tray LCT lct Bypass tray bypass Auto Tray Select all The following sample shows h...

Страница 420: ...ize Select the paper size Only the loaded paper sizes are available When PostScript 3 is selected in Printer Language and a custom paper size that exceeds 297x418 4 mm is specified a printout is counted as an A3 size output Be careful if you are using the charge option etc paper value of paper size Paper size Value A3 a3 12 18 a3wide A4 a4 A5 a5 A6 a6 B4JIS Japanese Industrial Standard jisb4 B5JIS...

Страница 421: ...8 101 2 glt 81 2 13 foolscap 81 4 13 folio 41 8 91 2 com10 6 38 9 02 162 229 mm c5 4 49 6 38 114 162 mm c6 4 33 8 66 110 220 mm dl 37 8 71 2 monarch 10 5 15 35 267 390 mm k8 7 68 10 5 195 267 mm k16 Custom size custom The following sample shows how to print using A4 size paper host name nphost file name file1 rsh rsh nphost print paper a4 file1 rcp Specifying the Device Option 29 ...

Страница 422: ...h this machine Paper Type Select the paper type Only the loaded paper types are available mediatype value of paper type Paper type Value Plain paper recycled paper plainorrecycled Plain paper plain Recycled paper recycled Special paper special special2 special3 Thick paper thick thick2 thick3 thick4 Thin Paper thin Tabstock tabstock OHP transparency transparency Letterhead letterhead 1 UNIX Config...

Страница 423: ...r glossy Auto Paper Select auto The following sample shows how to print using recycled paper host name nphost file name file1 rsh rsh nphost print mediatype recycled file1 rcp rcp file1 nphost mediatype recycled ftp ftp put file1 mediatype recycled The value or actions that can be selected differ depending on the model you are using For details about available paper type see the manual that comes ...

Страница 424: ...sh rsh nphost print outbin upper file1 rcp rcp file1 nphost outbin upper ftp ftp put file1 outbin upper The value or actions that can be selected differ depending on the model you are using For details about available output tray see the manual that comes with this machine Copies Specify the number of copies copies number of copies 1 to 999 Do not specify copies and qty 1 commands at the same time...

Страница 425: ...duplex printing Duplex printing Value enable on disable off The following sample shows how to set duplex printing host name nphost file name file1 rsh rsh nphost print duplex on binding longedge file1 rcp rcp file1 nphost duplex on binding longedge ftp ftp put file1 duplex on binding longedge Before selecting duplex the binding option must be set to on Data and paper volume affect the completion o...

Страница 426: ... file name file1 rsh rsh nphost print duplex on binding longedge file1 rcp rcp file1 nphost duplex on binding longedge ftp ftp put file1 duplex on binding longedge Before selecting the binding option the duplex option must be set to on Data and paper volume affect completion of the print job Orientation Select the paper feed orientation orientation feed direction portrait or landscape Orientation ...

Страница 427: ...on imagedirection value of print image rotation Rotation Value 0 degree normal 180 degrees reverse The following sample shows how to print the 180 degrees rotation using the imagedirection function host name nphost file name file1 rsh rsh nphost print imagedirection reverse file1 rcp rcp file1 nphost imagedirection reverse ftp ftp put file1 imagedirection reverse Resolution Select the printing res...

Страница 428: ...pending on the model you are using For details about available resolution see the manual that comes with this machine Gradation Quality Select this option to improve print quality Before you can select the bitsperdot option the printer language must be set to PostScript 3 and the resolution must be set to 600 dpi bitsperdot value of gradation quality Gradation quality Value Super Fine 4 Fine 2 Sta...

Страница 429: ... number of characters allowed for each PJL command line on GW PJL source 27 bytes number of characters for PJL SET BILLINGCODE CR LF rsh rsh nphost print billingcode 0x09 file1 rcp rcp file1 nphost billingcode 0x09 ftp ftp put file1 billingcode 0x09 Note that PJL syntax allows unlimited spaces for example more than one space can be placed between PJL and SET or before after the sign Therefore a pa...

Страница 430: ... print fold zright outbin finisherproof file1 rcp rcp file1 nphost fold zright outbin finisherproof ftp ftp put file1 fold zright outbin finisherproof Available fold positions vary depending on type of installed output tray The value or actions that can be selected differ depending on the model you are using For details about available folding position see the manual that comes with this machine S...

Страница 431: ...ht2land right2port Top 2 top2land top2port Booklet booklet The following sample shows how to print with the staple on the upper left using finisher shift tray host name nphost file name file1 finisher shift tray rsh rsh nphost print staple lefttop outbin finishershift file1 rcp rcp file1 nphost staple lefttop outbin finishershift ftp ftp put file1 staple lefttop outbin finishershift Punch Punchhol...

Страница 432: ...i multi The following sample shows how to print with four punch holes on the left using finisher shift tray host name nphost file name file1 finisher shift tray finishershift rsh rsh nphost print punch leftport punchhole eu4 outbin finishershift file1 rcp rcp file1 nphost punch leftport punchhole eu4 outbin finishershift ftp ftp put file1 punch leftport punchhole eu4 outbin finishershift When punc...

Страница 433: ...e if it is inside double quotation marks If this is the case include escape characters such as back slashes 0x5c in place of double quotation marks rsh rsh nphost print usercode 12345 file1 rcp rcp file1 nphost usercode 12345 ftp ftp put file1 USERCODE 12345 If you are printing with the ftp command enter the usercode in uppercase letters Symbol Set Select the set of print characters for the chosen...

Страница 434: ...o21 ISO 60 iso60 ISO 69 iso69 ISO Cyrillic isocyr ISO Greek isogrk ISO Hebrew isoheb ISO L1 isol1 ISO L2 isol2 ISO L5 isol5 ISO L6 isol6 ISO L9 isol9 Legal legal Math 8 math8 MC Text mctext MS Publ mspubl PC 8 pc8 PC 775 pc775 PC 850 pc850 PC 851 pc851 PC 852 pc852 1 UNIX Configuration 42 ...

Страница 435: ...Pifont pifont PS Math psmath PS Text pstext Roman 8 roman8 Roman 9 roman9 UCS 2 ucs2 Win 3 0 win30 Win Arabic winarb Win Baltic winbaltic Win Cyrillic wincyr Win Greek wingrk Win L1 winl1 Win L2 winl2 Win L5 winl5 The following sample shows how to print the ISO 4 character set host name nphost file name file1 rsh Specifying the Device Option 43 ...

Страница 436: ... rsh nphost print symset iso4 file1 rcp rcp file1 nphost symset iso4 ftp ftp put file1 symset iso4 1 UNIX Configuration 44 ...

Страница 437: ...tered trademark of The Open Group UPnPTM is a trademark of the UPnP Implementers Corporation Other product names used herein are for identification purposes only and might be trademarks of their respective companies We disclaim any and all rights to those marks The proper names of the Windows operating systems are as follows The product names of Windows XP are as follows Microsoft Windows XP Profe...

Страница 438: ...ows Microsoft Windows Server 2003 R2 Standard Edition Microsoft Windows Server 2003 R2 Enterprise Edition The product names of Windows Server 2008 are as follows Microsoft Windows Server 2008 Standard Microsoft Windows Server 2008 Enterprise The product names of Windows Server 2008 R2 are as follows Microsoft Windows Server 2008 R2 Standard Microsoft Windows Server 2008 R2 Enterprise 1 UNIX Config...

Страница 439: ...tion 35 Input tray 27 Installation shell script 8 9 12 IP address 8 L Laws and regulations 5 Legal prohibition 5 Linux 17 20 lp 17 lp commands 7 lpq 20 lpr 17 lpr commands 7 lpstat 20 N Note 4 Notice 3 O Orientation 34 Output tray 31 P Paper size 28 Paper type 30 Print job status 20 Printer language 26 Printer status 20 Printing method 17 Punch 39 Punchhole 39 R rcp 17 rcp commands 7 Resolution 35...

Страница 440: ...MEMO 48 EN GB EN US EN AU D143 7042 ...

Страница 441: ......

Страница 442: ...EN GB EN US EN AU D143 7042 2011 ...

Страница 443: ...Operating Instructions Security Guide For safe and correct use be sure to read the Safety Information in Read This First before using the machine ...

Страница 444: ......

Страница 445: ...3 Administrator Logout Method 24 Logging out Using the Control Panel 24 Logging out Using Web Image Monitor 24 Supervisor 25 Resetting the Administrator s Password 25 Changing the Supervisor 26 2 Configuring User Authentication Users 29 About User Authentication 30 Configuring User Authentication 31 User Code Authentication 33 Specifying User Code Authentication 33 Basic Authentication 37 Specifyi...

Страница 446: ...ckout 71 Auto Logout 72 Authentication Using an External Device 74 3 Restricting Machine Usage Restricting Usage of the Destination List 75 Restrict Use of Destinations Restrict Adding of User Destinations 75 Preventing Changes to Administrator Settings 77 Prohibiting Users from Making Changes to Settings 77 Menu Protect 78 Specifying Menu Protect 78 Limiting Available Functions 80 Specifying Whic...

Страница 447: ...ing Protocols Using the Control Panel 124 Enabling and Disabling Protocols Using Web Image Monitor 125 Specifying Network Security Level 126 Specifying Network Security Level Using the Control Panel 126 Specifying Network Security Level Using Web Image Monitor 127 Status of Functions under Each Network Security Level 128 Protecting the Communication Path via a Device Certificate 131 Creating and I...

Страница 448: ...ettings Configuration Flow 165 telnet Setting Commands 166 Configuring IEEE 802 1X Authentication 174 Installing a Site Certificate 174 Selecting the Device Certificate 175 Setting Items of IEEE 802 1X for Ethernet 175 Setting Items of IEEE 802 1X for Wireless LAN 177 SNMPv3 Encryption 179 Encrypting Transmitted Passwords 181 Specifying a Driver Encryption Key 181 Specifying an IPP Authentication ...

Страница 449: ...anaged Using Web Image Monitor 216 Customizing the Control Panel 246 Configuring the Home Screen for Individual Users 246 Configuring the Browser Functions 248 Precautions for Using the Browser Function 248 Changing the Browser Settings 248 Restricting User Browser Functions 250 Checking the Usage Status of the Browser Functions 251 Troubleshooting 251 Managing Device Information 253 Exporting Dev...

Страница 450: ...tor 276 Settings You Can Configure When IPsec Is Available Unavailable 277 8 Troubleshooting If Authentication Fails 281 If a Message is Displayed 281 If an Error Code is Displayed 283 If the Machine Cannot Be Operated 299 9 Checking Operation Privileges List of Operation Privileges for Settings 305 System Settings 307 Edit Home 317 Maintenance 318 Copier Document Server Features 319 Facsimile Fea...

Страница 451: ...6 Web Image Monitor Address Book 367 Web Image Monitor Reset Printer Job 368 Web Image Monitor Reset the Machine 369 Web Image Monitor Device Home Management 370 Web Image Monitor Customize Screen per User 371 Web Image Monitor Document Server 372 Web Image Monitor Fax Received File 373 Web Image Monitor Printer Print Jobs 374 List of Operation Privileges for Stored Files 375 List of Operation Pri...

Страница 452: ...Functions That Require Options The following functions require certain options and additional functions Data security for copying function Copy Data Security Unit 8 ...

Страница 453: ...Professional 1 DeskTopBinder ScanRouter EX Professional 1 and ScanRouter EX Enterprise 1 the ScanRouter delivery software Remote Communication Gate S Pro for Remote Enterprise 2 and Remote Communication Gate S 2 Remote Communication Gate S 1 This product is no longer sold 2 Sold separately 9 ...

Страница 454: ...10 ...

Страница 455: ...e required security settings there is a risk of security breaches by users 3 Before setting this machine s security features and to ensure appropriate operation by users administrators must read the Security Guide completely and thoroughly paying particular attention to the section entitled Before Using the Security Functions 4 Administrators must inform users regarding proper usage of the securit...

Страница 456: ... Web Image Monitor and then log in to the machine as the administrator For details about logging in to Web Image Monitor as an administrator see p 22 Administrator Login Method 8 Point to Device Management and then click Configuration 9 Click E mail under Device Settings 10 Enter the e mail address of the administrator of this machine in Administrator E mail Address and click OK 11 Install the dev...

Страница 457: ... Image Monitor to Configure Administrator Authentication 14 Log out and then close Web Image Monitor 15 Disconnect this machine from the administrator only access network and then connect it to the general usage network environment To enable higher security see p 274 Additional Information for Enhanced Security Before Using This Machine 13 ...

Страница 458: ...ing unauthorized operations by an administrator Multiple administrator roles can be assigned to one administrator and one role can also be shared by more than one administrator A supervisor can also be set up who can then change the administrators passwords Administrators cannot use functions such as copying and printing To use these functions the administrator must be authenticated as the user Fo...

Страница 459: ...rivileges are granted to a single login user name For instructions on registering the administrator see p 18 Registering and Changing Administrators You can specify the login user name login password and encryption password for each administrator The encryption password is used for encrypting data transmitted via SNMPv3 It is also used by applications such as SmartDeviceMonitor for Admin that use ...

Страница 460: ...ssion to access stored files You can specify passwords to allow only registered users with permission to view and edit files stored in Document Server By making this setting you can prevent data leaks and tampering due to unauthorized users viewing and using the registered data Administrator authentication can also be specified via Web Image Monitor For details see Web Image Monitor Help You can s...

Страница 461: ...eing lost Charges may also apply to the service call 1 Press the User Tools Counter key 2 Press System Settings 3 Press Administrator Tools 4 Press Next 5 Press Administrator Authentication Management 6 Press User Management Machine Management Network Management or File Management to select which settings to manage 7 Set Admin Authentication to On Available Settings appears Configuring Administrat...

Страница 462: ...end only one person take each administrator role The sharing of administrator tasks eases the burden on individual administrators while also limiting unauthorized operation by a single administrator You can register up to four login user names Administrators 1 4 to which you can grant administrator privileges For details about logging in and logging out with administrator authentication see p 22 A...

Страница 463: ...rators to one person each select one administrator for each category as shown on the screens below To combine the privileges of multiple administrators assign multiple administrators to a single administrator For example to assign machine administrator privilege and user administrator privilege to Administrator 1 press Administrator 1 in the lines for the machine administrator and the user adminis...

Страница 464: ...the login password and then press OK 12 Press Change for Encryption Password 13 Enter the encryption password and then press OK 14 If a password reentry screen appears enter the encryption password and then press OK 15 Press OK twice You will be automatically logged out For the characters that can be used for login user names and passwords see p 21 Usable characters for user names and passwords An...

Страница 465: ... up if it fulfill the conditions for complexity and minimum length as per Password Policy in Extended Security For how to set up passwords according to the password policy see Password Policy in p 262 Specifying the Extended Security Functions Using Web Image Monitor to Configure Administrator Authentication Using Web Image Monitor you can log in to the machine and change the administrator setting...

Страница 466: ... s user name and password Supervisors log in the same way Logging in Using the Control Panel 1 Press the User Tools Counter key 2 Press the Login Logout key CJS040 The login screen appears The login screen can also be made to appear by pressing Login in the User Tools menu 3 Press Login 1 Getting Started 22 ...

Страница 467: ... from an operating screen You do not have the privileges to use this function You can only change setting s as an administrator appears Press the User Tools Counter key to change the default Logging in Using Web Image Monitor 1 Open a Web browser 2 Enter http the machine s IP address or host name in the address bar When entering an IPv4 address do not begin segments with zeros For example If the a...

Страница 468: ...Using the Control Panel 1 Press the Login Logout key 2 Press Yes You can log out using the following procedures also Press the Energy Saver key Logging out Using Web Image Monitor 1 Click Logout to log out Delete the cache memory in Web Image Monitor after logging out If Web Image Monitor is inactive for 30 minutes the user is logged out automatically 1 Getting Started 24 ...

Страница 469: ...s see p 21 Usable characters for user names and passwords Be sure not to forget the supervisor login user name and login password If you do forget them a service representative will have to return the machine to its default state This will result in all data in the machine being lost and the service call may not be free of charge You cannot specify the same login user name for the supervisor and t...

Страница 470: ...dministrator s password Administrator s login names cannot be changed Changing the Supervisor This section describes how to change the supervisor s login name and password To do this you must enable the user administrator s privileges through the settings under Administrator Authentication Management For details see p 16 Specifying Administrator Privileges 1 The supervisor logs in from the control...

Страница 471: ...7 Press Change for Login User Name 8 Enter the login user name and then press OK 9 Press Change for Login Password 10 Enter the login password and then press OK 11 If a password reentry screen appears enter the login password and then press OK 12 Press OK twice You will be automatically logged out Supervisor 27 ...

Страница 472: ...1 Getting Started 28 ...

Страница 473: ...ormation in the machine s Address Book and can use only the functions they are permitted to access by administrators By enabling user authentication you can allow only people registered in the Address Book to use the machine Users can be managed in the Address Book by the user administrator For details about administrator see p 14 Administrators For details about user registration see Registering ...

Страница 474: ...ser starts to use this machine or when accessing the machine from a network 1 2 3 4 CJC010 1 User A user performs normal operations on the machine such as copying and printing 2 Group A group performs normal operations on the machine such as copying and printing 3 Unauthorized user 4 Unauthorized access 2 Configuring User Authentication 30 ...

Страница 475: ... Administrator Privileges p 18 Registering and Changing Administrators Configuring user authentication Specify user authentication Five types of user authentication are available p 33 User Code Authentication p 37 Basic Authentication p 43 Windows Authentication p 52 LDAP Authentication p 58 Integration Server Authentication To specify Basic authentication Windows authentication LDAP authenticatio...

Страница 476: ...hentication to another authentication method we recommend that you delete accounts you are not going to use or set up a login password For details about deleting accounts see Deleting a Registered Name Connecting the Machine System Settings For details about changing passwords see p 39 Specifying Login User Names and Passwords You cannot use more than one authentication method at the same time Use...

Страница 477: ...or details about specifying the LAN Fax driver user code see the LAN Fax driver Help For details about specifying the TWAIN driver user code see the TWAIN driver Help To control the use of DeskTopBinder for the delivery of files stored in the machine select Basic authentication Windows authentication LDAP authentication or Integration Server authentication Specifying User Code Authentication 1 The...

Страница 478: ...r Code authentication User Code authentication is not applied to the functions not selected For details about limiting available functions for individuals or groups see p 80 Limiting Available Functions If you do not want to specify printer job authentication proceed to step 15 9 Select an option other than PC Control for Printer under Functions to Restrict If you cannot see this item press Next t...

Страница 479: ...l proceed to step 15 If you select Simple Limitation proceed to step 12 12 Press Change 13 Specify the range in which Simple Limitation is applied to Printer Job Authentication You can specify the IPv4 address range to which this setting is applied and whether or not to apply the setting to the parallel and USB interfaces 14 Press Exit 15 Press OK User Code Authentication 35 ...

Страница 480: ...16 Press the Login Logout key A confirmation message appears If you press Yes you will be automatically logged out 2 Configuring User Authentication 36 ...

Страница 481: ...ered in the Address Book For details about limitation of functions see p 39 Authentication Information Stored in the Address Book Specifying Basic Authentication Before beginning to configure the machine make sure that administrator authentication is properly configured under Administrator Authentication Management 1 The machine administrator logs in from the control panel 2 Press System Settings ...

Страница 482: ...ceed to step 11 If you select Simple Limitation proceed to step 8 8 Press Change 9 Specify the range in which Simple Limitation is applied to Printer Job Authentication You can specify the IPv4 address range to which this setting is applied and whether or not to apply the setting to the parallel and USB interfaces 10 Press Exit 11 Press Next 2 Configuring User Authentication 38 ...

Страница 483: ...h user or group of users Specify the necessary settings in the Address Book entry of each user For details about limiting which functions of the machine are available see p 80 Limiting Available Functions Users must have a registered account in the Address Book in order to use the machine when user authentication is specified For details about user registration see Registering Names Connecting the...

Страница 484: ...strator logs in from the control panel 2 Press Address Book Mangmnt 3 Select the user 4 Press Auth Info 5 Press Change for Login User Name 6 Enter a login user name and then press OK 2 Configuring User Authentication 40 ...

Страница 485: ...want to use the login user name and password specified in Address Book Management for SMTP Authentication Folder Authentication or LDAP Authentication see Registering Folders and Registering SMTP and LDAP Authentication Connecting the Machine System Settings When using Use Auth Info at Login for SMTP Authentication Folder Authentication or LDAP Authentication a user name other than other admin sup...

Страница 486: ...tication select Use Auth Info at Login in Folder Authentication For LDAP authentication select Use Auth Info at Login in LDAP Authentication If the function you want to select is not displayed press Next 6 Press OK 7 Press Exit 8 Log out 2 Configuring User Authentication 42 ...

Страница 487: ...has been set up in a designated domain This function is supported by the operating systems listed below To obtain user information when running Active Directory use LDAP If you are using LDAP we recommend you use SSL to encrypt communication between the machine and the LDAP server Encryption by SSL is possible only if the LDAP server supports TLSv1 SSLv2 or SSLv3 Windows Server 2003 2003 R2 Window...

Страница 488: ... functions are available to which users first make settings in advance in the Address Book When accessing the machine subsequently you can use all the functions available to your group and to you as an individual user Users who are registered in multiple groups can use all the functions available to those groups If the Guest account on the Windows server is enabled even users not registered in the...

Страница 489: ...onfigured under Administrator Authentication Management 1 The machine administrator logs in from the control panel 2 Press System Settings 3 Press Administrator Tools 4 Press Next 5 Press User Authentication Management 6 Select Windows Auth If you do not want to use user authentication management select Off Windows Authentication 45 ...

Страница 490: ...os authentication a realm must be registered beforehand The realm name must be registered in capital letters For details about registering a realm see Programming the Realm Connecting the Machine System Settings Up to 5 realms can be registered 9 Press Change for Domain Name enter the name of the domain controller to be authenticated and then press OK 10 Press Next 2 Configuring User Authenticatio...

Страница 491: ...mple All proceed to step 15 If you select Simple Limitation proceed to step 12 12 Press Change 13 Specify the range in which Simple Limitation is applied to Printer Job Authentication You can specify the IPv4 address range to which this setting is applied and whether or not to apply the setting to the parallel and USB interfaces 14 Press Exit Windows Authentication 47 ...

Страница 492: ...p members Create global groups in the machine by entering the names of the global groups registered in the Windows Server Keep in mind that group names are case sensitive Then specify the machine functions available to each group If global groups are not specified users can use the available functions specified in Default Group If global groups are specified users not registered in global groups c...

Страница 493: ...n use the selected functions only For details about specifying available functions for individuals or groups see p 80 Limiting Available Functions 20 Press OK 21 Press OK 22 Press the Login Logout key A confirmation message appears If you press Yes you will be automatically logged out Installing Internet Information Services IIS and Certificate Services Specify this setting if you want the machine...

Страница 494: ...y and then click Next 10 Select a cryptographic service provider key length and hash algorithm to create a new private key and then click Next 11 In Common name for this CA enter the Certificate Authority name and then click Next 12 Select the validity period and then click Next 13 Leave the Certificate database location and the Certificate database log location settings set to their defaults and ...

Страница 495: ...Windows Server 2008 R2 is used to illustrate the procedure 1 Open the command prompt window enter regsvr32 schmmgmt dll and then press the Enter key 2 Click OK and then close the command prompt window 3 On the Start menu click Run 4 Enter mmc and then click OK 5 On the File menu click Add Remove Snap in 6 Select Active Directory Scheme and then click Add 7 Click OK 8 Click Active Directory Scheme ...

Страница 496: ...Image Monitor see Web Image Monitor Help During LDAP authentication the data registered in the LDAP server such as the user s e mail address is automatically registered in the machine If user information on the server is changed information registered in the machine may be overwritten when authentication is performed Under LDAP authentication you cannot specify access limits for groups registered ...

Страница 497: ...Directory Anonymous Authentication might be available If Windows authentication is available we recommend you use it The first time an unregistered user accesses the machine after LDAP authentication has been specified the user is registered in the machine and can use the functions available under Available Functions during LDAP authentication To limit the available functions for each user registe...

Страница 498: ...m Settings 3 Press Administrator Tools 4 Press Next 5 Press User Authentication Management 6 Select LDAP Auth If you do not want to use user authentication management select Off 7 Select the LDAP server to be used for LDAP authentication 2 Configuring User Authentication 54 ...

Страница 499: ...2 If you select Simple Limitation proceed to step 9 9 Press Change 10 Specify the range in which Simple Limitation is applied to Printer Job Authentication You can specify the IPv4 address range to which this setting is applied and whether or not to apply the setting to the parallel and USB interfaces 11 Press Exit 12 Press Next 13 Press Change for Login Name Attribute LDAP Authentication 55 ...

Страница 500: ...name accordingly 15 Press Change for Unique Attribute 16 Enter the unique attribute and then press OK Specify unique attribute on the machine to match the user information in the LDAP server with that in the machine By doing this if the unique attribute of a user registered in the LDAP server matches that of a user registered in the machine the two instances are treated as referring to the same us...

Страница 501: ...20 Press the Login Logout key A confirmation message appears If you press Yes you will be automatically logged out LDAP Authentication 57 ...

Страница 502: ...te are checked every time you access the SSL server For details about specifying SSL using Web Image Monitor see Web Image Monitor Help During Integration Server Authentication the data registered in the server such as the user s e mail address is automatically registered in the machine If user information on the server is changed information registered in the machine may be overwritten when authe...

Страница 503: ...f you do not want to use user authentication management select Off 7 Press Change for Server Name Specify the name of the server for external authentication 8 Enter the server name and then press OK Enter the IPv4 address or host name Integration Server Authentication 59 ...

Страница 504: ...Domain Name 11 Enter the domain name and then press OK You cannot specify a domain name under an authentication system that does not support domain login 12 Press Obtain URL The machine obtains the URL of the server specified in Server Name If Server Name or the setting for enabling SSL is changed after obtaining the URL the URL is Not Obtained 2 Configuring User Authentication 60 ...

Страница 505: ...ible you can use the global group If you set Authentication Type to Notes you can use the Notes group If you set Authentication Type to Basic Integration Server you can use the groups created using the Authentication Manager 14 Press Next 15 Under Group press Program Change and then press Not Programmed 16 Under Group Name press Change and then enter the group name 17 Press OK Integration Server A...

Страница 506: ...pecifying available functions for individuals or groups see p 80 Limiting Available Functions 19 Press OK 20 Press Next 21 Select the Printer Job Authentication level If you cannot see this item press Next to display more settings For a description of the printer job authentication levels see p 64 Printer Job Authentication If you select Entire or Simple All proceed to step 25 If you select Simple...

Страница 507: ... and whether or not to apply the setting to the parallel and USB interfaces 24 Press Exit 25 Press On for Use Secure Connection SSL and then press OK To not use secure sockets layer SSL for authentication press Off 26 Press OK 27 Press the Login Logout key A confirmation message appears If you press Yes you will be automatically logged out Integration Server Authentication 63 ...

Страница 508: ...g authenticated The machine authenticates printer jobs and remote settings that have authentication information and cancels the jobs and settings that fail authentication Unauthorized users may be able to use the machine since printing is allowed without user authentication Simple Limitation Select this setting when you want to restrict the range of Simple All You can specify the range to apply Si...

Страница 509: ...er Code is not entered using the PostScript 3 printer driver or PS3 universal driver This also applies to recovery parallel printing using a PCL printer driver that does not support authentication 7 A printer job or PDF file is sent from a host computer without a printer driver and is printed via LPR This can be also applied to Mail to Print For details about Mail to Print see Receiving E mail by ...

Страница 510: ... with User Code authentication is classified as B A Printing is possible regardless of user authentication B Printing is possible if user authentication is successful If user authentication fails the print job is reset C Printing is possible if user authentication is successful and Driver Encryption Key for the printer driver and machine match X Printing is not possible regardless of user authenti...

Страница 511: ...control is not displayed IPv4 address settings msh authfree ID range_addr1 range_addr2 IPv6 address settings msh authfree ID range6_addr1 range6_addr2 IPv6 address mask settings msh authfree ID mask6_addr1 masklen Parallel USB settings msh authfree parallel usb on off To exclude parallel and USB connections from printer job authentication set this to on The default setting is off Always specify ei...

Страница 512: ...hen information cannot be obtained the login user name is registered 2 When information cannot be obtained auto registration does not work 3 When Carry over Data on Data Carry over Setting for Address Book Auto program is specified it has priority Data Carry over Setting for Address Book Auto program Information that is not automatically registered in the Address Book can be copied from an already...

Страница 513: ...r the registration number of the Address Book that will use the setting content and press 7 Press OK 8 Press the Login Logout key A confirmation message appears If you press Yes you will be automatically logged out Auto Registration to the Address Book 69 ...

Страница 514: ...The lockout function settings can be made using Web Image Monitor Setting item Description Setting values Default setting Lockout Specify whether or not to enable the lockout function Active Inactive Inactive Number of Attempts before Lockout Specify the number of authentication attempts to allow before applying lockout 1 10 5 Lockout Release Timer Specify whether or not to cancel lockout after a ...

Страница 515: ...ctive 7 In the Lock Out User for field enter the number of minutes until lockout is disabled 8 Click OK User Lockout Policy is set 9 Log out Canceling Password Lockout 1 Log in as the user administrator from Web Image Monitor 2 Point to Device Management and then click Address Book 3 Select the locked out user s account 4 Click Manual Input and then click Change 5 Set Lockout to Inactive under Aut...

Страница 516: ...to wait before performing Auto Logout 1 The machine administrator logs in from the control panel 2 Press System Settings 3 Press Timer Settings 4 Press Auto Logout Timer 5 Select On If you do not want to specify Auto Logout Timer select Off 6 Enter 60 to 999 seconds using the number keys and then press If you make a mistake press Clear 7 Press the Login Logout key A confirmation message appears If...

Страница 517: ... If a paper jam occurs or toner runs out the machine might not be able to perform the Auto Logout function The auto logout time for Web Image Monitor is fixed at 30 minutes Auto Logout 73 ...

Страница 518: ...Authentication Using an External Device To authenticate using an external device see the device manual For details contact your sales representative 2 Configuring User Authentication 74 ...

Страница 519: ...e Address Book When a user is sending a document it becomes impossible to enter the other party s fax number e mail address or folder destination Restrict Adding of User Destinations Fax Restrict Adding of User Destinations Scanner This setting prevents the registration of addresses into the Address Book using Prg Dest when a fax or scanned document is being sent if the address was input directly ...

Страница 520: ...Destinations Fax to On Restrict Adding of User Destinations Fax will not appear Similarly if you set Restrict Use of Destinations Scanner to On Restrict Adding of User Destinations Scanner will not appear 8 Press OK 9 Press the Login Logout key A confirmation message appears If you press Yes you will be automatically logged out 3 Restricting Machine Usage 76 ...

Страница 521: ...made by each administrator see p 305 List of Operation Privileges for Settings Register the administrators before using the machine For instructions on registering the administrator see p 18 Registering and Changing Administrators Prohibiting Users from Making Changes to Settings Makes it possible to prohibit users from changing administrator settings Select the item under Available Settings in Ad...

Страница 522: ...ant to enable Menu Protect specify it to Level 1 or Level 2 Select Level 2 to impose stricter restrictions on users access permission to the machine settings If you want to disable Menu Protect specify it to Off When menu protect is set to Level 1 or Level 2 it eliminates the ability of users to register programs Copy Function 1 The machine administrator logs in from the control panel 2 Press Copi...

Страница 523: ...intenance 4 Press Menu Protect 5 Select the menu protect level and then press OK 6 Log out Scanner Function 1 The machine administrator logs in from the control panel 2 Press Scanner Features 3 Press Initial Settings 4 Press Menu Protect 5 Select the menu protect level and then press OK 6 Log out Menu Protect 79 ...

Страница 524: ...pier Document Server fax scanner printer and browser functions Specifying Which Functions are Available Specify the functions available to registered users By making this setting you can limit the functions available to users 1 The user administrator logs in from the control panel 2 Press Address Book Mangmnt 3 Select the user 4 Press Auth Info 5 Press Next two times 3 Restricting Machine Usage 80...

Страница 525: ...6 In Available Functions select the functions you want to specify If the function you want to select is not displayed press Next 7 Press OK 8 Log out Limiting Available Functions 81 ...

Страница 526: ...l panel 2 Press System Settings 3 Press Administrator Tools 4 Press Next 5 Press Media Slot Use 6 To restrict storing files on a removable memory device press Prohibit under Store to Memory Device 7 To restrict printing of files stored on a removable memory device press Prohibit under Print from Memory Storage Device 8 Press OK 9 Log out If you select Prohibit under Store to Memory Device the Stor...

Страница 527: ... If you select Prohibit under Print from Memory Storage Device the Print from Memory Storage Device button is not displayed on the printer function s initial screen Restricting Media Slot Access 83 ...

Страница 528: ...hod for limiting prints Stop Job When the maximum print volume is reached both the current job and waiting jobs are canceled Finish Job and Limit When the maximum print volume is reached the current job is allowed to finish but waiting jobs are canceled Allow Continue Use Print volume is not limited Stop Job Finish Job and Limit Allow Continue Use Default setting Print Volume Use Limitation Unit C...

Страница 529: ...in user names and these multiple login names are registered in the Address Book as separate users The following operations are exempt from print volume limitation Printing from an operating system that does not support the current authentication method Printing data using the Mail to Print function received faxes LAN Fax data and files stored using the fax function Specifying Limitations for Print...

Страница 530: ...em Settings 8 Press Administrator Tools 9 Press Print Volume Use Limitation Unit Count Setting 10 For each print condition use the number keys to enter a per page unit count between 0 and 200 and then press If you specify 0 for a print condition no volume restriction is applied to jobs matching that condition 11 Press OK 3 Restricting Machine Usage 86 ...

Страница 531: ... to them by the administrator they have used Under User Code authentication users cannot check the print volume they have made using either the control panel or Web Image Monitor Under User Code authentication administrators can inform users of the print volume they have made Log information related to print use limitations is not recorded in the Job Log or Access Log Depending on the settings con...

Страница 532: ...r keys to enter a value between 0 and 999 999 as the maximum available print volume and then press 6 Press OK 7 Log out Specifying the Maximum Use Count per User 1 The machine administrator logs in from the control panel 2 Press Address Book Mangmnt 3 Select the user whose maximum available print volume you want to specify 3 Restricting Machine Usage 88 ...

Страница 533: ... is reached If you do not want to limit user s print volume press Do not Limit 7 Press Change and then use the number keys to enter a value between 0 and 999 999 as the maximum available print volume and then press A user whose maximum print volume is set to 0 can only print jobs whose print conditions match those with a unit value of 0 8 Press OK Managing Print Volume per User 89 ...

Страница 534: ...ecify a maximum print volume for up to 500 users Checking Print Volume per User This procedure can be done by any administrator 1 The administrator logs in from the control panel 2 Press System Settings 3 Press Administrator Tools 4 Press Display Clear Print Counter per User 5 Press Print Volume Use Each user s print volume limit and print volume used to date are displayed 6 After confirming the s...

Страница 535: ...lume Use Counters 1 The machine administrator logs in from the control panel 2 Press System Settings 3 Press Administrator Tools 4 Press Display Clear Print Counter per User 5 Press Print Volume Use A list of users print volume use counters is displayed To select all the users displayed on the page press Select All on the Page Managing Print Volume per User 91 ...

Страница 536: ...and then press Print 8 Log out Print volume use counter lists can be printed only if the following paper sizes is loaded in the paper tray A4 8 1 2 11 in B4 8 1 2 14 in A3 or 11 17 in Clearing Print Volume Use Counters Clearing a user s print volume counter or increasing a user s print volume limit allows the user to continue printing beyond his her original print volume limit 1 The user administr...

Страница 537: ...lear the print volume use counters of every user press Clear under All Users To clear the print volume use counters of selected users only select the users whose counters you want to clear and then press Clear under Per User To select all the users displayed on the page press Select All on the Page Managing Print Volume per User 93 ...

Страница 538: ...volume counter can be reset at a specified time Options Details Every Month Resets the print volume at the specified time date each month Specify Date Resets the volume at the specified time date Only resets one time Specify Cycle Resets after the specified interval from a reference date then resets thereafter after the same interval 1 The machine administrator logs in from the control panel 2 Pre...

Страница 539: ... Cycle 7 Configure the conditions 8 Press OK 9 Log out If the machine is off at the specified time the volume is reset when the power is turned on If a date such as the 31st does not appear in the calendar under Every Month the volume is reset at 0 00 on 1st of the following month Managing Print Volume per User 95 ...

Страница 540: ...3 Restricting Machine Usage 96 ...

Страница 541: ...s the data in the Address Book To protect the data from unauthorized reading you can also encrypt the data in the Address Book Specifying Address Book Access Permissions These access permissions can be specified by the users registered in the Address Book or with full control or the user administrator 1 The user administrator logs in from the control panel 2 Press Address Book Mangmnt 3 Select the...

Страница 542: ...whom you want to assign access permission and then select the permission Select the permission from Read only Edit Edit Delete or Full Control 10 Press Exit 11 Press OK 12 Log out The Edit Edit Delete and Full Control access permissions allow a user to perform high level operations that could result in loss of or changes to sensitive information We recommend you grant only the Read only permission...

Страница 543: ... Settings 3 Press Administrator Tools 4 Press Next 5 Press Extended Security 6 Press On for Encrypt User Custom Settings Address Book 7 Press Change for Encryption Key 8 Enter the encryption key and then press OK Enter the encryption key using up to 32 alphanumeric characters Protecting the Address Book 99 ...

Страница 544: ...is successfully complete Press Exit appears If you press Stop during encryption the data is not encrypted If you press Stop during decryption the data stays encrypted 11 Press Exit 12 Press OK 13 Log out If you register additional users after encrypting the data in the Address Book those users are also encrypted The backup copy of the address book data stored in the SD card is encrypted For detail...

Страница 545: ...uthentication information Data stored in Document Server Temporary stored documents Logs Network I F setting information System settings information If the machine malfunctions or needs to be replaced the existing data can be transferred to a new machine even if the data is encrypted To transfer data contact your service representative Time required for encryption When setting up encryption specif...

Страница 546: ...Registered stamps Approximately 1 hour All Data All Data Both the data to be kept and data not kept when File System Data Only is specified None Types 1 2 Approx 8 hours Types 3 4 Approx 5 hours Format All Data None All Data Both the data to be kept and data not kept when File System Data Only is specified Several minutes Things to note when enabling encryption settings If you use Embedded Softwar...

Страница 547: ...ou use hard disk erase by overwrite and encryption simultaneously and you select overwrite three times for Random Numbers the maximum time to complete the operations will be 11 hours 45 minutes for types 1 and 2 or 9 hours 15 minutes for types 3 and 4 Re encrypting from an already encrypted state takes the same amount of time The Erase All Memory function also clears the machine s security setting...

Страница 548: ...select File System Data Only To reset all of the data select Format All Data 8 Select the backup method If you have selected Save to SD Card load an SD card into the media slot on the front of the control panel and press OK to back up the machine s data encryption key If you have selected Print on Paper press the Start key and print out the machine s data encryption key 9 Press OK 4 Preventing Lea...

Страница 549: ...or to print it The encryption key is required for data recovery if the machine malfunctions Be sure to store the encryption key safely for retrieving backup data 1 The machine administrator logs in from the control panel 2 Press System Settings 3 Press Administrator Tools 4 Press Next three times 5 Press Machine Data Encryption Settings 6 Press Back Up Encryption Key 7 Select the backup method If ...

Страница 550: ...encryption key will not be valid 1 The machine administrator logs in from the control panel 2 Press System Settings 3 Press Administrator Tools 4 Press Next three times 5 Press Machine Data Encryption Settings 6 Press Update Encryption Key 7 Select the data to be carried over to the hard disk and not be reset To carry all of the data over to the hard disk select All Data To carry over only the mac...

Страница 551: ...an be slow when there is data to be carried over to the hard disk When disposing of a machine completely erase the memory For details on erasing all of the memory see p 108 Deleting Data on the Hard Disk 1 The machine administrator logs in from the control panel 2 Press System Settings 3 Press Administrator Tools 4 Press Next three times 5 Press Machine Data Encryption Settings 6 Press Cancel Encr...

Страница 552: ...e machine is managed by an administrator who has carefully read and understood this manual and can ensure the safe and effective use of this machine by general users Customer engineers dispatched from the manufacturer and its affiliated companies are trained in the maintenance of this machine Instructions for Use Before turning off the main power of the machine always make sure that the Data Overw...

Страница 553: ...ter the job is completed Overwrite icon When Auto Erase Memory is set to On the Data Overwrite icon will be indicated in the bottom right hand corner of the panel display of your machine Icon Icon name Explanation Dirty This icon is lit when there is temporary data to be overwritten and blinks during overwriting Clear This icon is lit when there is no temporary data to be overwritten The Data Over...

Страница 554: ...Using Auto Erase Memory When Auto Erase Memory is set to On temporary data that remained on the hard disk when Auto Erase Memory was set to Off might not be overwritten If the main power switch is turned off before Auto Erase Memory is completed overwriting will stop and data will be left on the hard disk Do not stop the overwrite mid process Doing so will damage the hard disk Should the main powe...

Страница 555: ...ep 8 8 Press Change 9 Enter the number of times that you want to overwrite using the number keys and then press 10 Press OK Auto Erase Memory is set 11 Log out If you specify to both overwrite and encrypt the data the data will all be encrypted Canceling Auto Erase Memory 1 Follow steps 1 to 5 in Using Auto Erase Memory 2 Press Off Deleting Data on the Hard Disk 111 ...

Страница 556: ...es sent received using remote machines Data sent or received directly by this machine via facsimile as well as fax numbers will not be overwritten by Auto Erase Memory Scanner Scanned files sent by e mail Files sent by Scan to Folder Documents sent using DeskTopBinder the ScanRouter delivery software or Web Image Monitor Network TWAIN scanner Data scanned with network TWAIN scanner will not be ove...

Страница 557: ...ill be stopped and data will be left on the hard disk Do not stop the overwrite mid process Doing so will damage the hard disk We recommend that before you erase the hard disk you use SmartDeviceMonitor for Admin to back up the user codes the counters for each user code and the Address Book The Address Book can also be backed up using Web Image Monitor For details see SmartDeviceMonitor for Admin ...

Страница 558: ...oceed to step 8 8 Press Change 9 Enter the number of times that you want to overwrite using the number keys and then press 10 Press Erase 11 Press Yes 12 When overwriting is completed press Exit and then turn off the main power Before turning the power off see Turning On Off the Power Getting Started 4 Preventing Leakage of Information from Machines 114 ...

Страница 559: ... you specify to both overwrite and encrypt the data the data will all be encrypted Suspending Erase All Memory The overwriting process can be suspended temporarily Erase All Memory cannot be canceled 1 Press Suspend while Erase All Memory is in progress 2 Press Yes Erase All Memory is suspended 3 Turn off the main power Before turning the power off see Turning On Off the Power Getting Started To r...

Страница 560: ...4 Preventing Leakage of Information from Machines 116 ...

Страница 561: ...rinter WSD Scanner IPP DIPRINT RHPP Web Image Monitor SmartDeviceMonitor for Client or DeskTopBinder You cannot limit the monitoring of SmartDeviceMonitor for Client You cannot limit access involving telnet or SmartDeviceMonitor for Admin when using the SNMPv1 monitoring 1 Log in as the network administrator from Web Image Monitor 2 Point to Device Management and then click Configuration 3 Click A...

Страница 562: ...tDeviceMonitor for Admin and configure the settings from there Protocol Port Setting method When disabled IPv4 Control panel Web Image Monitor telnet SmartDeviceMonitor for Admin Remote Communication Gate S All applications that operate over IPv4 cannot be used IPv4 cannot be disabled from Web Image Monitor when using IPv4 transmission IPv6 Control panel Web Image Monitor telnet SmartDeviceMonitor...

Страница 563: ...re sftp cannot be used You can restrict personal information from being displayed by making settings on the control panel using Restrict Display of User Information telnet TCP 23 Web Image Monitor SmartDeviceMonitor for Admin Commands using telnet are disabled SMTP TCP 25 variable Control panel Web Image Monitor SmartDeviceMonitor for Admin Remote Communication Gate S Internet Fax or e mail notifi...

Страница 564: ...rtDeviceMonitor for Admin Remote Communication Gate S SMB printing functions cannot be used NBT UDP 137 UDP 138 telnet SMB printing functions via TCP IP as well as NetBIOS designated functions on the WINS server cannot be used SNMPv1 v2 UDP 161 Web Image Monitor telnet SmartDeviceMonitor for Admin Remote Communication Gate S Functions that require SNMPv1 v2 cannot be used Using the control panel W...

Страница 565: ...onitor telnet SmartDeviceMonitor for Admin Remote Communication Gate S Functions that require RSH and network TWAIN functions cannot be used You can restrict personal information from being displayed by making settings on the control panel using Restrict Display of User Information LPR TCP 515 Web Image Monitor telnet SmartDeviceMonitor for Admin Remote Communication Gate S LPR functions cannot be...

Страница 566: ...b Image Monitor SmartDeviceMonitor for Admin Remote Communication Gate S IP Fax connecting functions using H 323 SIP and T 38 cannot be used SSDP UDP 1900 Web Image Monitor telnet SmartDeviceMonitor for Admin Device discovery using UPnP from Windows cannot be used Bonjour UDP 5353 Web Image Monitor telnet SmartDeviceMonitor for Admin Remote Communication Gate S Bonjour functions cannot be used Rem...

Страница 567: ... panel Web Image Monitor telnet SmartDeviceMonitor for Admin Remote Communication Gate S Cannot print with NetWare SNMP over IPX cannot be used WSD Device TCP 53000 variable Web Image Monitor telnet SmartDeviceMonitor for Admin Remote Communication Gate S WSD Device functions cannot be used WSD Printer TCP 53001 variable Web Image Monitor telnet SmartDeviceMonitor for Admin Remote Communication Ga...

Страница 568: ...Monitor for Admin Cannot print with RHPP LLTD telnet Device search function using LLTD cannot be used LLMNR UDP 5355 Web Image Monitor telnet Name resolution requests using LLMNR cannot be respond Restrict Display of User Information is one of the Extended Security features For details about making this setting see p 262 Specifying the Extended Security Functions Enabling and Disabling Protocols U...

Страница 569: ...or 1 Log in as the network administrator from Web Image Monitor 2 Point to Device Management and then click Configuration 3 Click Network Security under Security 4 Set the desired protocols to active inactive or open close 5 Click OK 6 Updating appears Wait for about one or two minutes and then click OK 7 Log out Enabling and Disabling Protocols 125 ...

Страница 570: ...moderate security to protect important information Use this setting if the machine is connected to a local area network LAN FIPS140 Has a security strength intermediate between Level 1 and Level 2 It only uses a password as recommended by the U S government as its coding authentication algorithm Level 2 Select Level 2 for maximum security to protect confidential information Use this setting when i...

Страница 571: ...Using Web Image Monitor 1 Log in as the network administrator from Web Image Monitor 2 Point to Device Management and then click Configuration 3 Click Network Security under Security 4 Select the network security level in Security Level 5 Click OK 6 Updating appears Wait for about one or two minutes and then click OK 7 Log out Specifying Network Security Level 127 ...

Страница 572: ...Version TLS1 1 Active Active Active Active SSL TLS Version TLS1 0 Active Active Active Active SSL TLS Version SSL3 0 Active Active Inactive Inactive Encryption Strength Setting AES 128bit 256bit 128bit 256bit 128bit 256bit 128bit 256bit Encryption Strength Setting 3DES 168bit 168bit 168bit Encryption Strength Setting RC4 DIPRINT Active Active Inactive Inactive LPR Active Active Inactive Inactive F...

Страница 573: ...CP IP setting is not governed by the security level Manually specify whether to activate or inactivate this setting NetWare Function Level 0 Level 1 FIPS 140 Level 2 NetWare Active Active Inactive Inactive If NetWare is not used on your network the above settings are not applicable SNMP Function Level 0 Level 1 FIPS 140 Level 2 SNMP Active Active Active Active Permit Settings by SNMPv1 and v2 On O...

Страница 574: ... SHA1 SHA1 SHA1 SHA 256 bit SNMPv3 Authentication Algorithm MD5 SHA1 SHA1 SHA1 SNMPv3 Encryption Algorithm DES DES AES 128 AES 128 Kerberos Authentication Encryption Algorithm AES256 CTS HMAC SHA1 96 AES128 CTS HMAC SHA1 96 DES3 CBC SHA1 RC4 HMAC DES CBC MD5 AES256 CTS HMAC SHA1 96 AES128 CTS HMAC SHA1 96 DES3 CBC SHA1 RC4 HMAC AES256 CTS HMAC SHA1 96 AES128 CTS HMAC SHA1 96 DES3 CBC SHA1 AES256 C...

Страница 575: ... and renew the certificates before they expire The administrator is required to check that the issuer of the certificate is valid When SHA256 or SHA512 is set for the Algorithm Signature on the device certificate Windows XP SP3 or later is required to connect the device using Internet Explorer 6 0 Creating and Installing a Device Certificate from the Control Panel Self Signed Certificate Create an...

Страница 576: ... setting 9 Press OK Installed appears under Certificate Status to show that a device certificate for the machine has been installed 10 Log out Select Delete to delete the device certificate from the machine Creating and Installing a Device Certificate from Web Image Monitor Self Signed Certificate Create and install the device certificate using Web Image Monitor For details about the displayed ite...

Страница 577: ...appears under Certificate Status to show that a device certificate for the machine has been installed 10 Log out Click Delete to delete the device certificate from the machine Creating the Device Certificate Issued by a Certificate Authority Create the device certificate using Web Image Monitor For details about the displayed items and selectable items see Web Image Monitor Help This section expla...

Страница 578: ... Authority Install the device certificate using Web Image Monitor For details about the displayed items and selectable items see Web Image Monitor Help This section explains the use of a certificate issued by a certificate authority as the device certificate Enter the device certificate contents issued by the certificate authority 1 Log in as the network administrator from Web Image Monitor 2 Poin...

Страница 579: ... Image Monitor 2 Point to Device Management and then click Configuration 3 Click Device Certificate under Security 4 Check the radio button next to the number of the certificate you want to install 5 Click Install Intermediate Certificate 6 Enter the contents of the intermediate certificate In the certificate box enter the contents of the intermediate certificate issued by the certificate authorit...

Страница 580: ...S device certificate and public key CJC002 2 The device certificate and public key are sent from the machine to the user s computer CJC003 3 The shared key created with the computer is encrypted using the public key sent to the machine and then decrypted using the private key in the machine CJC004 4 The shared key is used for data encryption and decryption thus achieving secure transmission CJC005...

Страница 581: ... host name in your Web browser s address bar to access this machine If the The page cannot be displayed message appears check the configuration because the current SSL TLS configuration is invalid If you enable SSL TLS for IPP printer functions sent data is encrypted preventing it from being intercepted analyzed or tampered with Enabling SSL TLS After installing the device certificate in the machi...

Страница 582: ...u specify for TLS1 2 TLS1 1 TLS1 0 and SSL3 0 the machine might not be able to connect to an external LDAP server The following types of communication and data are always encrypted by SSL3 0 communication via Remote Integration Server authentication files sent via a delivery server and logs transferred to Remote Communication Gate S User Setting for SSL TLS We recommend that after installing the s...

Страница 583: ... can change the security level Encrypted communication mode Using the encrypted communication mode you can specify encrypted communication Encrypted communication mode Description Ciphertext Only Allows encrypted communication only If encryption is not possible the machine does not communicate Ciphertext Priority Performs encrypted communication if encryption is possible If encryption is not possi...

Страница 584: ...og out The SSL TLS encrypted communication mode can also be specified using Web Image Monitor For details see Web Image Monitor Help Enabling SSL for SMTP Connections Use the following procedure to enable SSL encryption for SMTP connections 1 The network administrator logs in from the control panel 2 Press System Settings 3 Press File Transfer 4 Press SMTP Server 5 Enhanced Network Security 140 ...

Страница 585: ...r SMTP connections press Off When Use Secure Connection SSL is set to On the port number is changed to 465 6 Press OK 7 Log out If you set Use Secure Connection SSL to On you cannot bypass the SMTP server to send Internet Fax documents directly Configuring SSL TLS 141 ...

Страница 586: ...ure is specified for an e mail the administrator s address appears in the From field and the address of the user specified as sender appears in the Reply To field When sending e mail to users that support S MIME and users that do not support S MIME at the same time the e mail is separated into encrypted and unencrypted groups and then sent When using S MIME the e mail size is larger than normal Fo...

Страница 587: ... the certificate file contains more than one certificate If this error message appears install the certificates one at a time Specifying the user certificate Each user certificate must be prepared in advance 1 Log in as the user administrator from Web Image Monitor 2 Point to Device Management and then click Address Book 3 Select the user for whom the certificate will be installed 4 Click Manual I...

Страница 588: ...via a Device Certificate To install an S MIME device certificate you must first register Administrator s E mail Address in System Settings as the e mail address for the device certificate Note that even if you will not be using S MIME you must still specify an e mail address for the S MIME device certificate Electronic signature 1 Install a device certificate on the machine The secret key on the c...

Страница 589: ...nder Security 4 Select the certificate to be used for the electronic signature from the drop down box in S MIME under Certification 5 Click OK The certificate to be used for the S MIME electronic signature is set 6 Updating appears Wait for about one or two minutes and then click OK 7 Log out If the selected device certificate expires signatures cannot be attached to e mail Select a certificate th...

Страница 590: ...er Signature 10 Click OK The settings for the S MIME electronic signature are enabled 11 Log out Configure the settings taking into consideration the encryption algorithm and digest algorithm supported by the user s e mail software Specifying Checking of the Certificate Valid Period The validity period of the certificate used with S MIME is verified when you send e mail You can change the timing a...

Страница 591: ...y a client computer the e mail cannot be retrieved from the server If an error occurs outside the validity period of the certificate when S MIME e mail is sent automatically such as when sending e mail at a specified time notification is sent in plain text to the sender s or administrator s e mail address The error content can be viewed in the job log When using S MIME be sure to enable the job lo...

Страница 592: ...o use for signatures 1 Log in as the network administrator from Web Image Monitor 2 Point to Device Management and then click Configuration 3 Click Device Certificate under Security 4 Select the certificate to be used for the electronic signature from the drop down box in PDF Digital Signature or PDF A Digital Signature under Certification PDF Digital Signature This can be attached to PDFs in form...

Страница 593: ...n access Web Image Monitor For details about enabling and disabling IPsec using the control panel see System Settings Connecting the Machine System Settings IPsec is not applied to data obtained through DHCP DNS or WINS IPsec for IPv4 is supported by Windows XP SP2 and Windows Server 2003 2003 R2 IPsec for both IPv4 and IPv6 is supported by Windows Vista 7 Windows Server 2008 2008 R2 Mac OS X 10 4...

Страница 594: ...n algorithm and authentication key are specified automatically Some operating systems use the term Compliance in place of Authentication Encryption Key Auto Exchange Settings and Encryption Key Manual Settings This machine provides two key setting methods manual and auto exchange Using either of these methods agreements such as the IPsec algorithm and key must be specified for both sender and rece...

Страница 595: ... for this machine can be made on Web Image Monitor The following table explains individual setting items Encryption key auto exchange manual settings shared settings Setting Description Setting value IPsec Specify whether to enable or disable IPsec Active Inactive Exclude HTTPS Communication Specify whether to enable IPsec for HTTPS transmission Active Inactive Specify Active if you do not want to...

Страница 596: ...Level Encryption Authentication and High Level Encryption Select this level if you want to encrypt the data packets as well as authenticate the transmission partner and prevent unauthorized packet tampering Packet encryption helps prevent eavesdropping attacks This level provides higher security than Authentication and Low Level Encryption The following table lists the settings that are automatica...

Страница 597: ...rresponding security settings are automatically configured but other settings such as address type local address and remote address must still be configured manually After you specify a security level you can still make changes to the auto configured settings When you change an auto configured setting the security level switches automatically to User Setting Setting Description Setting value Addre...

Страница 598: ... Mode Specify the encapsulation mode auto setting Transport Tunnel Tunnel beginning address Tunnel ending address Select the transport mode this has no bearing on the security level If you specify Tunnel you must then specify the Tunnel End Point which are the beginning and ending IP addresses Set the same address for the beginning point as you set in Local Address IPsec Requirement Level Specify ...

Страница 599: ...y for PSK authentication Enter the pre shared key required for PSK authentication Phase 1 Hash Algorithm Specify the Hash algorithm to be used in phase 1 auto setting MD5 SHA1 SHA256 SHA384 SHA512 Phase 1 Encryption Algorithm Specify the encryption algorithm to be used in phase 1 auto setting DES 3DES AES 128 CBC AES 192 CBC AES 256 CBC Phase 1 Diffie Hellman Group Select the Diffie Hellman group ...

Страница 600: ...etting HMAC MD5 96 HMAC SHA1 96 HMAC SHA256 128 HMAC SHA384 192 HMAC SHA512 256 Phase 2 Encryption Algorithm Permissions Specify the encryption algorithm to be used in phase 2 auto setting Cleartext NULL encryption DES 3DES AES 128 AES 192 AES 256 Phase 2 PFS Specify whether to activate PFS Then if PFS is activated select the Diffie Hellman group auto setting Inactive 1 2 14 Phase 2 Validity Perio...

Страница 601: ... Specify the address of the IPsec transmission partner You can also specify an address range The IPsec transmission partner s IPv4 or IPv6 address If you are not setting an address range enter 32 after an IPv4 address or enter 128 after an IPv6 address Encapsulation Mode Select the encapsulation mode Transport Tunnel Tunnel beginning address Tunnel ending address If you select Tunnel set the Tunne...

Страница 602: ...256 and 4095 Security Protocol To apply both encryption and authentication to sent data specify ESP or ESP AH To apply authentication data only specify AH ESP AH ESP AH Authentication Algorithm Specify the authentication algorithm HMAC MD5 96 HMAC SHA1 96 HMAC SHA256 128 HMAC SHA384 192 HMAC SHA512 256 5 Enhanced Network Security 158 ...

Страница 603: ...f HMAC SHA1 96 set 40 digits If HMAC SHA256 128 set 64 digits If HMAC SHA384 192 set 96 digits If HMAC SHA512 256 set 128 digits ASCII IF HMAC MD5 96 set 16 characters If HMAC SHA1 96 set 20 characters If HMAC SHA256 128 set 32 characters If HMAC SHA384 192 set 48 characters If HMAC SHA512 256 set 64 characters Encryption Algorithm Specify the encryption algorithm Cleartext NULL encryption DES 3DE...

Страница 604: ...below according to the encryption algorithm hexadecimal value 0 9 a f A F DES set 16 digits 3DES set 48 digits AES 128 set 32 digits AES 192 set 48 digits AES 256 set 64 digits ASCII DES set 8 characters 3DES set 24 characters AES 128 set 16 characters AES 192 set 24 characters AES 256 set 32 characters 5 Enhanced Network Security 160 ...

Страница 605: ...eck if the connection is established correctly However you cannot use Ping command when ICMP is excluded from IPsec transmission on the computer side Also because the response is slow during initial key exchange it may take some time to confirm that transmission has been established Specifying Encryption Key Auto Exchange Settings 1 Log in as the network administrator from Web Image Monitor 2 Poin...

Страница 606: ...via a Device Certificate 1 Log in as the network administrator from Web Image Monitor 2 Point to Device Management and then click Configuration 3 Click Device Certificate under Security 4 Select the certificate to be used for IPsec from the drop down box in IPsec under Certification 5 Click OK The certificate for IPsec is specified 6 Updating appears Wait for about one or two minutes and then clic...

Страница 607: ...cryption and Diffie Hellman Group settings in Security method preference order all match those specified on the machine in Encryption Key Auto Exchange Settings Phase 1 If the settings are not displayed click Add 12 Click OK twice 13 Click Add in the Rules tab The Security Rule Wizard appears 14 Click Next 15 Select This rule does not specify a tunnel and then click Next 16 Select the type of netw...

Страница 608: ...gs select Generate a new key every and enter the validity period in seconds that was specified on the machine in Encryption Key Auto Exchange Settings Phase 2 36 Click OK 37 Click Next 38 Click Finish 39 Select the filter action that was just created and then click Next 40 Select the authentication method and then click Next If you select Certificate for authentication method in Encryption Key Aut...

Страница 609: ... Confirm IPsec transmission Set IPsec SA using Web Image Monitor Set IPsec SA using the IPsec setting tool Decide IPsec SA items Machine PC Before transmission SA information is shared and specified by the sender and receiver To prevent SA information leakage we recommend that this exchange is not performed over the network After configuring IPsec you can use Ping command to check if the connectio...

Страница 610: ...n to telnet and telnet operations see Using telnet Connecting the Machine System Settings If you are using a certificate as the authentication method in encryption key auto exchange settings IKE install the certificate using Web Image Monitor A certificate cannot be installed using telnet ipsec To display IPsec related settings information use the ipsec command Display current settings msh ipsec D...

Страница 611: ...cify the protocol and then enter on to exclude it or off to include it for IPsec transmission Entering all specifies all protocols collectively ipsec manual To display or specify the encryption key manual settings use the ipsec manual command Display current settings msh ipsec manual 1 2 3 4 default To display the settings 1 4 specify the number 1 4 To display the default setting specify default N...

Страница 612: ...y the SPI input and output values Specify a decimal number between 256 4095 for both the SPI input and output values Not specifying a SPI value displays the current setting Encapsulation mode setting msh ipsec manual 1 2 3 4 default mode transport tunnel Enter the separate setting number 1 4 or default and specify the encapsulation mode To specify transport mode enter transport To specify tunnel m...

Страница 613: ...r string enter it as is If you have set the encryption algorithm to null enter an encryption key of arbitrary numbers 1 32 digits long Not specifying an encryption algorithm or key displays the current setting The encryption key is not displayed Reset setting values msh ipsec manual 1 2 3 4 default all clear Enter the separate setting number 1 4 or default and reset the specified setting Specifyin...

Страница 614: ...displays the current setting Security protocol setting msh ipsec ike 1 2 3 4 default proto ah esp dual Enter the separate setting number 1 4 or default and specify the security protocol To specify AH enter ah To specify ESP enter esp To specify AH and ESP enter dual Not specifying a protocol displays the current setting IPsec requirement level setting msh ipsec ike 1 2 3 4 default level require us...

Страница 615: ... character string setting msh ipsec ike 1 2 3 4 default psk PSK character string If you select PSK as the authentication method enter the separate setting number 1 4 or default and specify the PSK character string Specify the character string in ASCII characters There can be no abbreviations ISAKMP SA phase 1 hash algorithm setting msh ipsec ike 1 2 3 4 default ph1 hash md5 sha1 sha256 sha384 sha5...

Страница 616: ...ase 2 encryption algorithm setting msh ipsec ike 1 2 3 4 default ph2 encrypt null des 3des aes128 aes192 aes256 Enter the separate setting number 1 4 or default and specify the IPsec SA phase 2 encryption algorithm Separate multiple encryption algorithm entries with a comma The current setting values are displayed in order of highest priority Not specifying an encryption algorithm displays the cur...

Страница 617: ...ng values msh ipsec ike 1 2 3 4 default all clear Enter the separate setting number 1 4 or default and reset the specified setting Specifying all resets all of the settings including default Configuring IPsec 173 ...

Страница 618: ... IEEE 802 1X Client Certificate Installing a Site Certificate Install a site certificate root CA certificate which checks the reliability of the authentication server You need to have at least a certificate that is signed by a certificate authority who signed the server certificate or a certificate from an upper level certificate authority 1 Log in as the network administrator from Web Image Monit...

Страница 619: ...og in as the network administrator from Web Image Monitor 2 Point to Device Management and then click Configuration 3 Click IEEE 802 1X under Security 4 In User Name enter the user name set in the RADIUS server 5 Enter the domain name in Domain Name 6 Select EAP Type Configurations differ according to the EAP Type EAP TLS Make the following settings according to the operating system you are using ...

Страница 620: ... Method When you select TLS you must install IEEE 802 1X Client Certificate Make the following settings according to the operating system you are using Select On or Off in Authenticate Server Certificate Select On or Off in Trust Intermediate Certificate Authority Enter the host name of the RADIUS server on Server ID Select On or Off in Permit Sub domain 7 Click OK 8 Updating appears Wait for abou...

Страница 621: ...word and then enter the password set in the RADIUS server Click Change in Phase 2 User Name and then enter the user name set in the RADIUS server Select CHAP MSCHAP MSCHAPv2 PAP or MD5 in Phase 2 Method Certain methods might not be available depending on the RADIUS server you want to use Make the following settings according to the operating system you are using Select On or Off in Authenticate Se...

Страница 622: ...LAN Type 11 Select Infrastructure Mode in Communication Mode 12 Enter the alphanumeric characters a z A Z or 0 9 in SSID according to the access point you want to use 13 Select WPA in Security Method 14 Select WPA or WPA2 in WPA Authentication Method 15 Click OK 16 Updating appears Wait for about one or two minutes and then click OK 17 Log out If there is a problem with settings you might not be a...

Страница 623: ...Press Permit SNMPv3 Communication 6 Press Encryption Only 7 Press OK 8 Log out To use SmartDeviceMonitor for Admin for encrypting the data for specifying settings you need to specify the network administrator s Encryption Password setting and Encryption Password in SNMP Authentication Information in SmartDeviceMonitor for Admin in addition to specifying Permit SNMPv3 Communication on the machine F...

Страница 624: ...d setting is not specified the data for transmission may not be encrypted or sent For details about specifying the network administrator s Encryption Password setting see p 18 Registering and Changing Administrators 5 Enhanced Network Security 180 ...

Страница 625: ... on the machine and on the printer driver installed in the user s computer Password for IPP Authentication To encrypt the IPP Authentication password on Web Image Monitor set Authentication to DIGEST and then specify the IPP Authentication password set on the machine You can use telnet or FTP to manage passwords for IPP authentication although it is not recommended For details on encrypting the lo...

Страница 626: ...ified on the machine 8 Press OK 9 Log out For details about specifying the encryption key on the printer driver see the printer driver Help For details about specifying the encryption key on the LAN FAX driver see the LAN FAX driver Help For details about specifying the encryption key on the TWAIN driver see the TWAIN driver Help Specifying an IPP Authentication Password Specify an IPP authenticat...

Страница 627: ...tion list 5 Enter the user name in the User Name box 6 Enter the password in the Password box 7 Click OK IPP authentication is specified 8 Updating appears Wait for about one or two minutes and then click OK 9 Log out When using the IPP port under Windows XP Vista 7 Windows Server 2003 2003 R2 2008 2008 R2 you can use the operating system s standard IPP port Encrypting Transmitted Passwords 183 ...

Страница 628: ...C MD5 Windows Server 2008 AES256 CTS HMAC SHA1 96 AES128 CTS HMAC SHA1 96 RC4 HMAC ARCFOUR HMAC MD5 Windows Server 2008 R2 AES256 CTS HMAC SHA1 96 AES128 CTS HMAC SHA1 96 RC4 HMAC ARCFOUR HMAC MD5 Heimdal AES256 CTS HMAC SHA1 96 AES128 CTS HMAC SHA1 96 DES3 CBC SHA1 RC4 HMAC ARCFOUR HMAC MD5 DES CBC MD5 To use Kerberos authentication it must be enabled in the operating system settings 1 Log in as ...

Страница 629: ...also print and send the files Edit You can change the print settings for stored files This includes permission to view files Edit Delete You can delete stored files This includes permission to view and edit files Full Control You can specify the user and access permission This includes permission to view edit and edit delete files Password for stored files Passwords for stored files can be specifi...

Страница 630: ...the file administrator If you want to access a file but do not have access permission ask the file creator owner The file administrator can change the owner of a document using the document s Change Access Priv setting This setting also allows the file administrator to change the access privileges of the owner and other users The document owner and users with the Full Control privilege for the doc...

Страница 631: ...4 Select the file 5 Press Change File Info 6 Press Change Access Priv Configuring Access Permissions for Stored Files 187 ...

Страница 632: ... Press New Program 9 Select the users or groups to whom you want to assign access permission You can select more than one user By pressing All Users you can select all the users 10 Press Exit 6 Preventing the Leaking of Documents 188 ...

Страница 633: ...mation We recommend you grant only the Read only permission to general users Changing the Owner of a Document Use this procedure to change the owner of a document Only the file administrator can change the owner of a document 1 The file administrator logs in from the control panel 2 Press the User Tools Counter key to switch to the normal screen 3 Press the Home key on the top left of the control ...

Страница 634: ...and managing access permissions for each stored file If files become inaccessible be sure to enable the user administrator so that the user administrator can reset the access permission for the files in question 1 The user administrator or the file creator owner logs in from the control panel 2 Press Address Book Mangmnt 3 Select the user 4 Press Protection 5 Under Protect File s press Program Cha...

Страница 635: ...rmission Select the access permission from Read only Edit Edit Delete or Full Control 10 Press Exit 11 Press OK 12 Press Exit 13 Log out The Edit Edit Delete and Full Control access permissions allow a user to perform high level operations that could result in loss of or changes to sensitive information We recommend you grant only the Read only permission to general users Configuring Access Permis...

Страница 636: ...tor or the file creator owner logs in from the control panel 2 Press the User Tools Counter key to switch to the normal screen 3 Press the Home key on the top left of the control panel and press the Document Server icon on the Home screen CJS049 4 Select the file 5 Press Change File Info 6 Preventing the Leaking of Documents 192 ...

Страница 637: ...cessible if an invalid password is entered ten times This section explains how to unlock files Enhance File Protection is one of the extended security functions For details about this and other extended security functions see p 262 Specifying the Extended Security Functions 1 The file administrator logs in from the control panel 2 Press the User Tools Counter key to switch to the normal screen 3 P...

Страница 638: ...5 Press Change File Info 6 Press Unlock Files 7 Press Yes The icon changes to the icon 8 Press OK 9 Log out 6 Preventing the Leaking of Documents 194 ...

Страница 639: ...inter settings for unauthorized copy prevention The settings must be specified by the printer user For details on how to specify settings for unauthorized copy prevention see Printing Documents that are not Allowed to Duplicate Print Data Security for Copying 1 Using the machine specify the settings to print the pattern The settings must be specified by the machine administrator 2 Using the printe...

Страница 640: ...ng Priority Drvr Cmnd Mach 7 Select the range within which the user can specify the pattern to be printed using the printer driver Driver Command Specifies all the content of the pattern to be printed using the printer driver Driver Command Most Settgs Specifies the settings other than pattern type color and density using the printer driver 6 Preventing the Leaking of Documents 196 ...

Страница 641: ...led If a document printed is copied faxed scanned or stored in the Document Server the copy is grayed out If a document that is not copy guarded is copied faxed scanned or stored the copy or stored file is not grayed out 1 The machine administrator logs in from the control panel 2 Press System Settings 3 Press Administrator Tools 4 Press Next three times 5 Press Data Security for Copying 6 Press O...

Страница 642: ...ch function copying Document Server faxing and printing 1 The machine administrator logs in from the control panel 2 Press System Settings 3 Press Administrator Tools 4 Press Next four times 5 Select the function s for Compulsory Security Stamp To set the copy function to be stamped press Compulsory Security Stamp Copier To set the Document Server to be stamped press Compulsory Security Stamp Doc ...

Страница 643: ...not set up or when User Code authentication is not set up the name of the person who outputs a job is not printed Machine ID The same number as the Serial No of Machine in the Enquiry is printed Machine IP Address The IP address of the machine is printed If both an IPv4 address and an IPv6 address exist the IPv4 address is printed If there is no IP address configured then it does not stamp anythin...

Страница 644: ...8 Set the stamp position 9 Press OK twice 10 Log out 6 Preventing the Leaking of Documents 200 ...

Страница 645: ...rily select Stored Print in the printer driver If you select Stored Print Shared you can also share these files For details on how to use the Locked Print function see Locked Print Print Deleting Locked Print Files This can be specified by the file administrator or file creator owner To delete Locked Print files you must enter the password for the files If the password has been forgotten the file ...

Страница 646: ... entry screen does not appear if the file administrator is logged in 9 Press Yes 10 Log out You can configure this machine to delete stored files automatically by setting the Auto Delete Temporary Print Jobs option to On For details about Auto Delete Temporary Print Jobs see Maintenance Print 6 Preventing the Leaking of Documents 202 ...

Страница 647: ...tten the file administrator changes the password to restore access 1 The file administrator or the file creator owner logs in from the control panel 2 Press the User Tools Counter key to switch to the normal screen 3 Press the Home key on the top left of the control panel and press the Printer icon on the Home screen 4 Press Print Jobs 5 Press Locked Print Job 6 Select the file 7 Press Change Pass...

Страница 648: ...y On for Enhance File Protection the file will be locked and become inaccessible if an invalid password is entered ten times This section explains how to unlock files Enhance File Protection is one of the extended security functions For details about this and other extended security functions see p 262 Specifying the Extended Security Functions 1 The file administrator logs in from the control pan...

Страница 649: ...7 Press Unlock File 8 Press Yes The icon disappears 9 Log out This can also be specified via Web Image Monitor For details see Web Image Monitor Help Managing Locked Print Files 205 ...

Страница 650: ...torage Normal Print Sample Print Store and Print 1 The machine administrator logs in from the control panel 2 Press Printer Features 3 Press System 4 Press Next 5 Press Restrict Direct Print Jobs 6 Press Automatclly Store Jobs 7 Press OK 8 Log out If you select Cncl All Direct Prt Jobs the print jobs associated with printer output are cancelled and no data is stored For information on how to print...

Страница 651: ...opying printing and saving in Document Server and control panel operations such as sending and receiving faxes sending scan files and printing reports the configuration list for example Access Log Stores details of login logout activities stored file operations such as creating editing and deleting service engineer operations such as hard disk formatting system operations such as viewing log trans...

Страница 652: ...ess Next twice 5 Press Transfer Log Setting 6 Press Off 7 Press OK 8 Log out Specifying Delete All Logs 1 The machine administrator logs in from the control panel 2 Press System Settings 3 Press Administrator Tools 4 Press Next twice 5 Press Delete All Logs 6 Press Yes 7 Press Exit 8 Log out Deleting all logs from the machine as a batch can be achieved by either using the log collection server or ...

Страница 653: ... Click Logs under Device Settings 4 Select Active for each function Collect Job Logs Collect Access Logs and Collect Eco friendly Logs 5 Specify the collection level for each function Job Log Collect Level Access Log Collect Level and Eco friendly Log Collect Level When a level is changed the selection status of log details changes according to the level To change individual items of the log detai...

Страница 654: ...eb Image Monitor 2 Point to Device Management and then click Configuration 3 Click Logs under Device Settings 4 Select Active when encrypting the logs To disable log encryption select Inactive 5 Click OK A confirmation message appears 6 Click OK 7 Log out To encrypt the logs it is necessary to make the collection setting active for each of the job logs access logs and or eco friendly log If the da...

Страница 655: ... the time you click the Download button Any logs recorded after the Download button is clicked will not be downloaded The Result field of the log entry for uncompleted jobs will be blank Download time may vary depending on the number of logs If an error occurs while the CSV file is downloading or being created the download is canceled and details of the error are included at the end of the file If...

Страница 656: ...hine can maintain logs for 20 days without overwriting but to be cautious we recommend downloading after half that time 10 days to leave room for error It is the responsibility of the machine administrator to deal downloaded log files appropriately If you change the Collect Do not Collect setting for log collection you must perform a batch deletion of the logs After downloading the logs perform a ...

Страница 657: ... of the access log is overwritten In this example part of the access log was overwritten by a downloaded log and deleted The eco friendly log is downloaded as an independent file When logs are overwritten it depends on the priority order and the logs with higher priority will not be overwritten or deleted If logs are downloaded without overwriting CJD006 1 2 4 3 1 Access log 2 Job log 3 Download 4...

Страница 658: ...age in the last line of the downloaded logs If overwriting did not occur the last line will contain the following message Download completed If overwriting did occur the last line will contain the following message Download completed A part of the logs before Log ID xxxx does not exist any more Examine logs following Log ID xxxx Printer Job Logs Print Log entries are made before the login entry is...

Страница 659: ... login and logout details of those jobs are recorded in the access log Print job flowchart 1 2 3 4 5 7 8 9 10 6 CJD008 ID 0x00000000000022c5 ID 0x00000000000022c6 ID 0x00000000000022c5 ID 0x00000000000022c5 ID 0x00000000000022c7 1 Print job data is received 2 Authentication login data is received 3 Print job is processed 4 Print job is output 5 Authentication login data is received 6 An ID is assi...

Страница 660: ...ed File Downloading Details of files stored in Document Server and downloaded using Web Image Monitor or DeskTopBinder Stored File Printing Stored File Printing Details of files printed using the Document Server screen Scanner Sending Scanner Sending Details of sent scan files Scanner URL Link Sending and Storing Scanner URL Link Sending and Storing Details of scan files stored in Document Server ...

Страница 661: ... or through Web Image Monitor Printer Hold Print Incomplete Printer Hold Print Incomplete Log showing Hold Print documents temporarily stored on the machine Printer Hold Print Printer Hold Print Log showing Hold Print documents temporarily stored on the machine and then printed from the control panel or through Web Image Monitor Printer Stored Print Printer Stored Print Details of Stored Print fil...

Страница 662: ...nction Fax Stored File Printing Fax Stored File Printing Details of fax files stored on the machine and printed using the facsimile function Fax Stored File Downloading Fax Stored File Downloading Details of fax files stored in Document Server and downloaded using Web Image Monitor or DeskTopBinder Fax Receiving Fax Receiving Details of storage of received fax files Fax Receiving and Delivering Fa...

Страница 663: ...on Logs Collect Encrypted Communication Logs Log of encrypted transmissions between the utility Web Image Monitor or outside devices Access Violation Access Violation Details of failed access attempts Lockout Lockout Details of lockout activation Firmware Update Firmware Update Details of firmware updates Firmware Structure Change Firmware Structure Change Details of structure changes that occurre...

Страница 664: ...ook Restore Address Book Log of when data in the Address Book is restored Enhanced Print Volume Use Limitation Tracking Permission Result Enhanced Print Volume Use Limitation Tracking Permission Result Log of when a tracking error occurs Counter Clear Result Selected User s Counter Clear Result Selected User s Log of when the counter for an individual user is cleared Counter Clear Result All Users...

Страница 665: ...s set to Level 1 all job logs are collected If Access Log Collect Level is set to Level 1 the following information items are recorded in the access log HDD Format All Logs Deletion Log Setting Change Log Collection Item Change If Access Log Collect Level is set to Level 2 all access logs are collected The first log made following power on is the Firmware Structure log If Eco friendly Log Collect ...

Страница 666: ...ar on separate lines Eco friendly log Items in the list and eco friendly log entries appear on separate lines CJD001 1 2 3 1 All Each item in the list is displayed on a separate line 2 Source Displays details of the job log entry and the Result and Status of each item If there are multiple sources multiple lines are displayed 3 Target Displays details of the job log entry and the Result and Status...

Страница 667: ...he information items contained in each type of log see p 216 Logs that can be collected This is Item 3 of the CSV file Result 1 Indicates the result of an operation or event If Succeeded is displayed for a job log entry the operation completed successfully Failed indicates the operation was unsuccessful If the operation is still in progress this will be blank If Succeeded is displayed for an acces...

Страница 668: ...ssful Processing indicates the operation is still in progress Error indicates an error occurred Suspended indicates the operation is currently suspended If Succeeded is displayed for an access log entry the operation completed successfully if any of the following are displayed the operation was unsuccessful Password Mismatch User Not Programmed Other Failures User Locked Out File Password Mismatch...

Страница 669: ... specified file Specified File Format Error is recorded If the specified file cannot be found Specified File Not Exist is recorded If there are no privileges for operating the specified file Specified File No Privileges is recorded If an error occurs in accessing the specified file Specified File Access Error is recorded If the external media is full Memory Storage Device Full is recorded If an ab...

Страница 670: ...device is unplugged during operation External Charge Unit Disconnected is recorded If pages are missing from a manuscript during execution of the overlaid copying Insufficient No of Original for Overlay is recorded If the storage capacity of pages on Document Server is exceeded Exceed Max Stored Page File Storage is recorded If the storage capacity of documents on Document Server is exceeded Excee...

Страница 671: ...omes full Memory Full is recorded If an attempt to use a PDL or port not installed on the machine is made Print Data Error is recorded If the wrong type of driver is used a network malfunction occurs a job is cancelled by the PC fax driver or a fax communication failure occurs Data Transfer Interrupted is recorded If any other error occurs Other Error is recorded Status Supplement If the Source is...

Страница 672: ...e wrong type of driver is used a network malfunction occurs a job is cancelled by the PC fax driver or a fax communication failure occurs Data Transfer Interrupted is recorded If an attempt to use a PDL or port not installed on the machine is made Print Data Error is recorded If the storage capacity of pages on Document Server is exceeded Exceed Max Stored Page File Storage is recorded If the stor...

Страница 673: ...ceed Max Stored Page File Storage is recorded If the storage capacity of documents on Document Server is exceeded Exceed Max Stored File File Storage is recorded If the hard disk capacity on Document Server is exceeded Hard Disk Full File Storage Memory is recorded If the size of paper specified including irregular sizes is of a size that cannot be stored Unavailable Size to Store is recorded If t...

Страница 674: ... wrong type of driver is used a network malfunction occurs a job is cancelled by the PC fax driver or a fax communication failure occurs Data Transfer Interrupted is recorded If the destination is busy Line Busy is recorded If there is not response from the destination No Response is recorded If the destination is not a fax machine Not Facsimile Destination is recorded If the limit to e mail size ...

Страница 675: ...dates when Auto registration of users is enabled through Windows LDAP or another authentication system ID 0xffffff81 indicates only operations related to the creation of stored files when it is assumed such files will be deleted through system operations 0x00000000 and 0xffffff81 indicate operations that do not require user authentication such as copying and scanning and that were performed by non...

Страница 676: ...was last attempted No of Authentication Server Switches Indicates the number of times server switching occurred when the authentication server was unavailable You can determine whether or not authentication server availability is detected The number of server switches is indicated as 0 to 4 A value of 0 indicates the authentication server is available Logout Mode Mode of logout The remark by User ...

Страница 677: ...user did not belong to any of the above types of user Target User Entry ID Indicates the entry ID of the target user is This is a hexadecimal ID that indicates users to whom the following settings are applied Lockout Password Change Target User Code User Name User code or user name of the user whose data was accessed If the administrator s data was accessed the administrator s user name is logged ...

Страница 678: ...CopyUP FaxUP PrinterUP ScanerUP CopyProgram ScanerProgram D BOXProgram BrowserApplication WIMsetting WebService System CopySP ScanerSP PrinterSP FaxSP Target File Name The file name that is the target of device information importing or exporting is recorded Stored File ID Identifies a created or deleted file This is a hexadecimal ID that indicates created or deleted stored files Stored File Name N...

Страница 679: ... enabled Inactive indicates log transfer is disabled Not Changed indicates no changes have been made to the log transfer setting Encrypt Logs Indicates the status of the log encryption setting Active indicates log encryption is enabled Inactive indicates log encryption is disabled Not Changed indicates no changes have been made to the log encryption setting Log Type If a log s collection level set...

Страница 680: ...ecimal MAC Address Destination MAC physical address Primary Communication Protocol Indicates the primary communication protocol Secondary Communication Protocol Indicates the secondary communication protocol Encryption Protocol Indicates the protocol used to encrypt the communication Communication Direction Indicates the direction of communication Communication Start Request Receiver In indicates ...

Страница 681: ...work Attack Route Identifies the route of the network attack as either Attack from Control Panel or Attack from Other than Control Panel Login User Name used for Network Attack Identifies the login user name that the network attack was performed under Add Update Delete Firmware Indicates the method used to add update or delete the machine s firmware Updated with SD Card indicates an SD card was us...

Страница 682: ... Encryption Key for NVRAM or Device Certificate Validity Error File Name Indicates the name of the file in which a validity error was detected Configuration Category The category whose settings were changed is recorded For details see Category Attribute List Configuration name The attributes of the categories are recorded For details see Category Attribute List Configuration value The values of th...

Страница 683: ... Dates and times Scan File Received File and Printer operations started End Date Time Dates and times Scan File Received File and Printer operations ended Stored File Name Names of Stored File files Stored File ID Indicates the ID of data that is output as a stored file This is a decimal ID that identifies the stored file Print File Name Name of Printer files Output information Item Content Target...

Страница 684: ...g information items Item Content Start Date Time The event start date and time is recorded End Date Time The event end date and time is recorded Log Type The type of eco friendly log is recorded Power ON Power OFF Status of Power Job Information or Consumption of Paper is recorded Log Result Whether the event has ended or not is displayed When the event ends normally Completed is recorded When the...

Страница 685: ... seconds The elapsed time from the start of the previous job until the start of the job is recorded Job Duration seconds The elapsed time from the start of a job until its end is recorded Paper Usage Large Size The amount of large one sided paper used each hour is recorded Large size means A3 11 17 inches or larger Paper Usage Small Size The amount of small one sided paper used each hour is record...

Страница 686: ...ive is recorded 2 The number of times a user may enter a login password is recorded 3 Whether the lockout release timer is active Active or inactive Inactive is recorded 4 The time until lockout release is recorded Auto Logout Timer 1 Auto Logout Timer 2 Auto Logout Timer seconds 1 Whether an auto logout time is set to On or Off is recorded 2 The time until the auto logout operates is recorded 7 M...

Страница 687: ...ertificate is deleted Install is recorded when a certificate is installed When the certificate to be used is changed Change Application to Use Certificate is recorded When an intermediate certificate is installed Install Intermediate Certificate is recorded When an intermediate certificate is deleted Delete Intermediate Certificate is recorded 2 The number of the certificate to be used is recorded...

Страница 688: ...hen Authentication Only is selected Authentication Only is recorded When Authentication and Low Level Encryption is selected Authentication and Low Level Encryption is recorded When Authentication and High Level Encryption is selected Authentication and High Level Encryption is recorded When User Settings is selected User Settings is recorded 4 The authentication method used for the auto key excha...

Страница 689: ...y 1 The mode of operation is recorded 2 The signature is recorded when the scanner is used for sending e mail 3 The signature is recorded when transferring by fax 4 The signature is recorded when the fax is used for sending e mail 5 The signature is recorded when the fax is used for sending e mail notification 6 The signature is recorded when Document Server utility is used for transferring docume...

Страница 690: ...his allows each user to use their own home screen When a user logs in their personalized home screen is displayed 1 The machine administrator logs in from the control panel 2 Press System Settings 3 Press Administrator Tools 4 Press Next four times 5 Press Users Own Home Screen 6 Press Allow 7 Press OK 8 Log out This can also be configured from Web Image Monitor For details see Web Image Monitor H...

Страница 691: ... user s own home screen When Menu Protect has been set to Level 1 or Level 2 have the administrator create any necessary programs The icons of functions that an administrator has restricted are not displayed on the home screen of users whose use of the function s has been restricted When a user is deleted from the Address Book that user s home screen information is also deleted When a user has edi...

Страница 692: ...s Site Certificate Check settings can be specified only via Web Image Monitor See the related articles in the Web Image Monitor Help If Site Certificate Check is disabled and the user accesses an untrusted Web site a warning message may appear If this is the case the connected Web site may have a security problem In such a case the machine administrator must refer to p 251 Troubleshooting and then...

Страница 693: ...o keep the history When keeping the history specify a duration between 1 and 30 days Default Off JavaScript Specify whether or not to activate JavaScript and its extended function When JavaScript is inactive the JavaScript extensions are also inactive JavaScript Default Active Extended JavaScript Default Inactive Use Cookies Specify whether or not to enable cookies When user authentication is not ...

Страница 694: ...ault Display Horizontal Scroll Bar Default Display Bookmark You can register and manage bookmarks including changing deleting importing and exporting Restricting User Browser Functions You can restrict the user functions when using the browser 1 The machine administrator logs in from the control panel 2 Press Browser Features 3 Press Settings par Users 4 Press the setting you want to change and ch...

Страница 695: ...w the browser functions has been used View Send Log View Download Log View Print Log 1 The machine administrator logs in from the control panel 2 Press Browser Features 3 Press View Logs 4 Press View Send Log View Download Log or View Print Log 5 Press Exit 6 Log out Troubleshooting If the connected Web site has a security problem a message may appear If this is the case the machine administrator ...

Страница 696: ...lem Verification of the server to connect to cannot be performed This site has a security problem The http subcontents are included in the https site 1 1 The connected Web site contains non encrypted data 7 Managing the Machine 252 ...

Страница 697: ...Data that can be imported and exported Copier Document Server Features Printer Features Scanner Features Facsimile Features Extended Feature Settings Program Document Server Program Copier Program Scanner Web Image Monitor Setting Web Service Settings System Settings Data that cannot be imported or exported Address book Programs fax function Programs printer function Scanner function programs that...

Страница 698: ... Tools 5 Press Next three times 6 Press Device Setting Information Export Memry Strge Devc 7 Select the item s to export and set the export conditions Select the device information to export from the Export Range Select whether to Include or Exclude the Device Unique Information Device Unique Information includes the IP address host name fax number etc Select On or Off for Encryption If On is chos...

Страница 699: ...ved on an SD card 1 Insert an SD card into the media slot on the side of the control panel 2 Log in from the control panel as an administrator with all privileges 3 Press System Settings 4 Press Administrator Tools 5 Press Next three times 6 Press Device Setting Information Import Memry Strge Devc 7 Configure the import conditions Press Select of the Device Setting Info File to select the file s t...

Страница 700: ...estarts If importing failed or if some of the device information was not imported the content of the logs can be printed Periodically Importing Device Information This setting enables automatic importing of device information stored on a server 1 Log in from the control panel as an administrator with all privileges 2 Press System Settings 3 Press Administrator Tools 4 Press Next three times 5 Pres...

Страница 701: ...ect whether or not to send e mail notification to the machine administrator when importing fails 7 Press OK 8 Log out This can also be configured from Web Image Monitor For details see Web Image Monitor Help When the managing device sever is used more detailed import settings can be made For further details refer to the user s manual of the managing device sever Manually Importing the Device Setti...

Страница 702: ...nting Log Files The logs can be printed when either exporting or importing fails 1 Log in from the control panel as an administrator with all privileges 2 Press System Settings 3 Press Administrator Tools 4 Press Next three times 5 Print the logs Press Print Import Result Log for the import logs Press Print Export Result Log for the export logs 6 Press the Start key The logs are printed 7 Managing...

Страница 703: ... eco friendly counter for the machine Configuring the Display of Eco friendly Counters Set up the period for collecting data for the eco friendly counter and an administrator s message 1 The machine administrator logs in from the control panel 2 Press System Settings 3 Press Administrator Tools 4 Press Next four times 5 Press Eco friendly Counter Period Administrator Message 6 Change the settings ...

Страница 704: ... administrator logs in from the control panel 2 Press System Settings 3 Press Administrator Tools 4 Press Next four times 5 Press Display Clear Eco friendly Counter 6 Press Clear Current Value or Clear Crnt Prev Val 7 Press OK 8 Log out Clearing the Eco friendly Counter by User The eco friendly counter can be cleared according to the user 1 The machine administrator logs in from the control panel ...

Страница 705: ... The eco friendly counter for all users is cleared The eco friendly counter for individual users cannot be cleared Managing Eco friendly Counter 261 ...

Страница 706: ... settings 7 Press OK 8 Log out The operation privileges of an administrator differs depending on the setting Extended Security Function Settings Driver Encryption Key This can be specified by the network administrator When user authentication is ON specify the string of text for the key used for encrypting the login passwords or document passwords that are sent from each kind of driver To specify ...

Страница 707: ...d users cannot be viewed unauthorized users are prevented from obtaining information about the registered files Default Off Encrypt User Custom Settings Address Book This can be specified by the user administrator Encrypt the individual settings of the machine s users and the data in the Address Book Even if information on an internal part has been leaked encryption prevents the individual user se...

Страница 708: ...r to Off users will be able to register a fax or scanner destination in the Address Book simply by entering the destination and then pressing Prg Dest If you set these functions to On the Prg Dest key will not appear Users will still be able to enter a destination directly using the fax or scanner screen but cannot then register that destination in the Address Book by pressing Prg Dest Also note t...

Страница 709: ...ser Authentication Management was specified Default Off Remote Service This can be specified by the machine administrator Communication via HTTPS for Remote Service is disabled if you select Prohibit When setting it to Prohibit consult with your service representative If it is set to Proh Some Services it becomes impossible to change settings via a remote connection providing optimally secure oper...

Страница 710: ...Minimum Character No If you select Level 1 specify the password using a combination of two types of characters selected from upper case letters lower case letters decimal numbers and symbols such as If you select Level 2 specify the password using a combination of three types of characters selected from upper case letters lower case letters decimal numbers and symbols such as Default Off Settings ...

Страница 711: ...ify the number of acceptable authentication attempts when authentications are delayed due to an access violation Use the number keys to enter the number between 50 and 200 and then press Default 200 Depending on the values of the settings for Max Allowed No of Access and Measurement Time you may frequently receive violation detection e mail If violation detection e mail is received frequently chec...

Страница 712: ... authentication attempts of the user does not match the number of attempts logged internally For example access may be denied when a print job for multiple sets of pages is sent from an application If you select On under Security Setting for Access Violation you can prevent such authentication errors On Denial Durtn for Accs Viol Specify the time to limit repeated access by a user Use the number k...

Страница 713: ...itoring interval of Managed User Host Limit and Password Entry Host Limit Use the number keys to enter the time between 1 and 10 and then press Default 3 Off Default Off Specifying the Extended Security Functions 269 ...

Страница 714: ...ard disk by setting Stored Reception File User Setting to On under Reception Settings To access the machine over the network specified users must enter their user codes or login user names and passwords Only authorized users can manage fax files stored on the hard disk For details see Facsimile Features Fax Printing the Journal When user authentication is specified the Journal is automatically set...

Страница 715: ... can be enabled from Initial Settings available in Web Image Monitor For details see Preparing to Use WSD Scanner Push Type and Preparing to Use WSD Scanner Pull Type Scan System Status Pressing the Check Status key on the control panel allows you to check the machine s current status and settings If administrator authentication has been specified the Machine Address Info tab is displayed only if ...

Страница 716: ...n be specified by the machine administrator Service mode is used by a service representative for inspection or repair If you set Service Mode Lock to On service mode cannot be used unless the machine administrator logs on to the machine and cancels the service mode lock to allow the service representative to operate the machine for inspection and repair This ensures that the inspection and repair ...

Страница 717: ...7 Press Yes 8 Log out Limiting Machine Operations to Customers Only 273 ...

Страница 718: ...nt User Management Select On and then select Administrator Tools for Available Settings See p 15 Configuring Administrator Authentication Administrator Tools Administrator Authentication Management Machine Management Select On and then select Timer Settings Interface Settings File Transfer and Administrator Tools for Available Settings See p 15 Configuring Administrator Authentication Administrato...

Страница 719: ...o 8 or higher See p 262 Specifying the Extended Security Functions Administrator Tools Network Security Level Level 2 To acquire the machine status through printer driver or Web Image Monitor set SNMP to Active on Web Image Monitor See p 126 Specifying Network Security Level Administrator Tools Service Mode Lock On See p 272 Limiting Machine Operations to Customers Only Administrator Tools Machine...

Страница 720: ...in Web Image Monitor For details about the stored reception file user setting see p 270 Other Security Functions or Stored Reception File User Setting Fax Settings You Can Configure Using Web Image Monitor Use Web Image Monitor to configure the security settings shown in the following table Category Item Setting Device Settings Logs Collect Job Logs Active Device Settings Logs Collect Access Logs ...

Страница 721: ...NMPv3 is active Security Network Security FTP Inactive Before specifying this setting set Network Security Level to Level 2 on the control panel Security S MIME Encryption Algorithm AES 128 bit AES 256 bit or 3DES 168 bit You must register the user certificate in order to use S MIME Address Book E mail User Certificate You must register the user certificate in order to use S MIME The administrator...

Страница 722: ...sec Encryption Key Manual Settings Inactive Security IPsec Encryption Key Auto Exchange Settings Security Level Authentication and High Level Encryption Settings you can configure when IPsec is unavailable If IPsec is not available configure the settings shown in the following table to enhance the security of the data traveling on your network Control panel settings System Settings Tab Item Settin...

Страница 723: ...t Driver Installation Guide For details about SSL TLS settings see p 136 Configuring SSL TLS Scanner Sending the URL address of stored files Send the URL of scanned files to destinations by configuring Send Settings in Scanner Features instead of sending the actual scanned files For details see Sending the URL by E mail Scan Managing scanned files using Web Image Monitor Use Web Image Monitor thro...

Страница 724: ...7 Managing the Machine 280 ...

Страница 725: ...d follow the message to resolve the problem Messages Cause Solutions You do not have the privileges to use this function The privileges to use the function is not specified If this appears when trying to use a function The function is not specified in the Address Book management setting as being available The user administrator must decide whether to additionally assign the privileges to use the f...

Страница 726: ...error may have occurred Confirm the network in use with the LAN administrator If an error code appears follow the instructions next to the error code in the table below Administrator Authentication for User Management must be set to on before this selection can be made User administrator privileges have not been enabled in Administrator Authentication Management To specify Basic authentication Win...

Страница 727: ... s with access privileges will be deleted You have tried to delete files without the privileges to do so Files can be deleted by the file creator owner or file administrator To delete a file which you are not privileged to delete contact the file creator owner If an Error Code is Displayed When authentication fails the message Authentication has failed appears with an error code The following list...

Страница 728: ...ser name was not specified but a DeskTopBinder operation was performed Specify the DeskTopBinder login user name correctly B0206 002 1 A login user name or password error occurred Make sure the login user name and password are entered correctly and then log in B0206 002 2 The user attempted authentication from an application on the System Settings screen where only the administrator has authentica...

Страница 729: ... the password is entered correctly 2 Either DES or AES is selected for Driver Encryption Key Encryption Strength The administrator has restricted use of simple encryption You can use the encryption key if it has been specified in the driver 3 A driver encryption key error occurred Make sure that the encryption key is correctly specified on the driver W0107 000 A login user name was not specified b...

Страница 730: ...t an authentication attack is not occurring Notify the administrator of the screen message by e mail and check the system log for signs of an authentication attack W0400 102 Kerberos authentication failed because the server or security module is not functioning correctly 1 Make sure that the server is functioning properly 2 Make sure that the security module is installed W0406 104 1 Cannot connect...

Страница 731: ...n name is specified in domain name such as DOMAINNAME make sure that WINS is specified in Interface Settings W0406 104 4 Cannot resolve the domain name Specify the IP address in the domain name and confirm that authentication is successful If authentication was unsuccessful 1 Make sure that Restrict LM NTLM is not set in either Domain Controller Security Policy or Domain Security Policy 2 Make sur...

Страница 732: ...ize ports 137 and 139 Under Windows XP if the Windows firewall is activated open the properties for Network Connections and then click Settings on the Advanced tab On the Exceptions tab specify ports 137 and 139 as exceptions In the Properties window for Network Connections open TCP IP properties Then click detail settings WINS and then check the Enable NetBIOS over TCP IP box and set number 137 t...

Страница 733: ... name is specified in lower case letters Make sure the realm name is specified in capital letters 4 Kerberos authentication will fail if automatic retrieval for KDC fails Ask your service representative to make sure the KDC retrieval settings are set to automatic retrieval If automatic retrieval is not functioning properly switch to manual retrieval W0400 105 1 The UserPrincipleName user domainnam...

Страница 734: ... one DC make sure that a confidential relationship has been configured between each DC W0400 106 The domain name cannot be resolved Make sure that DNS WINS is specified in the domain name in Interface Settings W0400 200 Due to the high number of authentication attempts all resources are busy Wait a few minutes and then try again W0400 202 1 The SSL settings on the authentication server and the mac...

Страница 735: ...just been changed delete the old name on the server W0607 001 An authentication error occurred because the Address Book is being used at another location Wait a few minutes and then try again W0606 004 Authentication failed because the user name contains language that cannot be used by general users Do not use other admin supervisor or HIDE in general user accounts W0612 005 Authentication failed ...

Страница 736: ... authentication from an application on the System Settings screen where only the administrator has authentication ability Only the administrator has login privileges on this screen Log in as a general user from the application s login screen L0206 003 An authentication error occurred because the user name contains a space colon or quotation mark Recreate the account if the account name contains an...

Страница 737: ...ntication is disabled in the LDAP server settings Change the LDAP server settings in administrator tools in System Settings L0406 202 L0406 203 1 There is an error in the LDAP authentication settings LDAP server or network configuration 1 Make sure that a connection test is successful with the current LDAP server configuration If connection is not successful there might be an error in the network ...

Страница 738: ...e login user name exceeds 128 bytes L0406 202 L0406 203 3 There is an error in the simple encryption method 1 Authentication will fail if the password is left blank in simple authentication mode To allow blank passwords contact your service representative 2 In simple authentication mode the DN of the login user name is obtained in the user account Authentication fails if the DN cannot be obtained ...

Страница 739: ...in capital letters L0400 210 Failed to obtain user information in LDAP search The login attribute s search criteria might not be specified or the specified search information is unobtainable Make sure the login name attribute is specified correctly L0406 003 An authentication error occurred because the user name contains a space colon or quotation mark Recreate the account if the account name cont...

Страница 740: ...cation failed because the user name contains language that cannot be used by general users Do not use other admin supervisor or HIDE in general user accounts L0612 005 Authentication failed because no more users can be registered The number of users registered in the Address Book has reached capacity Ask the user administrator to delete unused user accounts in the Address Book L0707 001 An authent...

Страница 741: ...he DeskTopBinder login user name correctly I0206 002 A user attempted authentication from an application on the System Settings screen where only the administrator has authentication ability Only the administrator has login privileges on this screen Log in as a general user from the application s login screen I0206 003 An authentication error occurred because the user name contains a space colon o...

Страница 742: ...he following cases If the login user name contains a space colon or quotation mark If the login user name exceeds 128 bytes I0409 000 Authentication timed out because the server did not respond Contact the server or network administrator If the situation does not return to normal contact your service representative I0511 000 The authentication server login name is the same as a user name already r...

Страница 743: ...ng the machine provide the instructions on how to deal with them Condition Cause Solution Cannot perform the following Print with the printer driver Connect with the TWAIN driver Send or print with the LAN Fax driver User authentication has been rejected Confirm the user name and login name with the administrator of the network in use if using Windows authentication LDAP authentication or Integrat...

Страница 744: ...name and password a message that an incorrect password has been entered appears Driver Encryption Key Encryption Strength is not set correctly Alternatively SSL TLS has been enabled although the required certificate is not installed in the computer Set Driver Encryption Key Encryption Strength to Simple Encryption Alternatively enable SSL TLS install the server certificate in the machine and then ...

Страница 745: ... version of the ScanRouter delivery software Cannot access the machine using ScanRouter EX Professional V2 ScanRouter EX Professional V2 does not support user authentication ScanRouter EX Professional V2 does not support user authentication Cannot log out when using the copying or scanner functions The original has not been scanned completely When the original has been scanned completely press rem...

Страница 746: ... has expired The device certificate PDF A with digital signature does not exist or is invalid The administrator s e mail address is incorrect Install a user certificate destination certificate You can install a user certificate destination certificate from the Web Image Monitor address book The user certificate destination certificate itself must be prepared in advance Install a device certificate...

Страница 747: ...vice certificate PDF A with digital signature does not exist or is invalid The administrator s e mail address is incorrect Install a user certificate destination certificate You can install a user certificate destination certificate from the Web Image Monitor address book The user certificate destination certificate itself must be prepared in advance Install a device certificate for S MIME Install...

Страница 748: ...ver For details see the printer driver Help Finish Job and Limit is selected in Machine action when limit is reached but the current job is canceled before it is finished Depending on the application you are using the machine might recognize a job as multiple jobs causing cancelation of the job before it is finished Reset the print volume use setting for the user by for example clearing the print ...

Страница 749: ...peration Unset The logged in user has privileges for this operation In cases where no settings are selected in Available Settings of Administrator Authentication Management Set The logged in user has privileges for this operation Status when settings are selected in Available Settings of Administrator Authentication Management Lv 1 In cases where the Menu Protect setting is set to Level 1 Lv 2 In ...

Страница 750: ... When Menu Protect is set to Off users can execute change and read all of the settings of each function 9 Checking Operation Privileges 306 ...

Страница 751: ...cation R R W R R R W R Screen Colour Setting R R W R R R W R Print Priority R R W R R R W R Function Reset Timer R R W R R R W R Output Copier R R W R R R W R Output Document Server R R W R R R W R Output Facsimile R R W R R R W R Output Printer R R W R R R W R Key Repeat R R W R R R W R System Status Job List Display Time R R W R R R W R ADF Original Table Elevation 1 R R W R R R W R Small Size P...

Страница 752: ... R Tray Paper Size LCT R R W R R R W R Custom Size R R W R R R W R Cover Sheet Tray R R W R R R W R Slip Sheet Tray R R W R R R W R Designation Sheet 1 2 Tray R R W R R R W R Timer Settings Settings User Mach N W File Unset Set Sleep Mode Timer R R W R R R W R Low Power Mode Timer R R W R R R W R System Auto Reset Timer R R W R R R W R Copier Document Server Auto Reset Timer R R W R R R W R Facsim...

Страница 753: ...v6 Address R R R R R R IPv6 Gateway Address R R R R R R IPv6 Stateless Address Autoconfiguration R R R W R R W R DHCPv6 Configuration R R R W R R W R DNS Configuration 2 R R R W R R W R DDNS Configuration R R R W R R W R IPsec R R R W R R W R Domain Name 1 R R R W R R W R WINS Configuration R R R W R R W R Effective Protocol R R R W R R W R NCP Delivery Protocol R R R W R R W R NW Frame Type R R R...

Страница 754: ...e data is read only 2 All administrators and users can run a test of connections Parallel Interface Settings User Mach N W File Unset Set Parallel Timing R R W R R R W R Parallel Communication Speed R R W R R R W R Selection Signal Status R R W R R R W R Input Prime R R W R R R W R Bidirectional Communication R R W R R R W R Signal Control R R W R R R W R Wireless LAN Settings User Mach N W File U...

Страница 755: ...R POP3 IMAP4 Settings R R W R R R W R Administrator s E mail Address R R W R R R W R E mail Communication Port R R R W R R W R E mail Reception Interval R R R W R R W R Max Reception E mail Size R R R W R R W R E mail Storage in Server R R R W R R W R Default User Name Password Send 4 R R W R R R W R Program Change Delete E mail Message R R W R R R W R W Auto Specify Sender Name R R R W R R W R Fa...

Страница 756: ...ta Carry over Setting for Address Book Auto program R W R R R R W R Display Print Counter R R W R R R W R W Display Clear Print Counter per User R W 7 R W 8 R R R W Machine action when limit is reached R R W R R R R Print Volume Use Limitation Unit Count Setting R R W R R R R Print Volum Use Limit Default Limit Value R W R R R R R Media Slot Use R R W R R R R User Authentication Management R R W R...

Страница 757: ...rict Use of Destinations Fax 12 R W R R R R R Restrict Adding of User Destinations Fax 12 R W R R R R R Restrict Use of Destinations Scanner 12 R W R R R R R Restrict Adding of User Destinations Scanner 12 R W R R R R R Transfer to Fax Receiver 12 R R W R R R R Remote Diagnostics Facsimile R W Authenticate Current Job 12 R R W R R R W R Remote Service 12 R R W R R R W R Update Firmware 12 R R W R ...

Страница 758: ...arch R R W R R R W R Sleep Mode R R W R R R W R Service Test Call R W R W Notify Machine Status R W R W Service Mode Lock R R W R R R W R Firmware Version R R R R R R Network Security Level R R R W R R R Auto Erase Memory Setting R R W R R R R Erase All Memory R W Delete All Logs R W R W Transfer Log Setting 13 R R W R R R W R Data Security for Copying R R W R R R W R Fixed USB Port R R W R R R W ...

Страница 759: ...y to Suspend Print Job R R W R R R W R Energy Saver Key to Change Mode R R W R R R W R Compulsory Security Stamp Copier R R W R R R W R Compulsory Security Stamp Doc Srvr R R W R R R W R Compulsory Security Stamp Facsimile R R W R R R W R Compulsory Security Stamp Printer R R W R R R W R Users Own Home Screen R R W R R R W R Display Clear Eco friendly Counter R W Eco friendly Counter Period Admini...

Страница 760: ...cation function 10 Only the administrator privilege settings can be changed 11 Administrators can only change their own accounts 12 Extended Security settings 13 Can only be changed to Off 14 R W is the administrator with all privileges that include user administrator machine administrator network administrator and file administrator privileges Print List Settings User Mach N W File Unset Set Prin...

Страница 761: ...pending on the configurations in Available Settings Edit Home Settings User Mach N W File Unset Set Edit Icons Move Icon R W R W Edit Icons Delete Icon R W R W Edit Icons Add Icon R W R W Edit Icons Restore Default Icon Display R W R W Insert Image Insert Image on Home Screen R W R W Edit Home 317 ...

Страница 762: ...rictions to user operations differ depending on the configurations in Available Settings Maintenance Settings User Mach N W File Unset Set Auto Colour Calibration R W R W Colour Registration R W R W Plain Paper Setting R W R W 9 Checking Operation Privileges 318 ...

Страница 763: ...R Original Orientation in Duplex Mode R R W R R R R Copy Orientation in Duplex Mode R R W R R R R Max Copy Quantity R R W R R R R Auto Tray Switching R R W R R R R Alert Sound Original left on Exposure Glass R R W R R R R Job End Call R R W R R R R Customize Function Copier R R W R R R W R Customize Function Document Server Storage R R W R R R W R Reproduction Ratio Settings User Mach N W File Lv ...

Страница 764: ...n Combine R R W R R R W R Erase Centre Width R R W R R R R Front Cover Copy in Combine R R W R R R W R Copy Order in Combine R R W R R R W R Orientation Booklet Magazine R R W R R R W R Copy on Designating Page in Combine R R W R R R W R Image Repeat Separation Line R R W R R R W R Double Copies Separation Line R R W R R R W R Separation Line in Combine R R W R R R W R Stamp Background Numbering S...

Страница 765: ...se Only R R W R R R W 1 R Stamp Format CONFIDENTIAL R R W R R R W 1 R Stamp Format DRAFT R R W R R R W 1 R Stamp Colour COPY R R W R R R R Stamp Colour URGENT R R W R R R R Stamp Colour PRIORITY R R W R R R R Stamp Colour For Your Info R R W R R R R Stamp Colour PRELIMINARY R R W R R R R Stamp Colour For Internal Use Only R R W R R R R Stamp Colour CONFIDENTIAL R R W R R R R Stamp Colour DRAFT R R...

Страница 766: ...R R R R Stamp Setting R R W R R R W 2 R 2 Only adjustments to print position can be set The print position itself cannot be configured Page Numbering Settings User Mach N W File Lv 1 Lv 2 Stamp Format R R W R R R R Font R R W R R R W R Size R R W R R R W R Duplex Back Page Stamping Position R R W R R R W R Page Numbering in Combine R R W R R R W R Stamp on Designating Slip Sheet R R W R R R W R St...

Страница 767: ...justments to print position can be set The print position itself cannot be configured Stamp Text Settings User Mach N W File Lv 1 Lv 2 Font R R W R R R W R Size R R W R R R W R Superimpose R R W R R R W R Stamp Colour R R W R R R R Stamp Setting R R W R R R W R Change Job Serial No for First Job R R W R R R R Input Output Settings User Mach N W File Lv 1 Lv 2 Switch to Batch R R W R R R W R SADF A...

Страница 768: ...plified Screen Finishing Types R R W R R R W R Adjust Colour Image Settings User Mach N W File Lv 1 Lv 2 Background Density of ADS Full Colour R R W R R R W R Colour Sensitivity R R W R R R W R A C S Sensitivity R R W R R R W R A C S Priority R R W R R R W R Administrator Tools Settings User Mach N W File Lv 1 Lv 2 Menu Protect R R W R R R R 9 Checking Operation Privileges 324 ...

Страница 769: ...R R R R R R Adjust Sound Volume R R W R R R W R Box Setting R W R Box Setting Print List R W R W On Hook Mode Release Time R R W R R R W R Delete Recent Destinations R W Auto Print Fax Journal R R W R R R R Scan Settings Settings User Mach N W File Lv 1 Lv 2 Program Change Delete Scan Size R R W R R R W R Send Settings Settings User Mach N W File Lv 1 Lv 2 Max E mail Size R R R W R R R Program Cha...

Страница 770: ... Mark R R W R R R W R Print Reception Time R R W R R R W R Reception File Print Quantity R R W R R R W R Paper Tray R R W R R R W R Specify Tray for Lines R R W R R R W R Folder Transfer Result Report R R W R R R R Remote Reception Setting per Line R R W R R R R Initial Settings Settings User Mach N W File Lv 1 Lv 2 Parameter Setting R R W R R R R Parameter Setting Print List R W R W Program Close...

Страница 771: ...le SIP R R R W R R R H 323 Settings R R R W R R R SIP Settings R R R W R R R Program Change Delete Gateway R R R W R R R Menu Protect R R W R R R R E mail Setting R R W R R R R Folder Setting R R W R R R R File Type to Transfer R R W R R R R Security for E mail TX Results R R W R R R R Facsimile Features 327 ...

Страница 772: ...iffer depending on the Menu Protect setting Printer Functions Settings User Mach N W File Lv 1 Lv 2 Print from Memory Storage Device R W R W Job Reset R W R W R W Job Operation R W R W R W Form Feed R W R W R W Spooling Job List R W R W R W Error Log R W R W R W 9 Checking Operation Privileges 328 ...

Страница 773: ...uration Font Page R W R W R W PDF Configuration Font Page R W R W R W Hex Dump R W R W R W Maintenance Settings User Mach N W File Lv 1 Lv 2 Menu Protect R R W R R R R List Test Print Lock R R W R R R Delete All Temporary Print Jobs R W Delete All Stored Print Jobs R W Auto Delete Temporary Print Jobs R R R R W R R Auto Delete Stored Print Jobs R R R R W R R 4 Colour Graphic Mode R R W R R R R Sys...

Страница 774: ...ter Language R R W R R R R Sub Paper Size R R W R R R R Page Size R R W R R R R Letterhead Setting R R W R R R R Tray Setting Priority R R W R R R R Edge to Edge Print R R W R R R R Default Printer Language R R W R R R R Tray Switching R R W R R R R Extended Auto Tray Switching R R W R R R R Jobs Not Printed As Machn Was Off R R W R R R R Restrict Direct Print Jobs R R W R R R R Switch Initial Scr...

Страница 775: ...R R W R R R R Symbol Set R R W R R R R Courier Font R R W R R R R Extend A4 Width R R W R R R R Append CR to LF R R W R R R R Resolution R R W R R R R PS Menu Settings User Mach N W File Lv 1 Lv 2 Job Timeout R R W R R R R Wait Timeout R R W R R R R Swtchng btwn 1 2 Sided Prt Func R R W R R R R Data Format R R W R R R R Resolution R R W R R R R Toner Saving R R W R R R R Colour Setting R R W R R R...

Страница 776: ...oner Saving R R W R R R R Colour Setting R R W R R R R Colour Profile R R W R R R R Process Colour Model R R W R R R R Orientation Auto Detect R R W R R R R Unauthorized Copy Preventn Settings User Mach N W File Lv 1 Lv 2 Unauthorized Copy Prevention Setting R R W R R R R Setting Priority Drvr Cmnd Mach R R W R R R R Unauthorized Copy Prevention Type R R W R R R R Mask Type for Patrn Density Effec...

Страница 777: ... Time R R W R R R R Destination List Display Priority 1 R R W R R R R Destination List Display Priority 2 R R W R R R R Print Delete Scanner Journal R R W R R R R Print Scanner Journal R W Delete Scanner Journal R W Delete Recent Destinations R W Scan Settings Settings User Mach N W File Lv 1 Lv 2 A C S Sensitivity Level R R W R R R R Wait Time for Next Orig Exposure Glass R R W R R R R Wait Time ...

Страница 778: ...R R R W R Max E mail Size R R R W R R 1 R 1 Divide Send E mail R R R W R R 1 R 1 Insert Additional E mail Info R R W R R R W R No of Digits for Single Page Files R R W R R R W R Stored File E mail Method R R W R R R W R Default E mail Subject R R W R R R R 1 When Network Management in Administrator Authentication Management is set to Off user privilege becomes R W Initial Settings Settings User Ma...

Страница 779: ...Browser Features Settings User Mach N W File Unset Set Browser Default Settings R W R R Settings par Users R W R R View Logs R R R Browser Features 335 ...

Страница 780: ...tting R R W R R R R Install R R W R R R R Uninstall R R W R R R R Extended Feature Info R R W R R R R Administrator Tools R W Add Program Startup Setting R R W R R R R Install Add Program R R W R R R R Uninstall Add Program R R W R R R R Add Program Info R R R R R R 9 Checking Operation Privileges 336 ...

Страница 781: ...tory R R R 1 1 Can be viewed if user code authentication is used for the user authentication method Printer Settings User Mach N W File Unset Set Spool Printing Delete R W R W Job History R R W R R R R Error Log R R R Fax History Settings User Mach N W File Unset Set Transmission R R R 1 Reception R R R 1 LAN Fax R R R 1 1 Can be viewed when using user code authentication for the user authenticati...

Страница 782: ... Mach N W File Unset Set Fax Remote Send History R R R 1 Scanner Remote Send History R R R 1 1 Can be viewed when using user code authentication for the user authentication method 9 Checking Operation Privileges 338 ...

Страница 783: ...R W R R R W R Protect Printer Display Panel R R W R R Print Priority R R W R R Function Reset Timer R R W R R Energy Saver Key to Change Mode R R W R R R W R Stop Key to Suspend Print Job R R W R R R W R Permit Firmware Update R R W R R Permit Firmware Structure Change R R W R R Display IP Address on Device Display Panel R R W R R Media Slot Use R R W R R R R PDF File Type PDF A Fixed R R W R R R ...

Страница 784: ... User Mach N W File Unset Set Set Date R R W R R R W R Set Time R R W R R R W R SNTP Server Name R R W R R R W R SNTP Polling Interval R R W R R R W R Time Zone R R W R R R W R Timer Settings User Mach N W File Unset Set Sleep Mode Timer R R W R R R W R Low Power Mode Timer R R W R R R W R System Auto Reset Timer R R W R R R W R Copier Document Server Auto Reset Timer R R W R R R W R Facsimile Aut...

Страница 785: ...Log R R W R R R W R Eco friendly Logs R R W R R R W R Transfer Logs 1 R R W R R R W R Encrypt Logs R R W R R R W R Classification Code R R W R R R W R Delete All Logs R W R W 1 Can only be changed to Inactive Download Logs Settings User Mach N W File Unset Set Logs to Download R W Download R W E mail Settings User Mach N W File Unset Set Administrator E mail Address R W R W R Signature R W R W R R...

Страница 786: ...th Encryption R W R W R POP before SMTP R W R W R POP E mail Address R W R W R POP User Name R W R W POP Password 2 R W R W Timeout setting after POP Auth R W R W R POP3 IMAP4 Server Name R W R W R POP3 IMAP4 Encryption R W R W R POP3 Reception Port No R W R W R IMAP4 Reception Port No R W R W R Fax E mail Address R W R W R Receive Fax E mail R W R W Fax E mail User Name R W R W Fax E mail Passwor...

Страница 787: ...Detailed Settings of Each Item R R W R R R R On demand E mail Notification Settings User Mach N W File Unset Set Notification Subject R R W R R R R Notification Message R R W R R R R Access Restriction to Information R R W R R R R Receivable E mail Address Domain Name Settings R R W R R R R File Transfer Settings User Mach N W File Unset Set SMB User Name R W R W SMB Password 2 R W R W FTP User Na...

Страница 788: ...Server Authentication Settings R R W R R R W R Group Settings for Integration Server Authentication R R W R R R W R Administrator Authentication Management Settings User Mach N W File Unset Set User Administrator Authentication R W R R R R R Available Settings for User Administrator R W R R R R R Machine Administrator Authentication R R W R R R R Available Settings for Machine Administrator R R W ...

Страница 789: ...ord 1 R W R W R W R W 1 Administrators can only change their own accounts Print Volume Use Limitation Settings User Mach N W File Unset Set Machine Action When Limit is Reached R R W R R R R Print Volume Use Limitation Unit Count Setting R R W R R R R Volume Use Counter Scheduled Specified Reset Settings R R W R R R R LDAP Server Settings User Mach N W File Unset Set LDAP Search R W R W Program R ...

Страница 790: ... R W R W Delete R W R W Device Setting Information Import Setting Server Settings User Mach N W File Unset Set Import File From 1 Scheduled Import at Specified Time 1 Comparing New File to Last Import File 1 E mail Failure Notification 1 Number of Retries 1 Retry Interval 1 Encryption Key 1 1 R W is the administrator with all privileges that include user administrator machine administrator network...

Страница 791: ...le for Home Screen 1 1 R W is the administrator with all privileges that include user administrator machine administrator network administrator and file administrator privileges Eco friendly Counter Period Administrator Message Settings User Mach N W File Unset Set Display Information Screen R R W R R R W R Display Time R R W R R R W R Count Period R R W R R R W R Administrator Message R R W R R R...

Страница 792: ...mporary Print Jobs R R R R W R R Auto Delete Stored Print Jobs R R R R W R R Jobs Not Printed As Machine Was Off R R W R R R R Rotate by 180 Degrees R R W R R R R Print Compressed Data R R W R W R R R Duplex R R W R R R R Copies R R W R R R R Blank Page Print R R W R R R R Reserved Job Waiting Time R R W R R R R Printer Language R R W R R R R Sub Paper Size R R W R R R R Page Size R R W R R R W R ...

Страница 793: ...R R R R Host Interface R R W R R R R PCL Menu R R W R R R R PS Menu R R W R R R R PDF Menu R R W R R R R Unauthorized Copy Prevention Settings User Mach N W File Lv 1 Lv 2 Unauthorized Copy Prevention Setting R R W R R R R Setting Priority Driver Command Machine R R W R R R R Unauthorized Copy Prevention Type R R W R R R R Mask Type for Pattern Density Effect R R W R R R R Prevention Text Settings...

Страница 794: ...y 180 Degrees R R W R R R R Memory Usage R R W R R R R Duplex R R W R R R R Copies R R W R R R R Blank Page Print R R W R R R R Sub Paper Size R R W R R R R Input Tray R R W R R R W R W Page Size R R W R R R W R Paper Type R R W R R R W R W Output Tray R R W R R R W R W Letterhead Setting R R W R R R R Edge to Edge Print R R W R R R R PCL Menu R R W R R R R PS Menu R R W R R R R PDF Menu R R W R R...

Страница 795: ...h N W File Lv 1 Lv 2 PDF Temporary Password R W R W PDF Group Password Settings User Mach N W File Lv 1 Lv 2 PDF Group Password R W PDF Fixed Password Settings User Mach N W File Lv 1 Lv 2 PDF Fixed Password R W Web Image Monitor Printer 351 ...

Страница 796: ...W Menu Protect R W Program Memory Lock ID R W Security for E mail Transmission Results R W Fax Information R W Select Dial Push Phone R W Send Reception Settings Settings User Mach N W File Lv 1 Lv 2 Maximum E mail Size R W Switch Reception Mode R W SMTP RX File Delivery Settings R W 2 Sided Print R W R W Checkered Mark R W R W Center Mark R W R W Print Reception Time R W R W Reception File Print ...

Страница 797: ...Mach N W File Lv 1 Lv 2 H 323 R W SIP R W IP Fax Gateway Settings Settings User Mach N W File Lv 1 Lv 2 Prefix 1 50 R W Protocol 1 50 R W Gateway Address 1 50 R W Parameter Settings Settings User Mach N W File Lv 1 Lv 2 Just Size Printing R W Combine 2 Originals R W Convert to PDF When Transferring to Folder R W Automatic Printing Report R W E mail R W Web Image Monitor Fax 353 ...

Страница 798: ...R R R R Destination List Display Priority 2 R R W R R R R Print Delete Scanner Journal R R W R R R R External Authentication Folder Path Overwrite Setting R R W R R R R Scan Settings Settings User Mach N W File Lv 1 Lv 2 A C S Sensitivity Level R R W R R R R Wait Time for Next Original s R R W R R R R Background Density of ADS Full Color R R W R R R R Blank Page Detect R R W R R R R Send Settings ...

Страница 799: ...Management in Administrator Authentication Management is set to Off user privilege becomes R W Initial Settings Settings User Mach N W File Lv 1 Lv 2 Menu Protect R R W R R R Display WSD Destination List R R W R R R R Prohibit WSD Scan Command R R W R R R R Default Settings for Normal Screens on Device Settings User Mach N W File Lv 1 Lv 2 Store File R W R R Preview R W R R Scan Settings R W R R S...

Страница 800: ...Settings User Mach N W File Lv 1 Lv 2 Send File Type R W R R 9 Checking Operation Privileges 356 ...

Страница 801: ...Network R R R R R R MAC Address R R R R R R Ethernet Security R R R W R R W R Ethernet Speed R R R W R R W R Bluetooth R R R W R R W R Operation Mode R R R W R R W R USB R R W R R R W R USB Host R R R R R R PictBridge R R W R R R W R Wireless LAN Settings Settings User Mach N W File Unset Set LAN Type R W R Network R R R R R R MAC Address R R R R R R Available Wireless LAN R R R R R R Communicatio...

Страница 802: ...set Set Security Method R R R W R R W R WEP Authentication R W R W WEP Key Number R R R W R R W R WEP Key R R R W R R W R WPA Authentication Method R R R W R R W R WPA PSK WPA2 PSK R R R W R R W R 9 Checking Operation Privileges 358 ...

Страница 803: ...me R R R W R R W R DHCP R R R W R R W R Domain Name R R R W R R W R IPv4 Address R R R W R R W R Subnet Mask R R R W R R W R DDNS R R R W R R W R WINS R R R W R R W R Primary WINS Server R R R W R R W R Secondary WINS Server R R R W R R W R LLMNR R R R W R R W R Scope ID R R R W R R W R Details R R R W R R W R IPv6 Settings User Mach N W File Unset Set IPv6 R R R W R R W R Host Name R R R W R R W ...

Страница 804: ...R R R W R R W R NetWare Settings User Mach N W File Unset Set NetWare R R R W R R W R Netware Print Settings R R R W R R W R NCP Delivery R R R W R R W R SMB Settings User Mach N W File Unset Set SMB R R R W R R W R Protocol R R R R R R Workgroup Name R R R W R R W R Computer Name R R R W R R W R Comment R R R W R R W R Share Name R R R R R R Notify Print Completion R R R W R R W R 9 Checking Oper...

Страница 805: ...NMP R W Protocol R W SNMPv3 Setting R W SNMPv3 Trap Communication Setting R W Account User R W Account Network Administrator R W Account Machine Administrator R W SSDP Settings User Mach N W File Unset Set SSDP R W UUID R Profile Expires R W TTL R W Bonjour Settings User Mach N W File Unset Set Bonjour R R R W R R W R Web Image Monitor Network 361 ...

Страница 806: ...ach N W File Unset Set Local Hostname R R R R R R Details R R R W R R W R Print Order Priority R R R W R R W R System Log Settings User Mach N W File Unset Set System Log R R R R R 9 Checking Operation Privileges 362 ...

Страница 807: ...e Management Settings User Mach N W File Unset Set Network Security R W Access Control R W IPP Authentication R W SSL TLS R W ssh R W R R Site Certificate R W Device Certificate R W S MIME R W IPsec R W User Lockout Policy R W IEEE 802 1X R W Web Image Monitor Security 363 ...

Страница 808: ...ttings are in Configuration in Device Management Settings User Mach N W File Unset Set Setup RC Gate R W Update RC Gate Firmware R W RC Gate Proxy Server R W Notify Functional Problems of Device R W 9 Checking Operation Privileges 364 ...

Страница 809: ...ns to user operations differ depending on the configurations in Available Settings Settings User Mach N W File Unset Set Webpage Language R R R W R R W R Set URL Target of Link Page R R R W R R W R Set Help URL Target R R R W R R W R WSD UPnP Setting R R R W R R W R Download Help File R W R W R W R W R W R W Web Image Monitor Webpage 365 ...

Страница 810: ...Mach N W File Unset Set Startup Setting R W Extended Feature Info R R R R R R Install R W Uninstall R W Administrator Tools R W Additional Program Startup Setting R W Install Additional Program R W Uninstall Additional Program R W Copy Extended Features R W Copy Card Save Data R W 9 Checking Operation Privileges 366 ...

Страница 811: ...1 R W 1 Data Carry over Setting for Address Book Auto program R W R W 1 R W 1 Maintenance R W R W 1 R W 1 1 If either or both of Restrict Adding of User Destinations Fax or Restrict Adding of User Destinations Scanner of Extended Security are set to On when the machine is configured for basic authentication users can only change the password of their own account Web Image Monitor Address Book 367 ...

Страница 812: ...Web Image Monitor Reset Printer Job These settings are in Device Management Settings User Mach N W File Unset Set Reset Current Job R W Reset All Jobs R W 9 Checking Operation Privileges 368 ...

Страница 813: ...Device Management When administrator authentication is set the restrictions to user operations differ depending on the configurations in Available Settings Settings User Mach N W File Unset Set Reset the Machine R W R W Web Image Monitor Reset the Machine 369 ...

Страница 814: ...tor authentication is set the restrictions to user operations differ depending on the configurations in Available Settings Settings User Mach N W File Unset Set Edit Icons R R W R R R W R Restore Default Icon Display R W R W Home Screen Settings R R W R R R W R 9 Checking Operation Privileges 370 ...

Страница 815: ...b Image Monitor Customize Screen per User Users can change only their own settings Settings User Mach N W File Unset Set Function Priority per User R W R W Web Image Monitor Customize Screen per User 371 ...

Страница 816: ...pends on their access privileges For details see p 375 List of Operation Privileges for Stored Files Settings User Mach N W File Unset Set Print R W R W Send R W R W Delete R W R W R W Edit detailed information Detailed information icon R W R W R W Download R W R W Unlock File R W 9 Checking Operation Privileges 372 ...

Страница 817: ...t R W 1 R W 1 Delete R W 1 R W 1 Download R W 1 R W 1 Edit detailed information Detailed information icon R W 1 R W 1 1 Only the specified user can change a document when the machine is configured with Facsimile Features Reception Settings Stored Reception File User Setting set to On Web Image Monitor Fax Received File 373 ...

Страница 818: ...tication is off The printer documents stored by other users are not displayed Settings User Mach N W File Unset Set Print R W 1 R W 1 Delete R W R W 1 R W 1 Edit detailed information Detailed information icon R W R W 1 R W 1 Unlock Job R W 1 Access to saved documents may be restricted depending on the user s access privileges 9 Checking Operation Privileges 374 ...

Страница 819: ...a user set up as the owner File The file administrator Understanding the symbols R W Can execute Cannot execute Settings Read Edit E D Full Owner File Printing R W R W R W R W R W Details R W R W R W R W R W R W Preview R W R W R W R W R W Change Access Priv Owner R W Change Access Priv Permissions for Users Groups R W R W 1 R W Change User Name R W Change File Name R W R W R W R W 1 Change Passwo...

Страница 820: ... Insert File R W R W R W 1 Delete Pages R W R W R W 1 Print Specified Page R W R W R W R W R W Duplicate File R W R W R W R W R W Delete File R W R W R W 1 R W 1 The owner can change operation privileges 9 Checking Operation Privileges 376 ...

Страница 821: ...The person who knows the user login name and password User The user administrator Understanding the symbols R W Execute change and reading possible R Reading is possible Execute change and reading are not possible Names Settings Read Edit E D Full Entry User Name R R W R W R W R W R W Key Display R R W R W R W R W R W Registration No R R W R W R W R W R W Select Title R R W R W R W R W R W Auth In...

Страница 822: ...ead Edit E D Full Entry User Use Name as R R W R W R W R W R W Protection Code R W 1 R W 1 R W 1 Protection Object R W R W R W R W R W Protect Destination Permissions for Users Groups R W R W R W Protect File s Permissions for Users Groups R W R W R W Fax Dest Settings Read Edit E D Full Entry User Fax Destination R R W R W R W R W R W Select Line R R W R W R W R W R W International TX Mode R R W ...

Страница 823: ...t E D Full Entry User SMB FTP NCP R R W R W R W R W R W SMB Path R R W R W R W R W R W FTP Server Name R R W R W R W R W R W FTP Path R R W R W R W R W R W FTP Port Number R R W R W R W R W R W NCP Path R R W R W R W R W R W NCP Connection Type R R W R W R W R W R W Connection Test R W R W R W R W R W Add to Group Settings Read Edit E D Full Entry User Registration No R R W R W R W R W R W Search ...

Страница 824: ...ns Fax or Restrict Adding of User Destinations Scanner of Extended Security are set to On regardless of the user s operation privileges access to the Address Book is rescinded from any user other than the user administrator 9 Checking Operation Privileges 380 ...

Страница 825: ...stered trademark of Red Hat Inc Solaris is a trademark or registered trademark of Oracle Corporation and or its affiliates Thunderbird is a registered trademark of the Mozilla Foundation UPnPTM is a trademark of the UPnPTM Implementers Corporation Other product names used herein are for identification purposes only and might be trademarks of their respective companies We disclaim any and all right...

Страница 826: ...names of Windows Server 2003 R2 are as follows Microsoft Windows Server 2003 R2 Standard Edition Microsoft Windows Server 2003 R2 Enterprise Edition The product names of Windows Server 2008 are as follows Microsoft Windows Server 2008 Standard Microsoft Windows Server 2008 Enterprise The product names of Windows 2008 R2 are as follows Microsoft Windows Server 2008 R2 Standard Microsoft Windows Ser...

Страница 827: ...rypt User Custom Settings Address Book 263 Encryption key 105 Encryption Key Auto Exchange Settings 151 161 Encryption Key Manual Settings 151 165 Enforced storage of documents 206 Enhance File Protection 263 Erase All Memory 113 Error code 283 Error message 281 ESP Protocol 149 Extended security functions 262 F Firmware validity 270 I IEEE 802 1X 174 device certificate 175 Ethernet 175 site certi...

Страница 828: ...e of Destinations Fax 75 264 Restrict Use of Destinations Scanner 75 264 S S MIME 142 Scan to Media 82 Security for the fax function 270 Security for the scanner function 270 Self signed certificate 132 Service Mode Lock 272 Settings by SNMPv1 v2 266 SNMPv3 179 SSL for SMTP connections 140 SSL TLS 136 SSL TLS encryption mode 139 Supervisor 25 System status check 270 T Trademarks 381 Transfer to Fa...

Страница 829: ......

Страница 830: ...EN GB EN US EN AU D143 7040 2011 ...

Отзывы: