38
Tutorial 2: Drawing shapes to create an embroidery design
Step 5
Editing points and modifying
shapes
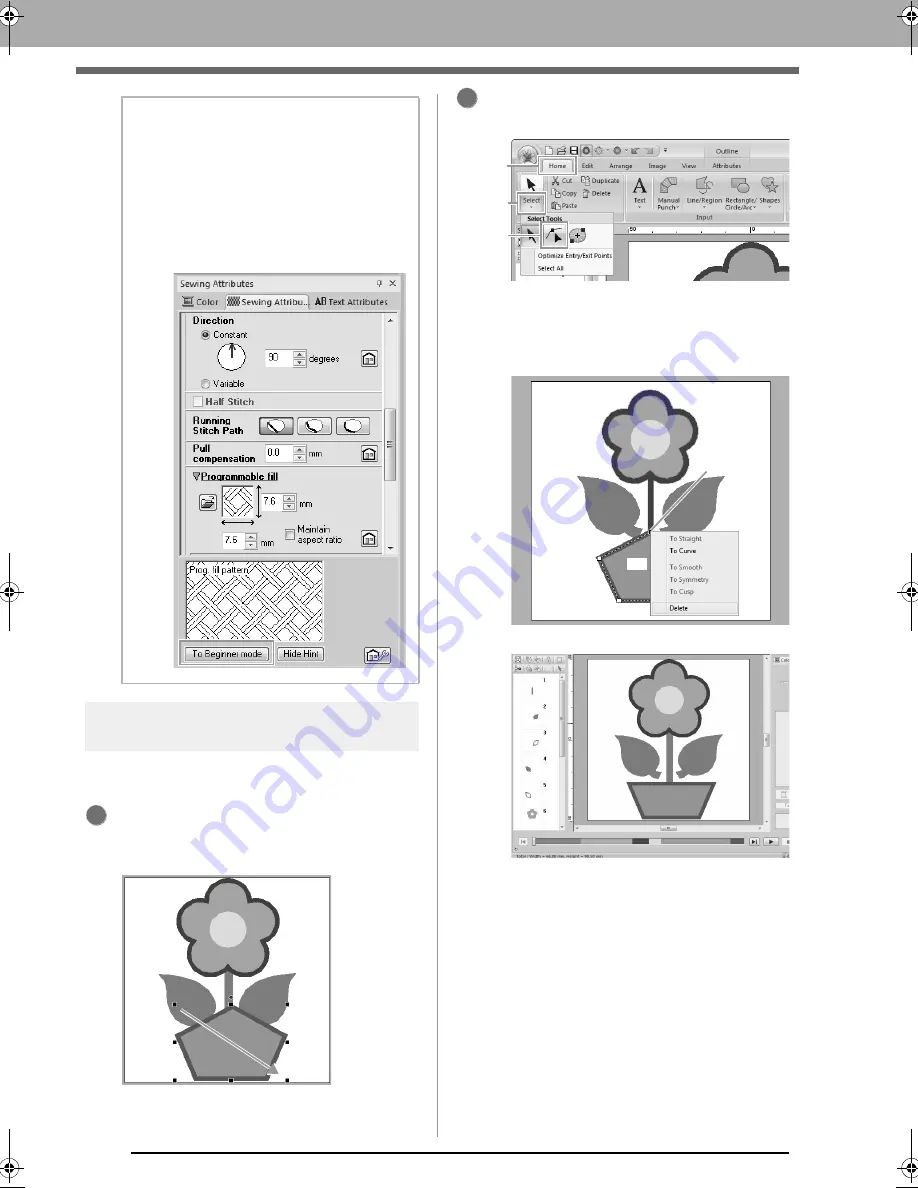
Now, we will delete one corner from the pentagon to
create a flowerpot.
Draw the flowerpot.
Drag the pointer in the Design Page, as shown
in the illustration.
Delete a point.
(A) Click
1
, then
2
, then
3
.
(B) Click the shape for the flowerpot.
The points in the shape appear.
(C) Right-click the top point to be deleted, and
then click
Delete
.
The point is deleted to form a trapezoid.
c
For details on saving embroidery
patterns, refer to “Saving” on page 81. For
details on transferring designs to an
embroidery machine, refer to
“Transferring Embroidery Designs to
Machines” on page 174.
b
Memo:
• If the dialog box is displayed in Expert
mode, click
To Beginner mode
to display
the dialog box in Beginner mode.
• More detailed settings can be specified in
Expert mode.
c
“Specifying sewing attributes” on
page 58.
1
2
1
2
3
(C)
(B)
XE8656-001.book Page 38 Monday, May 24, 2010 5:44 PM
Содержание PE-Design Next
Страница 1: ...Instruction Manual ...
Страница 32: ...30 Tutorial 1 Getting Started ...
Страница 175: ...Transferring Data This section describes operations for transferring embroidery designs to embroidery machines ...
Страница 184: ...182 Using the Link Function to Embroider From the Computer ...
Страница 230: ...228 Outputting a Catalog of Embroidery Designs ...
Страница 247: ...Font Creator Custom fonts can be created using Font Creator These fonts can be recalled to be used in Layout Editing ...
Страница 268: ...266 Changing the Settings ...
Страница 269: ...Supplement This section provides hints and detailed techniques for creating even more attractive embroidery ...
Страница 320: ...English XE8656 001 Printed in China ...


