


DS300f G2 Series User Manual
141
10. Highlight
Save Logical Drive
and press
Enter
.
The screen returns to Disk Array Migration Logical Drives.
At this point, if you have other logical drives in the same disk array, you can choose them for migration
at the same time.
11. Highlight
Complete Disk Array Migration
and press
Enter
.
12.
Press Y to confirm.
The screen returns to Disk Arrays Summary.
For migration rate, see "Making Background Activity Settings (CLU)" on page 154.
c
reatInG
a
lun c
lone
(clu)
A LUN clone is an exact copy of the original LUN or logical drive, including all the data it contains, at one point
in time. Use a LUN clone as a backup or to migrate a LUN from one system to another.
Important
The action of creating a LUN momentarily takes the original LUN or logical drive offline,
meaning nobody can read or write to it.
A LUN clone has the same capacity, stripe size, read and write policies as the orignal LUN. However, the LUN
clone can be a different RAID level. The choice of RAID levels depends on the disk array. And if you have multiple
disk arrays, you can create the LUN clone on a different disk array than the original LUN.
This action requires
Super User
or
Power User
privileges.
To create a LUN clone of a logical drive:
1. From the Main Menu, highlight
Logical Drive Management
and press
Enter
.
2. Highlight the logical drive you want to clone and press
Enter
.
3. Highlight
LUN Clone
and press
Enter
.
4.
Highlight the RAID Level of Copies field, type the RAID level you want.
5. Highlight Save Settings and Continue and press
Enter
.
6. Highlight the disk array you want to use and press the Spacebar to mark it.
7. Highlight Save Settings and Continue and press
Enter
.
8.
Highlight the Number of Copies field and type the number of LUN clones you want to create.
You can create up to 8 clones of a LUN at a time.
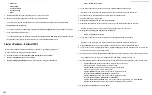
3. Highlight
Locate Logical Drive
and press
Enter
.
The drive carrier status LEDs flash for one minute.
Figure 5 - 6: Drive carrier status LED
m
IGratInG
a
l
oGIcal
D
rIve
(clu)
In order to migrate RAID level, you may have to add physical drives. For more information, see "RAID Level
To migrate a logical drive:
1. From the Main Menu, highlight
Disk Array Management
and press
Enter
.
2. Highlight the disk array you want and press
Enter
.
3. Highlight
Background Activities
and press
Enter
.
4. Highlight
Migration
and press
Enter
.
5. Highlight the physical drives you want to add and press the spacebar to choose them.
Note
You can add physical drives to a RAID 50 or 60 array but you cannot change the number of axles.
If you add an odd number of physical drives to a RAID 10 array, it becomes a RAID 1E array by
default.
6. Highlight
Save Settings and Continue
and press
Enter
.
7. Highlight a logical drive in the list that you want to migrate and press
Enter
.
8. Highlight
RAID Level
and press the spacebar to toggle through the available RAID levels.
9. Optional. If you want to increase capacity of the logical drive, highlight
Expand Capacity
and press the
spacebar to toggle to
Yes
.
Highlight
Capacity
, press the backspace key to erase the current capacity and type in the new value.
The new value must be equal or larger than the current capacity.
Drive Status LED
Power/Activity LED
Содержание DS300 G2 Series
Страница 1: ...ASUS Storage DS300 G2 Series ...
Страница 11: ......
Страница 34: ......
Страница 38: ......
Страница 262: ......


