34
MAINTENANCE
ENGLISH
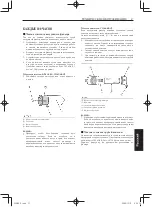
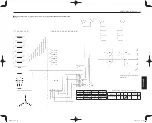
(1) Plug
(A) ”HIGHEST LEVEL”
(B) ”LOWEST LEVEL”
IMPORTANT:
¡
Connect the charger positive terminal to the
battery positive terminal, and negative to the
negative.
¡
When disconnecting the cable from the battery,
start with the negative terminal first.
When connecting the cable to the battery, start
with the positive terminal first.
If reversed, the contact of tools on the battery may
cause a shortage.
�
Direction for Long Term Storage
1. When storing the generator for long periods of
time, remove the battery, adjust the electrolyte to
the proper level, and store in a dry and dark place.
2. The battery naturally discharges while it is stored.
Recharge it once a month in summer, and every 2
months in winter.
�
Battery Boost Starting
3
DANGER
To avoid serious personal injury.
¡
¡
¡
¡
¡
Battery gases can explode.
Keep cigarettes, sparks, and
flames away from battery.
¡
¡
¡
¡
¡
If generator battery is frozen, do
not battery boost start engine.
¡
¡
¡
¡
¡
DO NOT connect other end of
negative
1
1
1
1
1
jumper cable to
n e g a t i v e
1
1
1
1
1
t e r m i n a l o f
generator battery.
When battery boost starting engine, follow the
instructions below to safely start the engine.
1.
Bring helper battery of the same voltage as
disabled generator within easy cable reach.
2.
Put on safety goggles and rubber gloves.
3.
Ensure the vent caps are securely in place. (if
equipped)
4.
Cover vent caps with damp rags. Do not allow the
rag to touch the battery terminals.
5.
Attach the red clamp to the positive (red,
2
or
pos.) terminal of the dead battery and clamp the
other end of the same cable to the positive (red,
2
or pos.) terminal of the helper battery.
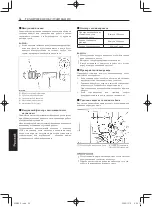
(1) Dead battery
(2) Lay a damp rag over vent caps.
(3) Jumper cables
(4) Engine block or frame
(5) Helper battery
6. Clamp the other cable to the negative (black,
1
or
neg.) terminal of the helper battery.
7. Clamp the other end to the engine block or frame
of the generator as far from the dead battery as
possible.
8. Start the disabled generator.
9. Disconnect the jumper cables in the exact reverse
order of attachment. (Steps 7, 6 and 5).
10. Remove and discard the damp rags.
IMPORTANT:
¡
This machine has a 12 volt negative
1
ground
starting system.
¡
Use only same voltage for jump starting.
¡
Use of a higher voltage source on generators
electrical system could result in severe damage to
generators electrical system.
F-5709
Installation
1. Turn the main switch to the "STOP" position to
prevent an accidental short circuit.
2. Install the battery on the battery mount tray securely.
TIP
Clamp the red wire to the positive (+) terminal and the
black wire to the negative (-) terminal of the battery. Do
not reverse these positions.
IMPORTANT:
¡
Connect the charger positive terminal to the
battery positive terminal, and negative to the
negative.
¡
When disconnecting the cable from the battery,
start with the negative terminal first.
When connecting the cable to the battery, start
with the positive terminal first.
If reversed, the contact of tools on the battery may
cause a shortage.
�
Direction for Long Term Storage
1. When storing the generator for long periods of
time, remove the battery, adjust the electrolyte to
the proper level, and store in a dry and dark place.
2. The battery naturally discharges while it is stored.
Recharge it once a month in summer, and every 2
months in winter.
�
Battery Boost Starting
3
DANGER
To avoid serious personal injury.
¡
¡
¡
¡
¡
Battery gases can explode.
Keep cigarettes, sparks, and
flames away from battery.
¡
¡
¡
¡
¡
If generator battery is frozen, do
not battery boost start engine.
¡
¡
¡
¡
¡
DO NOT connect other end of
negative
1
1
1
1
1
jumper cable to
n e g a t i v e
1
1
1
1
1
t e r m i n a l o f
generator battery.
(1) Plug
(A) "HIGHEST LEVEL"
(B) "LOWEST LEVEL"
9CGNO̲E̲p00-40.indd 50
2009/11/17 16:31:42
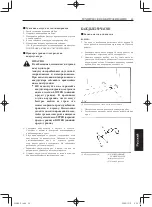
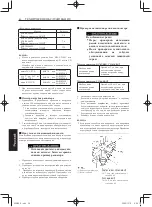
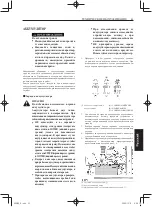
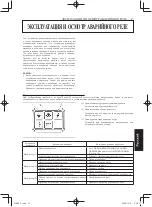
Соедините кабели в
пронумерованном порядке. После
использования отсоедините в
обратном порядке.
ТЕХНИЧЕСКОЕ ОБСЛУЖИВАНИЕ
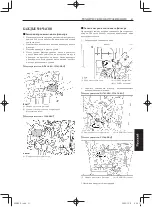
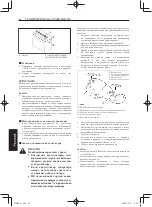
(1) Пробка
(A) «ВЕРХНИЙ УРОВЕНЬ»
(B) «НИЖНИЙ УРОВЕНЬ»
Установка
1. Поверните главный переключатель в положение
«STOP», чтобы предотвратить случайное короткое
замыкание.
2. Прочно установите аккумулятор на поддон для
аккумулятора.
Подключите красный провод к положительной (+) клемме
аккумулятора и черный провод к отрицательной (-) клемме.
Не меняйте полярности этих положений.
ВАЖНО:
•
Подсоединяйте положительную клемму зарядного
устройства к положительной клемме аккумулятора, а
отрицательную клемму – к отрицательной.
•
При отсоединении проводов от аккумулятора сначала
отсоединяйте отрицательную клемму. При подсоединении
проводов к аккумулятору сначала подсоединяйте
положительную клемму. Если это выполнять в обратном
порядке, прикосновение инструмента к аккумулятору
может вызвать короткое замыкание.
Инструкции по длительному хранению
1. Если аккумулятор помещается на длительное
хранение, снимите его, обеспечьте необходимый
уровень электролита и поместите на хранение в сухом,
темном месте.
2. Аккумулятор самопроизвольно разряжается во время
хранения. Заряжайте его раз в месяц в летнее время и
раз в 2 месяца зимой.
Запуск от внешнего аккумулятора
ОПАСНО
Во избежание серьезных травм:
•
Выделяемые аккумулятором газы
взрывоопасны. Держите зажженные
сигареты, искры и пламя подальше
от аккумулятора.
•
Если аккумулятор генератора
замерз, не запускайте двигатель
от внешнего аккумулятора.
•
НЕ подсоединяйте другой конец
отрицательного провода для запуска от
внешнего источника к отрицательной
клемме аккумулятора генератора.
■
■
■
При запуске двигателя от внешнего аккумулятора следуйте
приведенным ниже инструкциям для безопасного запуска
двигателя.
1. Поставьте внешний аккумулятор, имеющий такое
же напряжение, что и разряженный аккумулятор
генератора, на расстоянии длины провода.
2. Наденьте защитные очки и резиновые перчатки.
3. Проверьте, чтобы вентиляционные пробки находились
на месте (если имеются).
4. Накройте вентиляционные пробки влажной тряпкой.
Не допускайте, чтобы тряпка касалась клемм
аккумулятора.
5. Подсоедините красный зажим к положительной
(красной,
или pos.) клемме разряженного
аккумулятора и подсоедините другой зажим того
же провода к положительной (красной, или pos.)
клемме внешнего аккумулятора.
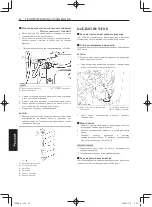
(1) Разряженный аккумулятор
(2) Положите мокрую тряпку на вентиляционные пробки
(3) Провода для запуска от внешнего источника
(4) Блок двигателя или рама
(5) Внешний аккумулятор
6. Подсоедините зажим другой провод к отрицательной
(черной, или neg.) клемме внешнего аккумулятора.
7. Подсоедините другой зажим этого провода к блоку
двигателя или раме генератора как можно дальше от
разряженного аккумулятора.
8. Запустите генератор.
9. Отсоедините провода для запуска от внешнего
источника в порядке, в точности противоположном
порядку подсоединения. (Шаги 7, 6 и 5).
10. Уберите и утилизируйте мокрые тряпки.
ВАЖНО:
•
Генератор имеет 12 В систему запуска с отрицательным
заземлением.
•
Используйте то же самое напряжение при запуске от
внешнего источника.
•
Использование источников с более высоким
напряжением на электрической системе генераторов
может серьезно ее повредить.
9CGNO_R.indb 34
2009/12/11 9:50:18
Summary of Contents for EDL13000SDE
Page 2: ...9cg cover_blank indd 1 2009 12 22 10 25 35 ...
Page 66: ...9CGNO E p47 indd 2 9CGNO E p47 indd 2 2009 10 26 10 04 12 2009 10 26 10 04 12 ...
Page 105: ...9CGNO ES p00 40 indd 39 9CGNO ES p00 40 indd 39 2009 12 18 16 57 03 2009 12 18 16 57 03 ...
Page 192: ...Ё 䇁 㒓 9CGNO C p41 46 indd 6 9CGNO C p41 46 indd 6 2009 12 15 17 50 33 2009 12 15 17 50 33 ...
Page 194: ...9CGNO C p47 indd 2 9CGNO C p47 indd 2 2009 12 03 15 34 19 2009 12 03 15 34 19 ...
Page 214: ... SPECIFICATIONS 9CGNO_F indb 4 2009 12 11 9 41 22 ...
Page 230: ...20 FONCTIONNEMENT DU MOTEUR 9CGNO_F indb 20 2009 12 11 9 41 29 ...
Page 250: ...40 DEPANNAGE 9CGNO_F indb 40 2009 12 11 9 41 35 ...
Page 256: ...46 SCHEMA DE CABLAGE 9CGNO_F indb 46 2009 12 11 9 41 37 ...
Page 258: ...9CGNO_F indb 48 2009 12 11 9 41 37 ...
Page 278: ... 1 9CGNO E ТЕХНИЧЕСКИЕ ХАРАКТЕРИСТИКИ 9CGNO_R indb 4 2009 12 11 9 50 05 ...
Page 294: ...20 ЭКСПЛУАТАЦИЯ ДВИГАТЕЛЯ 9CGNO_R indb 20 2009 12 11 9 50 13 ...
Page 314: ...40 ПОИСК И УСТРАНЕНИЕ НЕИСПРАВНОСТЕЙ 9CGNO_R indb 40 2009 12 11 9 50 19 ...
Page 320: ...46 МОНТАЖНАЯ СХЕМА 9CGNO_R indb 46 2009 12 11 9 50 21 ...
Page 322: ...9CGNO_R indb 48 2009 12 11 9 50 21 ...
Page 323: ...9CGNO_R indb 48 2009 12 07 17 29 23 ...
Page 325: ... عريب األسالك لشبكة التخطيطى الرسم 46 00AR_9CGN0 indb 46 12 8 2009 9 58 11 AM ...
Page 331: ... عريب وإصالحه اخللل حتري 40 00AR_9CGN0 indb 40 12 8 2009 9 58 07 AM ...
Page 351: ... عريب املحرك تشغيل 20 00AR_9CGN0 indb 20 12 8 2009 9 57 56 AM ...
Page 367: ... عريب املواصفات 4 00AR_9CGN0 indb 4 12 8 2009 9 57 46 AM ...


