background image

4-24

Xerox WorkCentre C226 User Guide

Network Scanner Operation

4.

If required, adjust the resolution setting. (Refer to page 4-37.)

The initial factory setting is "LOWER".

5.

If required, adjust the exposure setting. (Refer to page 4-36.)

The initial factory setting is "AUTO".

6.

If needed, select the file format. (Refer to page 4-38.)

The initial factory setting is "PROGRAMMED".

7.

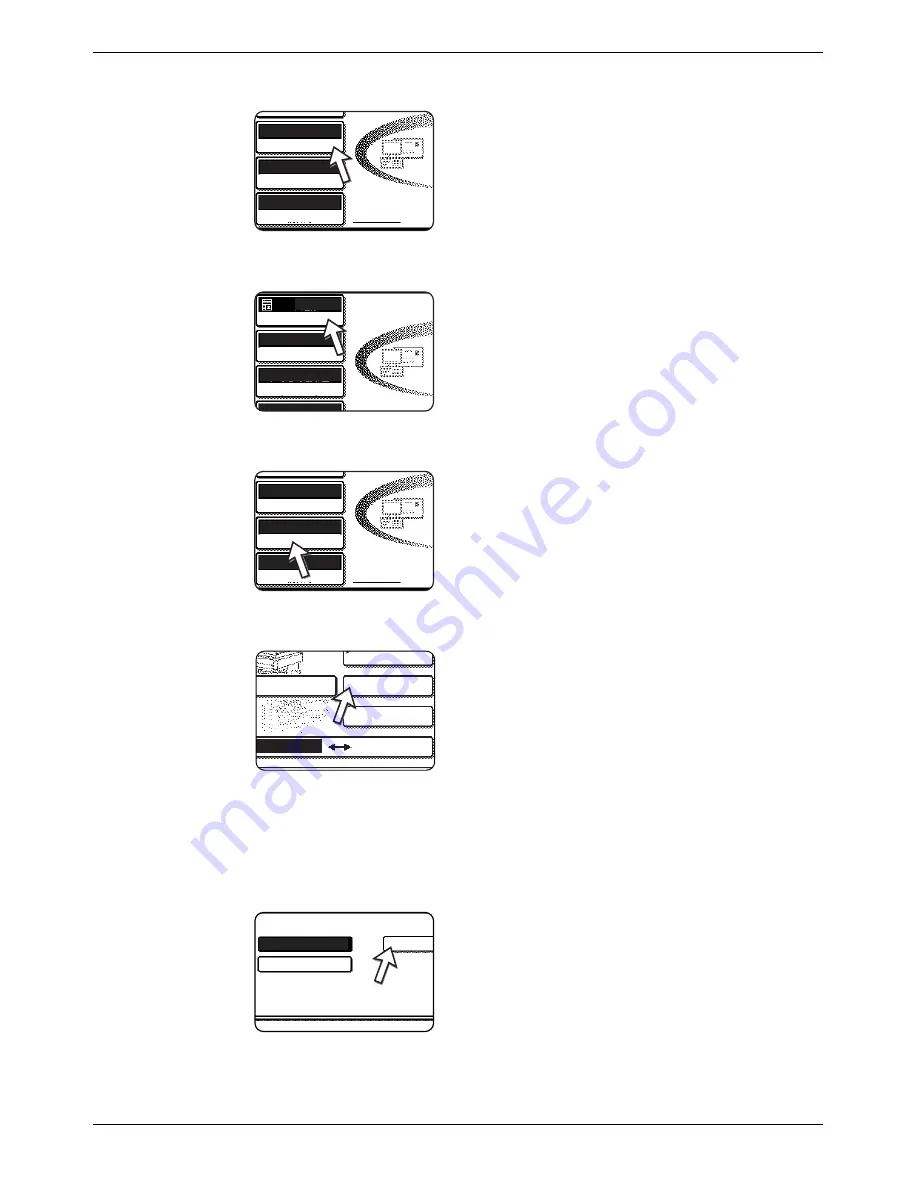
Touch the [SENDER LIST] key.

This step is not necessary for Scan to FTP. Go directly to 
step 10 (page 4-25).

NOTES:

You can omit selection of a sender (go directly to step 10). In this case, the default 
sender information stored with the key operator program is automatically 
transmitted. (page 4-67)

Up to 20 senders can be stored using the Web page. (page 4-16)

8.

Touch a key to select a sender.

The touched key is highlighted. If you made a mistake, 
touch the correct key. The highlighting will move to the 
new key.

The selected sender will be the sender of the e-mail.

Auto    A4    

Original

Lower

Resolution

Exposure

Programmed

File Format

Auto

A4

Lower

Resolution

Auto

Exposure

Programmed

File Format

Auto    A4    

Original

Lower

Resolution

Exposure

Programmed

File Format

-Mail Address

Directory

Address Review

Sender List

Fax

Scanner

2 Group

ABCD PPD

1 Group

der List

Summary of Contents for WorkCentre C226

Page 1: ...Xerox WorkCentre C226 User Guide...

Page 2: ...xcept as allowed under copyright laws Trademark information Microsoft Windows operating system is a registered trademark or trademark of the Microsoft Corporation in the U S A and other countries Wind...

Page 3: ...xix Product Safety Certification xix Regulatory Information for Fax Function xx USA xx FAX Send Header Requirements xx Data Coupler Information xxi Canada xxii Europe xxii Certification to 1999 5 EC R...

Page 4: ...ay 1 23 Setting envelopes or postcards 1 26 Loading paper in the stand 1 Tray Unit 3 Tray Unit 1 28 Specifications stand 1 Tray Unit 3 Tray Unit 1 29 Loading paper in the Duplex Module 2 Tray Unit 1 2...

Page 5: ...dge replacement and staple jam removal 1 61 Staple cartridge replacement 1 61 Staple jam removal 1 63 Disposal of hole punch scrap when the punch unit is installed 1 66 Misfeed in the Saddle Stitch Fi...

Page 6: ...e DADF 2 19 Copying from the document glass 2 21 1 sided copies of 1 sided originals 2 21 Automatic two sided copying from the document glass 2 24 Exposure Adjustments 2 25 Reduction Enlargement Zoom...

Page 7: ...inal from the DADF 2 79 User Maintenance for copying 2 81 Cleaning the Original Scanning Area 2 82 Troubleshooting 2 83 3 Printer Operation Basic Printing Procedures 3 1 Setting the Printer Drivers 3...

Page 8: ...ges 3 40 Accessing Web pages and displaying help 3 40 Items and outline of menu frame of Web pages 3 42 System Information 3 42 Device Setup 3 43 Network Setup 3 44 Printer Configuration Settings 3 44...

Page 9: ...the Network Scanner Function 4 3 Settings and Programming Required for the Network Scanner Feature 4 4 Accessing Web Pages 4 4 About the Web Page 4 5 Basic Settings for Network Scanning 4 6 Enable sca...

Page 10: ...tings 4 34 Manually Setting the Scanning Size 4 34 Selecting the Exposure 4 36 Change the exposure 4 36 Selecting the Resolution 4 37 Change the resolution 4 37 Selecting the File Format 4 38 Cancelli...

Page 11: ...scan 4 68 Default exposure settings 4 68 Disable of address direct entry 4 69 Specifications 4 70 Scanning margins 4 71 5 Fax Unit To Use this Product Correctly as a Fax Device 5 1 Important Safety In...

Page 12: ...p a Timer Transmission 5 33 Transmission and Reception Using the Polling Function 5 34 Using the Polling Function 5 36 Using Polling Memory 5 38 Own Number Sending 5 42 Faxing a Divided Original Dual...

Page 13: ...Keys 5 72 Storing a Group Key 5 74 Editing and Deleting Group Keys 5 76 Storing a Program 5 78 Editing and Deleting Programs 5 80 Storing a Group Index 5 80 Programming Editing and Deleting F Code Mem...

Page 14: ...xiv Xerox WorkCentre C226 User Guide...

Page 15: ...d safe operation of your product The safety and environment testing and performance of this product have been verified using Xerox materials only WARNING Any unauthorized alternation which may include...

Page 16: ...l be described in the user documentation supplied with the product Do not to carry out any maintenance on this product which is not described in the customer documentation Cleaning Your Product Before...

Page 17: ...at all times Do These Always connect equipment to a correctly grounded power outlet If in doubt have the outlet checked by a qualified electrician This equipment must be connected to a protective ear...

Page 18: ...ners The use of cleaners that are not approved may cause poor performance of the equipment and could create a dangerous condition Use supplies and cleaning materials only as directed in this manual Ke...

Page 19: ...rence to radio communications Operation of this equipment a residential area is likely to cause harmful interference in which case the user will required to correct the interference at his own expense...

Page 20: ...adiation from the ISM equipment may have to be limited or special mitigation measures taken WARNING This is a Class A product In a domestic environment the product may cause radio frequency interferen...

Page 21: ...the product identifier that has the format US XRXMM07BZSA1 The digits 07 are the REN without a decimal point e g 07 is a REN of 0 7 For earlier products the REN is separately shown on the label If thi...

Page 22: ...ication to 1999 5 EC Radio Equipment Telecommunications Terminal Equipment Directive This Xerox product has been self certified by Xerox for pan European single terminal connection to the analogue pub...

Page 23: ...tate and or shut off completely after a specified period of use These energy saving features can reduce product energy consumption in half when compared to conventional equipment Canada Environmental...

Page 24: ...r the sale of such bonds Internal Revenue Stamps If it is necessary to reproduce a legal document on which there is a canceled revenue stamp this may be done provided the reproduction of the document...

Page 25: ...1 Current bank notes or current paper money 2 Obligations or securities of a government or bank 3 Exchequer bill paper or revenue paper 4 The public seal of Canada or of a province or the seal of a pu...

Page 26: ...Recycling and Disposal Xerox operates a worldwide equipment takeback and reuse recycle program Contact your Xerox sales representative 1 800 ASK XEROX to determine whether this Xerox product is part...

Page 27: ...ng during use of the product or its options or failures due to incorrect operation of the product and its options or other failures or for any damage that occurs due to use of the product The display...

Page 28: ...uide General Information 3 Do not install your machine in areas that are exposed to direct sunlight poorly ventilated subject to extreme temperature or humidity changes e g near an air conditioner or...

Page 29: ...his machine Pull out the four handles as shown below grasp them firmly and keep the machine horizontal while moving it CAUTION Two people are required to lift and carry this machine If the machine has...

Page 30: ...l stand paper tray units These adjusters should be lowered until they contact the floor When moving the machine with the optional stand paper tray be sure to raise the adjusters Also unlock the two ca...

Page 31: ...tions For disposal or recycling information please contact your local authorities or the Elec tronics Industries Alliance www eia org Introduction To gain the maximum benefits in using this product it...

Page 32: ...een landscape and portrait the landscape orientation size indication will contain an R These are indicated as A4R B5R 8 1 2 x 11 R 5 1 2 x 8 1 2 R etc Sizes that can be placed only in the landscape or...

Page 33: ...tal data enabling the following advanced image processing features Photo Repeat Up to 24 full size copies of a photo image can be made on a single sheet of paper page 2 62 Multi shot Up to four origin...

Page 34: ...he time set in the key operator programs elapses when the machine is on standby This mini mizes the power used by the machine while on standby When this mode activates the touch panel screen turns off...

Page 35: ...in the fusing unit or the transfer unit DADF Duplex Automatic Document Feeder This automatically feeds originals to be scanned The feeder can turn the original over and scan the back side as well as...

Page 36: ...lex Module 2 Tray Unit See page 1 30 Paper tray Each tray can hold approximately 500 sheets of the recommended paper for colour 80 g m2 or 21 lbs or approximately 500 sheets of Xerox standard paper 80...

Page 37: ...The fusing unit is hot Take care in removing misfed paper Toner cartridge The toner cartridge must be replaced when indicated on the operation panel see page 1 42 Right side cover Open when a misfeed...

Page 38: ...o sided printing and two paper trays The two trays can hold approximately 500 sheets of the recommended paper for colour 80 g m2 or 21 lbs or approximately 500 sheets of Xerox standard paper 80 g m2 o...

Page 39: ...the fax function Fax Expansion Memory 8 MB This adds memory for use by the fax function 256 MB Memory Kit This adds memory that is used for the copy function printer function and scanner function Fac...

Page 40: ...tails see page 1 16 Mode select keys and indicators Use to change modes and the corresponding display on the touch panel PRINT key READY indicator DATA indicator Press to enter the printer mode READY...

Page 41: ...to clear a copy quantity entry If this key is pressed while the DADF is being used any originals in progress will be automatically output This key is used in copy mode network scanner mode 1 and fax...

Page 42: ...ed The confirmation beeps can be disabled by a key operator program The touch panel screens shown in this manual are printed images and may appear different from the actual screens Selection of functi...

Page 43: ...The screen below is an example and differs from actual screens Job list This shows the current job and the jobs waiting to be run The icons to the left of the jobs in the queue show the job mode Copy...

Page 44: ...ey This displays the transmission reception status and finished jobs of fax mode when the fax option is installed Display switching keys Use to switch the page of the displayed job list STOP DELETE ke...

Page 45: ...number in the setting screen of the printer driver on your computer in order to print When the account counter is turned on the following messages appear on the touch panel There are two types of pro...

Page 46: ...for several seconds and then changes to the following message NOTE If Account number security is turned on in the key operator programs the following message will appear in the event that an incorrect...

Page 47: ...Tray 1 you must change the paper type and size settings as explained in Setting the paper type except the Bypass Tray on page 1 33 Do not place heavy objects or press hard on any tray which is pulled...

Page 48: ...ins in the tray remove it 2 Adjust the paper size slide to the paper size Move the paper size slide right or left to indicate the paper size being loaded If a special size paper is loaded in the paper...

Page 49: ...is not set correctly after changing the paper size or if the paper type page 1 33 is not set correctly incorrect paper selection or paper misfeeding may occur Loading paper in the Bypass Tray The Byp...

Page 50: ...ay not display correctly To support papers that extend past the tray extension pull out the wire extension 2 Set the Bypass Tray guides to the width of the copy paper 3 Insert the copy paper all the w...

Page 51: ...A6 paper A5 paper 5 1 2 x 8 1 2 paper and postcards as shown in the diagram below A6 paper post cards A5 paper 5 1 2 x 8 1 2 paper When loading plain paper other than paper recommended for colour Xero...

Page 52: ...e orientation shown below Loading postcards Insert the postcard with the side to be printed on facing up The postcard should be oriented as shown in the diagram Loading envelopes Only the front side o...

Page 53: ...ree layer or four layer envelopes Print quality is not guaranteed on envelopes having peel off flaps for sealing the enve lopes Fusing unit pressure adjusting levers In some cases damage to the envelo...

Page 54: ...loaded in these trays The method of loading paper is the same as for Paper Tray 1 in the main unit see the explanation on page 1 21 The stand 1 Tray Unit only has the upper tray NOTE If the size of pa...

Page 55: ...ifferent from the previous size or is an extra size or if the paper type is different from the previous type you must change the paper tray settings in the custom settings Change the settings as expla...

Page 56: ...rom the main unit Dimensions 600 mm W x 642 mm D x 403 mm H 23 5 8 W x 25 9 32 D x 15 7 8 H not including the adjuster Weight Approximately 31 kg or 68 3 lbs Duplex Module Size of plain paper A3 B4 A4...

Page 57: ...x18 Special paper weight 201 to 300 g m2 54 to 80 lbs Transparency film Transparency film Envelopes Standard size envelopes that can be used COM10 Monarch DL C5 C Stand 1 Tray Unit Tray 2 Same as pap...

Page 58: ...t tray Paper in AB system Paper in inch system A6R A3W 5 1 2 x8 1 2 12 x18 Plain paper Xerox standard paper 80g m2 21 lbs Restrictions on paper other than Xerox stan dard paper 64 to 105g m2 or 17 to...

Page 59: ...d toner fusibility of special papers may change due to ambient conditions operating conditions and paper characteristics resulting in image quality inferior to that of Xerox standard paper Various typ...

Page 60: ...t an extra size is being used It does not inform the specific size To enter the specific size of the paper loaded follow the steps below For example if 8 1 2 x 11 size paper is loaded in the tray with...

Page 61: ...nd enter the dimensions for Y The permitted range for the X dimension is 139 to 432 mm 5 1 2 to 17 inches and the permitted range for the Y dimension is 182 to 297 mm 7 1 4 to 11 3 4 inches When both...

Page 62: ...tep 3 If you touched TRANSPARENCY go to step 4 If you touched ENVELOPE go to step 5 3 Touch HEAVY PAPER 1 or HEAVY PAPER 2 and go to step 6 For the types of heavy paper that can be used see page 1 32...

Page 63: ...d range for the X dimension is 139 to 432 mm 5 1 2 to 17 inches and the permitted range for the Y dimension is 100 to 297 mm 4 to 11 3 4 inches 7 Touch the OK key to complete the setting Custom Settin...

Page 64: ...istration Guide These settings can be configured if the fax function or network scanner function is available For the detailed descriptions and use of the settings listed below see Chapter 5 Fax Unit...

Page 65: ...e information on setting procedures In the following type of screen a setting is turned on when a checkmark appears next to the key A check mark will appear or disappear by alternate touches of the ch...

Page 66: ...itted using the fax function and scanned using the network scanner function The number of sheets used by optional equipment such as the DADF and the Duplex Module of the Duplex Module 2 Tray Unit and...

Page 67: ...and paper size Auto matic tray switching to another paper tray is used to automatically switch to another tray with the same size and type of paper in the event that the paper runs out during continu...

Page 68: ...he toner cartridge If copy images do not improve even after following this procedure replace the toner cartridge with a new cartridge If one of the toners is out including black toner colour copying w...

Page 69: ...ull the toner cartridge toward you Hold the toner cartridge with both hands as shown in the illustration and pull it out of the machine 4 Remove a new toner cartridge from the package and shake it hor...

Page 70: ...on 7 Push the cartridge in until it locks securely in place NOTE Do not push the white area shown in the illustration The lock lever may come down 8 Return the cartridge lock lever 9 Close the front c...

Page 71: ...ay not distribute well even after shaking the cartridge vigorously and will remain inside the cartridge without flowing out Supply and Consumables The supply of spare parts for a repair of the applian...

Page 72: ...ful not to tear the misfed paper during removal If paper is accidentally torn during removal be sure to remove all pieces Take care not to damage or leave fingerprints on the transfer belt when removi...

Page 73: ...e the paper may become torn and difficult to remove To prevent this from happening always open the right side cover first and remove the misfed paper if it is extending into that area Misfeed in Tray...

Page 74: ...he tray firmly all the way into the machine 5 Gently close the upper side cover After closing confirm that the misfeed message has been cleared and the normal display appears Misfeed in the Bypass Tra...

Page 75: ...ray before opening the side cover Be careful not to tear the misfed paper during removal NOTE The misfeed may have occurred inside the machine Check carefully and remove it 2 Gently close the upper si...

Page 76: ...remove the misfed paper as shown in the illustra tion taking care not to tear the paper Upper exit tray Gently remove the misfed paper as shown in the illustra tion taking care not to tear the paper F...

Page 77: ...ny metal parts 3 Misfeed in the transfer unit If paper is misfed on the transfer belt remove it gently without touching the transfer belt Do not pull out the transfer unit The transfer unit is hot Tak...

Page 78: ...a 1 Open the upper and lower side covers NOTE If paper is loaded in the Bypass Tray temporarily remove the paper and close the Bypass Tray before opening the side cover 2 Remove the misfed paper NOTE...

Page 79: ...it NOTE Paper misfed from a paper tray may be extending out of the tray into the right side cover area In this case if the tray is drawn out of the machine the paper may become torn and difficult to r...

Page 80: ...ding the exit tray up remove the misfed paper as shown in the illustration Be careful not to tear the misfed paper during removal 7 Close the cover of the Duplex Bypass Inverter Unit and return the ex...

Page 81: ...paper from the Duplex Module 11 Gently close the Duplex Module Push the tray firmly all the way into the machine 12 Gently close the Duplex Bypass Inverter Unit Misfeed in the upper or lower tray To r...

Page 82: ...hine does not operate Printer plugged in Plug the printer into a grounded outlet Power switch on Turn on the power switch READY indicator off The printer is warming up Warm up time is approximately 99...

Page 83: ...deviations occur When printing in colour character and colour deviations appear Perform colour registration as explained in the Key Operator Programs section of the WorkCentre C226 System Adminis trat...

Page 84: ...Printed paper is wrinkled or the image rubs off easily Is paper other than Xerox recommended paper being used Use Xerox recommended paper Is paper size or weight out of the allow able range Use paper...

Page 85: ...offset tray during printing as the tray moves up and down To install the Saddle Stitch Finisher a Duplex Bypass Inverter Unit and either a stand 1 Tray Unit a 3 Tray Unit or a Duplex Module 2 Tray Un...

Page 86: ...et function operates when Yes is selected and doesn t operate when No is selected The offset checkmark is automatically cleared when the staple sort function is turned on CENTRE TRAY key If the centre...

Page 87: ...he operation panel Follow the procedure below to replace the staple cartridge or remove jammed staples Staple cartridge replacement 1 Open the front cover 2 Pull out the stapler section 3 Turn roller...

Page 88: ...OTES Do not remove the tape from the cartridge before inserting the staple cartridge into the box Make sure that the new staple cartridge is locked securely in the staple box Press down on the staple...

Page 89: ...Finisher and slide it away from the main unit 2 Open the front cover 3 Turn roller rotating knob C as shown in the illustration until the blue indication is seen 4 Remove the paper from the stapler c...

Page 90: ...during removal 7 Close the saddle stitch section cover 8 Pull out the stapler section 9 Turn roller rotating knob A in the direction of the arrow to move the staple unit to the front Turn the roller...

Page 91: ...staple box Remove the top staple if it is bent If bent staples remain a staple jam will occur again 12 Return the lever to its original position 13 Reinstall the staple box Push the staple box in unti...

Page 92: ...al of hole punch scrap when the punch unit is installed 1 Unlatch the Saddle Stitch Finisher and slide it away from the main unit 2 Pull out the punch scrap collecting container and empty it Discard t...

Page 93: ...se caution when pulling them apart 2 Remove the misfed paper from the main unit After removing the misfed paper open and close the Duplex Bypass Inverter Unit to reset the jam indicator Misfeed in the...

Page 94: ...he paper gently taking care not to tear it 6 Close the top cover 7 Remove the misfed paper from the stapler compiler Be careful not to tear the misfed paper during removal 8 Open the saddle stitch sec...

Page 95: ...10 Open the front cover 11 Turn roller rotating knob in the direction of the arrow 12 Remove any misfed paper from the saddle stitch tray Be careful not to tear the misfed paper during removal 13 Clo...

Page 96: ...ining paper from the stapler compiler referring to step 4 on page 1 63 Stapling cannot be performed includ ing saddle stitch Message to check the staple unit dis played Remove jammed staples See page...

Page 97: ...page 1 66 Mixed paper sizes Punching is not possible when different paper sizes are mixed together Paper is badly curled and the output paper is not punched Differences in paper quality and type may r...

Page 98: ...osition stapling One position stapling Two position stapling Two position stapling One position stapling One position stapling One position stapling Left binding with two position stapling is not poss...

Page 99: ...e all interrelated The table below shows these relationships Same as above Orientation of original or original data Output result Page 1 Page 3 Page 2 Page 4 Page 1 Page 2 Duplexed Page 3 Page 4 Duple...

Page 100: ...the tray specifications page 1 31 Part name NOTES Do not place heavy objects on the High Capacity Feeder or press down hard on the tray To install the High Capacity Feeder the optional Duplex Module 2...

Page 101: ...paper table will automatically rise to the paper feed position Misfeed in the High Capacity Feeder When a misfeed occurs in the High Capacity Feeder remove the misfed paper follow ing the procedure b...

Page 102: ...to tear the misfed paper during removal After removing the misfed paper close the top cover 5 Push the High Capacity Feeder towards the main unit and latch it into place Gently push the High Capacity...

Page 103: ...WorkCentre C226 User Guide 1 77 8 Gently push the tray back into place The paper feed table automatically rises to the paper feed position Make sure that the paper misfeed screen is cleared and the no...

Page 104: ...1 78 Xerox WorkCentre C226 User Guide General Information...

Page 105: ...r provides basic information necessary for using the copier functions of the machine Please read this chapter before making copies Part Names and Functions The DADF Exterior DADF exit area Finished or...

Page 106: ...or copying and settings that can be selected Touch a key to make a selection The main screen of the copy mode will be displayed when the COPY key is pressed Message display Basic status messages are d...

Page 107: ...dicated by Original tab Touch this tab to manually enter the original size page 2 8 2 Sided Copy display Use to select the duplex copy mode setting pages 2 19 2 24 Special Modes tab Touch to display t...

Page 108: ...t glass may be soiled To prevent incorrect original size detection original misfeeds or smudges on cop ies use the following as a guide for feeding originals Transparency film tracing paper carbon pap...

Page 109: ...objects under the original size detector because they may damage it or the original size may not be detected properly If an original has been placed in the DADF tray of the DADF remove it Otherwise t...

Page 110: ...1 The setting can be changed using Original size detector setting in the key operator programs When the DADF is used these sizes are only supported for one sided originals Group Detectable original si...

Page 111: ...n in the illustration If not staples will be incorrectly positioned and some special features may not give the expected result Example 1 Example 2 DADF tray Document glass DADF tray Document glass DAD...

Page 112: ...is function operates in both the auto paper select or auto image mode Rotation copying can be disabled with a key operator program Selecting the Original Size When the correct original size is not det...

Page 113: ...hen enter the X width and Y length dimensions of the original with the or key The X dimension width is initially selected Touch the Y key and enter the Y dimension length The range of original sizes t...

Page 114: ...ly used original size saves you the trouble of manually setting the size each time you copy that size of document To cancel an original size storing using or deleting operation press the CLEAR ALL key...

Page 115: ...initially selected Enter X and then touch the key to enter Y A width of 64 to 432 mm can be entered in X and a length of 64 to 297 mm can be entered in Y 6 Touch the OK key The original size entered i...

Page 116: ...ier Operation Using a Stored Original Size 1 Follow steps 1 to 2 of Storing or deleting an original size 2 Touch the original size key that you wish to use 3 Touch the OK key The stored original size...

Page 117: ...l Copying This section describes the normal copying procedure Copying from the DADF NOTE Certain restrictions exist depending on the amount of memory installed and the copy settings See Copy mode outp...

Page 118: ...ements must be satisfied Originals of a standard size A3 B4 A4 A4R B5 B5R or A5 11 x 17 8 1 2 x 14 8 1 2 x 11 8 1 2 x 11 R or 5 1 2 x 8 1 2 are set and the auto paper select function is enabled If ori...

Page 119: ...ey to cancel an entry if a mistake has been made 6 Press the COLOUR COPY START or BLACK COPY START key If the C key is pressed while originals are being scanned scanning will stop If copying had alrea...

Page 120: ...riginal No added memory Memory added 128 MB or 256 MB Two sided copying mode Output mode original paper size Sort Group Sort Group One sided copying Colour copying Up to A3 11 x 17 A3W 12 x 18 Black a...

Page 121: ...vary depending on the content of the originals Output mode Original type Original size No added memory Added memory 128 MB 256 MB Colour copying Full colour origi nal mostly text Up to A4 8 1 2 x 11 1...

Page 122: ...ent glass 4 Press the COLOUR COPY START key or the BLACK COPY START key Your copies are printed If Sort was selected n sets of copies will print If Group was selected n copies of each page will print...

Page 123: ...ing the CENTRE TRAY key If a checkmark doesn t appear touch the checkbox Offset width Approximately 30 mm 1 3 10 A3W 12 x 18 paper cannot be offset Automatic two sided copying from the DADF When a Dup...

Page 124: ...ADF tray pages 2 4 to 2 10 2 In the 2 Sided Copy display select a duplex copy mode Note If 2 1 Sided copy mode is desired you must first touch the More key 3 Select the desired duplex copy mode The le...

Page 125: ...which cannot be fed from the DADF such as thick originals open the document cover and copy the originals from the document glass NOTE Certain restrictions exist depending on the amount of memory inst...

Page 126: ...rformed onto the currently selected paper Note The following requirements must be satisfied Originals of a standard size A3 B4 A4 A4R B5 B5R or A5 11 x 17 8 1 2 x 14 8 1 2 x 11 8 1 2 x 11 R or 5 1 2 x...

Page 127: ...that all selections made to that point will be cancelled 5 Use the numeric keys to set the desired number of copies Up to 999 can be set If you are only making a single copy the copy can be made with...

Page 128: ...restrictions on page 2 16 and Guidelines for the number of scannable originals during sort copying on page 2 17 1 Place an original on the document glass pages 2 4 to 2 10 2 On the 2 Sided Copy displ...

Page 129: ...btain the best image quality When a full colour copy is made the image is adjusted in the same way as when TEXT PRTD PHOTO initial settings is selected TEXT PRTD PHOTO TEXT PHOTO TEXT PHOTO PRINTED PH...

Page 130: ...ame way as when TEXT PRTD PHOTO initial settings below is selected TEXT PRTD PHOTO This mode provides the best balance for copying an original which contains both text and printed photographs TEXT PHO...

Page 131: ...Brightness adjustment page 2 57 and single colour copying page 2 60 are not possible The DADF cannot be used It can be used when making black and white copies 3 If a setting other than AUTO has been...

Page 132: ...ion Automatic selection auto image The reduction or enlargement ratio will be selected automatically based on the original size and the selected paper size 1 Place the original in the DADF tray or on...

Page 133: ...for the original size and the selected paper size will be selected and displayed in the copy ratio display NOTE If the message ROTATE ORIGINAL FROM TO is displayed change the orientation of the origi...

Page 134: ...can be used to select any ratio from 50 to 200 in increments of 1 NOTE When the DADF is used the ratio can only be set within the range 50 to 200 1 Place the original in the DADF tray or on the docum...

Page 135: ...ge quickly NOTES Touch a reduction or enlargement key to set the approximate ratio then touch the key to decrease the ratio or the key to increase the ratio The message IMAGE IS LARGER THAN COPY PAPER...

Page 136: ...e copy can be made with the copy number display showing 0 Use the C clear key to cancel an entry if a mistake has been made 8 Press the COLOUR COPY START or BLACK COPY START key If you placed the orig...

Page 137: ...the DADF is used the ratio can only be set within the range 50 to 200 Example Selecting 100 for the length and 50 for the width 1 Place the original in the DADF tray or on the document glass pages 2 4...

Page 138: ...e ratio If you continue to touch either key for 3 seconds the ratio begins to change quickly NOTE Touch a reduction key or an enlargement key to set the approximate ratio then touch the key to decreas...

Page 139: ...ber of copies and then press the COLOUR COPY START or BLACK COPY START key To cancel this function touch the CANCEL key or the XY ZOOM key again as in step 3 on page 2 33 or step 5 on page 2 34 This m...

Page 140: ...pies and press the COLOUR COPY START or BLACK COPY START key If you placed the original on the document glass set the output to Sort you must touch the READ END key after all pages of the original hav...

Page 141: ...age 2 41 DUAL PAGE COPY key This is useful to copy the left and right pages of bound documents without shifting the document on the document glass page 2 42 CENTRING key Use this to centre the copied...

Page 142: ...een This allows you to select the special functions shown below for colour adjustment when making colour copies page 2 51 IMAGE EDIT key Touch this key to display the image edit menu screen This allow...

Page 143: ...g transparency film with insert sheets B W reverse mirror image and A3 11 x 17 full bleed functions do not require setting screens Margin shift The margin shift function will automatically shift the t...

Page 144: ...shift amount The shift amount can be set from 0 to 20 mm in 1 mm incre ments If a Duplex Module 2 Tray Unit and Duplex Bypass Inverter Unit are not installed the margin shift setting for back side co...

Page 145: ...ow lines around the edges of copies caused when heavy paper or a book is used as an original CENTRE ERASE Eliminates shadow lines produced by the bindings of bound documents EDGE CENTRE ERASE Eliminat...

Page 146: ...21 through 2 24 To cancel the erase function touch the CANCEL key on the erase setting screen Dual page copy The dual page copy function produces separate copies of two documents placed side by side...

Page 147: ...will appear in the upper left of the SPE CIAL MODES screen 2 Touch the OK key on the SPECIAL MODES screen Return to the main screen of copy mode 3 Place the originals on the document glass When copyi...

Page 148: ...Centre Erase and Edge Centre Erase cannot be used in combination Centring When the original and copy paper are of different sizes CENTRING is used to shift the image to the centre of the copy paper bu...

Page 149: ...touch the FINISHER TRAY key to set the output tray to the finisher tray 1 Touch the TRANSPARENCY INSERTS key on the SPECIAL MODES screen of the Special Modes tab The TRANSPARENCY INSERTS key is highli...

Page 150: ...r fast printing QUALITY MODE is for a high quality image After touching either key followed by the OK key you will return to the main screen of copy mode About the steps that follow If a DADF is being...

Page 151: ...ARP SHARP Cover original 1 2 3 4 1 2 3 4 3 4 5 1 2 Cover original SHARP Back cover no copying Front cover can copy onto front side SHARP 1 2 3 4 5 One sided originals Two sided copies copying onto a c...

Page 152: ...2 3 4 1 Back cover Front cover not copying onto a cover One sided originals Two sided originals 1 2 3 4 1 2 3 4 4 1 2 3 Front cover One sided originals Two sided originals 1 2 3 4 4 1 2 3 One sided c...

Page 153: ...the copy job If the Saddle Stitch Finisher is to be used for stapling heavy stock cannot be used for the covers see page 1 32 Paper within the range of the stapler must be used About the steps that f...

Page 154: ...icon will appear in the upper left hand corner of the screen 3 Touch the OK key on the SPECIAL MODES screen Return to the main screen of copy mode About the steps that follow If a DADF is being used...

Page 155: ...e primary colours R red G green or B blue page 2 52 SHARPNESS Sharpens or softens image outlines page 2 53 SUPPRESS BACKGROUND Suppresses copying of lighter background areas page 2 54 Special Modes Ma...

Page 156: ...engthens or weakens one of three primary colours red R green G or blue B 1 Touch the RGB ADJUST key on the COLOUR ADJUSTMENTS menu screen 2 Select a colour from R RED G GREEN and B BLUE Only one prima...

Page 157: ...press the COLOUR COPY START key to begin copying To cancel the RGB ADJUST function select the RGB ADJUST function again and touch the CANCEL key step 2 or 3 Sharpness Sharpens or softens image outline...

Page 158: ...unwanted background areas on the original images when copying 1 Touch the SUPPRESS BACKGROUND key on the COLOUR ADJUSTMENTS menu screen The SUPPRESS BACKGROUND setting screen will appear The colour a...

Page 159: ...ouch the CANCEL key step 2 Colour balance This function is used to adjust the colour tone and density of colour copies 1 Touch the COLOUR BALANCE key on the COLOUR ADJUSTMENTS menu screen The COLOUR B...

Page 160: ...gs are the values set with key operator program Initial colour balance setting For this reason the initial settings may not necessarily be 0 the middle indicator position for all levels The initial se...

Page 161: ...h the OK key inside OK key on the BRIGHTNESS setting screen Return to the COLOUR ADJUSTMENTS menu screen 4 Touch the OK key on the COLOUR ADJUSTMENTS menu screen Return to the SPECIAL MODES screen 5 T...

Page 162: ...con will appear at the upper left of the screen to indicate that the function is turned on 3 Touch the OK key inside OK key on the INTENSITY setting screen Return to the COLOUR ADJUSTMENTS menu screen...

Page 163: ...on is used to copy up to four originals collectively in a specified order per sheet of copy paper in any one of four layout patterns page 2 64 A3 FULL BLEED Produces A3 11 x 17 full image copies onto...

Page 164: ...ted single colour 1 Touch the SINGLE COLOUR key on the IMAGE EDIT screen The SINGLE COLOUR setting screen will appear 2 Select the desired colour When one of the keys is touched the single colour icon...

Page 165: ...the copies 1 Touch the MIRROR IMAGE key on the IMAGE EDIT menu screen The MIRROR IMAGE key will be highlighted to indicate that the function is turned on and the mirror image icon will appear in the u...

Page 166: ...sed with A4 8 1 2 x 11 or A3 11 x 17 paper Original size to 130 x 90 mm 3 x 5 Four copies are made on a sheet of A4 8 1 2 x 11 size paper Eight copies are made on a sheet of A3 11 x 17 size paper Two...

Page 167: ...x 17 When making repeat copies of an original size to 57 x 100 mm 2 1 8 x 3 5 8 only A4 8 1 2 x 11 can be selected for the paper size 3 Touch the OK key inside OK key on the PHOTO REPEAT setting scre...

Page 168: ...sired paper size and select the copying mode before selecting the multi shot function on the special modes screen When using the multi shot function the appropriate copy ratio will be automatically se...

Page 169: ...f originals to be copied onto one sheet of copy paper on the multi shot selection screen The orientation of copy paper and the image of the originals may be rotated as needed 3 Select the layout Selec...

Page 170: ...ng used see pages 2 21 through 2 24 To cancel the multi shot function touch the CANCEL key on the multi shot setting screen step 2 A3 11 x 17 Full bleed In other copy modes image loss will occur along...

Page 171: ...Pull out the tray extension and wire extension see page 1 23 5 Touch the More key in the Paper Select display and then select the paper type in the Bypass Tray Touch the PLAIN key or the HEAVY PAPER...

Page 172: ...A system B system Overlap of sections of image There will be a margin around the edges of each copy The original image will be divided and copied onto multiple sheets of paper Areas for overlapping th...

Page 173: ...cate the enlargement sizes that can be selected If an enlargement size is selected first a message will indicate the original sizes that can be selected If a combination is selected for which multi pa...

Page 174: ...s automatically selected Load XXX paper will appear Change the paper in one of the trays or the Bypass Tray to the indicated size of paper 5 Place the original on the document glass in accordance with...

Page 175: ...binding opening from left to right can be selected Four originals will be copied onto one sheet Blank pages may be automatically added at the end depending on the number of the originals A Duplex Modu...

Page 176: ...aper touch the More key in the Copy Ratio display then select the desired size and touch the AUTO IMAGE key The appropriate copy ratio will be selected automatically based on the original size and the...

Page 177: ...gs each time you use them for a copy job Selection for functions stored as part of a job program will not be recalled as part of the program if the function has been disabled or changed by a key opera...

Page 178: ...p 3 and select a different number key NOTE If overwriting of programmed copy settings has been prohibited in the key operator programs you will not be able to store a job program Recalling a job progr...

Page 179: ...rator programs after the job program was stored the changed settings will not be included when the job program is recalled Deleting a stored job program 1 Press the P key 2 Touch the STORE DELETE key...

Page 180: ...step 3 will return but the program will not be deleted If no other programs are to be deleted touch the EXIT key on the screen dis played in step 3 to exit the job program mode NOTE If overwriting of...

Page 181: ...er with the numeric keys The copies you make will be added to the count of the entered account number If the INTERRUPT key is touched while an original is being scanned the interrupt state will begin...

Page 182: ...nd press the BLACK COPY START key Repeat this operation until all originals have been scanned Then touch the READ END key 4 When the interrupt copy job is finished touch the CANCEL key to turn off the...

Page 183: ...w the steps below to remove the misfed original NOTES For misfeed removal in the main unit and other peripheral devices see page 1 46 When a misfeed occurs touch the INFORMATION key to display detaile...

Page 184: ...n the reversing tray open the DADF right side cover and gently remove the original Close the DADF right side cover Check location C Remove the misfed original from the exit area If the misfed original...

Page 185: ...time it is recommended that the following maintenance procedures be performed on a regular basis CAUTION Do not use flammable spray to clean the machine If gas from the spray comes in contact with hot...

Page 186: ...e copies using the DADF use the accessory glass cleaning tool to clean the original scanning area 1 Open the DADF and remove the glass cleaning tool 2 Clean the original scanning area with the glass c...

Page 187: ...the exposure mode set to AUTO The exposure level for AUTO can be adjusted using the Exposure adjust ment key operator program Contact your key operator An appropriate resolution setting for the origi...

Page 188: ...ent job Scanning of origi nals is incomplete Is a message indicating memory is full displayed If the data amount exceeds the limit when using the pamphlet copy or multi shot copy which requires scanni...

Page 189: ...Printer Installation section in the WorkCentre C226 System Administration Guide and install the printer driver from the CD ROM NOTE The WorkCentre C226 comes standard with a WorkCentre C226 PCL Print...

Page 190: ...iven on page 3 2 4 Click the OK button NOTE Settings for the Duplex Module 2 Tray Unit Saddle Stitch Finisher 3 Tray Unit and other optional peripheral equipment can be accessed by right clicking the...

Page 191: ...tomatic is selected and mixed black and colour pages are printed a slower printing speed will result 4 Click the Apply button 5 Click the OK button Printing in Color Mode will now always take place Au...

Page 192: ...ate a docu ment that can be used for test printing To print in black and white select Gray Scale for the Color Mode setting Gray Scale uses only Bk black toner to produce a black and white image Colou...

Page 193: ...NT 4 0 click the Properties button In Windows 2000 click the displayed tab In Windows XP Server 2003 click the Preferences button NOTE For detailed explanations of the following settings see Setting...

Page 194: ...en will appear Adjust the brightness and contrast in the Image field at left page 3 38 When finished go to step 6 6 Click the Paper tab Make sure that the paper size is correct Next configure the Pape...

Page 195: ...eate a document that can be used for test print ing You can have the print driver identify the colours in each page and automatically switch to Color mode when colours other than black and white are u...

Page 196: ...played tab In Windows XP Server 2003 click the Preferences button NOTE For detailed explanations of the following settings see Setting the Printer Driver Properties on page 3 15 4 Click the Color tab...

Page 197: ...ur images and strengthen or weaken the RGB red green and blue colour components Use the Image field to adjust the brightness and contrast of both colour and black and white images page 3 38 When finis...

Page 198: ...ad 1 as an example If you do not have any documents created in WordPad create a docu ment that can be used for test printing To print in colour set the Color Mode setting to Color Both colour and blac...

Page 199: ...the displayed tab In Windows XP Server 2003 click the Preferences button NOTE For detailed explanations of the following settings see Setting the Printer Driver Properties on page 3 15 4 Click the Col...

Page 200: ...Paper Selection settings Auto Select is normally used for both Paper Source and Paper Type When you have completed the settings click the OK button to close the printer properties window NOTE Using t...

Page 201: ...appears Print window in Windows Me Print window in Windows XP 3 In Windows 95 98 Me NT 4 0 click the Properties button In Windows 2000 click the displayed tab In Windows XP Server 2003 click the Pref...

Page 202: ...ct 2 Sided Book or 2 Sided Tablet To use the saddle stitch function select Pamphlet Style and then set Staple to 2 Staples in the Finishing field 4 Click the Paper tab Make sure that the paper size is...

Page 203: ...he Print button in Windows 2000 XP Server 2003 Setting the Printer Driver Properties This section explains how to configure settings in the printer driver The settings are changed in the software appl...

Page 204: ...ain tab is selected The settings and buttons in the screen are explained below Copies Set the number of copies Any number from 1 to 999 can be set Default setting 1 Colour mode display This displays t...

Page 205: ...aper and bind down the middle Default setting 1 Sided 1 The following two formats can be selected for middle binding Tiled Pamphlet Print on paper double the size of the document size selected in the...

Page 206: ...page when a setting other than 1 Up is selected Default setting Not selected User Settings The user can store up to 30 sets of settings allowing the settings to be easily changed by simply selecting...

Page 207: ...onfigure settings for staple or punch finishing Binding Edge When automatic two sided printing is performed the Binding Edge setting is used to determine how the left right and top edges of the front...

Page 208: ...dle Stitch Finisher can automatically place two staples for centreline binding of prints or copies and fold them along the centreline Staple sort mode Collated sets of prints or copies will be stapled...

Page 209: ...x 13 and 8 1 2 x 11 R Stapling capacity Up to 30 sheets of A4R or 8 1 2 x 11 R paper can be stapled up to 25 sheets of other paper sizes Saddle stitch on centrefold line Paper in the portrait directio...

Page 210: ...ivered to the offset tray Saddle stitching and hole punching cannot be selected at the same time The automatic image rotation will not function when the hole punching function is used No Offset Select...

Page 211: ...This setting is used to prevent print jobs from being misplaced When a print job is executed the machine stores it in the hold job list rather than printing it The user can then initiate printing fro...

Page 212: ...ode with password Password entry on the operation panel of the printer is needed to start printing Proof Print mode with password Password entry on the operation panel of the printer is needed to prin...

Page 213: ...t printing be allowed even if a valid account number is not entered turn this setting off In this case pages printed by an invalid account number will be included in the OTHERS count Default Job ID Us...

Page 214: ...tically obtain the User Name and Job Name displayed in the machine s operation panel or whether to use the names entered in this dialog box Not selected The Windows login name will be automatically us...

Page 215: ...normally takes place using the paper size set in the application regardless of the paper size selected in the printer driver When the paper size is not specified in the application the paper size set...

Page 216: ...er type It is also necessary to set the paper type at the operation panel on the machine Default setting Auto Select Tray Status Click this button to display the paper size paper type and paper remain...

Page 217: ...on of transparency insert settings This cannot be selected when two sided printing the staple function or the punch function is selected Advanced settings PCL5c The following screen appears when the A...

Page 218: ...lt setting HP GL 2 Margin Shift Use this setting to shift the document image to move the margin at the left right or top of the paper Select from None 10 mm 20 mm or 30 mm Default setting None One sid...

Page 219: ...Select this setting to print the document as an overlay on a previously created form The form must have been previously stored Default setting No Overlay Edit Click this button to open the overlay se...

Page 220: ...thus reducing bandwith drain Job Compression Use this option to compress the entire job Default setting Medium Bitmap Compression Use this option to compress bitmap images without compressing the ent...

Page 221: ...directly dragging the image with your mouse or by using the scrollbars at the right and bottom of the preview screen Default setting x 0 y 0 NOTE The image that appears in the Watermark Preview is an...

Page 222: ...ny angle from 90 to 90 Default setting 45 Edit Fonts Use this setting to select the font of the currently selected watermark Edit Color Use this setting to adjust the colour of the font of the current...

Page 223: ...ault settings The default settings for the document types are as follows 1 Colour Rendering Select colour matching settings 2 UCR Under Colour Removable Selection Set the proportion of black toner to...

Page 224: ...xt Select whether to print black characters with black toner or with 4 colour CMYK toner Custom Use these settings when you wish to change the default settings for each document type Preview of docume...

Page 225: ...es place If only black is used black and white printing takes place This is convenient when colour and black and white pages are mixed together however the print speed is slower Default setting Color...

Page 226: ...selected when the Color Mode above is set to Gray Scale Speed Select this when you wish to print quickly even if the image quality is inferior Default setting Speed All Text to Black When you wish to...

Page 227: ...tings Color Balance This item is used to adjust the colour saturation and strengthen or weaken the R red G green and B blue components of colour Saturation This adjusts the colour saturation Select a...

Page 228: ...rface card Recommended Web browser Internet Explorer 5 5 or higher Windows 5 1 or higher Macintosh Netscape Navigator 6 0 or higher or equivalent NOTE The following characters cannot be input in the W...

Page 229: ...ction is completed the Web page infor mation of this product will be displayed The Web page information is explained on page 3 42 3 Click the Help button under the menu frame For details of each funct...

Page 230: ...mail delivery from the network scanner Destination E mail addresses and file types as well as information for destination control destination name index name for front panel display etc are configured...

Page 231: ...ormation Configure machine identification information for the status alert E mail function Password The settings and programmed information in the Web page can be protected by click ing Passwords in t...

Page 232: ...he optional Fax Unit is installed Network Setup Network Card A link to the network card Web page for configuring the print server card network interface card is provided The Admin password is the same...

Page 233: ...ter will be listed in the former print conditions 2 Touch the key of the desired item to display its setting screen Detailed descriptions for configuration settings start on page 3 46 3 Touch the desi...

Page 234: ...t to make Default setting 1 The number of copies can be set from 1 to 999 Orientation ORIENTATION allows portrait orientation or landscape orientation to be selected for printing Default setting PORTR...

Page 235: ...characters are used for certain of the symbols in the character code table of the PCL symbol set Use this setting when you need to select symbols that differ by country Default setting 1 Roman 8 See p...

Page 236: ...s turned off If the number of jobs exceeds 99 the job is processed as follows If Hold After Print is executed Printing will be executed but the job will not be held A notice page will be printed See p...

Page 237: ...nt data after completing the print job touch the PRINT AND DELETE THE DATA key To keep the print data after printing touch the PRINT AND SAVE THE DATA key To cancel printing and clear the print data t...

Page 238: ...operator programs that can be accessed depend upon how the product is configured with optional equipment Key operator program list Program name Page Printer Settings Default Settings Prohibit notice p...

Page 239: ...ram list Xerox WorkCentre C226 User Guide 3 51 Auto colour calibration 3 58 Initialize and or store settings Restore factory defaults 3 59 Store current configuration 3 60 Restore configuration 3 60 P...

Page 240: ...eys to enter the five digit key operator code number 4 Touch the PRINTER SETTINGS key Follow these steps to select the program that you wish to use In the following steps the setting screens for the s...

Page 241: ...Procedure for using key operator programs Xerox WorkCentre C226 User Guide 3 53 6 Press the CLEAR ALL key to exit the program You will exit the key operator programs and return to the main screen...

Page 242: ...HIBIT NOTICE PAGE PRINTING PROHIBIT TEST PAGE PRINTING A4 LETTER SIZE AUTO CHANGE DELETE THE PRINT HOLD DATA OUTPUT METHOD WHEN MEMORY IS FULL DEFAULT PAPER TYPE FOR BYPASS TRAY JOB QUEUING PORT SWITC...

Page 243: ...n place of 8 1 2 x 11 paper if A4 paper is available 8 1 2 x 11 paper cannot be automatically selected in place of A4 NOTE When 8 1 2 x 11 size is specified for a document attached to an E mail that h...

Page 244: ...the parallel port or network port of this printer Port switching method The machine can use the three ports shown below for printing This program is used to select when switching between ports will t...

Page 245: ...programs can be set The program that was set will be effective after the power is turned on NOTE For setting and modification of Network settings be sure to consult with the network administrator IP...

Page 246: ...u must turn off the main switch after exiting the key operator program wait briefly and then turn on the main switch to make the factory default settings take effect Colour adjustments This program is...

Page 247: ...ted If the registration is not correctly adjusted perform AUTO ADJUSTMENT in Registration adjustment in the Key Operator Programs section of the WorkCentre C226 System Administration Guide Initialize...

Page 248: ...n in memory even if the main switch is turned off To read the stored settings use the following RESTORE CONFIGURATION program This does not affect Colour adjustments in the PRINTER SETTINGS Restore co...

Page 249: ...e network when using as a network printer Make sure that this printer is selected in the software application software or use an appropriate utility to check that the printer is registered on the netw...

Page 250: ...f the password is not known printing cannot be executed In some cases the printed image may be rotated 90 degrees with respect to paper placed horizontally in the Bypass Tray Did you run out of paper...

Page 251: ...he paper type setting in the Paper Settings screen of the printer driver is different from the paper type setting in the machine printing will not take place In this event select the job key in the jo...

Page 252: ...r programs To use this procedure consult your key operator How to use the NIC Manager utility on the WorkCentre C226 PCL Print Drivers and Printer Network Setting Utilities CD ROM NIC Manager on the W...

Page 253: ...notice pages may tend to be printed more frequently even for jobs with small amounts of data When a print job is sent to the printer and the number of print hold jobs has reached the maximum of 99 jo...

Page 254: ...int area of A3 wide paper is the entire page excluding a margin of approxi mately 3 mm 1 8 at each edge Paper size Printable area Approx 4 3 mm 11 64 Approx 4 3 mm 11 64 Approx 4 3 mm 11 64 Approx 4 3...

Page 255: ...ISO 15 Italian 12 ISO 60 Norwegian v1 13 ISO 4 United Kingdom 14 ISO 11 Swedish names 15 PC1004 OS 2 16 DeskTop 17 PS Text 18 Microsoft Publishing 19 Math 8 20 PS Math 10 ISO 69 French symbol set No...

Page 256: ...3 68 Xerox WorkCentre C226 User Guide Printer Operation...

Page 257: ...from the Web page These settings are explained from page 4 3 on The settings must be established by the network administrator Such settings must be effected by the system administrator who has the spe...

Page 258: ...WorkCentre C226 User Guide Network Scanner Operation To use the network scanner function in colour or B W modes up to 600 dpi For printer controller Add two 256 MB modules For image memory Add one 256...

Page 259: ...ed information can be sent to a memory storage device on a network a designated directory on an FTP server Hereafter referred to as Scan to FTP in this section When sending scanned information to an F...

Page 260: ...Web browser Internet Explorer 5 5 or later Windows 5 1 or later Macintosh or Netscape Navigator 6 0 or later Accessing Web Pages Use the following procedure to access the Web pages 1 Open the Web bro...

Page 261: ...led explanations of the procedures for establishing settings click Help in the menu frame To use the network scanner function you must configure basic network scanner set tings pages 4 6 to 4 9 store...

Page 262: ...able Scanner Delivery to Select the scanner delivery methods that you want to use In the Enable Scanner Delivery to field click the checkbox next to each method that you want to use so that a checkmar...

Page 263: ...hat appears in the recipient s e mail program when you perform Scan to E mail Enter a subject when using Scan to E mail within 80 characters Only one subject can be entered If nothing is entered Scann...

Page 264: ...the primary server The default is 20 seconds If no con nection is made the system will then look for the secondary server if it has been set up If not the system will stop attempting to connect Reply...

Page 265: ...ecessary for authentica tion in these text boxes Item Description Item Description Primary DNS Server Enter the IP address of your primary DNS server here if required Secondary DNS Server Enter the IP...

Page 266: ...ations Refer to page 4 15 A total of 500 destinations can be stored including E mail FTP and Group destina tions Among these a combined total of 100 Scan to FTP destinations can be stored The stored d...

Page 267: ...l Address Required Enter one address as an e mail destination up to 64 characters If Global Address Search can be used you can click Global Address Search to select an e mail address from the Global A...

Page 268: ...me Required Enter the full name of the destination up to 36 characters Initial Optional Enter the initial character of the stored destination name This initial is used to place the destination in the...

Page 269: ...ssion PDF Middle compression PDF Low compression JPEG High compression JPEG Middle compression JPEG Low compression File Format for B W Select the file format and compression mode for transmission of...

Page 270: ...initial character of the stored destination name This initial is used to place the destination in the ABC index of the machine s address directory screen page 4 21 Custom Directory Drop down list Sele...

Page 271: ...ations List click the button of the destination that you want to edit or delete 3 To edit the selected destination click Edit under the Destinations List The programming screen of the destination sele...

Page 272: ...rmation Sender Name E mail Address that is displayed when the recipient receives your e mail click Sender in the menu frame and then click Add Information for up to 20 different senders can be stored...

Page 273: ...d in the ABC index Two types of indexes are available the ABC index and group indexes custom directories Group indexes allow you to assign any index name to the destination for easy search ing Six gro...

Page 274: ...tting the password turn the machine power off and then back on When a password is set you will be prompted for the password when you attempt to access a Web page with protected settings For the User n...

Page 275: ...ay is initially set factory setting to show the following condition setting screen as the initial screen Message display Messages appear here to indicate the current status of the machine ADDRESS DIRE...

Page 276: ...is key when you wish to manually set the size of the original to be scanned or scan both sides of the original page 4 32 FILE FORMAT key Touch this key to set the file format of scan images that you t...

Page 277: ...Copy copies of a Scan to E mail transmission to other recipients in addition to the main recipient touch this key so that it is highlighted and then select the CC destinations page 4 29 BCC key If yo...

Page 278: ...le to search for an e mail address in an Internet or intranet directory database page 4 30 To use this function the IP address or network name of the LDAP server must be set as well as an account name...

Page 279: ...1 on page 4 19 to switch to the base screen of scan fax mode 2 Load the original For detailed information on loading an original refer to page 2 4 NOTE You cannot load documents in both the DADF and...

Page 280: ...er go directly to step 10 In this case the default sender information stored with the key operator program is automatically transmitted page 4 67 Up to 20 senders can be stored using the Web page page...

Page 281: ...C key and then touch the one touch keys of the CC or BCC recipients NOTES Refer to pages 4 10 to 4 15 for information on programming one touch key destinations When touching a one touch key correspond...

Page 282: ...LACK COPY START key The original is scanned and the READ END key appears 13 If you have another page to scan change pages and then press the START key Repeat this sequence until all pages have been sc...

Page 283: ...sulting burden on the network may slow down the speed of other unrelated data transmissions and in some cases may even cause the mail server or network to go down In cases where you need to send multi...

Page 284: ...go directly to step 7 NOTE The initial file format setting can be changed with the key operator program Initial file format setting page 4 67 5 If you wish to scan in colour touch the COLOUR key If yo...

Page 285: ...if you are performing a broadcast transmission and wish to CC or BCC the document to the entered e mail address touch the CC or BCC key After touching one of the keys you will return to the initial s...

Page 286: ...m a broadcast transmission the compression mode set with the key operator program Compression mode at broadcasting page 4 67 is used as the file compression mode for all destinations The default setti...

Page 287: ...lay the remaining destinations touch the key For detailed information on the selected destination touch the DETAIL key You can also register the desti nation to the address book by touching the REGIST...

Page 288: ...wo sided Original A two sided original can be automatically scanned and transmitted using the DADF Follow the steps below 1 Make sure the machine is in scanner mode and then load the document in the D...

Page 289: ...2 SIDED BOOKLET key is touched 5 Continue from step 4 of Basic Transmission Method page 4 24 NOTES Booklets and tablets Two sided originals that are bound at the side are booklets and two sided origi...

Page 290: ...s that can be detected are as follows A3 B4 A4 A4R B5 B5R A5 11 x17 8 1 2 x14 8 1 2 x11 8 1 2 x11 R 5 1 2 x8 1 2 If a non standard size original is loaded including special sizes the closest standard...

Page 291: ...to 17 in the X direction and 10 to 297 mm 1 2 to 11 5 8 in the Y direction set in increments of 1 mm 1 8 Depending on the amount of memory installed it may not be possible to scan some original sizes...

Page 292: ...at exposure level 3 of the manual settings If you selected MANUAL touch the or key to adjust the exposure For darker contrast touch the key For lighter contrast touch the key 3 Selecting the original...

Page 293: ...4 Touch the OK key You will return to the initial screen Selecting the Resolution The resolution for scanning an original can be selected Load the original in scanner mode and then follow the steps b...

Page 294: ...o a different setting using the key operator program Initial resolution setting page 4 66 The resolution setting cannot be changed once scanning has begun Selecting the File Format When you send an im...

Page 295: ...e appropriate setting screen File format settings for colour scanning File format settings for black and white scanning Auto Original Lower Resolution Exposure Programmed File Format TIFF PDF File Typ...

Page 296: ...scanning a checkmark automatically appears in the ONE PAGE PER FILE checkbox and one file is created for each page 4 Touch the OK key You will return to the initial screen NOTES The initial file forma...

Page 297: ...cellation is done from the scanner job status screen 1 Press the JOB STATUS key 2 Touch the SCANNER JOB key 3 Touch the STOP DELETE key A message appears to confirm the cancellation Touch the YES key...

Page 298: ...from the touch panel of the machine Storing One Touch Keys Only Addresses for Scan to E mail The touch panel of the machine can also be used to store destinations for Scan to E mail Scan to FTP desti...

Page 299: ...Touch the INITIAL key 7 Touch a letter key The first letter initial of the name entered in step 5 is ini tially selected and is highlighted If you wish to change the letter touch a different letter k...

Page 300: ...ct key 11 Touch the OK key 12 Touch the ADDRESS key The E mail address entry screen appears 13 Enter the e mail address of the destination Up to 64 characters can be entered If you make a mistake touc...

Page 301: ...If you do not wish to change the name this step is not necessary 16 Check the file format and the compression mode If you need to change these settings touch the FILE FORMAT key If you do not need to...

Page 302: ...touch key perform the following procedure 1 Press the CUSTOM SETTINGS key touch the ADDRESS CONTROL key and then touch the DIRECT ADDRESS key refer to steps 1 to 3 on page 4 42 2 Touch the AMEND DELET...

Page 303: ...hange another one touch key repeat steps 3 through 5 The following steps are for deleting a one touch key 6 Touch the DELETE key 7 Touch the YES key If you wish to delete another one touch key repeat...

Page 304: ...Key Scan to E mail destinations that have been stored in one touch keys can be stored in group keys Up to 300 destinations can be stored in a group key To program a group key from the Web page refer t...

Page 305: ...you want to delete the destination touch the YES key 7 Touch the outer OK key The number of destinations in the group appears to the right of the ADDRESS key 8 Check the name of the key refer to step...

Page 306: ...up key you wish to edit or delete To edit a group key follow steps 4 and 5 To delete a group key follow steps 6 and 7 When you have finished editing or deleting touch the EXIT key 4 Touch the key of t...

Page 307: ...that it is no longer highlighted 5 Make sure the edited information is correct and then touch the EXIT key If you wish to change another group key repeat steps 3 through 5 The following steps are for...

Page 308: ...eceives your e mail Information for up to 20 dif ferent senders can be stored Select a sender from the stored senders using the touch panel of the machine when you send an image page 4 23 The selected...

Page 309: ...ave finished storing senders touch the EXIT key If you wish to store another sender touch the NEXT key Editing and Deleting Sender Information Use this procedure when you need to edit sender informati...

Page 310: ...any name up to 6 characters long to each of the USER indexes USER 1 to USER 6 To perform this procedure from the Web page refer to page 4 17 1 Press the CUSTOM SETTINGS key and then touch the ADDRESS...

Page 311: ...screen of step 3 5 If you wish to program another index name repeat steps 3 and 4 When finished touch the OK key Printing Programmed Information You can print out lists of the one touch keys and grou...

Page 312: ...uch the key of the list you wish to print PROCESSING PRINT DATA appears in the message display and printing begins To cancel printing touch the CANCEL key NOTE If you attempt to print a list when no d...

Page 313: ...erside of the document cover is dirty Solution To clean the document glass and the underside of the document cover see page 2 81 The scanned image is clipped Cause The set original scanning size is sm...

Page 314: ...s This information may help you determine the cause of the problem The recipient does not receive data sent by e mail Scan to E mail Cause A limit has been set in the Maximum size of e mail attachment...

Page 315: ...ARD HIGHER HIGHEST The default setting is LOWER If the original does not contain photographs illustrations or other halftone images STANDARD mode will give you a more workable scanned image HIGHER or...

Page 316: ...your key operator The key operator programs cannot be used when DHCP is being used 3 How to use the NIC Manager utility on the Software CD ROM NIC Manager on the Software CD ROM can be used to config...

Page 317: ...the PRINTER TEST PAGE key 4 Touch the NIC PAGE key PROCESSING PRINT DATA appears in the message screen and printing begins To cancel printing touch the CANCEL key Printer Test Page Sending Address Lis...

Page 318: ...ated data transmissions and in some cases may even cause the mail server or network to go down The example images below will produce the following file sizes when scanned as A4 8 1 2 x 11 size origina...

Page 319: ...to the Chapter 3 Printer Operation and WorkCentre C226 System Administration Guide Key Operator Program List Program name Page Network scanner settings Default display settings The number of direct a...

Page 320: ...tor code number Each time a number is entered the dashes in the dis play will change to asterisks 4 Touch the N W SCANNER SETTINGS key depending on the program you wish to use 5 Make desired settings...

Page 321: ...rams for the network scanner feature of the machine are explained here Network scanner settings The following programs are available Default display settings The number of direct address keys displaye...

Page 322: ...screen for 20 seconds The number of direct address keys displayed setting The number of one touch keys displayed in each address directory screen can be changed from 6 the normal setting to 4 or 9 To...

Page 323: ...ch the OK key The entered return address appears Check the address to make sure it is correct Compression mode at broadcasting This setting selects the compression mode for broadcasting using Scan to...

Page 324: ...original exceeds the limit the image files are discarded The limit can be set from 1 MB to 10 MB in increments of 1 MB The initial setting is 2 MB The limit cannot be disabled Scanner mode timeout aft...

Page 325: ...rect entry of e mail addresses is disabled only stored e mail addresses can be used as destinations This allows e mail destinations to be restricted and prevents accidental transmission to the wrong a...

Page 326: ...and white File type PDF TIFF scanning Compression mode NONE MEDIUM G3 HIGH G4 File creation method 1 One page per file One file for all pages Scan destinations Scan to FTP Scan to E mail Supported cl...

Page 327: ...4 71 Scanning margins When scanning an original the area indicated in the following diagram cannot be scanned Area that can be scanned Scanning margins Scan size setting Scan size setting Approx 3mm...

Page 328: ...4 72 Xerox WorkCentre C226 User Guide Network Scanner Operation...

Page 329: ...ct Correctly as a Fax Device Several points must be kept in mind when using this product as a fax device Please note the following Line connection Use the telephone cable supplied to connect the machi...

Page 330: ...the settings and programmed information Refer to page 5 89 The life of the lithium battery is approximately 5 years if the machine power switch and fax power switch are kept continually off Other inf...

Page 331: ...n addition to the machine power switch the machine also has a fax power switch see page 5 2 When using the machine be sure to keep the fax power switch turned on at all times Make sure the correct dat...

Page 332: ...activate fax reception remote operation NOTE If you connect a combination telephone answering machine to the machine you will not be able to use the answering machine function You can place calls fro...

Page 333: ...b addresses passcodes and numerical settings One digit is cleared each time you press the key When an original is being scanned this key can also be used to cancel scanning COLOR COPY START Not used w...

Page 334: ...the explanations that follow it is assumed that the initial screen that appears after pressing the IMAGE SEND key is the condition settings screen page 5 7 If you have set the display to show the addr...

Page 335: ...es into the NEXT ADDRESS key ADDRESS DIRECTORY Touch this key to display the address directory screen Touch this key when you want to use an auto dial number one touch dialing or group dialing SUB ADD...

Page 336: ...ou wish to manually set the size of the original to be scanned or scan both sides of the original RESOLUTION Touch this key to change the resolution setting for the original to be scanned The selected...

Page 337: ...left Touch the keys to move through the screens CONDITION SETTINGS This displays the condition settings screen which is used to set various conditions ABC GROUP Touch this key to switch between the al...

Page 338: ...ed document If the size width of the faxed document is greater than the receiving machine s paper size the size will be automatically reduced A document can also be faxed without reducing its size In...

Page 339: ...cument glass cover and make sure a document is not placed on the document glass Gently close the cover 2 Adjust the document guides on the DADF tray to the width of the document 3 Align the edges of t...

Page 340: ...cted automatic origi nal detection function and displayed in the top half of the ORIGINAL key Check the key to make sure that the original size has been correctly detected AUTO appears when the automa...

Page 341: ...at can be selected are displayed 3 Touch the desired original size key AUTO is no longer highlighted MANUAL and the orig inal size key you touched are highlighted To select B4 8x1 2 x14 A3 11 x17 or L...

Page 342: ...t characters or if it is a photo After loading the original in fax mode adjust the settings as explained below Selecting the Resolution The initial resolution setting is STANDARD To change the setting...

Page 343: ...your original consists of normal sized characters like those in this manual Fine Touch this key if your original has small characters or diagrams The original will be scanned at twice the resolution o...

Page 344: ...o darken the exposure touch the key To lighten the exposure touch the key To return to auto exposure touch AUTO 4 Touch the OK key You will return to the initial screen NOTE When using the document gl...

Page 345: ...A name of up to 36 charac ters can be programmed for the location a maximum of 18 charac ters are displayed When using F code transmission a sub address and passcode can also be pro grammed see page 5...

Page 346: ...refully at the touch panel and make sure you program the correct number when programming an auto dial number After storing a number you can also print out the stored number see page 5 89 to make sure...

Page 347: ...e from scanner mode touch the SCANNER FAX key see page 5 7 2 Load the original Using the DADF page 5 11 Using the document glass page 5 11 If you are using the document glass to send multiple pages lo...

Page 348: ...international num ber touch the PAUSE key in the upper right corner of the screen Each time you touch the PAUSE key a hyphen appears and a 2 second pause is inserted The PAUSE key is also be used to l...

Page 349: ...that the transmission job is stored and JOB STORED appears in the message display Using the document glass 7 Press the BLACK COPY START key The original is scanned and the READ END key appears in the...

Page 350: ...n in the transaction report or activity report Transmission by Auto Dialing One Touch Dialing and Group Dialing To dial by touching an auto dial key one touch key or group key instead of pressing the...

Page 351: ...fax mode from scanner mode touch the SCANNER FAX key see 8 on page 5 7 2 Place the original in the DADF tray see Using the DADF on page 5 11 3 Touch the ORIGINAL key If the address directory screen ap...

Page 352: ...sion will switch to a memory transmission Refer to the following section Storing transmission jobs memory transmission NOTE The machine is initially set factory setting to perform Quick On line transm...

Page 353: ...thin 45 seconds then transmission is stopped and then automatically re attempted later two recall attempts are made at an interval of 1 minute Automatic recalling can be stopped by pressing the JOB ST...

Page 354: ...e next position after the job currently being executed When the current job is completed execution begins of the job selected in step 3 NOTE If the job in progress is a broadcast transmission job see...

Page 355: ...ellation Touch the YES key to delete the selected job key and cancel the transmission NOTES If you do not wish to cancel the transmission touch the NO key CANCEL will appear in the Transaction Report...

Page 356: ...eive a fax that is smaller than A4 8 1 2 x11 or B5 size the paper size used to print the fax will depend on how the original was oriented vertically or horizontally in the sending fax machine Receivin...

Page 357: ...stinations in a Single Operation Broadcast Transmission This feature is used to send a document to multiple destinations in a single operation The document to be transmitted is scanned into memory and...

Page 358: ...2 If the condition settings screen appears touch the ADDRESS DIRECTORY key to display the address directory screen An auto dial key is highlighted when touched ADDRESS DIRECTORY SUB ADDRESS NEXT ADDRE...

Page 359: ...al key Simply touch the incorrect key one more time to cancel the selection The NEXT ADDRESS key only needs to be touched when successively dialing fax numbers with the numeric keys If desired you can...

Page 360: ...performed automatically at a specified time up to a week in advance This is convenient when you will be out of the office or for transmission at off peak nighttime rates A combined total of 50 timer t...

Page 361: ...is setting the transmission will be performed as soon as the specified time arrives Select the time Touch the key or the key until the desired time appears 4 Select the time in 24 hour format Example...

Page 362: ...he current job is completed Transmission and Reception Using the Polling Function This function can only be used if the other machine is a Super G3 or G3 machine and supports the polling function The...

Page 363: ...ase the sequence of operations in the above diagram is successively repeated for each sending machine selected NOTE The receiving machine bears the expense phone charges of polling transmission Pollin...

Page 364: ...ddress directory screen appears touch the CON DITION SETTINGS key to display the condition settings screen The POLLING key is highlighted and the polling icon appears To cancel polling touch the POLLI...

Page 365: ...l of the other party 1 Touch the SPEAKER key in fax mode and dial the number of the other machine A one touch key or the REDIAL key can also be used 2 Touch the SPECIAL MODES key If the address direct...

Page 366: ...Box for polling memory This procedure is for scanning a document into the Public Box If other document data has already been stored in the Public Box the new document will be added after that data If...

Page 367: ...ain Repeat this procedure until all pages have been scanned and then touch the READ END key that appears in the message screen When the document data has been stored in the Public Box JOB STORED appea...

Page 368: ...the MEMORY BOX key If the address directory screen appears touch the CON DITION SETTINGS key to display the condition settings screen 2 Touch the PRINT DATA key 3 Touch the PUBLIC BOX key Touching the...

Page 369: ...s directory screen appears touch the CON DITION SETTINGS key to display the condition settings screen 2 Touch the DELETE DATA key 3 Touch the PUBLIC BOX key The message screen appears 4 Touch the YES...

Page 370: ...e polling memory with polling security enabled the sender s number of the polling machine must be programmed in that machine and in your machine Own Number Sending This function prints the date time y...

Page 371: ...ted data Length of scanned data Length of transmitted data Direction of transmission Outside scanned data Inside scanned data None of the transmitted image is cut off however the transmitted data is l...

Page 372: ...until all originals have been scanned When finished touch the READ END key that appears in the message display NOTE To cancel Dual Page Scan Press the CLEAR ALL key Programming Frequently Used Operati...

Page 373: ...type of transmission Note however that programs do not allow you to establish a timer setting for transmission With the exception of polling reception operations cannot be stored in a program Using a...

Page 374: ...her Machine When Printing Is Not Possible Forwarding Function When printing is not possible because of a paper toner or other problem you can transfer received faxes to another fax machine if that mac...

Page 375: ...transfer Data received to a confidential memory box cannot be transferred See F Code Confidential Transmission on page 5 56 The result of transfer is indicated on an activity report See Viewing the C...

Page 376: ...estination programmed with the key operator program and begins transfer If you do not wish to transfer the data touch the NO key NOTES To cancel transfer Press the JOB STATUS key and then cancel the t...

Page 377: ...of other manufacturers that support F Code communication Before using the functions explained in this section make sure that the other fax machine supports F Code communication and has the same funct...

Page 378: ...the other party of a box name the other party only needs to know the sub address and passcode This machine uses the term sub address for the location of the memory box and the term passcode for the a...

Page 379: ...touch key the following steps are not needed 2 Touch the SUB ADDRESS key When the SUB ADDRESS key is touched a slash appears at the end of the fax number If you make a mis take press the C key to cle...

Page 380: ...o create the box First delete an unused box see Editing and Deleting a Memory Box on page 5 88 and then create the new box F Code Polling Memory F code polling memory allows one fax machine to call an...

Page 381: ...king and clear ing document data in a memory box on page 5 54 NOTE When using F code polling memory do not set the reception mode to manual reception Scanning a document into an F code polling memory...

Page 382: ...ox is being used for transmission Procedure for F Code Polling Make sure that a document has not been loaded in the DADF tray or on the document glass and then follow the steps below NOTES You must kn...

Page 383: ...51 for the procedure for entering sub addresses and passcodes 4 Press the BLACK COPY START key JOB STORED appears on the screen After communicating with the other machine your machine prints the rece...

Page 384: ...t data to the machine s F code confi dential memory box is called F code confidential reception and sending document data to another machine s F code confidential memory box is called F code confiden...

Page 385: ...mer transmission function page 5 33 and can be stored in a program page 5 85 Printing a Document Received to an F Code Confidential Memory Box Faxes received in an F Code confidential memory box are p...

Page 386: ...If the print PIN you entered is correct the message PRESS START TO PRINT DATA appears If the print PIN is not correct the message PIN IS NOT VERIFIED appears and you return to the entry screen To ret...

Page 387: ...ine The relay machine also prints the document sent by the relay request machine For example corporate headquarters in Seattle wants to send the same document to branch offices in San Francisco Oaklan...

Page 388: ...end receiving machines using a memory box only if the sub address and passcode sent by the relay request machine are cor rect Refer to pages 5 81 through 5 88 for the procedures for creating editing...

Page 389: ...programmed in the memory box enter only the sub address when dialing Aside from the method of dialing the relay machine the transmission procedure is the same as for a normal transmission Refer to En...

Page 390: ...witch to fax mode from scanner mode touch the SCANNER FAX key 2 Load the original NOTE If you have loaded the original on the document glass you can only send one page by manual transmission 3 Set the...

Page 391: ...L RECEPTION This will allow you to talk to the other party first and then receive a fax This is convenient when you only have one telephone line and receive more voice calls than faxes You must answer...

Page 392: ...TION page 5 63 you can talk to a person sending a fax manually and then begin fax reception without breaking the connection When the extension phone is in Fax mode A fax can be received manually even...

Page 393: ...perform the following procedure with the extension phone still lifted Remote reception is only possible when the call is made by the other party NOTE The following procedure is not possible if you are...

Page 394: ...g one touch keys and group keys is explained in Transmission by Auto Dialing One Touch Dialing and Group Dialing on page 5 22 and the procedure for using programs is explained in Using a Program on pa...

Page 395: ...elect destinations for group dialing and programs If no one touch keys have been stored the GROUP key and PROGRAM key will be greyed out and it will not be possible to store a group or a program Key O...

Page 396: ...haracters for the name Refer to page 5 90 for the procedure for entering letters 2 Touch the INITIAL key 3 Touch a letter key The first letter initial of the name entered in step 1 is ini tially selec...

Page 397: ...page 5 9 The lower keys are for selecting whether to include the one touch key in the FREQUENT USE index If you touch the wrong key simply touch the correct key 7 Touch the OK key 8 Touch the FAX No...

Page 398: ...including the fax number sub address passcode any pauses hyphens and slashes to separate the sub address and passcode 10 If you need to enter a sub address touch the SUB ADDRESS key and then enter th...

Page 399: ...c ters 14 Check the transmission settings The initial transmission settings are TRANSMISSION SPEED 33 6 kbps and INTERNATIONAL CORRESPONDENCE MODE NONE To change either of the settings touch the MODE...

Page 400: ...turns you to the screen of step 2 on page 5 67 Touching the NEXT key returns you to the screen of step 1 on page 5 68 Editing and Deleting One Touch Keys If you wish to delete a one touch key or chang...

Page 401: ...wish to delete another one touch key repeat steps 2 5 and 6 If you cannot edit or delete a one touch key If you attempt to edit or delete a one touch key in the following situations a warning message...

Page 402: ...he key is included in a group delete the key from the group and then change or delete it Storing a Group Key Up to 100 destinations can be stored in a group key To program a group key follow steps 1 t...

Page 403: ...OK key in the screen of step 3 You will return to the screen of step 2 The number of selected destinations will appear next to the ADDRESS key 5 Check the name of the key refer to step 13 on page 5 71...

Page 404: ...up key follow steps 3 and 4 To delete a group key follow steps 5 and 6 When you have finished editing or deleting touch the EXIT key 3 Touch the key of the item you wish to change to edit the item fol...

Page 405: ...ghted To show a list of the destinations stored in the group key touch the ADDRESS REVIEW key 4 When you have finished editing the group key touch the EXIT key in the screen of step 3 If you wish to e...

Page 406: ...r an F code relay broadcast operation See Editing and Deleting a Memory Box on page 5 88 The group key is included in a program See Editing and Deleting Programs on page 5 80 Storing a Program You can...

Page 407: ...st be programmed in an auto dial key one touch key or group key before it can be stored in a program 4 Touch the OK key Your settings are displayed Make sure they are correct 5 When you are finished t...

Page 408: ...he YES key in the confirmation screen that appears Storing a Group Index Auto dial keys one touch keys and group keys are normally stored in the ABC index To make auto dial keys more convenient to use...

Page 409: ...touch the OK key The new name appears in the screen of step 3 5 If you wish to program another index name repeat steps 3 and 4 When finished touch the OK key To change a user index name re enter the...

Page 410: ...and then touch the ADDRESS CONTROL key refer to steps 1 and 2 on page 5 67 2 Touch the F CODE MEMORY BOX key 3 Touch one of the memory box keys POLLING MEMORY CONFIDENTIAL or RELAY BROADCAST on the st...

Page 411: ...ess the C key and re enter the correct digit 8 Use the numeric keys to enter a passcode max 20 digits In addition to numbers the characters and can be used in a pass code If you make a mistake press t...

Page 412: ...ther to have document data that was scanned into an F code poll ing memory box automatically cleared after one transmission or to leave the docu ment data in the box and allow an unlimited number of t...

Page 413: ...gram the print PIN Personal Identification Number that is used to print a docu ment that has been received to an F code confidential memory box For information on using a print PIN refer to Printing a...

Page 414: ...reen of step 4 on page 5 82 Setting for F Code Relay Broadcast Memory Boxes Recipient Program the end receiving machines to which document data received in the F code relay broadcast memory box will b...

Page 415: ...machines touch the ADDRESS REVIEW key You can delete a destination from the list of end receiv ing machines by touching it When the confirmation mes sage appears touch the YES key to confirm the delet...

Page 416: ...n stored A memory box cannot be edited or deleted when data is stored in the box 5 Touch the keys as needed to edit or delete the information Edit a memory box in the same way as you programmed it To...

Page 417: ...ey 2 Touch the LIST PRINT key 3 Touch the SENDING ADDRESS LIST FAX key 4 Touch the key of the list you wish to print Printing begins To cancel printing after it has begun touch the CAN CEL key in the...

Page 418: ...1 Touch the X key To switch between upper case and lower case touch the ABC abc key When ABC is highlighted upper case letters are entered 2 Touch the ABC abc key 3 Touch the e key r key o key and x...

Page 419: ...the key 6 Touch the key To switch between upper case and lower case touch the key When is highlighted lower case letters are entered 7 Touch the key Sharp Sharp Sharp Address Name Space Cancel Xerox S...

Page 420: ...entry You can also enter numbers and symbols 9 When finished touch the OK key You will exit the character entry screen and return to the programming screen If you touch the CANCEL key you will return...

Page 421: ...umbers and symbols that can be entered are as follows Screen 1 2 Screen 2 2 Change screens by touching the key or key displayed in the screen If you make a mistake touch the key to move the cursor bac...

Page 422: ...hen you have finished entering characters touch the OK key You will exit the character entry screen and return to the programming screen If you touch the CANCEL key you will return to the programming...

Page 423: ...ng in the Fax Unit section of the WorkCen tre C226 System Administration Guide The Transaction Report shows the date of transmission the time transmission began the other party s name the duration of...

Page 424: ...ERROR Manual transmission was not successful because a jam occurred PASS NG The connection was broken because the polling passcode was not correct NO RX POLL The machine that was polled does not have...

Page 425: ...y polling box The name of the memory box appears in xxxxxx and the type of F code opera tion relay request reception polling memory transmission or confidential recep tion appears in FAIL xx xxxx The...

Page 426: ...nds and a Warning Message Is Displayed When an error occurs during a transaction an alarm will sound and a message will appear in the display Take action as explained in the following table Message sc...

Page 427: ...r is open Close the indi cated cover _ The self diagnosis func tion has activated and automatically stopped operation An error code appears in xx xx Turn off the power and then turn it back on If the...

Page 428: ...iving machine support G3 transmission Are the sub address and passcode correct Is the receiving machine ready to receive Was the original size detected correctly Check the transmittable sizes Checking...

Page 429: ...ty to re send the document using a suitable expo sure setting _ The received image is distorted Were line conditions poor due to thunder or another reason Ask the other party to send the document agai...

Page 430: ...5 102 Xerox WorkCentre C226 User Guide Fax Unit...

Page 431: ...g direct entry 4 69 storing 4 42 Advanced tab PCL5c 3 29 PostScript 3 31 alarm 5 98 alerts message 3 44 All Text to Black checkbox 3 38 Always Use This ID 3 26 AMEND DELETE key 4 46 applicable paper s...

Page 432: ...51 colour adjustments auto colour calibration 3 58 colour balance 2 52 2 55 COLOUR COPY START key 1 15 colour mode display 3 16 colour printing 3 10 colour rendering 3 35 colour settings default docu...

Page 433: ...ice Setup 3 43 Log 3 44 Password 3 43 Different Paper setting 3 28 direct address entry disabling 4 69 DIRECT ADDRESS key 4 42 display contrast 1 37 1 41 display switching keys 5 9 DNS server settings...

Page 434: ...leting 5 81 editing 5 81 file format selecting scanning scanning file format selecting 4 38 FILE FORMAT key 4 20 file naming scanned image 4 7 file size limit Scan to E mail 4 68 FINISHER TRAY key 1 6...

Page 435: ...eting 2 75 recalling 2 74 storing 2 73 job program memory 2 73 job queuing 3 56 JOB STATUS key 1 15 job status screen 1 17 K key operator programs A4 letter size auto change 3 55 custom setting 1 38 d...

Page 436: ...address keys displayed 4 66 N Up printing 3 18 Border 3 18 O offset function 2 18 OFFSET key 1 60 offset mode 3 22 one touch dialing 5 17 5 22 one touch key display 4 21 5 9 one touch keys deleting 5...

Page 437: ...nt data in Public Box 5 40 F code confidential memory box 5 57 F code polling memory box 5 54 programmed information 5 89 transaction report 5 95 print area 3 66 print contrast 3 6 3 9 3 12 PRINT JOB...

Page 438: ...iguration 3 60 restricting polling access 5 42 Retention 3 23 Hold After Print 3 23 Hold Before Print 3 23 Normal Print 3 23 PIN 3 24 Proof Print 3 23 returned e mail 4 59 reversing single pass feeder...

Page 439: ...and white 3 6 colour 3 9 3 12 printer drivers 3 1 3 2 scanning size manually 4 34 5 13 settings colour default document types 3 35 e mail server and DNS server 4 7 exposure default scanning 4 68 pape...

Page 440: ...4 3 transparency film copying onto 2 45 transparency inserts 3 29 TRANSPARENCY INSERTS key 2 37 Transparency Text 3 34 transport area misfeed 1 49 tray settings 1 38 1 41 Tray Status button 3 28 trou...

Reviews: