4.SCAN FUNCTIONS
How to Set Scan Options 117
4 SCAN FUNCTIONS
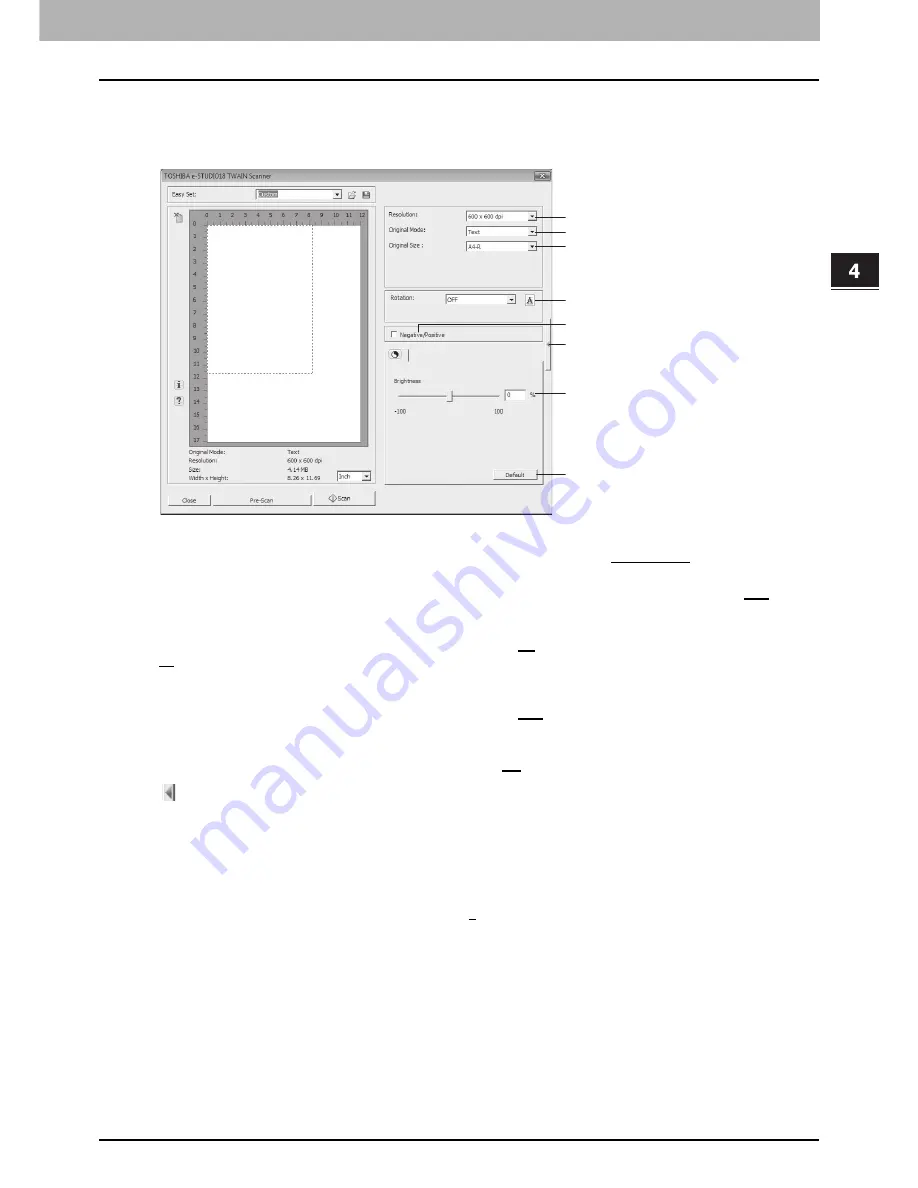
Advanced scan dialog
After you open the preview window, you can click the right-facing triangle located on the right side of the preview area so
that you can make the various scan options below. The default settings are boldfaced and underlined.
1) Resolution
The horizontal and vertical resolution can be set as dots per inch: 150 x 150 dpi,
300 x 300 dpi
, or 600 x 600 dpi.
2) Original Mode
The original mode can be set to fit the original image such as text only or the mixture of text and photos:
Text
or Text/
Photo.
3) Original Size
The original document size or the scanning area can be set: A3,
A4
, A4-R, A5-R, A6-R, B4, B5, B5-R, FOLIO, LD, LG,
LT
, LT-R, ST-R, COMP, 13” LG, 8K, 16K, or 16K-R.
4) Rotation
The image can be rotated clockwise by 90 degrees, counterclockwise by 90 degrees, or by 180 degrees. This option
takes effect on the image to scan but not on the preview image:
OFF
, Right 90, Left 90, or 180.
5) Negative/Positive
The negative or position image can be selected. Select the check box to turn on this function or clear the box to turn it
off. This option takes effect on the preview and scan images:
Off
or On.
6)
Click this icon to close the advanced scan dialog and return to the basic scan dialog.
P.116 “Basic scan dialog”
7) Brightness
The image brightness can be adjusted from -100 (lighter) to +100 (darker). Enter the value directly or move the scroll
bar right or left. The brightness of the preview image is changed slowly but not in real time.
8) Default
Click this button to restore the brightness to the default
0
%.
1
2
3
4
5
7
6
8
Summary of Contents for E-studio18
Page 1: ...MULTIFUNCTIONAL DIGITAL SYSTEMS User s Guide ...
Page 10: ......
Page 22: ......
Page 52: ......
Page 140: ......
Page 158: ......
Page 168: ......
Page 171: ...DP 1800 OME11004800 ...


