background image

25

© Tieline Research Pty. Ltd. 2019

Bridge-IT Manual v4.0

10

Headphone/Output Monitoring

 The 6.35mm (1/4") stereo headphone output on the codec can be used for monitoring audio inputs
1 and 2 and return link audio. 

Important Note:

 When the codec makes a connection it will monitor the decoded return

audio link by default.

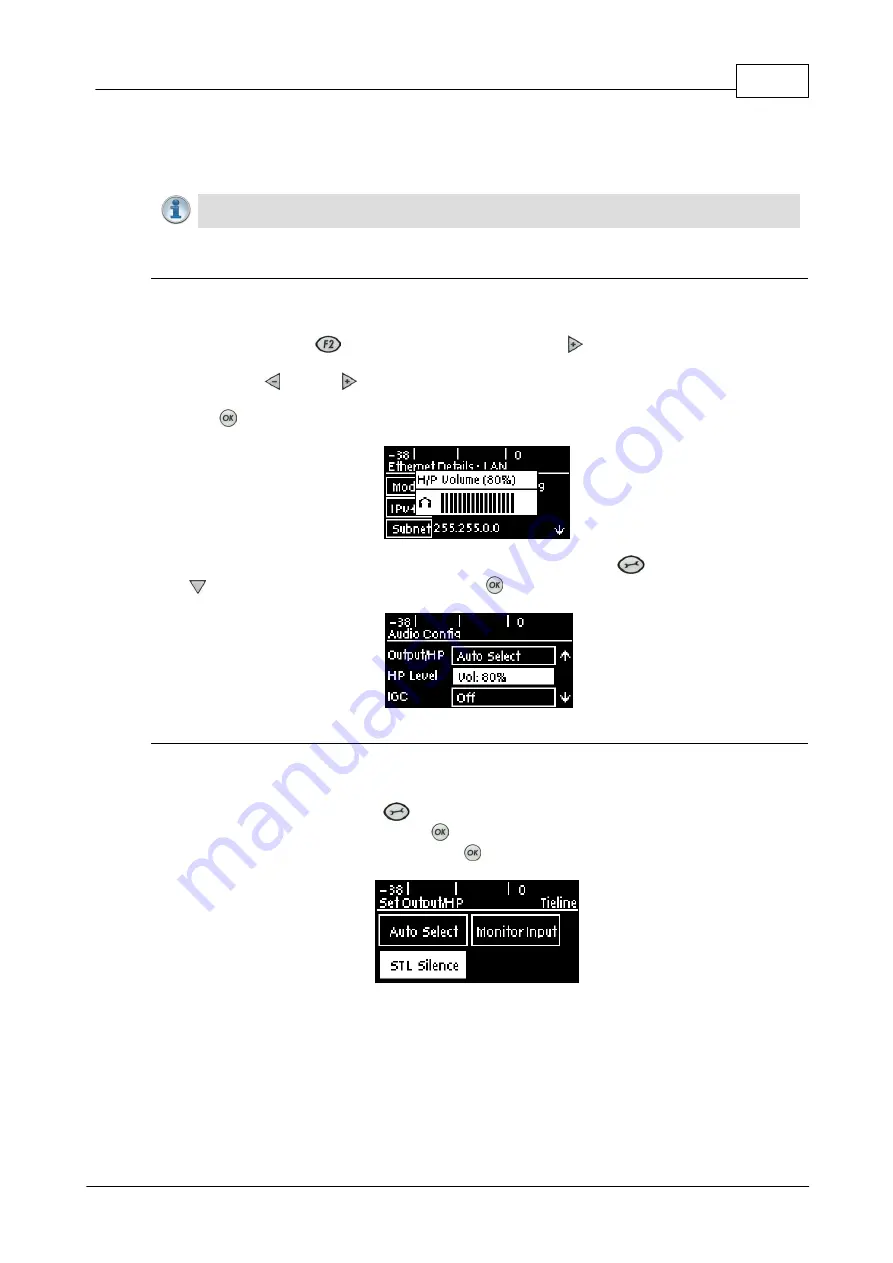
Adjusting Headphone Output Levels

When using analog or digital inputs you will see input audio on the PPMs and hear it in the
headphones.

1. Press  and  hold  the 

  button  and  then  press  the  right 

  arrow  button  to  display  the 

H/P

Volume

 adjustment screen. 

2. Use  the  left 


or  right 

  navigation  buttons  to  adjust  the  volume  levels  up  or  down.  The

screen displays level adjustments in real-time.

3. Press 

 when you have finished.

Headphone levels can also be adjusted by navigating to

 SETTINGS 


>


Audio

 and using the

down

 button to navigate to 

HP Level 

and press 

.


Output/Headphone Monitoring Settings

There are three 

Output/HP 

monitoring configurations available in the codec. The default setting is

Auto Select

 and to adjust this setting:

1. Press the 

SETTINGS 

 button.

2. Navigate to 

Audio

 and press 

.

3. Navigate to 

Output/HP

 and press 

 to select either 

Monitor Input 

or

 STL Silence

.

The  table  below  displays  how  audio  is  routed  to  the  codec  outputs/headphones  based  on  the
configuration selected and the current codec state (IP streaming or idle). Please note:

·

The same audio is always routed to the headphone and XLR outputs.

·

Output 1 corresponds to headphone left and output 2 corresponds headphone right. 

·

The same audio is routed to the analog and AES XLR outputs.

·

When  inputs  are  routed  to  the  outputs,  input  1  is  sent  to  output  1  and  input  2  is  sent  to
output 2.

Summary of Contents for Bridge-IT

Page 1: ...Bridge IT IP Codec User Manual Software Version 2 18 xx Manual Version v 4 0_20190220 February 2019...

Page 2: ...rt XII About Program Dialing 27 Part XIII Getting Connected Quickly 29 29 1 Quick Steps to Connect Bridge IT 33 2 Monitoring IP Connections 34 3 Load and Dial Custom Programs 35 4 Disconnecting a Conn...

Page 3: ...Programs 111 8 Configuring Multicast Server Programs 117 9 Configuring Multi Unicast Dialing Programs 124 10 Configuring SIP 130 11 Configure Peer to Peer SIP Programs 137 12 Load Unload and Dial a Pr...

Page 4: ...to Live 193 15 Reset and Restore Factory Default Settings 194 16 System Backup and Restore 196 17 Configuring SNMP Settings 196 18 Adjusting the LCD Screen Display 198 19 Adjusting Time Settings 198...

Page 5: ...that if ignored could result in death or serious personal injury caused by incorrect operation of the equipment These must be observed for safe operation Cautions Instructions warning against potentia...

Page 6: ...rchase During the warranty period we will repair or at our option replace at no charge a product that proves to be defective provided you obtain return authorization from Tieline and return the produc...

Page 7: ...tion base MIB is a database used for managing the entities in a communications network This term is associated with the Simple Network Management Protocol SNMP Multicast Efficient one to many streamin...

Page 8: ...uests and a STUN server attached to the public internet receives STUN requests and sends responses TCP TCP protocol ensures reliable in order delivery of data packets between a sender and a receiver T...

Page 9: ...rack unit Codec Features The following table outlines the features available in Bridge IT Bridge IT Features Peer to peer mono and stereo IP audio SmartStream PLUS dual redundant streaming Fuse IP co...

Page 10: ...kage Contents Your codec is delivered with Bridge IT IP codec Multi region plug pack 12 volt 1 Amp power supply 7 way connector for control port activation If any of the parts are incorrect missing or...

Page 11: ...menu items Dialing Keypad The keypad has alpha numeric buttons and operation buttons used to Launch codec functions Navigate menus Dial and hang up connections Configure contact details Operation But...

Page 12: ...DC input 2 1mm 12V DC power supply connection XLR Analog and Digital Inputs Bridge IT features two XLR microphone inputs Input 1 is a balanced mic line input with the ability to connect high medium an...

Page 13: ...he left headphone output and channel 2 is mapped directly to the right headphone output See Headphone Monitoring LAN Port The codec features a RJ 45 port for Ethernet 10 100 BaseT network connections...

Page 14: ...tings 4 Cxns Displays the number of current connections 5 Programs View and edit Program dialing configurations 6 Settings Select to configure codec settings Press the RETURN button to navigate backwa...

Page 15: ...15 Tieline Research Pty Ltd 2019 Bridge IT Manual v4 0 Codec Menu Overview...

Page 16: ...16 Bridge IT Manual v4 0 Tieline Research Pty Ltd 2019 Connect Menu...

Page 17: ...17 Tieline Research Pty Ltd 2019 Bridge IT Manual v4 0 IP Setup Menu Navigation...

Page 18: ...18 Bridge IT Manual v4 0 Tieline Research Pty Ltd 2019 Settings Menu...

Page 19: ...gs The codec can also automatically adapt to different Tieline reference scales A Tieline codec with proprietary Tieline session data enabled will automatically adjust the reference level to suit G5 a...

Page 20: ...ould not exceed 0dBFS when using analog audio to prevent clipping 1 Press the SETTINGS button 2 Navigate to Audio and press 3 Navigate to Ref Level and press 4 Select Tieline G3 and press Important No...

Page 21: ...Levels 1 Press the button and the right arrow button to open the Input Audio Level adjustment screen 2 Press on the numeric keypad to toggle channel 1 on and off and press to toggle channel 2 on and...

Page 22: ...lliseconds to detect audio levels have returned to normal after IGC Level has been initiated and will then return the levels to the previous setting within half a second This response is linear If the...

Page 23: ...select the Music algorithm the sample rate will be set to 32kHz when the codec is connected The codec accepts AES3 input sample rates of 32kHz 44 1kHz or 48kHz The output sample rate is determined by...

Page 24: ...td 2019 4 Select a preferred sample rate then press Tieline normally recommends selecting STL Silence Mode for audio monitoring if using AES3 If using Auto Select make sure the algorithm sample rate a...

Page 25: ...hed Headphone levels can also be adjusted by navigating to SETTINGS Audio and using the down button to navigate to HP Level and press Output Headphone Monitoring Settings There are three Output HP mon...

Page 26: ...connected This setting may be useful if an announcer wants to monitor their own voice and not return audio when connected STL Silence Mode 1 In STL Silence mode input audio is not monitored on the PP...

Page 27: ...ured 2 Once the codec receiving session data from the dialing codec has received information successfully it sends an acknowledgement to the dialing codec and streaming can commence If you configure a...

Page 28: ...to several studios and can be created using the Program Manager panel in the Toolbox web GUI See Configuring Multi Unicast Programs for configuration details Once multi unicast connections have been c...

Page 29: ...onfiguration See the HTML5 Toolbox Web GUI Introduction for details on configuring connections remotely via a computer See Installing the Codec at the Studio for valuable information about installing...

Page 30: ...p and press Important Note The codec remembers recent IP addresses just like a cell phone To view these addresses just press the OK button when you select the Connect IP screen The most recent address...

Page 31: ...er Route is configured An incoming call will be routed to an audio stream on a first come first served basis in a multi stream program Note By default IP streams are routed using audio ports Determini...

Page 32: ...the incoming stream to Encoder 1 on the G3 codec and Channel 2 will route the incoming stream to Encoder 2 on the G3 codec When configuration is complete press the RETURN button to navigate backwards...

Page 33: ...urn LQ numbers can also help to determine if a problem is occurring at either end of a connection For example on an IP connection the Return reading represents the audio being downloaded from the netw...

Page 34: ...hardware Renegotiate connection bit rate downwards If link quality good add or increase FEC as required Assess ISP s QOS if very bad performance Empty Indicates how often the jitter buffer reservoir e...

Page 35: ...fied in the Recent Program redial screen using either a previously entered name or by an IP address manually dialed connections A multi unicast connection will display the first IP address dialed and...

Page 36: ...sed either on the dialing codec s keypad or in the web GUI This setting should only be configured on the dialing codec 13 7 Speed Dialing Connections Assigning Speed Dial Numbers There are two methods...

Page 37: ...onnections Multiple Connections within Programs Multi unicast programs allow you to simultaneously transmit a mono or stereo audio stream to up to 6 destination codecs Multi unicast programs can only...

Page 38: ...ently loaded in the codec Ensure all connection related settings like the port algorithm bit rate etc match on both multicast server and client programs or they will not be able to join multicast stre...

Page 39: ...gorithm and press 5 Use the navigation buttons to select an algorithm profile or manually select algorithm settings then press 6 Navigate to and select TTL and enter the IP Time to Live value then pre...

Page 40: ...e server codec a Press the HOME button to return to the Home screen b Use the navigation buttons to select Programs and press the button c Use the up and down navigation buttons to select the multicas...

Page 41: ...ast IP audio streams To copy multicast client programs onto multiple codecs see Backup and Restore Functions To learn more about programs see the section titled About Program Dialing See HTML5 Toolbox...

Page 42: ...Select Proto protocol to select the audio protocol and adjust the Local Audio Port Select UDP IP RTP for RFC compliant IP streaming Press to save settings 7 If required enable A Recon auto reconnect a...

Page 43: ...sily This task is usually performed by SIP servers which communicate between SIP compliant devices to set up a call SIP connections can be made in two ways registered or unregistered Unregistered Peer...

Page 44: ...n connect by simply dialing the destination SIP address Some SIP servers route RTP audio through the SIP server as well and Tieline recommends avoiding this type of server whenever possible Otherwise...

Page 45: ...ctions Some ISPs and or cellular networks may block SIP traffic over UDP port 5060 Tieline G3 codecs do not support connections using algorithms like AAC aptX Enhanced and Opus and will default to MPE...

Page 46: ...VLAN1 5 SIP1 and SIP2 can each make multiple SIP calls e g two calls can be made over SIP1 or two calls can be made over SIP2 6 The settings for SIP1 and SIP2 cannot be edited if the interface is ena...

Page 47: ...o enter SIP account information Select Wizard to navigate through each screen in turn automatically 9 Navigate to Enable in the Modify SIP Interface menu and press the button to enable the interface s...

Page 48: ...Press the the SETTINGS button then navigate to SIP and press the button 2 Navigate to Accounts and press the button 3 Select an account which is Not Configured and press 4 Select Edit to enter SIP se...

Page 49: ...new SIP connection Configure this menu setting via Connect IP SIP Setup Account Confirming Account Registration There are three symbols displayed on the screen next to an account which indicate SIP a...

Page 50: ...gement tasks Peer to peer SIP calls between two codecs are detected automatically and require no special pre programming To make a peer to peer SIP call between codecs we recommend both codecs use pub...

Page 51: ...ll attempt to establish the connection via a SIP server Important Notes See Configuring SIP Accounts for instructions on entering SIP account details into the codec If you don t save the program durin...

Page 52: ...ure about which algorithm to use see Selecting an Algorithm for more details on each algorithm available in the codec 1 Press the HOME button to return to the Home screen 2 Use the navigation buttons...

Page 53: ...7 Use the right navigation button to select Profile 8 Select the profile you want from the All Mono or Stereo menus 9 Press the hatch button to add the profile into the Favorite menu Profiles that ha...

Page 54: ...o 32 24 10 AAC ELDv2 Stereo 32 48 11 Enhanced apt X Mono 32 16 bit 128 12 Enhanced apt X Mono 48 24 bit 288 13 Enhanced apt X Stereo 32 16 bit 256 14 Enhanced apt X Stereo 48 24 bit 576 15 G 711 Mono...

Page 55: ...threshold specified plus the time required to dial the alternative connection Dialing codec program monitors streaming and manages failover to a backup connection FEC Tieline FEC or RFC 2733 complian...

Page 56: ...ming ceases The backup connection is then dialed to replace the primary connection For details on configuring backup connections using failover see Configure Mono or Stereo Peer to Peer Programs Forwa...

Page 57: ...reliably 13 16 SDHC Card File Playback Playing Audio from the SDHC Card SDHC card files can be played back using the codec front panel controls 1 Press the HOME button to return to the Home screen 2 S...

Page 58: ...codec call is not allowed to Unload the current codec program e g mono or stereo Change the preferred local site settings like the jitter buffer and FEC configuration etc Incoming calls to an answeri...

Page 59: ...PIN is 456789 2 User PIN Required to use the codec front panel buttons and dial hangup a connection Default PIN is 123456 Enabling the Front Panel Lock Feature 1 Press the SETTINGS button 2 Navigate...

Page 60: ...UI has a reduced feature set and allows non technical users to load existing programs and dial via the Quick Connect panel Users can dial a simple peer to peer connection over POTS ISDN or IP To enabl...

Page 61: ...e broadcasts Using the Web GUI over the Internet If your codec is connected over the internet via a public static IP address it is possible to connect and configure it from any PC which is also connec...

Page 62: ...the codec and launch the web GUI If port 80 cannot be used across your network for some reason type the IP address of your codec into your browser with a full colon and the port number 8080 E g 192 16...

Page 63: ...ranslating these ports on the WAN side of your network into non standard port numbers Adjust ports using the Options panel in the Toolbox HTML5 Web GUI or see Configuring TCP UDP Ports 4 By default SI...

Page 64: ...press the button 3 Select Password and press 4 Use the KEYPAD to enter a new password and press the button to save the new setting Note there is no character limit for passwords If you forget the pass...

Page 65: ...between your PC and the Bridge IT USB port on the rear panel of the codec 4 Older PCs should detect that a new device has been attached and launch the Found New Hardware Wizard Note If the wizard doe...

Page 66: ...Default Password This will provide better network security to maintain reliability during live broadcasts 15 HTML5 Toolbox Web GUI Introduction The following sections provide an overview of the differ...

Page 67: ...e White theme for most images Opening a Panel Adjusting Screen Position Click an item in the Menu bar to display available panel options then click to select and open a panel New panels automatically...

Page 68: ...ect all audio streams in a program 2 Audio Stream Connect Disconnect button Click to connect disconnect all connections in an audio stream 3 Connection Connect Disconnect button Click to connect disco...

Page 69: ...ons Alphabetical listing options 3 Close button Click to close the panel 4 Speed Dial Select and dial programs using preconfigured speed dials 5 Check box symbol The Check box symbol identifies the cu...

Page 70: ...ew program using the program wizard 3 Import Selected Programs button Click to select and import previously saved programs 4 Export Selected Programs button Click to export selected programs as a zip...

Page 71: ...IT Manual v4 0 Statistics Panel Statistics Panel Feature Description 1 Show Hide Arrow Click to show hide audio stream statistics 2 Show Hide Arrow Click to show hide individual connection statistics...

Page 72: ...and Gain IGC settings and input Name Note input Type adjustment only available for input 1 2 Close button Click to close the panel 3 On Off button Click to toggle an input on or off 4 Input Sliders F...

Page 73: ...nfigure connection and disconnection after different relay inputs are switched ON 3 Synchronize a local relay input with a remote relay output Click to configure a local relay input to synchronize wit...

Page 74: ...VLAN link speed 10 100 1000 Auto and whether an interface will operate in Full Duplex or Half Duplex mode 5 TCP IP and DNS tabs Select the TCP IP tab to configure IPv4 IPv6 address details Select the...

Page 75: ...ssion Port settings SNMP the analog input PPM unit preference reference level Headphone Output Mode Firewall Hostname AES Output Clock sample rate and enable disable the Quick Connect HTML Web GUI opt...

Page 76: ...l in a new browser or view support information Note the codec name displayed will vary by product type 3 Support website link Click to visit the support page on the Tieline website 4 Email Tieline Sup...

Page 77: ...ec serial number Note the codec name displayed will vary by product type Feature Description 1 Close button Click to close the panel Language Selection The HTML5 Toolbox Web GUI offers language suppor...

Page 78: ...panel can also be launched from the Connect menu in the HTML5 Toolbox Web GUI Important Note Simple peer to peer connections are not saved as programs with unique names Details of the last ad hoc dial...

Page 79: ...ram Loader panel and click the Load button to load it in the codec 2 The Check box symbol appears next to the program name to confirm it has been loaded and the Load button changes to an Unload button...

Page 80: ...ridge IT Manual v4 0 Tieline Research Pty Ltd 2019 Disconnect a Loaded Program 1 Click the Disconnect button in the Quick Connect panel 2 Click Yes in the confirmation dialog to disconnect the connect...

Page 81: ...ot normal broadcast configurations 1 Click the drop down Transport menu arrow in the Quick Connect panel and select IP 2 Click the drop down Algorithm menu and select an algorithm 3 Click the select t...

Page 82: ...bled will automatically adjust the reference level to suit G5 and G3 codecs or Report IT When connecting to a non Tieline codec or a Tieline codec without session data enabled the codec will use the T...

Page 83: ...83 Tieline Research Pty Ltd 2019 Bridge IT Manual v4 0 When connecting with a stereo program the codec displays audio on PPM1 and 2 for inputs 1 and 2 and PPM 3 and 4 for the return audio...

Page 84: ...you to use IPv6 infrastructure to connect to other codecs globally Configuring Ethernet Ports and VLANs The codec features a physical Ethernet port and up to four additional VLAN interfaces VLAN inter...

Page 85: ...ting IPv4 Address Configuration Click to select the TCP IP tab in the Network panel to configure settings The codec is capable of automatic DHCP address assignment or manually configured static IPv4 a...

Page 86: ...This process is similar to how an IPv4 DHCP address is assigned 2 Manually Select to enter static IPv6 address details 3 Off Select to ignore IPv6 address details Important Note Select Off in the drop...

Page 87: ...Select the DNS tab in the Network panel to configure settings 2 Click Save to store all configuration settings IP Via Mapping When dialing over IP you can select the preferred interface to use when e...

Page 88: ...HTML5 Toolbox Web GUI and click Transport and then click IP Via Mapping to open this panel 2 Click the drop down arrow for each interface to select the preferred default setting 3 Click Save to store...

Page 89: ...s transmitted over the network 1 Open the HTML5 Toolbox web GUI in a browser on your PC 2 Click Settings at the top of the screen and then click Options to display the Options panel 3 Click in the QoS...

Page 90: ...pen the HTML5 Toolbox Web GUI and click Transport and then Fuse IP 2 Click the Fuse IP Mode drop down menu and select Server if the codec is not initiating the connection 3 Leave the default Fuse IP P...

Page 91: ...se IP Port as 8999 in most situations unless this port is already in use e g you have multiple codecs behind a firewall using Fuse IP therefore you need to allocate a different port for each Fuse IP t...

Page 92: ...sent by the codec over the newly created tunnel as soon as Fuse IP is enabled even if a connection has not been configured and dialed Depending on the number of interfaces being used the codecs may t...

Page 93: ...this feature is available in Merlin Genie and ViA codecs As an example when dialing a codec using a multi stream program with line hunt groups configured select Line Hunt as the routing type Then sele...

Page 94: ...click Audio in the Menu Bar then click Inputs to display the Inputs panel Important Note 15 volt phantom power can only be supplied on analog input 1 this is disabled by default Adjusting Analog and...

Page 95: ...meters which represents nominal 0 VU at 18dBFS Audio levels should also be verified using the meters in the PPMs panel Input attenuation is available when the input type is AES digital however there i...

Page 96: ...ither Analog or AES3 3 Click Save to confirm the new setting 4 See Configuring AES3 Audio for more information about the digital inputs and outputs Adjusting IGC 1 Click the Input Settings symbol 2 Se...

Page 97: ...mple Rate Configuration The AES3 output sample rate can be configured using the HTML5 Toolbox Web GUI 1 Open the HTML5 Toolbox Web GUI and click Settings then click Options to open the Options panel 2...

Page 98: ...a codec to ensure the currently loaded program cannot be unloaded by a codec dialing in with a different type of program Some drop down menus and settings may be greyed out intentionally depending on...

Page 99: ...tNet IP Tieline codec can be configured to trigger a WheatNet LIO in a Tieline WheatNet IP codec Tieline WheatNet IP codecs require Wheatstone Razor firmware version 1 4 22 or later to support WheatNe...

Page 100: ...ll from a G5 codec 1 Auto The codec will dial the G3 codec and connect in mono or stereo 2 Dual Program This allows the codec to dial a G3 codec with a Dual Program profile loaded and support two simu...

Page 101: ...re sending audio The Local Audio Port is used by the local codec to receive audio from the remote codec When Tieline Codecs is the Session Protocol selected using Tieline session data the default port...

Page 102: ...e Session Protocol then RFC compliant FEC is available Configuration instructions are displayed in the right hand pane FEC Delay is only available when the FEC percentage is 100 This is designed to de...

Page 103: ...d the Local Audio Port allocated is Automatic Note Automatic indicates that the codec will arbitrarily allocate the local port value and send this information to the codec to which you are dialing 8 C...

Page 104: ...select 3 After configuring all settings there are 3 options i If you want to create another answering connection select the check box for Create another answering connection and continue through the w...

Page 105: ...When you create your MP2 or MP3 files ensure the audio levels match the audio reference level of your codec and that peaks average at the correct levels If you create a single file name ensure you ad...

Page 106: ...cast client codecs will display return link quality LQ only The Return reading represents the audio being downloaded from the network locally Multicast server codecs do not display LQ readings The def...

Page 107: ...ieline codec can be configured to trigger a WheatNet LIO in a Tieline WheatNet IP codec Tieline WheatNet IP codecs require Wheatstone Razor firmware version 1 4 22 or later to support WheatNet LIOs In...

Page 108: ...figure the multicast IP address and audio port the same multicast address and port must be used for both the server and client programs then specify which IP streaming interface is used to dial this c...

Page 109: ...o packets 10 Click the Enable Auto Reconnect check box to turn this feature on then click Next 11 After configuring all settings there are 2 options Click Save Program to save the program at this poin...

Page 110: ...odec File playback audio is sent directly to the codec outputs and therefore IGC is not available When you create your MP2 or MP3 files ensure the audio levels match the audio reference level of your...

Page 111: ...create large demands on network bandwidth if the multicast group is significant in size As a result only small sections of the internet are multicast enabled and many internet service providers ISPs b...

Page 112: ...codec to ensure the currently loaded program cannot be unloaded by a codec dialing in with a different program type Some drop down menus and settings may be greyed out intentionally depending on feat...

Page 113: ...IP network Bridge IT has 2 physical CONTROL PORT GPIOs 5 Tieline and WheatNet virtual inputs 1 5 64 Tieline virtual logic outputs and 64 virtual WheatNet logic outputs these allow Tieline WheatNet IP...

Page 114: ...nly client program This setting is configured when you select either Multicast Server or Multicast Client when you first create the program in the wizard The TTL value you need to use is dependent upo...

Page 115: ...redetermined period after the primary audio stream s packets are sent This will increase the likelihood that the FEC packets will take an alternate route to the primary stream s packets This means tha...

Page 116: ...ram to save the program settings then click Finish Important Notes There is no jitter buffer setting on the server codec because it never receives audio packets 14 Configure multicast server and multi...

Page 117: ...a G3 codec first then the G3 Audio Reference Level will be configured for all connections Connections are dial only for multi unicast programs Some drop down menus and settings may be greyed out inten...

Page 118: ...Tieline WheatNet IP enabled codecs to activate functions across a WheatNet IP network Bridge IT has 2 physical CONTROL PORT GPIOs 5 Tieline and WheatNet virtual inputs 1 5 64 Tieline virtual logic ou...

Page 119: ...supports maintaining specific G3 codec settings when answering a call from a G5 codec 1 Auto The codec will dial the G3 codec and connect in mono or stereo 2 Dual Program This allows the codec to dial...

Page 120: ...t Notes The Remote Audio Port is the codec port at the remote end of the link to which you are sending audio The Local Audio Port is the port used by the local codec to receive audio from the remote c...

Page 121: ...the Jitter Buffer for more details Alternatively select a Fixed Buffer Level and enter the Jitter Depth which must be between 12ms and 5000ms depending on the algorithm you select 9 Select the Enable...

Page 122: ...o stream Click Save Program to save the program at this point Configuring SD Card File Playback Options 1 Click Next to configure SD card file playback using Output Audio Source configuration options...

Page 123: ...odec File playback audio is sent directly to the codec outputs and therefore IGC is not available When you create your MP2 or MP3 files ensure the audio levels match the audio reference level of your...

Page 124: ...gs as well as the selected IP interface used to make the connection e g LAN or VLAN 3 Create a SIP program using the front panel via the Home screen or create a SIP program using the HTML5 Toolbox Web...

Page 125: ...dress in the Public IP menu if you want to dial over SIP from behind a firewall Then configure port forwarding to route traffic to the codec s local IP address behind your firewall Note Do not enter a...

Page 126: ...star port Outbound Proxy Proxy port Password Registration Timeout this shouldn t need to be adjusted from the default setting Important Notes In most situations it is best to configure a SIP account w...

Page 127: ...ted e g SIP1 or SIP2 The SIP interface contains settings related to ports and the selected Via interface e g LAN See Configuring SIP Interfaces for more details 4 Click the Enable check box at the top...

Page 128: ...P connection Important Notes Some ISPs may block SIP traffic over UDP port 5060 Troubleshooting SIP Registration If a SIP account is not registering successfully please check the following 1 Confirm a...

Page 129: ...no match on either Blacklist Important Note To only allow a predefined list of codecs to connect add them to the URI Whitelist and add a wildcard asterisk to the URI Blacklist all incoming calls will...

Page 130: ...Remember to lock an answering program in a codec when answering multiple SIP calls Ensure the appropriate TCP and UDP audio ports are open in your firewall to allow SIP audio streams to connect See I...

Page 131: ...WNet Enable LIO checkbox selected in the Options panel of the HTML5 Toolbox Web GUI Relay reflection is not available for SIP and Multicast Client programs Connection related rules are not displayed i...

Page 132: ...is using a VLAN then the call will proceed using the VLAN If you do not wish to use an account for the dial then leave the Account field blank and select the required interface Note the interface must...

Page 133: ...is also possible to configure the Minimum depth and Maximum depth of jitter over the connection See Configuring the Jitter Buffer for more details Alternatively select a Fixed Buffer Level and enter...

Page 134: ...nother answering connection and continue through the wizard ii Click Save Program to save the program at this point iii Click Next to configure Output Audio Source options Configuring SD Card File Pla...

Page 135: ...ther codec File playback audio is sent directly to the codec outputs and therefore IGC is not available When you create your MP2 or MP3 files ensure the audio levels match the audio reference level of...

Page 136: ...ams or audio streams 2 Click Save Program to save the program 3 Click Finish to exit the wizard 4 The newly created program will be displayed in the left pane within the Program Manager panel and in t...

Page 137: ...rogram 1 Open the HTML5 Toolbox Web GUI and click Connect in the Menu Bar then click Program Loader to open the Program Loader panel 2 Click to select a program in the Program Loader panel and then cl...

Page 138: ...ections to open the Connections panel 2 Click the program Connect Disconnect symbol and then click Connect this connects all active audio streams and connections associated with the program 3 Click th...

Page 139: ...ct Disconnect symbol and then click Disconnect to disconnect a program this includes all audio streams and connections associated with the program 2 Click the audio stream Connect Disconnect symbol an...

Page 140: ...ts dialing programs using preconfigured speed dials This is configured and managed using the Program Loader panel Create a New Speed Dial To configure speed dialing 1 Open the HTML5 Toolbox Web GUI an...

Page 141: ...nt panel of the codec select SETTINGS Speed Dial and press the button 16 14 Delete a Program 1 Open the HTML5 Toolbox Web GUI and click Connect in the Menu Bar then click Program Manager to open the P...

Page 142: ...justing the Connection Bit Rate 1 Open the HTML5 Toolbox Web GUI and click Connect then select Connections to open the Connections panel 2 Click Connect Disconnect symbol for an active connection and...

Page 143: ...for more details on each option 1 Open the HTML5 Toolbox Web GUI and click Settings at the top of the screen then click Reset Backup to display the Reset Backup panel 2 Click one of the available rese...

Page 144: ...stream and connection names IP address port algorithm jitter buffer FEC and bit rate settings etc for audio stream connections Creating Backup Files 1 Open the HTML5 Toolbox Web GUI and click Settings...

Page 145: ...em settings Advanced Settings XML Config Caution DO NOT use advanced XML configuration features unless you fully understand how they will affect the codec The standard backup and restore function shou...

Page 146: ...and export individual programs via the Program Manager panel Exporting Programs 1 Open the HTML5 Toolbox Web GUI and click Connect in the Menu Bar then select Program Manager to launch the Program Man...

Page 147: ...Lock or Unlock Programs It is possible to lock a loaded custom program in a codec to ensure the currently loaded program type e g mono cannot be unloaded by a codec dialing in with a different program...

Page 148: ...pears next to the program name in the Connections panel and in the Program Loader panel to indicate a program is locked in the codec It is only possible to lock custom programs in a codec If Lock Prog...

Page 149: ...Server 5 A Success dialog in the web GUI Licensing panel confirms when installation is complete and the codec screen should display a confirmation message 6 Reboot the codec via Settings Reset Reboot...

Page 150: ...ion SNMP attribute Contact A text identifier for the contact person for this managed node together with information on how to contact this person R O Community SNMP provides two types of access namely...

Page 151: ...Logs to Tieline 1 Open the HTML5 Toolbox Web GUI and click Help in the Menu Bar then click Support 2 Click Download System Logs 3 Save the file to your computer and then send the zip file to Tieline s...

Page 152: ...d Flow Control 1 Open the HTML5 Toolbox Web GUI and click Settings in the Menu Bar then click Options to display the Options panel 2 Click the Baud rate drop down menu arrow to select the serial port...

Page 153: ...rules in the HTML5 Toolbox Web GUI 1 Rules panel Configure codec level rules related to programs and or hardware and software I O states 2 Program Manager panel Configure program level rules early in...

Page 154: ...es The rules available are displayed in the following image Note Rules intended to activate dialing will not be valid in Answer only programs or audio streams Stream Level Rules In the Program Manager...

Page 155: ...the control port input which will trigger program connection and disconnection 3 Click the drop down Program arrow to select the program to be connected 4 Check the Rule Summary and click Create Rule...

Page 156: ...a remote relay output 1 Click the third rule in the Rules panel titled Synchronise a local input to a remote relay 2 Click the drop down arrow to select the local control port input used to control a...

Page 157: ...lay based on the connected state of a connection 2 Click the drop down Relay arrow and select the relay output you want to toggle 3 Click the drop down Program arrow to select a specific program which...

Page 158: ...158 Bridge IT Manual v4 0 Tieline Research Pty Ltd 2019 4 Click Yes in the confirmation dialog...

Page 159: ...umbers 1 3 on the codec 16 26 Adjusting Codec Time and Date Network Time Protocol NTP is a networking protocol for clock synchronization between computer systems over packet switched variable latency...

Page 160: ...ver to automatically update users when a firmware upgrade is available 1 Connect the codec to a PC using either a LAN or USB connection and open the HTML5 Toolbox Web GUI See Opening the HTML5 Web GUI...

Page 161: ...u are using to perform the upgrade and click Open to start the upgrade IMPORTANT The codec will reboot automatically after the firmware upgrade DO NOT remove power or reboot the codec before the updat...

Page 162: ...rnet port and up to four additional VLAN interfaces VLAN interfaces have features similar to physical Ethernet ports However your network administrator will need to configure VLAN support throughout y...

Page 163: ...then press the button 8 Navigate to v4 Snet and enter the Subnet Mask then press the button 9 Navigate to v4 Gway and enter the Gateway details then press the button 10 Use the up navigation button t...

Page 164: ...possible to configure the Ethernet link speed 10 100 Auto and whether each available interface operates in Full Duplex or Half Duplex modes 1 Press the SETTINGS button 2 Select Network and press the...

Page 165: ...VLAN settings to a physical Ethernet port in the codec Only one physical Ethernet port is available which cannot be reconfigured 17 2 Configuring a Hostname It is possible to assign a hostname to the...

Page 166: ...interfaces However your network administrator will need to configure VLAN support throughout your network for them to be supported in your codec Reconfigure Default Primary Secondary and Tertiary Inte...

Page 167: ...as a single LAN interface however it can still connect as a fuse Fuse IP server or client This means Bridge IT can stream data between itself and another codec which is bonding over multiple IP interf...

Page 168: ...button to disable Fuse IP if it is enabled 3 Navigate down to Fuse IP Mode and press the button to select Server if the codec is at the studio and not initiating the connection Note the server codec s...

Page 169: ...ctivity Timeout and press the button if you want to adjust the predetermined time period for turning the Fuse IP tunnel off Adjust the setting and press the button to store the new setting Note Inacti...

Page 170: ...the newly created tunnel as soon as Fuse IP is enabled even if a connection has not been configured and dialed Depending on the number of interfaces being used codecs may transmit and receive up to 24...

Page 171: ...o 20 kHz mono from 48kbps upwards It can also deliver up to 20 kHz stereo from 96kbps upwards offering huge savings on your IP data bills and outstanding audio quality Overview of AAC Algorithms Impor...

Page 172: ...minimum connection bit rate of 128Kbps per channel and offers 10Hz to 24kHz frequency response 24 bit 48kHz aptX Enhanced at the maximum bit rate of 576Kbps delivers 120dB of dynamic range Overview of...

Page 173: ...ou are connecting using SIP or not The uplink bandwidth capability of your broadband connection Important Notes Music and MusicPLUS algorithms cannot be used over SIP connections Use MP2 algorithms at...

Page 174: ...nnouncers is required G 711 3kHz 1ms 64kbps minimum 80kbps Low quality 3kHz POTS phone quality audio Very low delay at moderate bit rates Highly compatible with other brands of audio codec Low quality...

Page 175: ...oice and music Low delay at low bit rates Great for live voice or music remotes where limited connection bandwidth is available Suitable when bidirectional communication between announcers is required...

Page 176: ...n bidirectional communications is required Sampling Rates When selecting linear PCM uncompressed audio or AAC MPEG and aptX Enhanced algorithms it is possible to select different either 32kHz 44 1kHz...

Page 177: ...treaming and minimizes delay A fixed jitter buffer is preferable over satellite connections to ensure continuity of signals CAUTION If a Tieline codec connects to a device that is using non compliant...

Page 178: ...his setting is best to use where audio quality is the most important factor and delay is not as critical Unless delay is irrelevant this setting is not recommended over peaky jitter networks e g cellu...

Page 179: ...t of a connection where no action is taken at all while the establishment of a stable connection means analysis of jitter data is not valid 2 Stage 2 a2 A compatibility check to ensure the RTP connect...

Page 180: ...k carefully about the type of connection you will be using Following is a table displaying rule of thumb settings for configuring jitter buffer delays into your codec Connection Jitter Buffer Recommen...

Page 181: ...tream packets are lost or corrupted then packets from the secondary stream can be substituted to replace them The amount of FEC required depends on the number of data packets lost over the IP connecti...

Page 182: ...d local connections No Yes 20 Additional data is sent by FEC in a ratio of 5 1 Recommended for local and LAN connections Yes Yes 10 Highest delay Additional data is sent by FEC in a ratio of 10 1 Reco...

Page 183: ...intain the quality of the connection If you are losing more packets than this say one in three it will be necessary to increase the FEC setting to 33 to compensate Note There is an inverse relationshi...

Page 184: ...dec This effectively reduces the bandwidth required over the return link and increases the overall bandwidth available for the incoming broadcast signal from the remote site 17 8 Configuring Encode De...

Page 185: ...nd press the button 3 Select IP and press the button 4 Select Tieline or Sessionless and then Peer to Peer and press the button 5 Use the down navigation button to select Setup and press the button 6...

Page 186: ...utputs CMOS field effect transistors switch a low impedance path between the two pins when activated These are opto isolated and floating above ground It is important to current limit the source as da...

Page 187: ...tion 7 CTS RTS 8 RTS CTS 9 No connection No connection DB9 Male Connector Pins DB9 Female Connector Pins Important Notes When connecting to G3 codecs only in band data is available via the Music and M...

Page 188: ...onfiguring TCP UDP Ports In TCP and UDP networks the codec port is the endpoint of your connection Software network ports are doorways for systems to communicate with each other For example several co...

Page 189: ...g To adjust the local Tieline session data port used by your codec to answer incoming calls 1 Press the HOME button to return to the Home screen 2 Use the navigation buttons on the front panel to sele...

Page 190: ...ise data packets being transmitted through routers across networks This is useful because in modern data networks many different IP services like email voice web pages video and streaming music coexis...

Page 191: ...ity The codec is able to support dialing to Tieline Commander and i Mix G3 codecs in various modes 1 Auto the codec will dial the G3 codec and connect in mono stereo 2 Dual Program This allows the cod...

Page 192: ...default value of 1 is used to ensure packets are sent through a single LAN router and not over multiple router hops and networks This setting is only used in Multicast Server mode 1 Press the HOME bu...

Page 193: ...ms Call History Deletes custom programs and recent calls in the codec speed dial contacts are retained 6 Reboot Codec Select to restart the codec 7 Reset Codec Log Deletes codec event and log history...

Page 194: ...eliable and are not recommended Creating an SD Card Backup File 1 Press the SETTINGS button 2 Use the navigation buttons to select Reset Backup and press the button 3 Insert a single partition FAT 32...

Page 195: ...Restoring Data from an SD Backup File 1 Press the SETTINGS button 2 Use the navigation buttons to select Reset Backup and press the button 3 Insert a single partition FAT 32 formatted SDHC card into...

Page 196: ...etwork Management Protocol SNMP for managing devices on IP networks To configure SNMP settings 1 Press the SETTINGS button 2 Use the navigation buttons to select SNMP and press the button 3 Navigate t...

Page 197: ...CD Screen Auto Dim Mode By default the codec LCD screen has Auto Dim mode enabled This dims the intensity of the display 30 secs after inactivity and is designed to maximize the working life of the sc...

Page 198: ...odecs can be upgraded by purchasing and installing licenses with new features Options include a multi unicast license includes multicast capability AAC Encode license or aptX Enhanced encoding license...

Page 199: ...omatically install all valid licenses 3 The screen will indicate the update is in progress and then confirm it has been completed successfully 4 Press the RETURN button a few times until you return to...

Page 200: ...ect System and press the button 4 Navigate down to Firmware update from an SD and press the button Note it can take a few seconds for the USB drive to be detected 5 Navigate to the firmware file after...

Page 201: ...L certificate Certificate Installation To install certificates purchased from a reputable vendor 1 Press the SETTINGS button 2 Use the navigation buttons to select Web GUI and press the button 3 Navig...

Page 202: ...tificate if supplied navigate up to Install and press the button 10 Select Yes to confirm installation of the certificates 11 A dialog confirms the certificates have been installed correctly 12 The SS...

Page 203: ...ialog confirms the certificates have been removed succesfully Changing the Default SSL Port The codec uses the standard TCP port 443 for SSL communications The port number can be adjusted by navigatin...

Page 204: ...F attacks To enable or disable this setting 1 Press the SETTINGS button 2 Use the navigation buttons to select Web GUI and press the button 3 Navigate down to CSRF and press the button to toggle betwe...

Page 205: ...ter with a firewall configure Network Address Translation NAT in your router NAT is performed between the public internet and your private Local Area Network LAN by your router Your remote codec sends...

Page 206: ...ng and or outgoing TCP and UDP ports or not configuring NAT and port forwarding correctly The following table lists the firewall ports you need to open for each model of Tieline codec if they are dial...

Page 207: ...Stream 3 9020 Web GUI 80 SIP Session 5060 SIP Session 5060 Alternativ e Web GUI 8080 Fuse IP 8999 Alternativ e Web GUI 8080 Audio Port Stream 4 9030 Alternativ e Web GUI 8080 SIP Audio 5004 5054 SIP A...

Page 208: ...e IPv6 Gateway Getting Connected Once the studio codec is configured you are now ready to receive an incoming call from the remote codec over the internet Always dial from the field codec to the studi...

Page 209: ...udio from the remote codec is being blocked by a firewall at either point A or B in the preceding diagram Troubleshooting TCP Port Blocking Error messages on the codec screen can help to diagnose TCP...

Page 210: ...d IP addresses Network Address Translation NAT port forwarding and firewalls 18 2 Understanding IP Networks Types of IP Addresses Available Type of IP Address How the IP Address is Allocated Descripti...

Page 211: ...0 169 254 255 255 172 16 0 0 172 31 255 255 and 192 168 0 0 192 168 255 255 and are assigned by network DHCP servers and routers These IP Addresses are generally assigned for a predefined period know...

Page 212: ...onnections The following 10 tips are provided to help obtain the best possible IP connection between two codecs without paying for Quality of Service QoS 1 Always use the best quality Internet Service...

Page 213: ...www speedtest net index php If the bandwidth detected is low then something is wrong Get it fixed before going live 7 Use a dedicated DSL ADSL line for your codecs Do not share a link with PCs or comp...

Page 214: ...to test a codec will be unsuccessful if you try to scan and the port is already in use i e the codec is connected Visit www subnetonline com and use an online port scanner to check for open and closed...

Page 215: ...played as well as any packet loss for the period of time that the test occurred Trace the Route of IP Packets Another utility available on your PC is traceroute This tool can be used to determine the...

Page 216: ...216 Bridge IT Manual v4 0 Tieline Research Pty Ltd 2019 18 5 Bridge IT Declaration of Conformity...

Page 217: ...217 Tieline Research Pty Ltd 2019 Bridge IT Manual v4 0...

Page 218: ...void the user s authority to operate this equipment Declaration of Conformity The Tieline Bridge IT IP codec meets the requirements of directives for CE and C Tick certifications Technical documentat...

Page 219: ...registered trademark of Mozilla Corporation in the United States and or other countries 4 Solaris is a trademark of Sun Microsystems Inc in the United States and or other countries 5 Linux is the regi...

Page 220: ...ic Tieline MusicPLUS G 711 G 722 MPEG Layer 2 IP Pro version only AAC LD AAC ELD AAC LC AAC HE AAC HEv2 IP Pro version only 16 24 bit Enhanced apt X IP uncompressed Linear PCM16 Data and Control Inter...

Page 221: ...19 ch1 mic line level audio 19 ganging inputs 19 IGC 19 IGC Auto Level 19 intelligent gain control 19 metering 19 phantom power 19 quick adjustment of levels 19 Auto Reconnect configuration 36 operat...

Page 222: ...5 Toolbox dial a program or audio stream 137 disconnect a program or audio stream 137 unload a program 137 Dialing default algorithm profiles 52 hanging up 35 how to connect 29 speed dialing 36 Dim LC...

Page 223: ...help panels 66 inputs panel 66 IP via mapping 84 IPv4 address configuration 84 IPv6 address configuration 84 licensing panel 66 master panel bit rate adjust 142 master panels 66 modules panel 66 netwo...

Page 224: ...quality 33 monitoring 33 Lock programs 58 Lock programs HTML5 Toolbox 147 Logs clear history via web GUI 193 Logs HTML5 Toolbox send logs to Tieline 151 view event logs 151 LQ 33 M Manual conventions...

Page 225: ...29 Programs HTML5 Toolbox backup and restore 144 configure peer to peer mono stereo 98 exporti programs 146 import programs 146 monitor multi unicasts 117 multi unicast dialing 117 Q QoS configuration...

Page 226: ...6 SNMP HTML5 Toolbox configuring settings 150 downloading MIB files 150 setting descriptions 150 Software upgrades HTML5 Toolbox 160 Specifications 220 Speed dial HTML5 Toolbox create new 140 dialing...

Page 227: ...7 Tieline Research Pty Ltd 2019 Web GUI connecting over a LAN 60 installing USB drivers 65 internet connections 60 LAN troubleshooting 60 launching via a USB connection 66 PC LAN settings 60 port sele...

Reviews: