27
How to measure period
1.
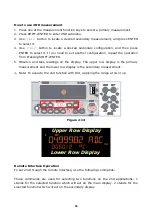
Connect the test leads to the terminals on the front panel as shown in
Figure 2-7
.
2.
Set RESOLUTION (refer to 3.1.3 Resolution & NPLC Setting) or skip this step to use
the default setting.
3.
Press FREQ button for frequency measurement, and then press CONFIG button.
4.
use
◁
and
▷
buttons to locate “PERIOD”. Press ENTER to switch the frequency
measurement to period measurement.
5.
Select the auto-range function by pressing AUTO button on the front panel or use
△
and
▽
buttons to manually select the desired range.
6.
Connect test leads to your source signal and observe readings shown on the
display. If the input signal voltage is beyond the allowed range, an overflow
message “
VAC
OVLD” will be displayed.
Figure 2-7


