background image

65 64 020 D3650

D3650

.

201.01.02

.

02 04.2016

67

Sirona Dental Systems GmbH 

4 Operation

Operating Instructions Simulation Unit SIM MODULAR

4.5 Dentist element

båÖäáëÜ

4.5.7.3

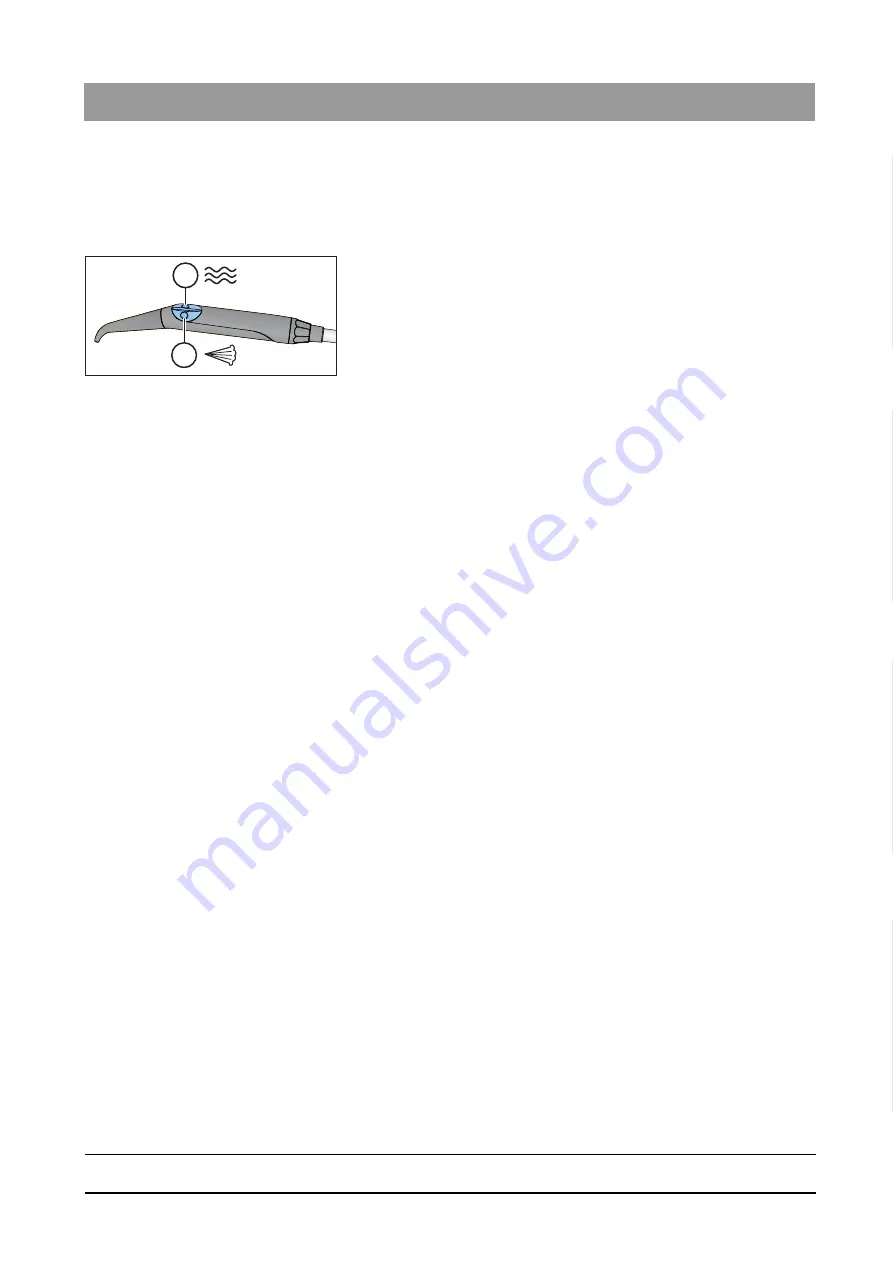
Using the 3-way SPRAYVIT E syringe

The following instructions apply to the standard version (water on the 

right) of the SPRAYVIT E 3-way syringe. A SPRAYVIT E with inverted 

media (water on the left) is available as an option.
➢ Press the 

Air

 key (A).

Air flows out of the instrument tip.

➢ Press the 

Water

 key (B).

Water flows out of the instrument tip.

➢ Press the 

Air

 key A and the 

Water

 key B simultaneously.

Spray flows out of the instrument tip.

For more information on operation and care, please refer to the operating 

instructions of the SPRAYVIT.

B

A

Summary of Contents for SIM MODULAR

Page 1: ...kÉï ë çÑW léÉê íáåÖ fåëíêìÅíáçåë MQKOMNS páãìä íáçå råáí pfj jlari o båÖäáëÜ båÖäáëÜ SIM 2015 simulation unit operating instructions ...

Page 2: ......

Page 3: ... use 11 1 5 Formats and symbols used 11 2 Safety instructions 12 2 1 Identification of the danger levels 12 2 2 Information on the unit 12 2 3 On site installation 13 2 4 Installing the simulation unit 13 2 5 Media quality 13 2 6 Maintenance and repair 14 2 7 Maintenance 14 2 8 Trouble free operation 14 2 9 Vacuum system 15 2 10 Intermittent operation 15 2 11 Ventilation slots 15 2 12 Fresh water ...

Page 4: ...rface 32 3 6 4 1 EasyPad display and status displays 32 3 6 4 2 Fixed keys 33 3 6 5 Comfort EasyTouch user interface 35 3 6 5 1 Touch screen 36 3 6 5 2 Fixed keys of the EasyTouch user interface 38 3 7 Assistant element 39 3 7 1 Instrument positions 40 4 Operation 41 4 1 Putting the simulation unit into operation 41 4 1 1 Initial Operation 41 4 1 2 Selecting a user profile 43 4 2 Concept of the us...

Page 5: ...ir motor other air driven instruments 68 4 5 8 1 Using the highspeed handpiece 68 4 5 8 2 Setting the light of the highspeed handpiece 68 4 5 9 Electric motor 72 4 5 9 1 BL ISO E motor 72 4 5 9 2 Setting the speed on the EasyPad 73 4 5 9 3 Setting the speed on the EasyTouch 75 4 5 9 4 Setting the direction of rotation 77 4 5 10 Integrated torque control 78 4 5 10 1 Integrated torque control on the...

Page 6: ...r supply with the EasyTouch 114 4 8 Operating light 116 4 8 1 Switching the operating light on off 116 4 8 2 Setting the brightness and sensor control of the LEDview 117 4 9 SIVISION digital video system 118 4 9 1 SIVISION monitor 119 4 9 2 SiroCam F AF AF intraoral camera 120 4 9 2 1 Safety instructions 120 4 9 2 2 Functional description 120 4 9 2 3 Connecting the SiroCam F AF AF intraoral camera...

Page 7: ... service function 139 4 11 2 Configuring the simulation unit on EasyTouch 140 4 11 2 1 Opening the setup dialogs 140 4 11 2 2 Setting the time and date 141 4 11 2 3 Configuring control options 142 4 11 2 4 Configuring the network connection 145 4 11 2 5 Opening the service function 145 5 Care cleaning and maintenance by the user 146 5 1 Basics 146 5 1 1 Intervals 146 5 1 2 Care cleaning and disinf...

Page 8: ...tion 173 5 4 2 2 Suction hose cleaning without suction hose cleaning option 175 5 4 3 Cleaning suction hoses and suction system 175 5 4 4 Sterilize disinfect the suction handpieces 178 5 4 5 Empty the central suction sieve 179 5 4 6 Cleaning and disinfecting the suction hoses 179 5 5 Refilling DENTOSEPT P disinfectant 180 5 6 Change the water and air filters 182 5 7 Clean the filter insert of the ...

Page 9: ...hat stands for easy operation high quality design and cost effectiveness These operating Instructions are designed to assist you prior to initial use and whenever you require information later on We wish you a great deal of success and pleasure with SIM MODULAR Your SIM MODULAR team 1 2 Contact information Worldwide customer service Customer service center In the event of technical queries please ...

Page 10: ...tal for technical documents We have set up an online portal for the Technical Documents at http www sirona com manuals There you can download these operating instructions and further documents Please complete the online form if you would like a hard copy of a particular document We will then be happy to send you a printed copy free of charge Help If you reach an impasse despite having thoroughly s...

Page 11: ...instructions If the unit is not used in accordance with the operating instructions this may have a negative effect on the recommended protective measures This device is not intended for operation in areas subject to explosion hazards and only allowed for indoor use 1 5 Formats and symbols used The formats and symbols used in this document have the following meaning CAUTION Follow the instructions ...

Page 12: ...the unit observe the operating instructions Meaning The accompanying documents are available on the homepage of Sirona Electrostatic discharge ESD Connector pins or sockets bearing ESD warning labels must not be touched or interconnected without ESD protective measures See also Electrostatic discharge 17 and Electromagnetic compatibility DANGER An imminent danger that could result in serious bodil...

Page 13: ... tank can be used as a water container Use only drinking water and dry oil free hygienically clean air in this simulation workstation As the owner of the simulation workstation you are generally responsible for the water quality Please note that drinking water e g water from bottles must never be filled into the disinfectant tank of the simulation workstation due to the minerals contained therein ...

Page 14: ...carry out such work it must contain any changes in rated parameters or working ranges if applicable as well as the date the name of the company and a signature In the event that the system owner fails to fulfill its obligation to perform maintenance activities or ignores error messages Sirona Dental Systems GmbH cannot assume any liability for any damage thus incurred 2 7 Maintenance Despite the o...

Page 15: ...y integrated in the supply module Water is pumped into a container behind the suction hose intake and suctioned off from there see Vacuum system 173 The unit can be optionally operated with an air jet pump Air Venturi instead of a suction device 2 10 Intermittent operation Continuous operation with intermittent loading corresponding to the dental mode of working 2 11 Ventilation slots Under no cir...

Page 16: ...e safe operation of the unit the use of possible wireless phones cell phones must be prohibited in the operating area 2 16 Modifications and extensions of the system Modifications to this unit which might affect the safety of the operator users or other persons are prohibited by law For reasons of product safety this product may only be operated with original Sirona accessories or third party acce...

Page 17: ...earth Endangered regions are indicated on the unit by the ESD warning label We recommend that all persons working with this system are made aware of the significance of the ESD warning label A training course should also be held to inform users about the physics of electrostatic charges Physics of electrostatic charges An electrostatic discharge requires prior electrostatic charging There is a dan...

Page 18: ...ions in a device The circuits must be miniaturized to a very high degree in order to include as many functions as possible on these chips This leads to structure thicknesses as low as a few ten thousandths of a millimeter Integrated circuits that are connected to wires leading externally are therefore particularly at risk from electrostatic discharge Even voltages that are imperceptible to the use...

Page 19: ...egory II according to IEC 60664 1 Protection class I Water quality Drinking water Water hardness 1 4 mmol l 8 dH 2 1 mmol l 12 dH Air quality Dry oil free dirt free not contaminated Average power consumption for dimensioning an air conditioning system 100 W Power consumption in switched off state 0 W main switch available On site water pressure 2 5 6 bar 3 l min On site air pressure 5 5 7 5 bar 50...

Page 20: ...rs and instruments 1 min operation 7 min pause with a motor current of 1 5 A Intermittent operation for hoisting motor and tilting motor of the simulation unit 30 s operation 270 s pause on the rating plate on the junction box This work station complies with the requirements of DIN EN ISO 12100 2011 03 DIN EN 61010 1 2011 07 DIN EN 61326 1 2013 07 This product bears the CE marking in accordance wi...

Page 21: ...åÖäáëÜ Simulation unit rating plate SIM MODULAR Device type Serial Number Material number CE marking Observe the operating instructions For disposal information see the section Disposal 210 Year of manufacture TYPE SN REF D3650 XXXXXXX XXXXXXX 230 V 1 5 A 50 60 Hz Made in Germany 20XX Sirona Dental Systems GmbH Fabrikstr 31 64625 Bensheim Germany TYPE SN REF 20XX ...

Page 22: ...he following main components Overview of electric height and tilt adjustment A LEDview operating light B Removable handle covers left right Assistant element D Clamping lever for dummy head rotation E Phantom head F 4 way foot switch and electric height adjustment of the phantom head G Electronic foot control H 22 AC monitor I TS dentist element J CS dentist element with swivel arm K Supply module...

Page 23: ...ce flap for accessing the cleaning agent tank to chemically clean the suction hoses sediment container or filter insert for wet suction N Water bottle system on support tube A LEDview operating light B Removable handle covers left right Assistant element D Clamping lever for dummy head inclination E Phantom head F Clamping lever for dummy head rotation G Foot pedal and manual height adjustment of ...

Page 24: ...Simulation Unit SIM MODULAR 3 3 Treatment position LEFT Treatment position LEFT 1 Pull off the suction hose 2 Shut down the patient simulator 3 Raise the dentist element to the highest position and swivel it into the left hand position 4 Swing the assistant element into the right hand position 5 Insert the suction hose into the suction socket ...

Page 25: ...iculating headrest is equipped with two rotary joints They allow the head inclination to be manually adjusted over a wide range for maxillary mandibular treatment The headrest extension can be pushed in or pulled out to manually adjust it to the height of the patient For details see Adjusting the double articulating headrest A Head pad B Rotary joints C Unlock button one sided D Support bar for ad...

Page 26: ...f the patient Head support double joint force holding force 1 Take hold of them with one hand under the headrest 2 Use the other hand to press the release button A Both rotary joints are now freely movable 3 Adjust the headrest to the desired treatment position Then let go of the release button A Both rotary joints lock into place Ensure that they are securely positioned The headrest is secure aga...

Page 27: ... pneumatic foot switch the compressed air valve for activating the high speed handpieces is integrated into the foot switch The high speed handpieces are therefore continuously adjustable For electric motors and the SIROSONIC L scaler the foot switch is operated as a direct starter i e at a preset speed and intensity A Foot pedal B Toggle switch for activating spray C Button for chip blower D Conn...

Page 28: ...electronic foot switch The C electronic foot control can be set as a speed foot control or direct starter for electric motors and the SIROSONIC L scaler The compressed air for turbines cannot be adjusted A Foot pedal B Left button spray 4 way foot switch plate for adjusting the instruments D Right button chip blower E Positioning bar F Connecting cable F E D C B A S 0 ...

Page 29: ...ment 3 6 1 TS dentist element hanging hoses With this TS dentist element instruments are placed upright in the instrument holders The instrument hoses hang freely under the dentist element A Optional instrument holder option max 5 instruments B Optional holder with non slip silicone mat for 2 standard trays Optional removable handle covers left right D Knob to release or tighten the support arm br...

Page 30: ...truments are placed on the instrument holder horizontally and facing downwards The instrument hoses are placed above the dentist element over the whip arms A Instrument holder max 5 instruments B Removable handle covers left right C Button to release the support arm brake for adjusting height left right D EasyPad or EasyTouch user interface E Holder with non slip silicone mat F X ray viewer G Whip...

Page 31: ...C L scaler and one intraoral camera can be connected 3 The additional holder for an intraoral camera is only available for the TS dentist element Changes in the instrument positions can be made only by your service technician Holder 1 Holder 2 Holder 3 Holder 4 Holder 5 Additional holder3 3 way syringeStandard Turbine Turbine Turbine Scaler SIROSONIC L2 Intraoral cameraSiroCam F or SiroCam AF2 3 w...

Page 32: ...atus displays EasyPad display For indicating speed intensity and torque and for configuring and servicing the simulation unit The time timer function and error messages are also displayed Status displays Indicate activation of spray only for C electronic foot switch counterclockwise rotation torque control and user profile B A EasyPad display B Status displays C Fixed keys membrane keyboard D Favo...

Page 33: ...when the Operating light key is pressed 2 s the operating context light intensity appears The light intensity of the LEDview can be set on the user interface of the treatment center and the NoTouch sensor For details please refer to the section Operating light 116 Backrest tilt Moving the patient simulation see Tilting backrest Height of patient simulator See Adjusting the chair height Countercloc...

Page 34: ...ctions Display mode clean Display mode clean With motor removed and torque control switched on Switching between torque and speed display see Setting the speed 83 in the section Integrated speed control With instruments in place Deactivates the complete user interface of the dentist element The instruments of the dentist and assistant elements can no longer be activated The SIVISION monitor and th...

Page 35: ...ng Instructions Simulation Unit SIM MODULAR 3 6 Dentist element båÖäáëÜ 3 6 5 Comfort EasyTouch user interface The EasyTouch option is available only for the SIM MODULAR simulation unit A Touchscreen pressure sensitive user interface B Fixed keys membrane keyboard INTEGO A 10 45 03 2 1 0 S A B Clean ...

Page 36: ...iew of all function keys Some programs are divided into main programs and sub screens The main programs are briefly introduced below Start dialog After the simulation unit is switched on the start program automatically appears The start program displays the function keys for the patient simulator adjustment and other general functions Instrument program The Instrument program that corresponds to t...

Page 37: ...3 Unit description Operating Instructions Simulation Unit SIM MODULAR 3 6 Dentist element båÖäáëÜ SIVISION program The SIVISION program enables certain computer programs running on the PC to be controlled directly from the simulation unit For details see Operation with a PC ...

Page 38: ...ace and protect from interference from an external HF device see Disinfect user interfaces 151 Electromagnetic interference can often be reduced if the external HF surgical device is operated with a neutral electrode Operating light Switches the operating light on for composite operation or off Composite operation is needed to prevent premature curing of composite materials Reduced light intensity...

Page 39: ...imulation unit can be equipped with the comfort assistant element The user interface on the assistant element is optional Comfort assistant element The Comfort assistant element is attached to the supply module by a support arm It can also be positioned to allow unassisted treatment by the dentist A Holders 1 to 4 from left to right for instruments B User interface optional Handle D Tray area with...

Page 40: ...ositions are available 1 Either a MINI LED curing light an intraoral camera or an additional spray aspirator can be connected to the simulation unit Changes to instrument holder 2 can be made only by your service technician Holder 1 Holder 2 Holder 3 Holder 4 3 way syringeSPRAYVIT E additional spray aspirator 1 Spray aspirator Saliva ejector 3 way syringeStandard Polymerization light Mini L E D 1 ...

Page 41: ...r using the 4 way foot switch Adjusting the inclination and rotation 1 Release the clamping lever 2 Move the patient simulator to the desired position 3 Tighten the clamping lever CAUTION For safety reasons always switch the SIM MODULAR simulation workstation off O after completing work CAUTION Risk of getting crushed trapped When adjusting the height it is very important to ensure that there are ...

Page 42: ...and inclination adjustment Adjusting the height Press the foot pedal to manually move the patient simulator up and down Adjusting the rotation 1 Release the rotation clamping lever 2 Move the patient simulator to the desired position 3 Tighten the clamping lever Adjusting the inclination 1 Release the clamping lever 2 Move the patient simulator to the desired position 3 Tighten the clamping lever ...

Page 43: ...s and settings become available Selecting a user profile on the EasyPad If the status display user profile lights up user profile B is pre selected if is does not light up user profile A The user profile used last is automatically loaded when the simulation unit is switched on All instruments are placed in the holders Press the Counterclockwise rotation User profile key The status display User pro...

Page 44: ...nk alternately action is required by the user e g disinfectant or water must be refilled For information about the display of errors messages please refer to Easy Pad error messages Status displays There are status lights below the EasyPad displays They indicate activation of spray only for C electronic foot switch counterclockwise rotation torque control and user profile B Favorite key pad These ...

Page 45: ... of integrated torque control The integrated torque control cannot be activated in this case Toggling between speed and torque display is not possible Accessing functions Functions are triggered using the fixed keys on the user interface By pressing and holding the Tumbler filling and Flushing keys 2 s the setting context can be accessed Stopping processes Depending on the operating context you ca...

Page 46: ... the feature option Network interface Furthermore in the Start dialog the User profile key can be hidden with the setup setting Preselect the number of user profiles Key background color General functions are represented by gray keys If the corresponding function is switched on or active the key is displayed in orange Keys that initiate a dialog change or lead to sub dialogs and settings dialogs a...

Page 47: ...disabled for inputs Settings screens are usually automatically hidden after a certain period has elapsed The Return key return arrow closes the opened settings screen immediately 4 2 2 3 Status column There is a column for status displays at the left edge of the touchscreen Here the current time with the seconds below is shown and if several user profiles A are preselected the active user profile ...

Page 48: ...rument dialog is called up Foot pedal Remove an instrument electric motor highspeed handpiece air motor SIROSONIC L and step on the foot pedal The instrument is switched on with the set speed and intensity For highspeed handpieces air motors the speed is controlled by the pedal action Spray switch Move the toggle switch Left position Spray off Right position Spray on The spray is either switched o...

Page 49: ...activated With the EasyPad the motor and the SIROSONIC L are activated with the set speed or intensity direct starter When the speed control foot switch function is set on the EasyTouch the motor and SIROSONIC L can be controlled depending on the pedal position see Set C electronic foot switch as direct starter or speed control foot switch 64 When the intraoral camera is removed from the holder th...

Page 50: ...removed Slide the 4 way foot switch plate to the right The instrument settings saved for the favorite key e g speed intensity and activation of spray are called up An electric motor is removed Slide the 4 way foot switch plate to the left The clockwise counterclockwise rotation of the electric motor is activated Foot switch functions during active treatment S 0 1 2 Setup 3 S 0 1 2 40 20 Set S 0 IM...

Page 51: ...ient simulator keys on the control panel of the assistant element Triggering movement stop on the pneumatic foot switch Press the pedal of the pneumatic foot switch With all instruments are in place press the pedal or the left or right button of the C electronic foot switch With an instrument removed from the holder press the pedal of the C electronic foot switch Move the 4 way switch plate on the...

Page 52: ...ns Simulation Unit SIM MODULAR 4 4 2 Manually moving the patient simulator Dentist element on support arm collision manual movement WARNING The dentist element could be positioned within the movement range of the patient simulator Before moving the patient simulator position the dentist element to make a collision impossible ...

Page 53: ...this case the maximum load on the dentist element and the tray is 1 kg 2 2 lbs each CS dentist element The maximum load on the CS dentist element without a tray holder is 0 5 kg 1 1 lbs The CS dentist element can be equipped with a tray holder mounted below the dentist element The holder is available in two sizes for one or two standard trays The maximum load on the CS dentist element with a tray ...

Page 54: ...ay tightly 2 Open the lock by turning the lever downwards 3 Remove the tray 4 Let the lever fall back into its original position To insert the tray simply guide it into the mount The mechanism locks automatically Tray Tray Holder CAUTION If the tray is not locked in place it can disengage from the tray holder After installing the tray make sure it is securely attached to the tray holder ...

Page 55: ...t element only has one button on the right side The button must only be pressed to move the chair vertically Horizontal movements are also possible without releasing the brake 1 Grip a handle with your hand and keep the button pressed The locking brake is released with the sound of pressurized air The dentist element can be raised and lowered 2 Position the dentist element and release the button T...

Page 56: ...entist element is attached to the front mount of the supply module Positioning the CS dentist element standard position In the standard position the support arm of the CS dentist element is attached to the front mount of the supply module 4 5 3 Fixed keys on the dentist element An overview of the fixed keys on the EasyPad and EasyTouch can be found in the Description of Device see EasyPad standard...

Page 57: ...rst is displayed Therefore always ensure that all instruments are placed in the correct instrument holders If any instruments are placed in the wrong holders the wrong instrument dialog will be opened when they are removed from the holders Cover for TS dentist element Cover A cover can be purchased as an accessory for an instrument holder which is not used Insert the cover into an unassigned instr...

Page 58: ... along the instrument hose On the EasyPad the speed or intensity of the respective instrument is shown on the display with the EasyTouch the instrument dialog appears on the touchscreen The instrument can be activated via the foot control The positions of the instruments on the holder can be optimized by moving the guide rollers A on the whip arms Holder on the CS dentist element Dentist element w...

Page 59: ...iewer It switches off automatically after 10 minutes If the simulation unit does not have an X ray viewer but is equipped with a SIVISION monitor it can be switched to a white screen in the Start sub screen The white screen function is available only with the EasyTouch Monitor not suitable for diagnosis WARNING Faulty diagnoses may be possible for X ray images Use the white screen of the SIVISION ...

Page 60: ...ith the instrument On the EasyPad the spray is switched on off via the foot switch Cooling of treatment areas Flow rate reduced Switch spray on off with the pneumatic foot switch With a pneumatic foot switch Toggle the switch on the pneumatic foot switch Left position Spray off Right position Spray on The spray is switched on off when the instrument is activated Activation of the spray is not disp...

Page 61: ...s switched on when the instrument is activated Activation of the spray is saved on the favorite keys see section Setting the speed on the EasyPad 73 Setting the intensity on the EasyPad 90 and Integrated torque control on the EasyPad 79 4 5 6 1 2 Activating the chip blower With the chip blower an air jet comes out of the burr instrument nozzle A highspeed handpiece or motor is removed from the hol...

Page 62: ...pray on off on the pneumatic foot switch The spray is switched on when the foot switch is activated in combination with the instrument The spray can be switched on off via the foot switch Cooling of treatment areas Toggle the switch on the pneumatic foot switch Left position Spray off Right position Spray on The spray is switched on off when the instrument is activated When spray is activated by t...

Page 63: ...tus column with a spray or air symbol Switching the coolant on off The preselected coolant is switched on when the foot pedal is pressed while the instrument is activated The spray can be switched on off via the foot switch Cooling of treatment areas An instrument is removed from the holder Press the left button of the C electronic foot switch If the preselected coolant is switched on it will be d...

Page 64: ...ocator section Endodontic treatments with ApexLocator and torque limitation handpiece The ApexLocator is available only with the EasyTouch comfort user interface 4 5 6 2 6 Setting the C electronic foot switch as a direct starter or speed control foot switch To operate the motor or scaler SIROSONIC L the C electronic foot switch can be set as a direct starter or a control foot switch Direct starter...

Page 65: ... favorite keys The instrument settings can be called up again by pressing the key or actuating the C foot switch see section Setting the speed 73 Setting the intensity 90 and Integrated torque control 79 4 5 6 4 Setting the amount of spray water The amount of spray air or water is factory preset for the instruments This basic setting and the compressed air for the turbines can be changed by the se...

Page 66: ...IMPORTANT Also note the SPRAYVIT operating instructions as well as the information on care of the 3 way syringe Standard in the section Cleaning and sterilizing the standard 3 way syringe 169 WARNING The nozzle of the Standard 3 way syringe must lock into the holder Otherwise the jet could fall out during treatment Prior to treatment ensure that the jet is securely in place CAUTION Leakage of air ...

Page 67: ...ard version water on the right of the SPRAYVIT E 3 way syringe A SPRAYVIT E with inverted media water on the left is available as an option Press the Air key A Air flows out of the instrument tip Press the Water key B Water flows out of the instrument tip Press the Air key A and the Water key B simultaneously Spray flows out of the instrument tip For more information on operation and care please r...

Page 68: ...rument EasyTouch user interface When the highspeed handpiece is removed from the holder a highspeed handpiece signal appears on the touchscreen 4 5 8 2 Setting the light of the highspeed handpiece Instrument light optional with INTEGO The instrument light supply is optional in SIM MODULAR Halogen lamps cannot be operated with the SIM MODULAR simulation unit The voltage or current can be limited fo...

Page 69: ... focus Voltage U flashes Limiting voltage The selection focus Voltage U flashes 1 Press the function key 2 Setup The setting focus Setting the voltage flashes 2 Set the voltage for the lamp of the turbine selected in volts using favorite keys 1 and 3 3 Confirm the setting by pressing the function key 2 Setup The voltage is limited to the level set The operating context Turbine appears Limiting cur...

Page 70: ...e selection focus Voltage U flashes 1 Press the favorite key 3 twice The selection focus Light off flashes 2 Confirm your choice by pressing the function key 2 Setup The power supply for the removed highspeed handpiece is switched off The operating context Highspeed handpiece appears Switching instrument light on The selection focus Light off flashes 1 Press the favorite key 3 twice The selection ...

Page 71: ...setup Highspeed handpiece appears on the touchscreen 4 To set the voltage for the lamp of the highspeed handpiece which has been removed touch the key V mA until the field V Volt is highlighted orange Use the and keys to set the voltage in volts Use the and keys to set the voltage in volts 5 Touch the V mA key The Milliampere mA field is highlighted orange 6 Use the and keys to set the current for...

Page 72: ... be used for the BL ISO E motors The BL ISO E motor is equipped with an ISO coupling T1 LINE and handpieces can thus be used without an adapter With SIM MODULAR the speed range of the BL ISO E motor is 1 200 to 40 000 rpm The motor can be used for integrated torque control The motor can be sterilized Reference to apex measurement via the instrument For information on performing apex measurement us...

Page 73: ...nute on the EasyPad display By moving the 4 way switch plate of the C electronic foot switch to the right the settings of the favorite keys can be accessed consecutively Changing the speed Press and hold the favorite key 1 or 3 1 s The speed is increased or reduced The speed can also be increased or reduced by moving the 4 way switch plate of the C electronic foot switch up or down Electric motor ...

Page 74: ... switched on or off will be saved 1 Press and hold the favorite key 2 Setup 2 s The speed flashes on the EasyPad display 2 Press the favorite key 1 2 or 3 An acoustic signal sounds The set speed and if applicable activation of spray is saved on the favorite key While the speed flashes and is displayed on the EasyPad display pressing the Counterclockwise rotation user profile key will interrupt sav...

Page 75: ...te key the selected speed is displayed in rpm revolutions per minute Electric motor speeds on the favorite keys By moving the 4 way switch plate of the C electronic foot switch to the right the settings of the favorite keys can be accessed consecutively Changing the speed Press and hold the left or right favorite key 1 s The speed is increased or reduced The favorite keys are shaded gray for inter...

Page 76: ...spray is saved on the favorite key The speed set is displayed on the favorite key While the speed flashes and is displayed on the touchscreen pressing any other key on the touchscreen will interrupt saving to a favorite key IMPORTANT Increments The size of the increments depends on the speed range setting From 100 to 1 000 rpm 100 rpm increments with eControl option From 1 000 to 2 000 rpm 200 rpm...

Page 77: ...tion is set Via the touchscreen of the EasyTouch An electric motor is removed from the holder The Motor dialog is displayed on the touchscreen Touch the Counterclockwise rotation key on the touchscreen For counterclockwise rotation The key is highlighted orange For clockwise rotation The key is displayed in gray Via C electronic foot switch The rotational direction of the motor can also be set via...

Page 78: ...orque limitation Never perform endodontic treatments without torque limitation Use an endodontic handpiece with mechanical torque limitation e g SIRONiTi from Sirona CAUTION Torque limitation does not always protect against file breakage The integrated torque control maintains the torque values which you have set with a tolerance safety margin Please note The limiting values stated by the file man...

Page 79: ... control is switched on the status display torque control lights up The preset torque of 1 00 Ncm Newton centimeters is displayed on the EasyPad display Switching torque control off If the integrated torque control is switched on when the burr drive assigned to the torque control is removed from the holder the torque or speed of the contra angle handpiece is displayed instead of that of the motor ...

Page 80: ...cludes a measurement of motor current at different speeds to assess the properties of the system Calibration only with Sirona instruments Integrated torque control is switched on The status display torque control lights up The torque is shown on the EasyPad display 1 Attach the contra angle handpiece that you wish to use with torque control to the electric motor 2 Insert a file in the contra angle...

Page 81: ...on the 4 way switch plate of the C electronic foot switch Endodontics speed and torque settings Endodontics speed and torque settings Treatment torque adjustment Accessing saved torque The electric motor is removed from its holder with torque control switched on The set torque is shown on the EasyPad display Press one of the favorite keys briefly 1 s The torque saved on the favorite key is shown o...

Page 82: ...creased or reduced by moving the 4 way switch plate of the C electronic foot switch up or down Saving torque The desired torque is set 1 Press and hold the favorite key 2 Setup 2 s The torque flashes on the EasyPad display 2 Press the favorite key 1 2 or 3 An acoustic signal sounds The torque setting is saved on the favorite key While the torque flashes and is displayed on the EasyPad display pres...

Page 83: ...on on off only for the torque Speed is not saved on the favorite keys only torque The torque is shown on the EasyPad display 1 Press the Display mode Clean key The selected speed is shown on the EasyPad display in rpm revolutions per minute 2 Set the desired speed for the contra angle handpiece Press and hold the favorite keys 1 or 3 1 s The speed is increased or reduced The speed can also be incr...

Page 84: ...ed on off On the EasyPad display a horizontal bar appears above the Burr drive calibrated or Burr drive not calibrated display 4 5 10 1 6 Changing direction of rotation The direction of rotation can be changed only with the motor stopped Counterclockwise rotation is performed without torque limitation Tip After starting the electric motor with the foot switch an audible warning signal sounds 6 tim...

Page 85: ...ng torque control on Torque control is assigned to the burr drive removed from the holder The desired electric motor for torque control is removed from the holder The motor speed and favorite keys are shown 1 Press the Sub dialog fixed key The Motor sub dialog is displayed 2 Press the Integrated torque control key The Endodontics dialog is displayed on the touchscreen B 10 45 03 2 1 0 S rpm 20000 ...

Page 86: ...chscreen To show the motor speed again when the burr drive is removed the integrated torque control must first be switched off The electric motor assigned to the integrated torque control is removed from the holder The Endodontics dialog is displayed on the touchscreen 1 Press the Sub dialog fixed key The Endodontics sub dialog is displayed 2 Press the Integrated torque control key If the key is b...

Page 87: ...cs dialog or the Endodontics sub dialog is displayed on the touchscreen 1 Attach the contra angle handpiece that you wish to use with torque control to the electric motor 2 Insert a file in the contra angle handpiece This ensures that the file is taken into account in the measurement 3 Touch the Calkey on the touchscreen or Press the right button of the C electronic foot switch The key flashes The...

Page 88: ... rotation The key Counterclockwise rotation is displayed in gray and the orange counterclockwise arrow is hidden 4 5 10 2 2 Selecting a working step Speed and torque can be saved for up to six working steps At the end of each working step the required settings can be accessed immediately by selecting the next step The Endodontics dialog or the Endodontics sub dialog is displayed on the touchscreen...

Page 89: ...ng step with which the speed and torque are to be changed is selected Use the and keys to set the speed and torque of the contra angle handpiece You can also hold down the keys for this purpose The selected speed is displayed in the first line in rpm revolutions per minute the second line indicates the speed in Ncm Newton centimeters IMPORTANT Torque adjustment The maximum adjustable torque depend...

Page 90: ...s for each user profile On the C electronic foot switch spray activation is saved on the favorite keys The settings can also be made via the 4 way switch plate Accessing intensity settings The SIROSONIC L scaler is removed The intensity setting is shown on the EasyPad display Press the favorite keys briefly 1 s The intensity saved on the favorite key is shown as a percentage on the EasyPad display...

Page 91: ...et Via the C electronic foot switch The spray is switched on or off will be saved 1 Press and hold the favorite key 2 Setup 2 s The intensity flashes on the EasyPad display 2 Press the favorite key 1 2 or 3 An acoustic signal sounds The intensity set and if applicable activation of spray will be saved on the favorite key While the intensity flashes on the EasyPad display pressing the Counterclockw...

Page 92: ... 1 Press the Endodontics Purge key The endodontics intensity endo mode is displayed instead of ultrasonic intensity ultrasonic mode 2 Use favorite keys 1 and 3 to set the desired endodontics intensity En 1 to En 5 By pressing the Endodontics Purge key again the user is returned to ultrasonic mode The intensity settings cannot be saved on the favorite keys in endo mode IMPORTANT Intensities in endo...

Page 93: ...e of the C electronic foot switch to the right the settings of the favorite keys can be accessed consecutively Changing the intensity Press and hold the left or right favorite key 1 s The intensity is increased or reduced The favorite keys are shaded gray for intermediate values The intensity can also be increased or reduced by moving the 4 way switch plate of the C electronic foot switch up or do...

Page 94: ...e SIROSONIC L scaler is removed The Ultrasonic dialog is displayed on the touchscreen Touch the Endo key The key is highlighted orange In the ultrasonic dialog the endodontics intensity is displayed instead of the ultrasonic intensity IMPORTANT Endo intensity values The intensity can be adjusted from 1e to 5e Please note that the endodontics intensity values of 1e to 5e do not match the values of ...

Page 95: ... SIM MODULAR 4 5 Dentist element båÖäáëÜ 4 5 12 Mini LED curing light The function is described in the chapter on the assistant element see Mini LED curing light 101 4 5 13 SiroCam F AF AF intraoral camera Functionality is described in the SIVISION digital video system section see SiroCam F AF AF intraoral camera SiroCam AF ...

Page 96: ...2 Timer function on the EasyTouch A set time can be counted down to zero with the timer function A time loop automatic restart of the countdown and an acoustic signal when the set time has expired can be added to each timer Presetting the timer The maximum time setting is 9 minutes and 30 seconds The Start dialog of the highspeed handpiece or the sub dialog of an instrument is shown on the touchsc...

Page 97: ...alog is closed Starting the timer Press the Timer key on the touchscreen briefly The preset timer is started immediately The set and elapsed time are displayed on the left side of the touchscreen Stopping resetting the timer Briefly touching the key stops the timer Touching it again continues the countdown Pressing and holding the Timer key 2 s serves to display theTimer function setting dialog Th...

Page 98: ...or below the patient simulator The phantom head or the assistant element may become damaged when moving the patient simulator Move the assistant element out of the collision zone before moving the patient simulator CAUTION The suction handpieces can be closed using the slide The suction can be switched off with the 4 way foot switch option location selection valve Due to the lack of suction flow f...

Page 99: ...nula please attach the adapter supplied Saliva ejector A curved tip that can be placed in the corner of the mouth is provided for saliva ejection The suction flow can be stopped and regulated using the A rotating knob Interrupting suction flow with the 4 way foot control If the simulation unit is equipped with a position selector valve for the suction system it can be set so suction flow can be in...

Page 100: ...tion Sirona Dental Systems GmbH 4 6 Assistant element Operating Instructions Simulation Unit SIM MODULAR 4 6 4 3 way standard and SPRAYVIT E syringe The function is described in the chapter on the assistant element see Standard and SPRAYVIT E 3 way syringe ...

Page 101: ...cycline Any persons who have in the past suffered from retinal or lens disorders or have undergone eye surgery especially for cataracts must consult their ophthalmologist before undergoing treatment with the mini LED It is especially advisable to always wear appropriate protective goggles For the frequency range of the light see Technical data 19 EHDP H LW DSHUWXUH 77 17 21 3RWHQWLDOO GDQJHURXV UD...

Page 102: ...onnect supply line A to the assistant element of the simulation unit 2 Screw hose coupling B onto the Mini LED C 3 Screw the sterilized light guide B onto the Mini L E D C Make sure to insert the fiber optic correctly The fiber optic clicks into place audibly 4 Slip the glare shield E onto the light guide D The glare shield protects your eyes against reflecting curing light 4 6 5 4 Functional desc...

Page 103: ...e light intensity output is as follows 1250 mW cm 10 with the standard light guide dia 7 5 mm 2000 mW cm 10 with the booster light guide dia 5 5 mm Pulsed curing mode In the pulsed curing mode the Mini LED radiates in 10 consecutive light pulses of 1 s each There is a 250 ms break between the individual pulses Soft start mode The soft start mode features A 10 second soft start from 0 to 1250 mW cm...

Page 104: ... ready for operation 2 Hold the light guide as close as possible to the composite material surface to be photopolymerized 3 Start the curing cycle Press the on off button C briefly An acoustic signal sounds The curing cycle is started The acoustic signal sounds every 5 seconds The end of the curing cycle is also indicated by an acoustic signal You can interrupt the curing cycle immediately by pres...

Page 105: ...ce HD and exposure hazard value EHV according to IEC 62471 Model Mini L E D Weight of handpiece without hose 105 g Dimensions Dia 23mm x 240mm Current consumption of handpiece 5 V DC 0 65 A Thermal safety Overheat protection Wavelength Max intensity 420 nm 480 nm 1 at 450 nm Light power dia 7 5 mm standard version 1250mW cm2 Light power dia 5 5 mm available from Satelec 2000 mW cm2 Light power 450...

Page 106: ...for the fresh water bottle Regularly sanitize the water lines every 4 weeks and always after switching to the public drinking water supply from the stand alone water supply see Sanitization The functionality of the stand alone water supply is only available if the simulation unit is equipped with a fresh water bottle The simulation unit must be equipped with the integrated water disinfection syste...

Page 107: ... air supply is automatically switched off when the bottle is turned The existing pressure escapes 2 Mix food grade water 100 CFU ml with the DENTOSEPT P disinfectant at a ratio of 100 1 1 liter of water 10 ml DENTOSEPT P and fill this into the fresh water bottle The bottle has a capacity of approx 1 3 liters 3 Insert the tube in the fresh water bottle and screw the bottle into the holder again Whe...

Page 108: ...ise to the bottle symbol For operation with the public drinking water supply turn the lever counterclockwise to the faucet symbol 2 Sanitize the water lines after switching to the public drinking water supply see Sanitizing with fresh water bottle Water supply stand alone rinsing the water lines after switching to the fresh water bottle CAUTION After switching to the water supply from the fresh wa...

Page 109: ...y switched off when the bottle is turned The existing pressure escapes 3 Mix food grade water 100 CFU ml with the DENTOSEPT P disinfectant at a ratio of 100 1 1 liter of water 10 ml DENTOSEPT P and fill this into the fresh water bottle The bottle has a capacity of approx 1 3 liters 4 Insert the tube in the fresh water bottle and screw the bottle into the holder again When the simulation unit is sw...

Page 110: ...d into the holder Unsuitable bottles such as beverage bottles can burst Use only Sirona fresh water bottles Please also observe the general safety instructions see Fresh water bottle section CAUTION Replace deformed scratched or discolored bottles immediately Operating temperature 10 C 45 C Do not use the bottle anymore after expiration of the maximum period of use See example in illustration Repl...

Page 111: ...h the optional fresh water bottle in the version which allows switching to the public drinking water supply the water supply can be switched by turning a lever 1 For the water supply from the fresh water bottle flip the switch downwards to the bottle symbol For operation with the public drinking water supply flip the switch upwards to the faucet symbol 2 Sanitize the water lines after switching to...

Page 112: ...ext is displayed If there is a 0 next to the text AqU the simulation unit takes the water from the public drinking water supply If there is a 1 the simulation unit is switched to the stand alone water supply To change the mode of operation proceed as follows Changing disinfection system to stand alone water supply 1 Press the favorite key 2 Setup The selection focus flashes The simulation unit is ...

Page 113: ... water supply 7 Acknowledge the message by pressing the favorite key 2 Setup The time is displayed Resetting disinfection system for operation with public drinking water and disinfectants Resetting the disinfection system to public drinking water is similar to changing to stand alone water supply Instead of the Refill water display the Refill disinfectant display appears on the EasyPad 1 Fill appr...

Page 114: ... switched to the stand alone water supply To change the mode of operation proceed as follows 1 Press and hold the Aqua key 2 s The Aqua key flashes orange until the disinfectant tank is emptied Moreover the Changing to self sufficient water supply display appears If there is still disinfectant in the tank it is rinsed down the drain This can take up to 6 minutes The Refill water display then appea...

Page 115: ...ng disinfectant display appears on the touchscreen 1 Fill approx 0 5 liters of DENTOSEPT P into the disinfectant tank 2 Sanitize the water lines after switching to the public drinking water supply see Sanitizing 190 Level control If the Refill water or Refill disinfectant display appears during operation the tank is almost empty 300 ml Pressing the Return key hides the display and allows the opera...

Page 116: ... The operating light is switched on at the preset brightness level 2 Composite function The operating light is operated with reduced brightness to prevent the premature curing of composite materials 3 Switched off Press the Operating light fixed key on the dentist or assistant element several times if necessary The operating light switches to on composite function or off The operating light is alw...

Page 117: ...focus flashes 2 Use the left and right arrows on the favorite key pad to adjust the brightness of the operating light 7 levels The left arrow key decreases the brightness the right arrow key increases it 3 Confirm your setting with the 2 Setup favorite key The time is displayed Setting LEDview on the EasyTouch 1 Press and hold the Operating light key on the dentist element 2 s The settings screen ...

Page 118: ... stored there This computer can then display the images on the SIVISION monitor of the treatment center The video images are an outstanding way to improve communication Video system not suitable for diagnosis The SIVISION connect and or SIUCOM plus application must be installed in order to transmit the camera images to the PC SIUCOM plus enables PC control Furthermore a video application e g SIDEX...

Page 119: ...port rod VESA standard Monitors with threaded holes at a distance of 100 mm can also be mounted on the holder of the LEDview lamp support rod Monitor not suitable without approval Connection of loudspeakers WARNING Monitors without approval must not be connected They endanger the product safety of the simulation unit Use only monitors that are approved according to IEC 60950 1 office equipment or ...

Page 120: ...and SiroCam AF feature automatic focus and can thus be used for both intraoral and extraoral images In the SiroCam F focusing is set for the close up range NOTICE The lens window is sensitive to scratches The lens window can be damaged by hard objects Deep scratches in the lens window impair image quality Always place the intraoral camera in the designated holder and clean the lens window with a s...

Page 121: ...n is located underneath the instrument holder The holder is fixed on the front edge with two internal clamps on the dentist element 1 The instruments must be removed from the instrument holder To do this remove all instruments one after the other and allow these to hang down in front of the dentist element 2 Lift the instrument holder by the front edge until the clamps are released and the holder ...

Page 122: ... the second instrument position of the assistant element The camera connection is located underneath the assistant element instead of the connection for the curing light Plug the connector of the intraoral camera into the socket on the assistant element The plug locks in place Removing the intraoral camera The plug of the intraoral camera is secured against unintentional removal Grasp the plug by ...

Page 123: ...Cam AF AF intraoral camera adjusts the image focus at the touch of a button It is focused continuously 1 Direct the camera to the subject to be acquired The image is displayed on the SIVISION monitor 2 Press the Auto focus key A The intraoral camera adjusts the image focus according to the distance from the subject to be acquired The adjustment remains until the key is pressed again Focusing the c...

Page 124: ... on the EasyTouch touchscreen When the intraoral camera is put in the holder the live image disappears from the monitor The generated still images remain displayed Operation of SI Video with the camera removed When the camera is removed the SI video is controlled via the C electronic foot control the keys of the EasyPad or the virtual keys of the EasyTouch in the SIVISION dialog Switching between ...

Page 125: ...previously marked quad image is displayed as a single image Conversely the displayed single image is marked in the quad image The intraoral camera must be removed to allow for operation via the foot switch Press the right button of the C electronic foot control or Press the Display mode Clean key on the EasyPad on the EasyTouch the Quad image key The mode changes between quad and single image Oper...

Page 126: ...witching SiroCam AF AF intraoral camera on off The PC is in operation and the SIVISION connect or SIUCOM plus PC application is started Pull out the SiroCam AF AF intraoral camera SIDEXIS is started and the live image appears on the SIVISION monitor The text CAM is displayed on the EasyPad display The SIVISION dialog is displayed on the EasyTouch touchscreen When the intraoral camera is returned t...

Page 127: ... it can be configured in the setup that the camera image can be focused with the foot control see Switching on off the C electronic foot control function for intraoral camera focus for EasyPad for EasyTouch If this function is switched on the foot pedal must be pressed down fully to switch between live and still images Saving an image The patient must be registered in SIDEXIS The still image to be...

Page 128: ...oCam AF and SiroCam AF intraoral camera Weight of handpiece without cable approx 85 g Dimensions diam 27 5 x 207 mm Working temperature 10 to 40 C Power supply and signal output 5 V via USB 2 0 interface modified plug in connection SiroCam F SiroCam AF SiroCam AF Lighting 2 white light LEDs Image sensor 1 4 CMOS Focusing set for close up range Autofocus Live image resolution 824 x 514 Resolution o...

Page 129: ...IVISION connect manual The simulation unit can be operated with the following PC versions External PC The simulation unit is connected to an external PC via an Ethernet cable PC applications such as SIDEXIS Microsoft PowerPoint Windows Mediaplayer and SI Video can be controlled from the simulation unit Operation without PC The use of SIVISION is not possible The SI Video application is used in sim...

Page 130: ...ations which were started from the simulation unit are terminated SIUCOM plus has been started e g via Autostart Touch the SIVISION dialog key on the touchscreen or If intraoral images are desired Remove the SiroCam AF AF intraoral camera from the holder The SIDEXIS PC application or SI Video starts immediately The SIVISION dialog is displayed on the touchscreen Starting other PC applications 1 Se...

Page 131: ...f playing back multimedia files stored on the external PC using the Windows Media Player The audio or video files in the file system can be selected and the player can be controlled from the simulation unit Video images can be viewed on the SIVISION monitor Media Player control keys Previous next title Stop playback Start interrupt playback Mute Adjust volume 4 10 1 3 Communication with Microsoft ...

Page 132: ...uniform size in the display area and arranged without overlapping Full frame The active image window is enlarged so that it covers the entire display area The control elements of the SIDEXIS user interface are not concealed in the process Accepting an order Accepts an order that has been created and is waiting in SIDEXIS Readiness for intraoral X ray exposure Establishes readiness for an X ray exp...

Page 133: ...e display area The size of the windows is adapted so that the complete exposures are visible Invert image This function inverts the brightness values of the image pixels thus enabling a positive or negative display of the image The inversion can be canceled by pressing the key once again Display image in pseudocolors To enable better distinction of image details an image can be displayed in a so c...

Page 134: ...hout reducing the overall definition of the image Undo The effect of the last filter operation is undone Restore original image The changes previously made e g via filters are canceled The most recently saved version of the image is restored Close current media window Close all media windows Note The SIUCOM plus PC application can be used to configure the layout of the keys For a description of th...

Page 135: ...h a PC båÖäáëÜ 4 10 2 USB interfaces The dentist and assistant element can be equipped with a USB 2 0 interface CAUTION USB devices with their own voltage supply e g via a power supply unit may lead to increased leakage current This endangers the safety of operators and users Connect only USB devices that use the USB connection as their sole power source ...

Page 136: ...nd hold the favorite key 2 Setup 2 s The Setup operating context opens The first Time selection context appears on the EasyPad display The Setup operating context contains several selection contexts The active focus flashes Press favorite key 2 Setup to select the next focus item or display the next selection context Use favorite keys 1 and 3 to set Setup program storing settings Pressing the Coun...

Page 137: ...the month and year 4 Confirm with the 2 Setup favorite key Switching 12 24 hour display The 12 hour display is switched only in the standard operating context of the EasyPad display It will continue to use the 24 hour system in the Setup operating context The setting focus 12 24 hour display flashes 1 Use favorite keys 1 and 3 to select the hour display 2 Confirm with the 2 Setup favorite key 4 11...

Page 138: ...ng agent is added to the water if the simulation unit is equipped with the chemical suction hose cleaning option For more information see the section Suction hose cleaning with suction hose cleaning option 173 It is possible to set how much cleaning agent should be added to the water for chemical suction hose cleaning The quantity is dependent on the cleaning agent used and the type of treatment P...

Page 139: ...l If this function is switched off the display switches between a still or live image when the foot pedal is pressed The knob on the camera is used to focus the image If the function is switched on the camera image is focused when the foot pedal is actuated The display only switches between a still or live image when the foot pedal is pressed down fully The knob on the camera can still be used to ...

Page 140: ... Date and time Control options Network connection Service domain for service engineers only The current software version of the simulation unit is displayed on the left side of the touchscreen Touch the corresponding key to open the Setup dialogs Some of the setup dialogs comprise several pages Using the Scroll forward key you can switch to the next Setup dialog page Setup program storing settings...

Page 141: ...the and keys to set the day 2 Touch the Date key The month field is highlighted orange 3 Repeat this procedure for the month and year Setting the time 1 Use the and keys to set the hour 2 Touch the Time key The minutes field is highlighted orange 3 Use the and keys to set the minutes Switching 12 24 hour display The 12 hour display is changed in the status column of the touchscreen only The setup ...

Page 142: ...umber can be limited so that only the specified users can be selected after the simulation unit is switched on Use the and keys to set the number of user profiles If the number of user profiles is limited to one the User profiles key is hidden in the start dialog 4 11 2 3 2 Adjusting the touchscreen brightness Use the and keys to set the brightness of the touchscreen 4 11 2 3 3 Switching the key s...

Page 143: ...wer Touch the Afterblow key If the key is highlighted orange the afterblow function is activated 4 11 2 3 6 Switching on off the foot control function for intraoral camera focus If the simulation unit is equipped with an autofocus camera and the C electronic foot control it can be configured in the setup that the camera image can be focused with the foot control If this function is switched off th...

Page 144: ... A cleaning agent is added to the water if the simulation unit is equipped with the chemical suction hose cleaning option For more information see the section Suction hose cleaning with suction hose cleaning option 173 It is possible to set how much cleaning agent should be added to the water for chemical suction hose cleaning The quantity is dependent on the cleaning agent used Please follow the ...

Page 145: ... setup dialog page In this screen the name of the simulation unit in the practice network and the MAC address of the unit are shown Call in your data processing specialist for network configuration Network configuration is described in detail in the INTEGO INTEGO pro installation instructions 4 11 2 5 Opening the service function The Service domain is intended to be used only by service engineers ...

Page 146: ...ean and disinfect surfaces Clean disinfect surfaces Disinfect the user interface Lubricate disinfect sterilize instruments 169 Disinfect handles Care for and clean the operating light see separate operating instructions for the operating light Cleaning the suction hoses Sterilize disinfect the suction handpieces Purge the water lines purge function Daily Automatically purge water lines autopurge f...

Page 147: ... for the backrest component Clean outlet lines if chemical suction hose cleaning option available Change the cotton wool roll on the turbine hose and oil collector Clean the foot control 153 Monthly or as required Change the water and air filters Conduct a microbiological water test Sanitize the simulation unit 190 Empty the sediment container or clean the filter insert of the wet suction system o...

Page 148: ... two weeks and adjust the time intervals depending on the results In addition to running laboratory tests you can also use the Total Count Tester as a simple means of performing this test To order the motor total count tester see Spare parts and consumables Total Count Tester shelf life The cardboard disk contains a dehydrated culture medium It is activated by the sample and serves as culture medi...

Page 149: ... will now absorb 1 ml of the water sample 6 Remove the tester from the container Shake out any excess water Empty the tank 7 Place the tester in the container for incubation either for two days at a room temperature of 20 C 68 F or for 24 hours at a temperature of 35 C 95 F 8 Count all colonies found on the surface of the tester If the number of germs is well over 100 the water must be treated see...

Page 150: ...in they can dissolve etch bleach or discolor surfaces Clean any residues off of the unit immediately with a moist cloth NOTICE Liquids can enter the unit during cleaning or disinfection Electrical components of the simulation unit can be damaged or destroyed by liquids Do not spray any liquids into the unit To clean near openings first spray the liquid onto a cleaning cloth Then wipe over the unit...

Page 151: ... on the EasyPad display The simulation unit is blocked for data input The instruments of the dentist and assistant elements can no longer be activated The SIVISION monitor and the camera system are switched off 2 Disinfect the user interfaces by wiping them 3 Press and hold the Display mode clean fixed key on the dentist element 3 s The user interfaces are now reactivated Switching functions on th...

Page 152: ... disinfecting surfaces 4 Replace the handles after sterilization Place the sterilized silicone mat on the dentist element Return the instruments to the instrument holders CS dentist element 1 Remove both silicone covers from the handles and lift the silicone mat off the dentist element 2 Remove all instruments one after the other and allow them to hang down in front of the dentist element 3 Clean ...

Page 153: ...its stability Clean the bottom plate of the foot control with a moist cloth water 5 2 5 Disinfect the tray The tray can be removed to facilitate cleaning or thermal disinfection Care cleaning and disinfecting agents 1 Hold the tray tightly 2 Open the lock by swiveling the lever downwards 3 Remove the tray 4 Let the lever fall back into its original position 5 Thermally disinfect the tray To insert...

Page 154: ...ction individual instruments are removed from the holder and held over the cuspidor for purging The water lines of all removed instruments are then purged consecutively Press the water key of the 3 way syringe for purging With the SIM MODULAR simulation unit the purge and sanitizing function is optional With the SIM MODULAR simulation unit it is also possible to automatically purge the water lines...

Page 155: ...ed with insufficient water Mix distilled water with the DENTOSEPT P disinfectant at a ratio of 100 1 1 liter of water 10 ml DENTOSEPT P and fill this into the disinfectant tank of the supply module When sufficient water has been refilled the purge program continues Purging water lines A revolving element is shown on the EasyPad display next to the Purge display 1 Remove the instruments from the TS...

Page 156: ...y for operation again Interrupting the purging process Press the foot pedal to interrupt the purging process If the instrument is not put back in the holder the purging process can be continued by pressing the foot pedal again up to the end of the set purging time Canceling the purge function The purging function can be stopped at any time Press the Counterclockwise rotation user profile fixed key...

Page 157: ...r only for stand alone water supply If the Refill water display appears after the purge function has been started there is not sufficient water in the disinfectant tank of the supply module to purge the water lines The purge function cannot be started with insufficient water Mix distilled water with the DENTOSEPT P disinfectant at a ratio of 100 1 1 liter of water 10 ml DENTOSEPT P and fill this i...

Page 158: ... for the 3 way syringe The removed instruments are purged with water for the duration of the set purging time 2 Place the removed instruments back in their holders after the purging process 3 Hold the 3 way syringe of the dentist and assistant element over the bucket and press the water key for at least 20 seconds 4 Touch the Stop key to end the purge program After all instruments have been put ba...

Page 159: ...rrupting the purging process Press the foot pedal to interrupt the purging process If the instrument is not put back in the holder the purging process can be continued by pressing the foot pedal again up to the end of the set purging time Canceling the purge function In the case of the error message Deposit instruments or during purging the purge function can be canceled Touch the Stop key on the ...

Page 160: ...urge function is activated If the instruments remain in the supply module after the simulation unit is switched off the purging process will automatically be started again the next time the unit is switched on Execute the autopurge function Before starting work At the end of the work day It is also possible to purge individual instruments see Purging water lines purge function Preparation The foll...

Page 161: ... their holders 1 Press the Torque control purge key The Purge operating context is shown on the EasyPad display 2 Press favorite key 3 The AutoPurge operating context is shown 3 Press the favorite key 2 Setup Inserting water bearing instruments into the cleaning adapters The supply module can have integrated cleaning adapters for water carrying instruments These enable all instruments to be purged...

Page 162: ...ule permanently 3 Dentist element side Insert the couplings of all water bearing treatment instruments into the adapters on the supply module for SPRAYVIT E valve lever turned upward locking knob turned downward 4 In addition for the CS dentist element Move the swivel arm of the instruments to be purged into the operating position so that the weight of the instrument hoses allows them to remain in...

Page 163: ...iately after the unit is switched on After you can prepare the simulation unit for the next use If the simulation unit is out of operation over a prolonged period of time you can briefly switch it on every day and then switch it off again when the purging process is finished This ensures that the number of microorganisms in the water lines will not increase excessively If any instruments are remov...

Page 164: ...l Systems GmbH 5 3 Instruments and instrument hoses Operating Instructions Simulation Unit SIM MODULAR Canceling the purge function In the case of the error message Deposit instruments or during purging the autopurge function can be canceled Press the Counterclockwise rotation user profile fixed key A B ...

Page 165: ... instruments If the Deposit instruments display appears after the autopurge function has been started the simulation unit has detected that not all of the instruments have been placed in their holders Check the instruments marked with a warning triangle on the touchscreen When all of the instruments have been deposited the autopurge program will continue Setting the instrument purge time and start...

Page 166: ...The SPRAYVIT adapters can be inserted only into the two receptacles on the right side of the dentist element with the guide rib facing upward Similarly a SPRAYVIT adapter must be inserted into the assistant element side The adapters remain in the supply module permanently 3 Dentist element side Insert the couplings of all water bearing treatment instruments into the adapter in the supply module fo...

Page 167: ...f the SPRAYVIT E into the adapter in the supply module All water carrying instruments are inserted into the cleaning adapters 6 Touch the Start key on the touchscreen The purging process begins IMPORTANT Pinching the instrument hoses Be careful not to pinch the instrument hoses when inserting the instruments If the hoses are pinched the water flow will be obstructed during purging The water flow r...

Page 168: ...it is out of operation over a prolonged period of time you can briefly switch it on every day and then switch it off again when the purging process is finished This ensures that the number of microorganisms in the water lines will not increase excessively If any instruments are removed from the supply module or new instruments are connected to the simulation unit while the latter is switched off y...

Page 169: ...sions Highspeed handpieces 3 way syringeSPRAYVIT E Standard3 way syringe see Cleaning and sterilizing the standard 3 way syringe 169 SIROSONIC L Scaler 5 3 4 2 Cleaning and sterilizing the standard 3 way syringe The Standard 3 way syringe can be cleaned under running water Spray and wipe disinfection can be used The jet can be removed from the tip for sterilization Press on the ring shaped unlock ...

Page 170: ...ide is in perfect condition There should be no traces of composite material on the light guide Immediately remove any residue If you find any damage replace the light guide since damage will impair its performance considerably 5 3 4 4 Cleaning disinfecting the SiroCam F AF AF intraoral camera Due to its shape the SiroCam AF AF intraoral camera complies with hygienic requirements and therefore has ...

Page 171: ...eed handpiece hose The instrument connections are located below the instrument holder The holder is fixed on the front edge with two internal clamps on the dentist element 1 The instruments must be removed from the instrument holder Remove all instruments one after the other and allow these to hang down facing forward 2 Lift the instrument holder by the front edge until the clamps are released and...

Page 172: ...SIM MODULAR Oil collector The CS dentist element is also equipped with an oil collector It is located below the instrument connections and collects any liquids that leak out 1 Remove the instrument holder from the dentist element as described above 2 Pull out the oil collector located under the instrument connections and replace it To reorder the oil collectors see Spare parts and consumables ...

Page 173: ...ove residue from the suction hoses the vacuum system must be purged several times a day To clean the suction system water is pumped into a tank behind the suction hose intake and suctioned off from there 5 4 2 1 Suction hose cleaning with suction hose cleaning option The supply module is optionally equipped with an adapter for the suction hose cleaning function This can be used to purge the suctio...

Page 174: ... 2 Pull the tank slightly out of the supply module At the same time check the hose line 3 Open the lock of the tank and add the cleaning agent The cleaning agent tank has a capacity of 1 liter 4 Close and slide the tank back into the supply module after filling The filling opening must face the front If the simulation unit is equipped with this option the drains should be cleaned weekly CAUTION Su...

Page 175: ...cold water must be regularly aspirated instead 5 4 3 Cleaning suction hoses and suction system If the simulation unit is not equipped with the chemical suction hose cleaning option the suction system should be cleaned on a daily basis Cleaning at regular intervals is absolutely mandatory for hygienic reasons Care cleaning and disinfecting agents Vacuum system foaming cleaning agents Preparation fo...

Page 176: ...s from the suction hoses 3 Set the maximum suction flow on the suction handpieces Cleaning procedure 1 Pour 1 liter of cleaning solution into a container 2 Remove the suction hoses from their holders and aspirate the cleaning solution from the container as simultaneously as possible 3 Allow the cleaning solution to act Observe the reaction time specified for the cleaning solution by the manufactur...

Page 177: ...r finishing the aspiration process place the suction hoses back in their holders If the simulation unit is equipped with a third suction hose repeat the procedure If the simulation unit is equipped with a wet suction device the filter insert of the wet suction device must also be cleaned once a month after cleaning the vacuum system see Clean the filter insert of the wet suction device 183 If the ...

Page 178: ...zation process Grease No surgical suction device option 1 Detach the handpiece of the spray aspirator and the saliva ejector from the suction hoses 2 Detach the rotary joint of the handpiece from the spray aspirator 3 Regrease the disconnection points and O rings of the handpieces E D C B A 134 C 274 F 3 min F A Suction tip B Suction Handpiece C Rotary joint D Saliva ejector handpiece E Surgical s...

Page 179: ...sposed of separately 3 Clean the sieve under running water and put it back into the assistant element 5 4 6 Cleaning and disinfecting the suction hoses The hoses of the spray aspirator and the saliva ejector as well as the connection hose to the supply module can be pulled off for rinsing under running water The outside of the suction hoses can be disinfected by spraying or wiping Assistant elemen...

Page 180: ... Error messages Code 14 1 Open the cover A of the disinfectant tank by turning it in a counterclockwise direction 2 Refill disinfectant The container has a capacity of approx 1 3 liters It is full when the disinfectant is visible on the filter of the filling tube The Disinf display is grayed out Water supply stand alone Mixing with cleaning agent for chemical suction hose cleaning Tumbler filling ...

Page 181: ...ting Instructions Simulation Unit SIM MODULAR 5 5 Refilling DENTOSEPT P disinfectant båÖäáëÜ Disinfectants for water lines NOTICE Approved care cleaning and disinfecting agents Use only disinfectants which have been approved for water lines by Sirona for the disinfection system see Care cleaning and disinfecting agents 148 ...

Page 182: ...umables 1 Switch the simulation unit off at the power switch The water and air supply are switched off 2 Open the maintenance flap A 3 Any remaining water flows out of the water filter when it is opened You should therefore place an absorbent cloth underneath the filter Then unscrew and remove the screw on cap of the water filter B and or the air filter C 4 Check the filters and replace them if ne...

Page 183: ...filter The filter insert must be cleaned when the suction power decreases Wear gloves risk of contamination Cleaning the suction system Before the filter insert of the wet suction is cleaned the suction system should be cleaned If the simulation unit is equipped with the chemical suction hose cleaning option see Vacuum system 173 Suctioning off remaining water completely removing and cleaning the ...

Page 184: ...supply module is completely empty 3 Loosen the bayonet catch of filter insert D Unscrew the filter insert from the filter housing of the wet suction device counterclockwise 4 Properly dispose of the amalgam residues together with the amalgam residues collected from the cuspidor and from the suction hoses Then clean the filter insert under running water in a sink 5 Grease the O ring C of the filter...

Page 185: ...s GmbH 5 Care cleaning and maintenance by the user Operating Instructions Simulation Unit SIM MODULAR 5 7 Clean the filter insert of the wet suction device båÖäáëÜ 7 Assemble protective ground wire B and side cover A The simulation unit is ready for operation again A B ...

Page 186: ...vice nor air jet pump is installed Cleaning the suction system Perform a cleaning of the suction system before removing the sediment container If the simulation unit is equipped with the chemical suction hose cleaning option see Vacuum system 173 Removing and emptying the sediment container Wear gloves risk of contamination 1 Remove side cover A and loosen the connection for the protective ground ...

Page 187: ... container 1 Lubricate the O ring C on the sediment container Lubricants see Care cleaning and disinfecting agents 148 2 Hold the sediment container C so that the latches of the bayonet catch are positioned transverse to the supply module Rotate the sediment container C clockwise The sediment container is locked in place 3 Install the protective ground wire B and side cover A The simulation unit i...

Page 188: ...ainer of the air jet pump due to the force of gravity Empty the container of the air jet pump in cycles that are appropriate for your work method but at least every week Cleaning the suction system Perform a cleaning of the vacuum system before removing the collection container If the simulation unit is equipped with the chemical suction hose cleaning option see Vacuum system 173 Removing and empt...

Page 189: ...m the container and dispose of the accumulated solid particles along with the residue from the suction hoses Installing the collector of the air jet pump 1 Hold the sediment container C so that the latches of the bayonet catch are positioned transverse to the water unit Rotate the sediment container C clockwise The collector is locked in place 2 Install the protective ground wire B and side cover ...

Page 190: ...disinfection system Sanitizing is performed in operation with the public drinking water supply and in operation using a stand alone water supply on the EasyPad and EasyTouch Please see also the information in the section Stand alone water supply Sanitizing with the fresh water bottle In the simulation unit the purging and sanitizing functions and the fresh water bottle are available as options Bot...

Page 191: ...ng water supply and DENTOSEPT P disinfectant The sanitizing process takes at least 24 hours Additional devices sanitation with disinfectant Preparation The following preparations should be made prior to beginning sanitation 1 Rinse the water lines Activate the Sprayvit for at least one minute 2 Set all burr drives and the SIROSONIC L scaler to the maximum water flow rate The water regulators under...

Page 192: ...ation unit Sanitation cannot be started with insufficient disinfectant see Refilling with DENTOSEPT P disinfectant For operation with a stand alone water supply the water is first pumped out of the reservoir of the supply module Refill disinfectant is then displayed Fill approx 0 6 liter DENTOSEPT P into the reservoir of the supply module When sufficient DENTOSEPT P has been added the sanitizing p...

Page 193: ...ntly 3 Dentist element side Insert the couplings of all water bearing treatment instruments into the adapters on the Comfort supply module for SPRAYVIT E valve lever turned upward locking knob turned downward 4 In addition for the CS dentist element Move the swivel arm of the instruments to be purged into the operating position so that the weight of the instrument hoses allows them to remain in th...

Page 194: ...he supply module Make sure that the simulation unit is switched off for at least 24 hours but not longer than 3 days maximum sanitation time Switch the simulation unit on again after 24 hours and before 3 days have elapsed IMPORTANT Pinching the instrument hoses Be careful not to pinch the instrument hoses when inserting the instruments If the hoses are pinched the water flow will be obstructed du...

Page 195: ... sleeves and the straight and contra angle pieces on the instruments Place all the instruments back in their holders The time is displayed on the EasyPad display The sanitation process is finished The simulation unit is ready for operation again Canceling the sanitizing process The sanitizing process can be canceled e g if the simulation unit must be switched on again before 24 hours have passed T...

Page 196: ... sanitation phase is highlighted by an orange rectangle Symbol legend The status of the individual instruments is represented by symbols on the touchscreen as operational help and for support in case of an error These symbols have the following meaning Empty gray circle Instrument cannot be sanitized Solid gray circle Instrument not yet sanitized Solid orange circle Instrument sanitized Crossed ou...

Page 197: ...f the instruments have been placed in their holders Check the instruments marked with a warning triangle on the touchscreen When all of the instruments have been deposited sanitation phase 1 begins automatically Sanitation phase 1 Inserting instruments into the cleaning adapters on the supply module The supply module has integrated adapters for water carrying instruments This allows all instrument...

Page 198: ...t element side Insert the couplings of all water bearing treatment instruments into the adapters on the supply module for Sprayvit valve lever turned upward locking knob turned downward 4 In addition for the CS dentist element Move the swivel arm of the instruments to be purged into the operating position so that the weight of the instrument hoses allows them to remain in this position 5 Assistant...

Page 199: ...er flow If this is not possible the instrument concerned can be excluded from the sanitation process 1 Check the water flow through the instruments in the instrument positions marked with a warning triangle on the touchscreen Set the instruments to maximum water flow Leave all instruments plugged into the supply module If the simulation unit detects the water flow the warning triangle will disappe...

Page 200: ...screen next to the sanitation phase 4 field starting from 24 hours The simulation unit has automatically switched to Standby mode 1 Leave all instruments plugged into the supply module 2 Switch the simulation unit off using the main switch on the supply module Make sure that the simulation unit is switched off for at least 24 hours but not longer than 3 days maximum sanitation time 3 Switch the si...

Page 201: ...itation phase 6 Returning instruments to their holders After the water lines have been rinsed the instruments can be removed from the cleaning adapters on the supply module and returned to their holders The Return instruments to their holders display appears on the touchscreen Place the SPRAYVIT sleeves and the straight and contra angle pieces on the instruments Place all the instruments back in t...

Page 202: ...nceled If the water lines have not yet been treated with DENTOSEPT P disinfectant prior to sanitation phase 3 the simulation unit automatically proceeds directly to sanitation phase 6 If the sanitation process is canceled during the reaction time the water lines are initially rinsed with water sanitation phase 5 Cleaning the suction hoses After sanitization all suction hoses should also be chemica...

Page 203: ... After longer periods of disuse one week If the germination index exceeds 100 germs per milliliter see Microbiological water test Sanitation takes at least 24 hours Additional devices sanitation with disinfectant Preparation The following preparations should be made prior to beginning the sanitizing process 1 Set all burr drives and the SIROSONIC L scaler to the maximum water flow rate The water r...

Page 204: ...letely 5 Fill the fresh water bottle with approx 0 4 to 0 5 liters of pure DENTOSEPT P 6 Attach the hose to the fresh water bottle and screw the bottle into the holder Displaying the sanitizing operating context All instruments are in their holders 1 Press the Torque control Purge fixed key The Purge operating context is shown on the EasyPad display 2 Press favorite key 3 The Sanitizing operating ...

Page 205: ...ime Switch the simulation unit off using the main switch on the supply module Make sure that the simulation unit is switched off for at least 24 hours but not longer than 3 days maximum sanitation time Switch the simulation unit on again after 24 hours and before 3 days have elapsed Filling the fresh water bottle with water The display Refill water appears on the EasyPad 1 Unscrew the fresh water ...

Page 206: ... 5 Repeat the procedure for all other instruments 6 After you have flushed the last instrument press favorite key 2 Setup The time is displayed on the EasyPad display The sanitation process is finished The simulation unit is ready for operation again Interrupting instrument purging Step on the foot pedal to interrupt the instrument purging process If the instrument is not put back in the holder th...

Page 207: ...tal Systems GmbH 5 Care cleaning and maintenance by the user Operating Instructions Simulation Unit SIM MODULAR 5 10 Sanitizing båÖäáëÜ Cleaning the suction hoses After sanitizing with the fresh water bottle the suction hoses should also be chemically cleaned ...

Page 208: ...tion unit does not correspond with the hygiene requirements in spite of regular sanitization of the water lines and or regular purge autopurge cycles the biofilm must be removed using special chemicals Biofilm removal should be performed if the bacterial count is significantly above 100 colony forming units per mililiter Please contact your service technician Before initiating biofilm removal it m...

Page 209: ...his is done by an authorized service technician from your dealer or by Sirona technicians When the next servicing date is less than 42 days away the servicing prompt appears each time the unit is switched on On the EasyPad display the text Sr and the number of days until the servicing date will appear On the EasyTouch a tool symbol will appear in the status column of the touchscreen The days until...

Page 210: ...eed as follows In Germany To initiate return of the electrical device please send a disposal request to enretec GmbH You have the following options here Use the Returning an electrical device button under the eom menu item on the enretec GmbH homepage www enretec de Alternatively you can also contact enretec GmbH directly enretec GmbH Kanalstraße 17 16727 Velten Tel 49 3304 3919 500 E Mail eom enr...

Page 211: ... drive 80 87 Calibrating the motor 80 87 Calibration of the burr drive 80 87 Call up the start program with the foot control 49 Camera 118 120 170 Use with SI video 124 Use with SIDEXIS 126 Care cleaning and disinfecting agents 148 Chemical suction hose cleaning 173 Chip blower 48 49 61 64 Clean key 151 Cleaning adapter 198 Cleaning agent for hose cleaning 174 Composite function 116 Configuration ...

Page 212: ... GmbH 210 External HF device 38 External HF unit 34 External PC 129 Extract residual water 183 F Favorite key pad 44 50 Filter Air and water 182 Wet suction 183 Firmware 140 fixed key Clean 151 Composite function 116 Counterclockwise rotation User profile 43 77 84 91 Display mode Clean 83 Endodontics Purge 79 80 92 Fn 96 Operating light 116 Setup 136 Sub screen 46 Timer function 96 Flat screen 119...

Page 213: ...68 Instruments rinse purge function 154 Switch on control 49 Integrated torque control 78 Intensity 90 93 Intervals for maintenance cleaning and disinfection 146 Intraoral camera 118 120 170 Use with SI video 124 Use with SIDEXIS 126 Intraoral camera focusing 123 IP address 145 K Key color 46 Key tone 139 142 Keys missing 46 140 Keys missing 136 L LEDview 116 Live image 124 126 Load Dentist elemen...

Page 214: ... SIRONiTi 78 SIROSONIC L 90 SIROSONIC L scaler 90 SIUCOM plus 118 129 130 SIVISION connect 118 129 130 SIVISION digital 118 170 SIVISION digital video system 118 170 SIVISION monitor 119 SIVISION program 130 Software version 140 Speed 73 75 81 88 Spray 49 60 63 Spray aspirator 99 138 178 Spray water quantity 65 SPRAYVIT 66 Standard 3 way syringe 66 Status lights 44 Status messages 47 Still image 1...

Page 215: ...aning 173 Suction hoses 179 Ventilation slots 15 W Water unit Air jet pump Air Venturi 188 Sediment container 186 Self sufficient water supply 106 Suction hose cleaning 173 Wet suction 183 Water microbiological test 148 Wet suction 183 Whip arm dentist element 58 White balance for intraoral camera 128 White screen on the SIVISION monitor 59 143 Working steps for integrated torque control 88 X X ra...

Page 216: ......

Page 217: ......

Page 218: ...ëK páêçå aÉåí ä póëíÉãë dãÄe OMNS péê ÅÜÉW ÉåÖäáëÅÜ mêáåíÉÇ áå dÉêã åó aPSRMKOMNKMNKMOKMO MQKOMNS ûKJkêKW NOO NPU páêçå aÉåí ä póëíÉãë dãÄe çåí Åí áå íÜÉ rp W c Äêáâëíê É PN aJSQSOR _ÉåëÜÉáã dÉêã åó páêçå aÉåí äI fåÅK QUPR páêçå aêáîÉ Ü êäçííÉI k OUOTP rp lêÇÉê kç SR SQ MOM aPSRM ïïïKëáêçå KÅçã ...

Reviews: