background image

M

AnAgIng


wItH

 clu

CLU and CLI management both use a text-based terminal user interface.

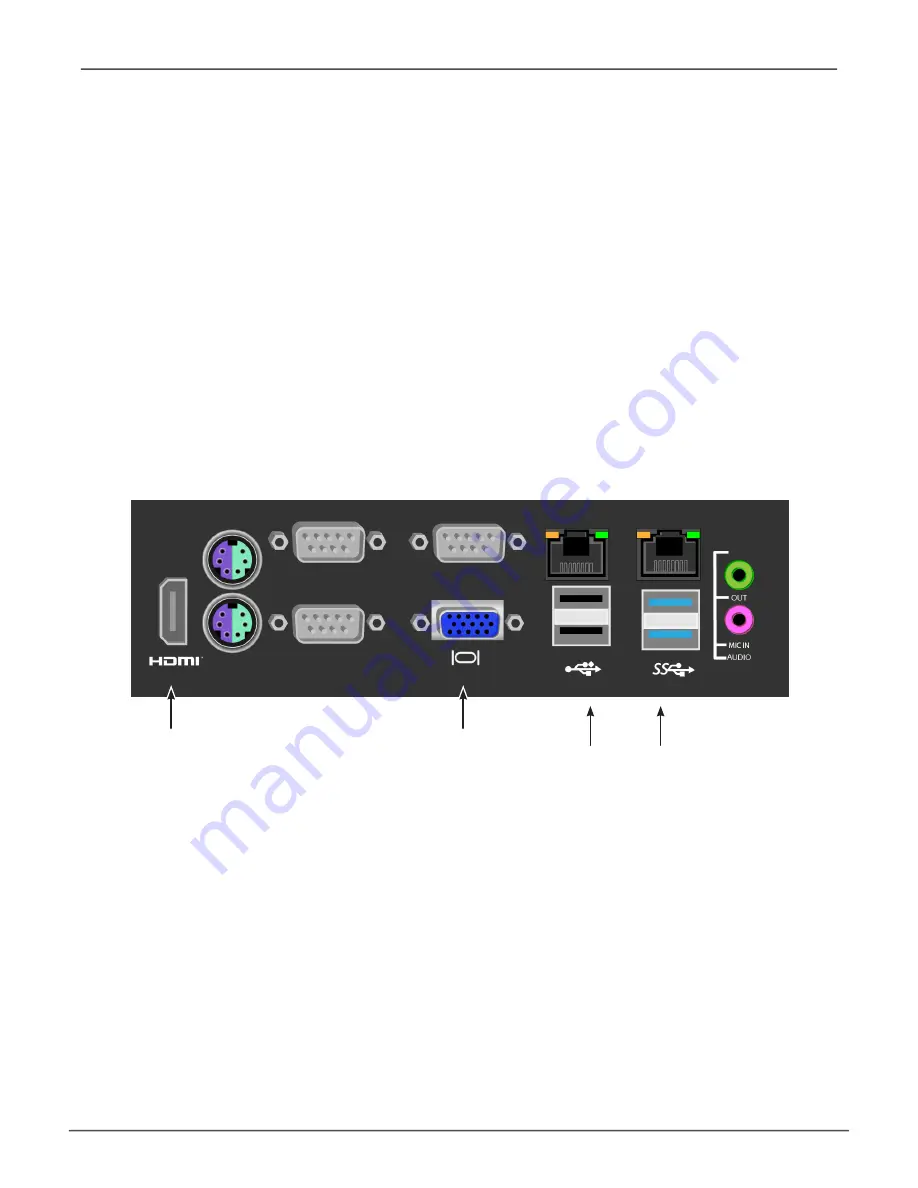
In order to access the terminal program interface used for CLI and CLU management on the Vess 

A-Series subsystem, insert a USB keyboard into any USB port, and connect a monitor using either the 

VGA or HDMI port.

 Vess A3340 Ethernet, video monitor connections and USB ports

USB ports

Use to connect to USB 

keyboard for text input

VGA port

Connect to VGA 

monitor

HDMI port

Connect to HDMI 

monitor

27

Managing with CLU

Vess A3340 Product Manual 

Summary of Contents for Vess A3340

Page 1: ...Vess A Series NVR Storage Appliance Vess A3340 Product Manual Version 1 0 2016 PROMISE Technology Inc All Rights Reserved ...

Page 2: ...e in which case the user may be required to take adequate measures Warning The electronic components within the Vess enclosure are sensitive to damage from Electro Static Discharge ESD Observe appropriate precautions at all times when handling the Vess or its subassemblies Warning Turn off the power and disconnect the power cord before servicing this device ...

Page 3: ...ossibility of physical injury and how to avoid them Caution A Caution informs you of possible equipment damage or loss of data and how to avoid them Important An Important message calls attention to an essential step or point required to complete a task including things often missed Note A Note provides helpful information such as hints or alternative ways of doing a task ...

Page 4: ...ections 8 Hardware Setup 9 Unpacking 10 Packing List 10 Mounting the Vess A3340 in a rack 11 Attach ear brackets to front 12 Install the sliding rails and place device in rack 13 Installing Disk Drives 16 Number of Drives Required 16 Remove Security Cover 17 Drive Slot Numbering 18 Drive carriers 19 Management Path Connections 21 Management Path network connection 21 Management Path on site keyboa...

Page 5: ... 35 Releasing the Lock 36 Releasing a Lock set by another user 36 View Subsystem Date and Time CLU 36 Managing the RAID Controllers CLU 37 Viewing Controller Information CLU 37 Clearing Statistics 37 Making Controller Settings CLU 38 Managing the Enclosure CLU 40 Viewing the Enclosures Summary CLU 40 Viewing Enclosure Information CLU 41 Adjustable items 41 Making Enclosure Settings CLU 41 Viewing ...

Page 6: ...isk Array Automatic CLU 52 Creating a Disk Array Express CLU 53 Creating a Disk Array Advanced CLU 54 Making Disk Array Settings CLU 57 Viewing Disk Array Information CLU 58 Enabling Media Patrol PDM and Power Management on a Disk Array CLU 58 Rebuilding a Disk Array CLU 59 Running Media Patrol on a Disk Array CLU 59 Running PDM on a Disk Array CLU 60 Running Transition on a Disk Array CLU 61 Loca...

Page 7: ...tivity Settings CLU 74 Working with the Event Viewer CLU 75 Viewing Runtime Events CLU 76 Clearing Runtime Events CLU 76 Viewing NVRAM Events CLU 77 Clearing NVRAM Events CLU 77 Managing Users CLU 78 Viewing User Information CLU 78 Creating a User CLU 79 Changing User Settings CLU 80 Changing User Password CLU 81 Deleting a User CLU 82 Software Management CLU 83 Email Settings CLU 83 Web Server Se...

Page 8: ...ing out of WebPAM PROe 99 Subsystem Management 100 Background Activities 101 View Current Background Activities 101 View Background Activities Parameters settings 101 Manage Background Activities Settings 102 Rebuild Settings 103 Background Synchronization 103 Logical Drive Initialization 104 Redundancy Check 105 PDM 106 Transition 106 Media Patrol 107 Managing Activity Schedules 108 Add or delete...

Page 9: ...117 Saving a Service Report 118 Email Service 120 Stop Email Service 120 Restarting Email Service 120 Email Settings 121 Sending A Test Email Message 121 Performance Monitoring 122 Controllers 124 View Controller Information 124 Viewing Controller Statistics 126 Controller Settings 127 Enclosures 128 Locate an enclosure 128 Enclosure Information 128 Enclosure temperature sensor settings 129 Buzzer...

Page 10: ... do I know when a drive is failing 192 Check Drive Status LEDs 192 Status LEDs 193 Check Drive Status in WebPAM PROe 194 Anticipating Hard Drive Problems 195 Rebuilding a Disk Array 198 How to Rebuild a Disk Array 199 How to Save a Service Report 201 The Alarm Buzzer is Sounding what does this mean 203 How to disable the alarm buzzer 204 Reinstalling the Operating System 205 Reintsall Windows 206 ...

Page 11: ...ilities 216 Returning the Product For Repair 216 Update Installation Requirements 219 USB Flash Drive 219 Operation Systems 219 Download Driver Package 219 Update Install the Driver 220 Uninstall Driver 224 How to check driver version 226 Check versions with CLI 226 Check versions with WebPAM PROe 228 Check versions in windows device manager 229 ...

Page 12: ... a Video Management Software suite and disk drives in order to streamline the installation and integration process The Vess A Series subsystems are stand alone devices with internal RAID storage eliminating need for additional servers controllers separate enclosures etc The Vess A Series uses the renowned PROMISE RAID engine for maximum reliability all drive bays are hot swappable and models are a...

Page 13: ... 6 10 30 50 60 RAID stripe size 64K 128K 256K 512K 1MB Max LUNs 256 system 32 array Hot swap drives Yes Controller Single Graphics Intel HD 5300 Memory 8GB DDR Processor Intel Xeon E3 1275 v5 Quad core 8 thread PSU 350W System fans Redundant fan Dimensions 88 2 x 446 x 410 mm Weight 7 38 kg 16 23 lbs w o drives 12 9 kg 28 38 lbs w drives Specifications 2 Vess A Class NVR Storage Appliance Promise ...

Page 14: ... protect the drive carriers from being unintentionally removed For all Vess A Series enclosures defective drives can be replaced without interruption of data availability to the host computer If so configured a hot spare drive will automatically replace a failed drive securing the fault tolerant integrity of the logical drive The self contained hardware based RAID logical drive provides maximum pe...

Page 15: ...disks and cooling unit module Use the tubular key shipped with the unit to lock or unlock this cover to access the eight hard drive carrier trays in front Secure panel tubular lock LEDs visible through bezel Vess A3340 front view with bezel security cover Front with bezel removed LEDs USB ports two USB 3 0 ports Drive carriers eight drive 3 5 carriers Power button 4 Vess A Class NVR Storage Applia...

Page 16: ...t Global RAID Status Lights GREEN when healthy or RED if any RAID volume is offline ORANGE for critical state of any logical drive Global HDD Activity Blinks BLUE to indicate one or more drives are being accessed remains dark when no drives are being accessed HDD Status Lights GREEN when healthy RED if the RAID member is offline or there is a physical disk error ORANGE indicates the drive is rebui...

Page 17: ... to the power supply local management connection via USB keyboard and VGA or HDMI monitor port iSCSI Ethernet data ports and system fan Power insert System fan Ports and LEDs See details on next page Vess A3340 back panel view 6 Vess A Class NVR Storage Appliance Promise Technology ...

Page 18: ...port is connected flashes GREEN when there is activity on the port and remains dark no connec tion has been established The LED on the left indicates connection speed GREEN is 100 Mbps ORANGE is 1000 Mbps Vess A3340 ports and LEDs on rear panel VGA port USB ports two USB 2 0 ports USB ports four USB 3 0 ports Audio In Out HDMI port S PDIF out Gigabit Ethernet ports Display Port 7 Introduction Vess...

Page 19: ...el of the A3340 features two USB 2 0 and two USB 3 0 ports Use to connect to a USB keyboard for managing the Vess A Series or use it to transfer data to or from a USB memory device RS 232 Serial port can be used for two different functions 1 Use for the controlling line connection to an uninterruptible power supply UPS 2 Use to connect to analog cameras using the analog camera input cable Audio In...

Page 20: ... management connection to the device and installing hard drives The sections in Hardware Setup include the following Unpacking Mounting the Vess A3340 in a rack Installing Disk Drives Number of Drives Required Remove Security Cover Drive Slot Numbering Drive carriers Management Path Connections Connect the Power Power On Vess A3340 Connect to iSCSI Storage Area Network SAN 9 Hardware Setup Vess A3...

Page 21: ...torage Appliance Screws for disk drives 40 pieces for 8 bays One 1 5m 4 9 ft Power cord Sliding rail assembly for rack mounting These items might be an optional feature in your region Please contact your sales representative to learn whether this is included or an option for your Vess A Series enclosure 10 Vess A Class NVR Storage Appliance Promise Technology ...

Page 22: ...port that Vess A3340 unit when properly installed Additional loading on the rails is at the customer s risk The mounting rails will support your Vess A3340 unit only if in stalled as instructed Do not install hard disk drives in the system until after placing the system in the rack The Vess A3340 installs in a 19 equipment rack Please examine the illustrations in this section to make sure you are ...

Page 23: ... handles can be used to pull or push the device out or into the rack system while the sliding rails support the weight of the device DO NOT lift or attempt to support the weight of the Vess A3340 using the handles on the ear brackets Attach each ear bracket at the front on each side of the device housing and secure with the screws included with the ship ment The handle should protrude in the direc...

Page 24: ...ack then place the right and left rack rails at the same height on in the right and left rack position Choose the mounting holes accordingly for your rack system Note that three holes are required on each front post the uppermost of the three to be used for the flange nuts to anchor the enclosure to the rack posts Adjust the length of the mounting rails as needed Notice that each end of the slidin...

Page 25: ...Press the spring lock on the other end of the rail and insert the studs into the selected mounting hole on the rack post If necessary extend the rail to reach the post c Use the rail screws and washers to anchor the rack rail to the post d Make sure the rack rail is aligned secure stable and in the correct place e Perform steps a through c above for the other rail f Make sure the rack rails are al...

Page 26: ...ed to post Front view of Vess A3340 secured to rack and placed on rail system 4 Use the attaching screws that came with the mounting hardware to secure the enclosure to the rack 15 Hardware Setup Vess A3340 Product Manual ...

Page 27: ...ves required for each RAID level Level Number of Drives Level Number of Drives RAID 0 1 or more RAID 6 4 to 32 RAID 1 2 only RAID 10 4 or more RAID 1E 2 or more RAID 30 6 or more RAID 3 3 to 32 RAID 50 6 or more RAID 5 3 to 32 RAID 60 8 or more Must be an even number of drives Caution The Vess supports disk drive hot swapping To avoid hand contact with an electrical hazard do not remove more than ...

Page 28: ...move the security cover 1 Use the tubular key to unlock the cover Turn counterclockwise to unlock 2 Slide the cover to the right about 4 mm 3 Pull the cover straight back to remove Be careful not to drop the cover 17 Hardware Setup Vess A3340 Product Manual ...

Page 29: ... below shows how drive slots are numbered on both the Vess A3340 Slot numbering is reflected in the web manager GUI and CLI CLU user interfaces Install all of the drive carriers into the enclosure to ensure proper airflow even if you do not populate all the carriers with disk drives 18 Vess A Class NVR Storage Appliance Promise Technology ...

Page 30: ...ed for use with the Vess A Series 1 Remove a disk drive carrier 2 Carefully lay the disk drive into the drive carrier at the front so that the screw holes on the sides line up 3 Insert the screws through the holes in the drive carrier and into the sides of the disk drive See illustration below Install only the counter sink screws supplied with the drive Install four screws per drive Snug each scre...

Page 31: ...hanism insert This piece must be removed to unlatch the carrier To remove squeeze the tabs together and pull out To reinsert squeeze the tabs together and replace in position Do not discard the locking mechanisms Vess A3340 Disk carrier with HDD installed front view Caution The Vess A Series supports disk drive hot swapping To avoid hand contact with an electrical hazard do not remove more than on...

Page 32: ... ports on the rear panel for connection to an Ethernet network Use this connection with WebPAM PROe to login as the device administrator To establish the management path 1 Attach one end of an Ethernet cable to the network connector or standard NIC in the Host PC Attach the other end of the Ethernet cable to one of the ports on the standard network switch 2 Attach one end of an Ethernet cable to o...

Page 33: ...m The VGA port HDMI and USB ports are also located on the rear panel of the Vess these are enabled by default upon booting up the system Connect a VGA or HDMI monitor to the appropriate port on the Vess and connect a USB keyboard to either USB port on the rear panel Important Be sure to place the monitor and keyboard on a stable and secure surface before connecting them 22 Vess A Class NVR Storage...

Page 34: ...er supply System fan Connect the Power Insert one power cable into the power receptacle for each power supply and connect the PSU to a suitable power source The Vess A3340 is equipped with a single power supply see below 23 Hardware Setup Vess A3340 Product Manual ...

Page 35: ...Power On Vess A3340 With the power supplies connected the system can now be powered on To power on the Vess A3340 press the Power button in the lower left corner of the front panel see figure below Observe the LEDs on the front panel to make certain the boot up proceeds smoothly 24 Vess A Class NVR Storage Appliance Promise Technology ...

Page 36: ...y or RED if any RAID volume is offline ORANGE for critical state of any logical drive Global HDD Activity Blinks BLUE to indicate one or more drives are being accessed remains dark when no drives are being accessed HDD Status One LED for each HDD carrier Each LED lights GREEN when healthy RED if the RAID member is offline or there is a physical disk error ORANGE indicates the drive is rebuilding a...

Page 37: ...upport This arrangement requires A GbE network interface card NIC or iSCSI HBA NIC in the host PC or server A GbE network switch A standard network switch Note To expand physical capacity available for the Vess A3340 use the onboard iSCSI ports to connect to Vess R2000 Series storage enclosures and each Vess R2000 can also be connected to Vess J2000 Series JBOD expansion units 26 Vess A Class NVR ...

Page 38: ...agement on the Vess A Series subsystem insert a USB keyboard into any USB port and connect a monitor using either the VGA or HDMI port Vess A3340 Ethernet video monitor connections and USB ports USB ports Use to connect to USB keyboard for text input VGA port Connect to VGA monitor HDMI port Connect to HDMI monitor 27 Managing with CLU Vess A3340 Product Manual ...

Page 39: ...these final tasks the Windows 7 desktop appears To use the CLU interface first open the CLI terminal interface 1 Go to Start Run and click the Browse button 2 Navigate to the C PromiseApp clitest folder 3 Click clitest exe file then click the Open button 4 Click the OK button in the Run dialog box The CLI window opens See Using the CLU below for instructions for instructions on how to access the C...

Page 40: ...inistrator 2 At the Password prompt type the password and press Enter The default password is password The CLI screen appears 3 At the administrator cli prompt type menu and press Enter The CLU Main Menu appears 4 Use the arrow keys or tab key on your keyboard to scroll the highlighted text to a command then select or activate that command by pressing Enter 29 Managing with CLU Vess A3340 Product ...

Page 41: ...ext selector indicated by the highlighted line of text Tab Key Use the tab key to scroll down the list of text options Enter Key Press the Enter key to select or activate the highlighted text action command or option CTRL X Press the Control key and X key to return to the previous menu CTRL E Press the Control key and E key to bring up the Help menu CLU Main Menu 30 Vess A Class NVR Storage Applia...

Page 42: ...s to highlight the given command then pressing enter to view another list of CLU command selections or parameter options For example listed below are the steps used to create a new user account Notice that Step 1 lists the path of CLU menu items to get to the Create New User menu while Step 2 presents the various parameters to configure for the newly created user It is implied in Step 1 that the u...

Page 43: ...rThreshold Disk Array Management page 50 Create New Array Delete Array Spare Drive Management page 62 Create New Spare Drive Logical Drive Management page 66 Logical Drive Summary Network Management page 85 Network Port Summary Background Activities page 73 Background Activity Settings Media Patrol AutoRebuild Rebuild Rate Migration Rate PDM Rate Transition Rate Sync Rate Initialization Rate RC Ra...

Page 44: ...I When you shut down or restart the Vess A Series subsystem you are automatically logged out of the CLI To manually log out of the CLI no shut down or restart At the username cli prompt type logout and press Enter The prompt changes to cli Logging Back Into the CLI and CLU To log into the CLI and CLU after a manual logout 1 At the cli prompt type login followed by your user name and press Enter 2 ...

Page 45: ...king Subsystem Settings CLU An alias is optional To set an Alias for this subsystem 1 Main Menu Subsystem Management Subsystem Settings 2 Make changes as required Type and alias into the Alias field Maximum of 48 characters Use letters numbers space between words and un derscore 3 Press Control A to save your settings 34 Vess A Class NVR Storage Appliance Promise Technology ...

Page 46: ...ding sessions with the same user from making a configuration change to the controller until the lock expires or a forced unlock is done When the user who locked the controller logs out the lock is automatically released Setting the Lock To set the lock 1 Main Menu Subsystem Management Lock Management 2 In the Lock Time field type a lock time in minutes 1440 minutes 24 hours 3 Highlight Lock and pr...

Page 47: ...omebody else s lock 1 Main Menu Subsystem Management Lock Management Force Unlock 2 Press the Spacebar to toggle to Yes Unlock View Subsystem Date andTime CLU This is a display only screen to view current Date and Time Main Menu Subsystem Management System Date Time 36 Vess A Class NVR Storage Appliance Promise Technology ...

Page 48: ...y information includes Alias if assigned Operational Status OK means normal Might show BGA running Not present indicates a malfunction or no controller is installed Readiness Status Active or Standby is normal N A means not accessible 2 Highlight the controller you want and press Enter To access additional controller information highlight Advanced Information and press Enter To access controller s...

Page 49: ...rs Use letters numbers space between words and un derscore An alias is optional Highlight Coercion and press the spacebar to toggle between Enabled and Disabled For more information see Capacity Coercion Highlight Coercion Method and press the spacebar to toggle through GB Truncate Reduces the capacity to the nearest 1 GB boundary 10 GB Truncate Reduces the capacity to the nearest 10 GB boundary G...

Page 50: ...d the spacebar to choose a time period After an HDD has been idle for a set period of time Power Saving Idle Time Parks the read write heads Power Saving Standby Time Lowers disk rotation speed Power Saving Stopped Time Spins down the disk stops rotation You must also enable Power Management on the disk array See Creating a Disk Array Advanced CLU on page 54 and Enabling Media Patrol PDM and Power...

Page 51: ...re Sensor Status CLU on page 43 Viewing Voltage Sensor Status CLU on page 43 Locating an Enclosure CLU on page 44 Viewing the Enclosures Summary CLU Enclosure Management includes information status settings and location To access Enclosure Management 1 Main Menu Subsystem Management Enclosure Management The following information is shown Enclosure ID number Enclosure Type Operational Status Status...

Page 52: ... and Critical temperature thresholds See Making Enclosure Settings below Making Enclosure Settings CLU To make Enclosure settings 1 Main Menu Subsystem Management Enclosure Management 2 Highlight the enclosure you want and press Enter 3 Highlight Enclosure Settings and press Enter 4 Highlight the Temperature Warning threshold you want to change 5 Press the backspace key to erase the current value ...

Page 53: ... supply or supplies If any status differs from normal or the fan speed is below the Healthy Threshold value there is a fan power supply malfunction Viewing Cooling Unit Status CLU To display the status of the power supply fans Main Menu Subsystem Management Enclosure Management This is a read only menu The screen displays the status and speed of cooling units If fan speed is below the Healthy Thre...

Page 54: ...ceeds the Healthy Threshold value there is an overheat condition in the enclosure ViewingVoltage Sensor Status CLU To display the status of the voltage sensors Main Menu Subsystem Management Enclosure Management This is a read only menu If any voltage is outside the Healthy Threshold values there is a voltage malfunction in the enclosure 43 Managing with CLU Vess A3340 Product Manual ...

Page 55: ...ng with through the CLU 1 Main Menu Subsystem Management Enclosure Management and press Enter 2 Highlight the enclosure you want and press Enter 3 Highlight Locate Enclosure and press Enter The LEDs on the front of the Vess A Series blink for one minute 44 Vess A Class NVR Storage Appliance Promise Technology ...

Page 56: ...Physical Drive Settings CLU on page 46 Viewing Physical Drive Information CLU on page 47 Setting an Alias CLU on page 48 Locating a Physical Drive CLU on page 49 Viewing a List of Physical Drives CLU To view a list of physical drives Main Menu Physical Drive Management The list of physical drives displays 45 Managing with CLU Vess A3340 Product Manual ...

Page 57: ...and Disabled Highlight MediumErrorThreshold and press the backspace key to remove the current value then type a new smaller value Highlight DMA Mode and press the spacebar to toggle through UDMA 0 to 6 and MDMA 0 to 2 3 Press Control A to save your settings See Viewing Physical Drive Information below to determine which functions your physical drives support Medium Error Threshold is the number of...

Page 58: ...t a physical drive 1 Main Menu Physical Drive Management 2 Highlight the physical drive you want and press Enter Basic information displays 3 Highlight Advanced Information and press Enter Advanced information displays 47 Managing with CLU Vess A3340 Product Manual ...

Page 59: ...stics To clear physical drive statistics see Clearing Statistics CLU on page 87 Setting an Alias CLU An alias is optional To set an Alias for a physical drive 1 Main Menu Physical Drive Management 2 Highlight the physical drive you want and press Enter 3 Type an alias into the field provided Maximum of 32 characters Use letters numbers spaces and underscores 4 Press Control A to save your settings...

Page 60: ...CLU To locate a physical drive 1 Main Menu Physical Drive Management 2 Highlight the physical drive you want and press Enter 3 Highlight Locate Physical Drive and press Enter The drive carrier status LED flashes for one minute See the illustration below LED indicators on front of Vess A3340 HDD Status 49 Managing with CLU Vess A3340 Product Manual ...

Page 61: ...age 51 Making Disk Array Settings CLU on page 57 Viewing Disk Array Information CLU on page 58 Enabling Media Patrol PDM and Power Management on a Disk Array CLU on page 58 Rebuilding a Disk Array CLU on page 59 Running Media Patrol on a Disk Array CLU on page 59 Locating a Disk Array CLU on page 61 50 Vess A Class NVR Storage Appliance Promise Technology ...

Page 62: ...ee Creating a Disk Array Automatic Express You choose the parameters for a new disk array by specifying the characteristics you want You can create multiple logical drives at the same time however they are all identical Creates a hot spare drive for all RAID levels except RAID 0 See Creating a Disk Array Express Advanced Enables you to specify all parameters for a new disk array logical drives and...

Page 63: ...y and logical drives highlight Save settings and Continue and press Enter To reject the proposed configuration highlight Return to previous menu and press Enter You return to the Disk Arrays Summary screen To create a disk array with different characteristics repeat the steps above specify ing different parameters but choose the Express or Advanced option Important A logical drive cannot be expand...

Page 64: ... number of logical drives you want 4 Highlight Application Type and press the spacebar to toggle though the applications and choose the best one for your disk array File Server Video Stream Transaction Data Transaction Log Other 5 Press Control A to save your settings and move to the next screen 6 Review the proposed configuration of disk array and logical drives To accept the proposed configurati...

Page 65: ...nd type a name Maximum of 32 characters letters numbers spaces and underscores 2 Choose whether to enable Media Patrol PDM and Power Management 3 Choose a Media Type HDD or SSD 4 Highlight Save Settings and Continue and press Enter Step 2 Select Physical Drives 1 Highlight a physical drive you want to add to your array and press the spacebar to choose it Repeat this action until you have selected ...

Page 66: ...light Sector and press the spacebar to toggle through sector sizes and choose 512 B 1 KB 2 KB or 4 KB Highlight Write Policy and press the spacebar to toggle write cache policy between WriteBack and WriteThru write through Highlight Read Policy and press the spacebar to toggle read cache policy though ReadCache ReadAhead and NoCache 6 Highlight Save Logical Drive and press Enter Step 4 Summary Rev...

Page 67: ...ng a disk array 1 Main Menu Disk Array Management and press Enter 2 Highlight the disk array you want to delete and press the spacebar to mark it The mark is an asterisk to the left of the listing 3 Highlight Delete Marked Arrays and press Enter 4 Press Y to confirm the deletion 5 Press Y again to reconfirm 56 Vess A Class NVR Storage Appliance Promise Technology ...

Page 68: ... and press the spacebar to toggle between enable and disable PDM Highlight and press the spacebar to toggle between enable and disable Power Management Highlight and press the spacebar to toggle between enable and disable 4 Press Control A to save your settings Notes You can also enable or disable Media Patrol for the entire RAID system Power Management must be enabled on the disk array for the HD...

Page 69: ...e physical drive fails Power Management parks the heads spins down and stops rotation after a set period of time to reduce power consumption Media Patrol PDM and Power Management are enabled by default Enabled is the recommended setting for both features To enable Media Patrol PDM and Power Management on a disk array 1 Main Menu Disk Array Management 2 Highlight the disk array you want and press E...

Page 70: ...ource and target drives are shown with possible alternative choices 4 To choose different drive highlight the drive press the backspace key to remove the current number then type a new number 5 Highlight Start and press Enter Running Media Patrol on a Disk Array CLU Media Patrol is a routine maintenance procedure that checks the magnetic media on each disk drive If Media Patrol encounters a critic...

Page 71: ...disk array you want and press Enter 3 Highlight Background Activities Predictive Data Migration and press Enter Default source and target drives are shown with possible alternative choices 4 To choose different drive highlight the drive press the backspace key to remove the current number then type a new number 5 Highlight Start and press Enter See Enabling Media Patrol PDM and Power Management on...

Page 72: ...ctivities Transition Default source and target drives are shown with possible alternative choices 4 To choose different drive highlight the drive press the backspace key to remove the current number then type a new number 5 Highlight Start and press Enter For transition rate see Making Background Activity Settings CLU on page 74 Locating a Disk Array CLU This feature helps you identify the physica...

Page 73: ...of spare drives Main Menu Spare Drive Management A list of the current spare drives appears including the following parameters ID number Operational Status Physical Drive ID number Configured Capacity Revertible The spare drive returns to spare status after you replace the failed drive in the disk array Type Global all disk arrays or Dedicated to specified disk arrays Dedicated to Array The array ...

Page 74: ...ss the spacebar to toggle between Yes and No A revertible drive can be returned to spare status after you replace the failed drive in a disk array 4 Highlight Spare Type and press the spacebar to toggle between Dedicated and Global Dedicated means this spare drive can only be used with the specified disk arrays Global means this spare drive can be used by any disk array If you chose Dedicated a de...

Page 75: ... only be used with the specified disk arrays Global means this spare drive can be used by any disk array 4 Press the spacebar to toggle between the choices 5 For dedicated spares type the array number the spare is assigned to 6 Press Control A to save your settings Running Spare Check CLU To run Spare Check 1 Main Menu Spare Drive Management A list of the current spare drives appears 2 Highlight t...

Page 76: ...To delete a spare drive 1 Main Menu Spare Drive Management A list of the current spare drives appears 2 Highlight the spare drive you want to delete and press the spacebar to mark it The mark is an asterisk to the left of the listing 3 Highlight Delete Marked Spare Drives and press Enter 4 Press Y to confirm the deletion 65 Managing with CLU Vess A3340 Product Manual ...

Page 77: ...ve from an existing disk array 1 Main Menu Disk Array Management 2 Highlight the disk array in which you want to create a logical drive and press Enter 3 Logical Drives in the Disk Array Create New Logical Drive The Disk Array ID number and Maximum capacity available for the new logical drive are displayed 4 Highlight the following parameters and press the backspace key to erase the current value ...

Page 78: ...ress spacebar to choose Write Back or Write Through Read Policy Press spacebar to choose No Cache Read Cache or Read Ahead Cache 6 RAID 30 50 and 60 only Highlight Number of Axles and press the spacebar to choose the number of axles 7 Highlight Save Logical Drive and press Enter Note If you did not use all of the available capacity of the disk array you can create an additional logical drive at th...

Page 79: ...ess Enter 4 Highlight the logical drive you want to delete and press the spacebar to mark it The mark is an asterisk to the left of the listing 5 Highlight Delete Marked Logical Drives and press Enter 6 Press Y to confirm the deletion Press Y again to re confirm Caution When you delete a logical drive you delete all the data it contains Back up all important data before deleting a logical drive 68...

Page 80: ...heck and Inconsistency Check Tables Logical Drive Statistics Background Activities Locate Logical Drive Viewing Logical Drive Statistics CLU To view logical drive information 1 Main Menu Logical Drive Management 2 Highlight the logical drive you want and press Enter The information and settings screen appears 3 Highlight Logical Drive Statistics and press Enter The statistics screen appears To cle...

Page 81: ...ress the spacebar to toggle between WriteBack and WriteThru write though Highlight ReadPolicy and press the spacebar to toggle though ReadCache ReadAhead and None 4 Press Control A to save your settings Viewing the Logical Drive CheckTable CLU To view logical drive information 1 Main Menu Logical Drive Management 2 Highlight the logical drive you want and press Enter 3 Highlight Check Table and pr...

Page 82: ...rameters appear Initialization pattern The default 00000000 is best for most applications Quick Initialization Yes means only the first and last sections of the logical drives are initialized No means the entire logical drive is initialized To change a parameter highlight it and press the backspace key to erase the current value then type the new value 4 Highlight Start and press Enter If necessar...

Page 83: ... and press the backspace toggle between Yes and No 4 Highlight Start and press Enter If necessary you can pause and resume or stop and restart the Redundancy Check You can use the logical drive while Redundancy Check is running For Redundancy Check rate see Making Background Activity Settings CLU on page 74 Locating a Logical Drive CLU This feature helps you identify the physical drives assigned t...

Page 84: ...age 66for more information about how and when to use background activities Background Activity Management includes the following functions Viewing Current Background Activities CLU on page 73 Making Background Activity Settings CLU on page 74 Viewing Current Background Activities CLU Main Menu Background Activities A count of current background activities appears including Rebuild PDM Predictive D...

Page 85: ... to a replacement physical drive in a disk array PDM Migrates data from a suspect physical drive to a replacement drive in a disk array Transition Returns a revertible spare drive to spare status Synchronization Checks the data integrity on disk arrays Initialization Full initialization sets all data bits in the logical drive to a specified pattern such as all zeros Redundancy Check Checks reports...

Page 86: ...VRAM Events A list of and information about the most important events over multiple subsystem startups NVRAM events are stored in non volatile memory Event Severity Levels Level Description Fatal Non recoverable error or failure has occurred Critical Action is needed now and the implications of the condition are serious Major Action is needed now Minor Action is needed but the condition is not a s...

Page 87: ...sk Array Logical Drive Physical Drive by its ID number Severity See the table above Timestamp Date and time the event happened Description A description of the event in plain language 2 Press the up and down arrow keys to scroll through the log Clearing Runtime Events CLU To clear the Runtime Event log 1 Main Menu Event Viewer Clear Runtime Event Log 2 Press Y to confirm 76 Vess A Class NVR Storag...

Page 88: ...nce number Begins with 0 at system startup Device Disk Array Logical Drive Physical Drive by its ID number Severity See the table on the previous page Timestamp Date and time the event happened Description A description of the event in plain language 2 Press the up and down arrow keys to scroll through the log Clearing NVRAM Events CLU To clear the Runtime Event log 1 Main Menu Event Viewer NVRAM ...

Page 89: ... on page 80 Changing User Password CLU on page 81 Deleting a User CLU on page 82 Viewing User Information CLU Each user types their user name and password to log into the CLI To view a list of current user accounts 1 Main Menu Additional Info and Management User Management A list of the current users appears 78 Vess A Class NVR Storage Appliance Promise Technology ...

Page 90: ...on User name Maximum 31 characters use letters numbers and underscores No spaces Password Optional Maximum 31 characters Use letters numbers and underscore Display name Optional User s email address 3 Highlight Privilege and press the space bar to toggle though the options See the Table on the next page 4 Press Control A to save the user 79 Managing with CLU Vess A3340 Product Manual ...

Page 91: ...other users and delete disk arrays and logical drives The default administrator account is a Super User Changing User Settings CLU The Administrator or a Super User can change other users settings To change user settings 1 Main Menu Additional Info and Management User Management 2 Highlight the User whose settings you want to change and press Enter 3 Highlight Privilege and press the space bar to ...

Page 92: ...t the User whose password you want to change and press Enter 3 Highlight Change Password and press Enter 4 Highlight New Password and type a new password Maximum 31 characters Use letters numbers and underscore 5 Highlight Retype Password and type the new password again to verify 6 Press Control A to save the new password Note To reset the Administrator s password to the factory default see Restor...

Page 93: ...a user account To delete a user 1 Log in under a user name other than the one you want to delete 2 Main Menu Additional Info and Management User Management 3 Highlight the user you want to delete and press the spacebar to mark it The mark is an asterisk to the left of the listing 4 Highlight Delete Marked Users and press Enter 5 Press Y to confirm the deletion 82 Vess A Class NVR Storage Appliance...

Page 94: ...e key to erase the current value then type the new value SMTP server IP address or server name Server Port number 25 is the default 4 Highlight Authentication and press the spacebar to toggle between Yes and No If you selected Yes type in a User name and Password in the fields provided 5 The following items are optional but recommended Highlight and press the backspace key to erase the current val...

Page 95: ...key to erase the current value then type the new value HTTP Port 8090 is the default Session Time Out 24 minutes is the default 1440 minutes 24 hours 4 Highlight SSL and press the spacebar to toggle between Enabled and Disabled 5 Highlight HTTPS Port and press the backspace key to erase the current value then type the new value 8443 is the default 6 Press Control A to save your settings To start s...

Page 96: ...ng and press the backspace key to erase the current value then type the new value Port Number 161 is the default System Name optional Type a system name in this field System Location Type a country name in this field System Contact Type the email address of your system administrator in this field Read Community Type a community name in this field 4 Press Control A to save your settings To start st...

Page 97: ...type the new IP address in this field 3 Highlight Trap Filter and press the spacebar to toggle through the severity levels See the Table below 4 Press Control A to save the Trap Sink Event Severity Levels Level Description Fatal Non recoverable error or failure has occurred Critical Action is needed now and the implications of the condition are serious Major Action is needed now Minor Action is ne...

Page 98: ... Trap Sinks Clearing Statistics CLU This function clears the statistical counts for the RAID controller iSCSI ports physical drives and logical drives To clear statistics 1 Main Menu Additional Info and Management Clear Statistics 2 Press Y to confirm the deletion 87 Managing with CLU Vess A3340 Product Manual ...

Page 99: ...when necessary 1 Main Menu Additional Info and Management Restore Factory Defaults 2 Highlight the setting groups you want to restore and press the spacebar to toggle between Yes and No Yes means this setting is restored to the default value No means the current setting remains untouched 3 Highlight Restore Factory Defaults and press Enter 4 Press Y to confirm the reset 88 Vess A Class NVR Storage...

Page 100: ...ers appears with the current buzzer setting and status 2 Highlight Enabled and press the spacebar to toggle between Yes and No 3 Press Control A to save your settings Silencing the Buzzer Caution This action disables the buzzer for all events To silence the buzzer follow the procedure above for disabling the buzzer 89 Managing with CLU Vess A3340 Product Manual ...

Page 101: ...ng in at the Enclosure At the Vess enclosure to log into WebPAM PROe do one of the following actions Double click the WebPAM PROe desktop icon Choose WebPAM PROe in the Windows Programs menu Follow the steps under Logging in over the Network on page 91 Note The default IP settings for the Gigabit Ethernet ports are Port 1 192 168 0 1 Port 2 192 168 1 1 IP settings for the ports are controlled by t...

Page 102: ... If you chose External SSL Security during installation use the Secure Connection Otherwise use the Regular Connection Regular Connection WebPAM PROe uses an HTTP connection http Enter the Subsystem IP address 192 168 0 1 Enter the Port number 8090 Together your entry looks like this http 192 168 0 1 8090 Important For Vess A Series running Windows OS it is necessary to disable the Windows Firewal...

Page 103: ... Enter the Port number 8443 Together your entry looks like this https 192 168 0 1 8443 Note You can enter the Host PC s network name in place of the IP address If you are logging in at the Host PC you can enter local Host in place of the IP address Whether you select a regular or a secure connection your login to WebPAM PROe and your user password are always secure ...

Page 104: ...hen the opening screen appears 1 Type administrator in the User Name field 2 Type password in the Password field 3 Click the Login button The User Name and Password are case sensitive See Figure 1 The WebPAM PROe login screen After logging in the Quick Links menu appears ...

Page 105: ... is the administrator s Home page for WebPAM PROe Here you will find links to menus to view setting and manage logical drives physical drives and disk arrays Also links to view network settings and event logs as well as the background activities management menu Quick Links menu User s Home page ...

Page 106: ...e Interface WebPAM PROe is browser based RAID management software with a graphic user interface Basic user interface components and functions include WebPAM PROe interface Subsystem home page There are four major parts to the WebPAM PROe interface Header Tree View Event Frame ...

Page 107: ... to navigate around all components of the Vess enclosure software management RAID controller enclosure physical drives disk arrays logical drives and spare drives The figure below shows the components of Tree View WebPAM PROe Tree View The Administrative Tools section is different for the Administrator and Super Users than for other users The remainder of the Tree is the same for all users Logged ...

Page 108: ...ction tabs access menus to control specific actions and processes Click the Help link to the right of the tabs in Management View to access online help for the function currently displayed Choosing a Display Language WebPAM PROe displays in the following languages English Simplified Chinese Traditional Chinese French German Italian Japanese Korean Spanish Russian To change the display language 1 C...

Page 109: ...ific type of event Severity See below Information Information only no action is required Warning User can decide whether or not action is required Minor Action is needed but the condition is not serious at this time Major Action is needed now Critical Action is needed now and the implications of the condition are serious Fatal Non Recoverable error or failure has occurred Time Time and date of the...

Page 110: ...ut of WebPAM PROe There are two ways to log out of WebPAM PROe Close your browser window Click Logout in the WebPAM PROe Header Clicking Logout brings you back to the Login Screen After logging out you must enter your user name and password in order to log in again ...

Page 111: ... for warnings and enable disable warning buzzer Disk Arrays manage disk arrays Spare Drives manage spare drives Logical Drives Summary read only logical drive information display Click on the subsystem IP address and model name listed under the Subsystems top level menu icon in Tree View In the Information tab the following information for the subsystem appears Alias Vendor Model Serial Number Wor...

Page 112: ...nd activity affects I O performance View Current Background Activities To view current background activities 1 Click the Subsystem icon of the subsystem on which you want to view Background Activities 2 In the Subsystem menu click the Background Activities tab Background Activities currently running are displayed in the top portion of the menu You can also view the current Background Activities pa...

Page 113: ... Activities tab and the Scheduler tab and select the Settings option The following settings can be configured Rebuild Rate High Medium Low Background Synchronization Rate High Medium Low Logical Drive Initialization Rate High Medium Low Redundancy Check Rate High Medium Low Migration Rate High Medium Low PDM Rate High Medium Low Transition Rate High Medium Low Reassigned Block Threshold Error Bloc...

Page 114: ...on one physical drive When a physical drive in a disk array fails and a spare drive of adequate capacity is available the disk array begins to rebuild automatically using the spare drive If there is no spare drive of adequate capacity but the Auto Rebuild function is ENABLED the disk array begins to rebuild automatically as soon as you remove the failed physical drive and install an unconfigured p...

Page 115: ...ile it is initiating Initialization is normally done to logical drives after they are created from a disk array Initialization sets all data bits in the logical drive to zero The action is useful because there may be residual data on the logical drives left behind from earlier configurations For this reason Initialization is recommended whenever you create a logical drive Logical Drive Initializat...

Page 116: ...chedule click the menu expander to the right of the Scheduler tab and select Redundancy Check Schedule Redundancy Check Rate To change Redundancy Check Rate setting the in Background Activities Settings menu 1 Click the Redundancy Check Rate drop down menu and choose a rate Low Fewer system resources to Redundancy Check more to data read write operations Medium Balances system resources between Re...

Page 117: ...h More system resources to PDM fewer to data read write operations 2 Highlight the current values in the block threshold fields and input new values Reassigned Block Threshold range is 1 to 512 blocks Error Block Threshold range is 1 to 2048 blocks 3 Click the Submit button Transition Transition is the process of replacing a revertible spare drive that is currently part of a disk array with an unc...

Page 118: ... To enable Media Patrol click on the Subsystem in Tree View then click on the Background Activities menu tab Click to check the Enable Media Patrol option Notice also that the Auto Rebuild option is here as well If you want to automatically begin rebuilding a logical drive as soon as a faulty drive is replaced make sure this option is enabled To begin Media Patrol manually click on the menu expand...

Page 119: ...click on the Scheduler menu expander to the right of the Scheduler tab Scroll down to the schedule option you want to view that menu Schedule options are Add Media Patrol Schedule Add Redundancy Check Schedule Add Spare Check Schedule and Delete Schedule View or modify an existing activity schedule To view existing schedules including the recurrence start time and status of existing schedules clic...

Page 120: ...toring subsystems To view save or clear subsystem event logs click on the subsystem in Tree View then click on the Event menu expander Choose to display Runtime Events or NVRAM Events Event logs can be saved as a simple text file by clicking the Save button in either menu To clear the log and start fresh click the Clear Event Log button ...

Page 121: ...the Restore Factory Defaults link to reveal a new menu 3 Check mark the option boxes for the settings you want to return to the factory default values Default Settings options include 4 Click the Submit button to return the selected settings to default values To deselect all options and start over click the Reset button Clear Statistics To clear all subsystem statistics for controllers ports physi...

Page 122: ... View Making User Settings To change settings of other users 1 Log into WebPAM PROe as the Administrator or a Super User 2 Click the Administrative Tools icon 3 Click the User Management icon 4 Click the Information tab 5 In the list of users click the link of the user whose settings you want to change The Settings screen for the chosen user displays 6 Enter or change the settings for this user En...

Page 123: ...y name or mail address 6 Click the Submit button Changing Your Own Password To set or change your own password 1 Log into WebPAM PROe under your own user name 2 Click the Administrative Tools icon 3 Click the User Management icon 4 Click the Password tab in Management View 5 Enter the current password in the Old Password field 6 If you do not have a password leave this field blank 7 Enter the new ...

Page 124: ...rd for this user in the New Password and Retype Password fields A password is optional If you do not assign password tell this user to leave the password field blank when he she logs into to WebPAM PROe 7 Check the Enabled box to enable this user on this subsystem 8 Enter a display name in the Display Name field A display name is optional but recommended 9 Choose a privilege level from the Privile...

Page 125: ...rives and the controller Super Allows the user full access to all functions including create and delete users and changing the settings of other users and delete disk arrays and logical drives The default administrator account is a Super User Deleting a User There is always at least one Super User account You cannot delete the user account you used to log in To delete a user 1 Log into WebPAM PROe...

Page 126: ...are Management The Software Management menu is used to manage settings for Email SNMP settings and Web services The Email function is used for sending notifications of events The Web service is used for remote network connection to the WebPAM PROe management interface This is also where you can export and import configuration script files and user database files If the port is enabled disabled If ...

Page 127: ...m one Vess subsystem export it and then import it to automatically configure your other Vess subsystems To import a configuration script 1 Click the Administrative Tools icon 2 Click the Software Management icon 3 Click the Import tab in the Service Management menu 4 Choose Configuration Script from the Type drop down menu 5 Click the Choose File button and select the configuration script on the H...

Page 128: ...pt 1 Click the Administrative Tools icon 2 Click the Software Management icon 3 Click the Export tab in the Service Management menu 4 Choose Configuration Script from the Type drop down menu 5 Click the Export button 6 Select a location on the Host PC for the downloaded file and save the file The file is saved to your PC as Configscript txt Cautions Do NOT attempt to write or modify a configuratio...

Page 129: ... IP address and device name in Tree View to open the Subsystem Information display 2 Click the Save button in the Save System Service Report row of the information display Information for the report is gathered and compiled This action takes up to a few minutes depending on the size of your RAID system 3 Determine where you want to store the file on the Host PC then click the Save button in the po...

Page 130: ...Event Info Runtime LogDrive Info Basic logical drive information LogDrive Dump Info Diagnostic information Logical Drive Verbose Info Full logical drive information Network Info Virtual port Phydriv Info Basic physical drive information Phydriv Verbose Info Full physical drive SWMGT Info Software management Service Setting Email Service Setting Webserver Spare Info Basic spare drive information Sp...

Page 131: ...the Stop button under Service Status Email 5 Click the Confirm button To start the Email service after stopping it 1 Click the Administrative Tools icon 2 Click the Software Management icon 3 Click on Email in the Service List of the Service Management menu 4 Click the Start button under Service Status Email 5 Click the Confirm button Restarting Email Service To restart the Email service 1 Click t...

Page 132: ...s option enables authentication The No option disables SMTP Authentication under Email Server Settings Username Required if SMTP authentication is enabled SMTP Authentication Password Required if SMTP authentication is enabled Under Email Content Customization Email Sender From Address The sender s name shown on notification messages Email Subject The subject line of the notification message 5 Cli...

Page 133: ...nitoring icon 3 Click the Information tab for aggregated statistics or choose the Read Write tab to view specific Read and Write performances separately 4 Under Logical Drive choose the metric you want to see from the Measurement drop down menu 5 Check the boxes for the logical drives you want to see Total of all logical drives Up to 4 devices Information Bandwidth in MB s Cache usage by Dirty cac...

Page 134: ... display it does not accumulate information and there is no clear or save function To save performance statistics for analysis or troubleshooting save a Service Report See Saving a Service Report Information Bandwidth in MB s Maximum latency in ms Average latency in ms Minimum latency in ms I Os per second Read Write Read bandwidth Write bandwidth Maximum Read latency in ms Maximum Write latency i...

Page 135: ...hange controller settings See the following sections View Controller Information Viewing Controller Statistics Controller Settings View Controller Information To view controller information 1 Click the Controllers icon 2 Click the specific Controller icon of the controller for which you want to view information 3 The Information tab will present basic controller information ...

Page 136: ...evision WWN Install Package Version Install Package Build Date Memory Type Memory Size Flash Type Flash Size Preferred Cache Line Size Cache Line Size Coercion Enabled Disabled Coercion Method SMART Log Enabled Disabled SMART Polling Interval Write Back Cache Flush Interval Enclosure Polling interval Host Cache Flushing Enabled Disabled Forced Read Ahead Enabled Disabled Spin Down Type HDD Power L...

Page 137: ...ics 3 At the top of the Information display menu between the Information and Settings tabs click on the menu expander to reveal the Statistics link Reveal Statistics link Controller statistics include Data Transferred Read Data Transferred Errors Read Errors I O Requests Read IO Requests Statistics Start Time Write Data Transferred Non Read Write Errors Write Errors Non Read Write Requests Write I...

Page 138: ...e 10GBTruncate GrpRounding TableRounding Write Back Cache Flush Interval Enter a value into the field 1 to 12 seconds HDD Power Saving Choose time periods from the drop down menus After an HDD has been idle for the set period of time Power Saving Idle Time Parks the read write heads Power Saving Standby Time Lowers disk rotation speed Power Saving Stopped Time Spins down the disk stops rotation Ho...

Page 139: ...enclosure To locate an enclosure in the list click the Locate button The LED indicators on the front panel of the enclosure will blink for one minute Enclosure Information The Enclosure Information read only display menu provides key real time information about current hardware status of the enclosure Click on the expanders buttons to reveal current conditions and status of the enclosure power sup...

Page 140: ...ure Threshold 90 95 C If the enclosure temperature reaches this threshold a warning message is sent and an event is recorded in the event log Controller Critical Temperature Threshold 100 105 C If the enclosure temperature reaches this threshold a warning message is sent an event recorded is recorded in the event log Buzzer Settings The audible enclosure alarm buzzer can be enabled or disabled To ...

Page 141: ...ives To see the Physical Drives List expand the individual Enclosure icon in Tree View to see the Physical Drives icon for the enclosure To display the information for any populated slot you can expand the Physical Drives icon in Tree View to reveal links to each slot or click on the slot in the Physical Drives List or click on the populated slot in the virtual enclosure displayed in the menu View...

Page 142: ...Block Size Bytes Operational Status Configuration Status Model Drive Interface Serial Number Firmware Version Protocol Version Visible To Controller Write Cache Enabled Disabled Read Look Ahead Cache Enabled Disabled SMART Feature Set SMART Self Test SMART Error Logging Command Queuing Support Command Queuing Enabled Disabled Queue Depth Maximum Multiple DMA Mode Supported Maximum Ultra DMA Mode S...

Page 143: ... and logical drives using WebPAM PROe please refer to the Quick Start Guide Use the top level Disk Arrays menu to view the Disk Array List to delete existing arrays and to create new disk arrays using the Automatic Express or Advanced disk array creation menus Note that there must be physical drives available in order to use any of the disk array creation menus View information for existing disk a...

Page 144: ...able However the logical drive has lost redundancy fault tolerance You must determine the cause of the problem and correct it Rebuilding This condition is temporary When a physical drive has been replaced the logical drive automatically begins rebuilding in order to restore redundancy fault tolerance When a logical drive is rebuilding it will function and your data is available However access will...

Page 145: ...ary icon for the Subsystem Click on any Logical Drive LD in the list to view Information and Statistics to change Settings Alias Read Policy Write Policy to start Background Activities Initialization Redundancy Check or to view the Check Table for the LD Information displayed in the menu includes Logical Drive ID Alias Raid Level Operational Status Capacity Physical Capacity Number of Axles Number...

Page 146: ...drive Spare Drive Information includes Spare Drive ID Operational Status Physical Drive ID Capacity Revertible Yes No Type Dedicated to Disk Arrays Running Spare Check A Spare Check verifies the operational status of your spare drives You can also schedule a Spare Check To check a spare drive 1 Click the Spare Drives icon 2 Click the Spare Check tab 3 From the Physical Drive drop down menu choose ...

Page 147: ...y displays a list of all logical drives in the Subsystem This list does not arrange the logical drives under the disk array to which they belong nor under the enclosure in which they are located The menu functions in the same way as the Logical Drives menu discussed in Logical drive management on page 134 ...

Page 148: ...t is much easier with the CLU or WebPAM PROe Opening the CLI on Windows To open the CLI click the CLI icon on the desktop or 1 Go to Start Run and click the Browse button 2 Navigate to the C PromiseApp clitest folder 3 Click clitest exe file then click the Open button 4 Click the OK button in the Run dialog box The CLI window opens Use the default user name administrator and default password passw...

Page 149: ...checktable View logical drive error tables config For express or automatic configuration For advanced configuration please see the array command ctrl View or edit controller information and settings enclosure View or edit enclosure and SEP information and settings Locate an enclosure via LEDs event View or clear events logs export Subsystems only Export files to remote tftp host factorydefaults Re...

Page 150: ...s sc View spare check status Start spare check spare Create or modify hot spare drives spath Discover and change subsystem path stats View or reset statistics subsys View or edit subsystem information and settings swmgt View start or stop software component sync View logical drive synchronization status and progress transit View transition status and progress Start stop pause or resume a transitio...

Page 151: ...ontext sensitive help type one of the following commands command h command help command That action will display full context sensitive help for the specific command Each command when used alone such as array will display a summary of relevant information If more information is desired the v verbose mode can be used This will provide information for all relevant aspects of that command Usage termi...

Page 152: ...ay a del d DaId list array a locate d DaId array a accept d DaId t condition type array a addld d DaId c Ld count l list of ld settings array a delld l LdId list Summary The array command is the main command for performing advanced configuration and maintenance tasks on disk arrays This command lists creates modifies deletes and locates disk arrays It also adds and deletes logical drives Note that...

Page 153: ...ecific array add Adds creates an array This action might also create logical drives at the same time addld Adds creates a logical drive to an existing array delld Deletes a logical drive from an array mod Modifies array settings del Deletes an array and all its associated logical drives locate Locates an array accept Accepts the condition of an incomplete array The condition that can cause an arra...

Page 154: ... The default is enable disable pdm Enables or disables PDM for this array enable The default is enable disable l option value Specifies logical drive settings when adding a logical drive to an existing array addld or during array creation add Options are comma separated LD ID list Specifies a list of Logical Drive IDs Requires the a delld option ID Assigns a specific ID to an array Overrides autom...

Page 155: ... are cached ReadPolicy Specifies logical drive read policy readahead Reads extra data to help reduce read times of sequential data readcache Caches reads the data in case the same request is made again nocache No caching algorithm Axle A member element when creating a RAID10 or RAID50 or RAID60 RAID10 have 2 axles RAID50 and RAID60 may have up to 16 axles with up to 16 drives per axle PreferredCtr...

Page 156: ... drive in the array v Verbose mode Displays all array properties requires a list option Examples array v c 1 array a add s alias MyArray mediapatrol enable p 1 3 5 9 l raid 5 capacity 50gb stripe 256kb sector 1kb array a add p 1 3 5 9 l raid 5 capacity 50gb stripe 256kb array a mod d 1 s alias YourArray mediapatrol disable array a del d 3 array a locate d 0 array a addld d 0 l raid 1e capacity 125...

Page 157: ... BBM for all configured SATA drives Options a action Specifies the action to perform list Default List the BBM information clear Clears the BBM list For configured SATA drives only p PdId Specifies the physical drive id For the a list option the default is all physical drives For the a clear option you must specify a physical drive id Examples bbm p 1 bbm a clear p 3 ...

Page 158: ...s to one of the settings s option value Specifies which background activity settings to change autorebuild Enable or disables auto rebuild and auto transition Auto rebuild will rebuild an array when an unconfigured drive is inserted into the slot of a dead drive Auto transition will start transitioning on a used revertible spare in the following condition 1 When the rebuild has completed using the...

Page 159: ...assignedBlock 1 512 Threshold value to trigger PDM when re assign map exceeds the threshold value ErrorBlock 1 2048 Threshold value to trigger PDM when number of medium error on the PD exceeds the threshold value bg task rate Background task rates determine what percentage of the IO load on the controller should be dedicated to the background task A lower number will mean the task takes longer to ...

Page 160: ...ill run low 25 medium 50 high 75 low medium high syncrate Synchronization rate determines the rate at which synchronization will run low 25 medium 50 high 75 low medium high initrate Initialization rate determines the rate at which initialization will run low 25 medium 50 high 75 low medium high rcrate Redundancy check rate determines the rate at which redundancy check will run low 25 medium 50 hi...

Page 161: ...z a list buzz a enable buzz a disable buzz a on buzz a off Summary The buzz command displays the status of the buzzer and enables disables turns on or turns off the buzzer Options a action Specifies the action to perform list Default List the status of the buzzer enable Enable the buzzer disable Disable the buzzer on Turn on the buzzer off Turn off the buzzer ...

Page 162: ...ays the error check tables of a logical drive Options t tableType Specifies which error table to display The default displays all tables rct Displays the read check table wct Displays the write check table ibt Displays the inconsistent block table l LdId Specifies the logical drive ID Examples checktable l 10 t rct checktable l 10 ...

Page 163: ...dant logical drives RAID 1 10 1E 5 50 6 or 60 The capacity option enables optimizes the logical drives for capacity The performance option optimizes the logical drives for performance If you choose all three options redundancy gets highest priority and capacity gets lowest priority Note that you cannot combine HDDs and SSDs in the same disk array If your system has both type of drives it will crea...

Page 164: ...Random read write mix small to medium sized IO log Sequential small block write other Random read write mix small to medium sized IO fileserver Random read write mix small to medium sized IO l num of LDs Specifies how many logical drives to include in the configuration Array capacity is divided evenly among the logical drives Examples config a auto config a expr ry p y c n sy t data l2 ctrl Usage ...

Page 165: ... which settings to change alias A user specified name for the controller Up to 48 characters long alpha numeric characters blank spaces and underscores The beginning and ending blank spaces are discarded coercion Enables or disables disk coercion Disk coercion will truncate the size of the physical drives Makes different size drives appear to be the same size For example a 90 1 GB drive would appe...

Page 166: ...in number of minutes to poll the drive SMART status cacheflushinterval 1 12 Sets the time interval in seconds to flush the controller writeback cache ddf Uses the DDF area on the physical drives of the disk array nvram Uses the NVRAM on the controller enable disable pollinterval Sets interval in seconds to poll enclosure SEP information adaptivewbcache Enables or disables adaptive writeback cache ...

Page 167: ... Enables or disables common WWNN For high availability products only enable All controllers report one common WWNN disable Each controller reports its own WWNN alua Subsystems only Enables or disables asymmetric logical unit access Enabling ALUA will enable LUN affinity automatically enable disable t condition type Specifies the type of condition to clear Valid only when the command action is clea...

Page 168: ... status and information about the various components of the enclosure unit It is also sets temperature threshold values for JBOD enclosures and displays Vendor Provided Data VPD f FRU id Specifies id of FRU to locate Requires a locate option Valid values are 1 and 2 v Verbose mode Requires a list option VPD information is displayed Examples enclosure enclosure v enclosure a mod e 10 s tempwarning ...

Page 169: ...ified clear Clear events for a specified location l location Specifies the location from which to display or clear events ram All events are stored in RAM These events are lost after rebooting nvram Some events are also stored in NVRAM These events remain after rebooting and are a subset of the RAM events i sequence ID Specifies a specific event by its sequence number This is a starting point Requ...

Page 170: ...d For list action the default is for all enclosures if unspecified s option value Specifies the settings to change Applies to the JBOD enclosures only tempwarning 25 45 Enclosure warning theshold temperature in degrees Celsius tempcritical 30 51 Enclosure critical theshold temperature in degrees Celsius ctrltempwarning 90 95 Controller warning theshold temperature in degrees Celsius ctrltempcritic...

Page 171: ...nd and can only be exported to a remote host servicereport System service report file This file is exported to remote host for embedded and local host for in band f file name Specifies the name of the file to be exported s TFTP server Specifies TFTP server s IP or host name Do not specify TFTP server for in band p port num The port number of the TFTP server Default is 69 Do not specify port number...

Page 172: ... type Specifies the type of settings to restore all All settings allfw All firmware settings allsw Subsystems only All software settings Following are individual Firmware settings bga Background activity settings ctrl Controller settings encl Enclosure settings including temperature thresholds netiscsi Subsystems only Network settings of iSCSI ports netmgmt Subsystems only Network settings of mana...

Page 173: ...ly to Subsystems bgascheduler Background activity scheduler settings service Service startup type settings webserver Web server settings snmp SNMP settings Linux only telnet Telnet settings Linux only email Email settings user User settings Examples factorydefaults a restore t phydrv factorydefaults a restore t all ...

Page 174: ...om a remoter TFTP host Options t file type userdb User database file configscript Configuration script s TFTP server Specifies tftp server s IP or host name f file name Specifies the name of the file to import p port num The port number of the TFTP server Default is 69 i Get format validation information about imported file only File is not really applied to subsystem yet ...

Page 175: ...nutes depending on the size of the logical drive A quick initialization writes to the first and last few megabytes of the logical drive Typically a quick initialization is completed in moments Options a action Specifies the action to perform list Displays a list of the initialization processes in progress or paused and their status The default action start Start an initialization stop Stop an init...

Page 176: ...q size 1 1024 Specifies the amount of data in megabytes MB for a quick initialization p pattern Specifies the pattern for a full initialization The pattern can range from 1 to 128 bytes HEX string and is padded to even number of bytes such as fff padded to 0fff Pattern is not supported for quick initialization Examples init init a stop l0 init a start l0 p5a5a0101 ...

Page 177: ...ry of one or more logical drives mod Changes logical drive settings locate Locates a logical drive within the enclosure by flashing drive carrier LEDs l LD ID Logical drive ID c LD count Logical drive count Requires the a list option s option value Specifies the logical drive settings to change alias A user specified name for the logical drive Up to 32 characters containing alpha numeric character...

Page 178: ...ential data readcache Caches reads in the case the same request is made again nocache No caching algorithm PreferredCtrlId Specifies which controller the LD is prefers for LUN affinity Valid value is 1 or 2 v Verbose mode Used with a list Examples logdrv logdrv v logdrv a mod l0 s readpolicy readahead logdrv a locate l2 logout Usage logout Summary The logout command is used to logout the current u...

Page 179: ... attempts to repair the error If it fails to correct the error Media Patrol attempts to remap the sector Note Sector remapping is not currently supported You can start stop pause or resume Media Patrol and monitor its progress and status Options a action Specifies the action to perform list Default Displays the status and progress of Media Patrol start Starts Media Patrol stop Stops Media Patrol p...

Page 180: ...bnetmask can be displayed Options a action Which action to perform list Default Displays a list of IP configurations for all or the specified ports p port ID To specify which Ethernet port to view or change settings 1 Port 1 2 Port 2 3 Port 3 4 Port 4 v Verbose mode Used with a list Examples net shows a list of ip info for all network ports Type more at the end of each command to display info page...

Page 181: ...ssword pdm Usage pdm a action d DaId s SeqNo pdm a start d DaId s SeqNo p PdId pdm a stop d DaId s SeqNo pdm a pause d DaId s SeqNo pdm a resume d DaId s SeqNo Summary The pdm command activates Predictive Data Migration PDM PDM replaces a suspect physical drive such as a drive with a PFA condition with a different drive The replacement drive can be an unconfigured drive a global spare or a dedicat...

Page 182: ...condition To clear the PFA conditon of a physical drive please refer to phydrv command Note that the destination drive must be the same media type HDD or SSD as the other physical drives in the disk array Options a action Specifies the action to perform list Default Displays the active and paused PDMs and their status start Starts a manual PDM stop Stops a PDM pause Pauses a PDM resume Resumes a p...

Page 183: ...s locates individual drives and forces a drive to an online or offline state Options a action Specifies the action to perform list Default Displays all physical drives their make model number and array they belong to Their status is also shown mod Modifiies physical drive settings locate Flashes the physical drive s LED so you can location it online Forces a drive from an Offline to an Online stat...

Page 184: ...quires the a mod option Defaults to be all if d is not specified sata SATA related setting s writecache rlacache and cmdqueuing The SATA settings apply to all SATA physical drives all All drives where is applicable s option value Specifies which settings to change alias User specified name only for configured physical drives Up to 32 characters containing alpha numeric characters blank spaces and ...

Page 185: ...conds If value is 0 polling is disabled For high availability products only mediumerrorthreshold 0 4294967294 Medium error threshold If the threshold is reached the physical drive is marked as dead The default value is 0 indicating that physical drive is not marked as dead for medium errors For high availability products only v Verbose mode Used with a list Examples phydrv phydrv v phydrv a locate...

Page 186: ...s active and paused Redundancy Checks and their status start Starts a Redundancy Check stop Stops a Redundancy Check pause Pauses a Redundancy Check resume Resumes a paused Redundancy Check l Ld ID Specifies the logical drive ID on which to run the Redundancy Check n Do not fix inconsistent data This option causes Redundancy Check to run without correcting inconsistent data All inconsistency error...

Page 187: ...e progress of a running Rebuild Note that the replacement drive must be the same media type HDD or SSD as the other physical drives in the disk array Options a action Specifies action to perform list Default Displays the running and paused Rebuilds and their status start Starts a manual Rebuild stop Stops a Rebuild pause Pauses a Rebuild resume Resumes a paused Rebuild d DA ID Specifies which disk...

Page 188: ...0 s2 sc Usage sc a action i SpareId sc a start i SpareId Summary The sc command starts a Spare Check and monitors the status of a running Spare Check Options a action Specifies the action to perform list Default Displays Spare Check status start Starts the Spare Check i Spare ID Specifies the spare ID on which to run Spare Check Valid value range is 0 255 Examples sc sc a start i 3 ...

Page 189: ...rray A dedicated hot spare is assigned to one or more redundant disk arrays and can only replace a drive that belongs to one of the assigned arrays A revertible hot spare can be transitioned back to spare status after it replaces a failed drive in a disk array See the transit command The hot spare drive must be of equal or greater size than the drive it replaces The spare drive must be the same me...

Page 190: ... list option Displays a list of global spares and spares dedicated to this disk array When used with other actions it specifies the disk array IDs to which this spare is dedicated t type Specifies the type of hot spare drive g A global hot spare drive d A dedicated hot spare drive r revertible Specifies whether the spare drive is revertible y Yes n No s option value Specifies options for the spare...

Page 191: ...nent name swmgt a restart n component name Summary The swmgt command allows a user to view and modify setting of software components Options a action Which action to perform list Default Displays all software components start Start a software component stop Stop a software component restart Restart a software component mod Change a component s startup type when system boots n component name Specif...

Page 192: ...ver IP address serverport SMTP server port number authentication SMTP server authentication no yes username Username if using SMTP authentication password Password if using SMTP authentication senderaddr Sender s email address subject Email subject webserver settings httpport Port number for web server sessiontimeout Session time out in minutes Maximum 1440 ssl Turn on or off SSL for web server en...

Page 193: ...rap sinks trapsinkip Trap sink IP address For snmp only trapfilter Trap filter level It implies the level and above For snmp only info warning minor major critical fatal Examples swmgt swmgt n webserver swmgt a start n webserver swmgt a stop n webserver swmgt a mod n webserver t automatic swmgt a mod n webserver s httpport 8090 Type more at the end of each command to display info page by page ...

Page 194: ... to zero Options a action Specifies the action to perform list Default Displays the statistics clear Resets the statistics count to zero t type Specifies the device type ctrl Controller logdrv Logical drive phydrv Physical drive all All the above options i devId Specifies the device ID Default is the first available device ID c Count Specifies the device count Default is all devices Examples stats...

Page 195: ... the action to perform list Default Displays information for the specified subsystem mod Modifies subsystem settings lock Locks the subsystem so other users cannot apply changes Other users must wait for you to unlock the system or for your lock to expire unlock Clears a subsystem lock chklock Checks the status of the lock s option value Specifies which subsystem settings to change alias User spec...

Page 196: ...the a lock option Default is 30 minutes r Renews the lock timer Requires the a lock and t number of mins options f Specifies a forced unlock Requires super user privilege v Specifies verbose mode Examples subsys subsys v subsys a mod s alias MySubsystem subsys a lock t 60 subsys a lock r t 35 subsys a unlock subsys a chklock ...

Page 197: ...allows read and write operations on the logical drive If an initialization starts the background synchronization pauses until the initialization has finished Since background synchronization is starts pauses and resumes automatically there is no need for start stop pause or resume functions Options a action Specifies the action to perform list Default Displays the current background synchronizatio...

Page 198: ...e can be restored to spare drive status The destination drive can be an unconfigured drive a non revertible global spare or a non revertible spare dedicated to the array During transition the data on the revertible spare is transferred to the destination drive while the disk array remains online After transition the destination drive becomes the part of the array and the revertible spare is a spar...

Page 199: ... a paused transition d DA ID Specifies the id of disk array which contains the revertible spare drive s sequence Num Specifies the sequence number of the revertible spare drive in the array p PD ID Specifies the physical drive ID of the destination drive Examples transit transit a start d 0 s 2 p 10 transit a stop d 0 s 2 ...

Page 200: ...unt u username Specify the user account to display edit or delete p privilege Specify the privilege lavel of the user super Designates user has complete administrative control power Designate user cannot modify user accounts or delete configurations maintenance Designates the user can perform background tasks only view Designates the user can only view information has no administrative or write ca...

Page 201: ...username p privilege s option value Summary The user command is used to list modify create and delete user accounts on the subsystem Usage a action u username p privilege s option value Summary The user command is used to list modify create and delete user accounts on the subsystem ...

Page 202: ... already failed it will need to be replaced Follow the instructions in Installing Disk Drives on page 16 to swap out bad hard drives Note Hard drives on all Vess A Series models can be hot swapped that is they can be replaced without first shutting down the system Note Follow the instructions in Installing Disk Drives on page 16 to swap out bad hard drives This chapter includes the following troub...

Page 203: ...use the Event Frame or go to the Physical Drives information display Or you can simply check the status LED of the drives on the device Check Drive Status LEDs The quickest way to check drive status if you are near the device is to simply look at the hard drive status LED indicators then use the other LED indicators to help diagnose any problems that might exist Drive status LEDs Vess A3340 front ...

Page 204: ...nstalled or the drive is not configured A RED LED here means that drive should be replaced System Status Lights GREEN when healthy RED if there is a critical problem LD offline fan malfunction voltage out of range system temperature alert blinks RED for HDD high temperature alert remains dark when not ready This will be RED if a hard drive has failed or has critical errors Replace the drive corres...

Page 205: ...List expand the individual Enclosure icon in Tree View to see the Physical Drives icon for the enclosure To display the information for any populated slot you can expand the Physical Drives icon in Tree View to reveal links to each slot or click on the slot in the Physical Drives List or click on the populated slot in the virtual enclosure displayed in the menu To see information about physical dr...

Page 206: ...critical In Web PAM PROe Media Patrol is enabled or disabled using the Background Activities menu you can also create a schedule to run Media Patrol Note In order that hard disk problems can be anticipated and dealt with smoothly it is highly recommended to make sure that Media Patrol is enabled and running and Auto Rebuild is enabled if you are not using a spare drive If using a spare drive make ...

Page 207: ...e or click on the Subsystem in Tree View then click on the Background Activities menu tab Click to check the Enable Media Patrol option Notice also that the Auto Rebuild option is here as well If you want to automatically begin rebuilding a logical drive as soon as a faulty drive is replaced make sure this option is enabled Enable PDM and Media Patrol ...

Page 208: ... Then click on the Start button To schedule Media Patrol click on the menu expander to the right of the Scheduler tab and scroll down and select Add Media Patrol Schedule to open the schedule menu Use this menu to add a Media Patrol schedule To run Media Patrol using the CLU menu go to Main Menu Subsystem Management Media Patrol and choose Start Stop Pause or Resume If you choose Stop press Y to c...

Page 209: ...d automatically using the spare drive If there is no spare drive of adequate capacity but the Auto Rebuild function is ENABLED the disk array begins to rebuild automatically as soon as you remove the failed physical drive and install an unconfigured physical drive in the same slot See Making Rebuild Settings If there is no spare drive of adequate capacity and the Auto Rebuild function is DISABLED ...

Page 210: ...uild requires a Spare Drive then you must rebuild the array manually after the affected drive has been replaced Follow the instructions here to rebuild an array You will know that a logical drive is critical by looking at the Operational Status in the Logical Drive Information display To begin rebuilding the drive go to the Local Host menu the Background Activities and move the cursor to select St...

Page 211: ...ow determine the source and target for the rebuild In the new menu choose the Source Physical Drive and Target Physical Drive from the menus and click on the Submit button The progress of the rebuild is displayed in the Background Activities information display ...

Page 212: ... address and device name in Tree View to open the Subsystem Information display 2 Click the Save button in the Save System Service Report row of the information display Information for the report is gathered and compiled This action takes up to a few minutes depending on the size of your RAID system 3 Determine where you want to store the file on the Host PC then click the Save button in the pop u...

Page 213: ...ive information LogDrive Dump Info Diagnostic information Logical Drive Verbose Info Full logical drive information Network Info Virtual port Phydriv Info Basic physical drive information Phydriv Verbose Info Full physical drive SWMGT Info Software management Service Setting Email Service Setting Webserver Spare Info Basic spare drive information Spare Dump Info Diagnostic information Spare Verbos...

Page 214: ...event log When a continuous tone sounds there are multiple alarm patterns sounding at the same time see example number 1 illustrated below Other alarm patterns include three short buzzes followed by a longer silence then repeated example number 2 above This can indicate a serious problem that requires immediate action such as high enclosure temperature or the system fan is not installed If you hea...

Page 215: ...k on the Buzzer menu expander scroll to Settings and click the Enable Buzzer option box to remove the check mark Click the Submit button To disable the buzzer in the CLU 1 From the Main Menu use the arrow keys to go to Buzzer a list of Controllers appears with the current buzzer setting and status 2 Highlight Enabled and press the spacebar to toggle No 3 Press Control A to save your settings ...

Page 216: ...ote that the BIOS of the Vess A Series is configured to first look for the boot image in a USB drive The install image is available at the PROMISE website online Note You can also download an image writer utility for Vess A Series here To download the install image go to www promise com and follow these steps 1 From the Promise home page find the Vess A Series menu page 2 Scroll down the page and ...

Page 217: ...tter of the USB flash memory device then use the Select Image button to locate the image file you downloaded When you have the USB drive letter and image file location selected click Write to begin The process takes a few minutes A boot image is written to the USB device 5 Insert the USB drive into the Windows Vess A Series and boot up 6 During the boot a dialog menu asks if you want to reinstall ...

Page 218: ...an replace if necessary Fan module is not cooling HDD to below critical threshold Replace system fan module Allow time to reduce HDD temperature to below critical threshold System fan failure Replace system fan module One or more LD offline Contact Technical Support One or more LD is critical Replace failed HDD and rebuild LD LD rebuilding Wait until the rebuild is finished When the rebuild is com...

Page 219: ...208 Vess A Class NVR Storage Appliance Promise Technology LED indicators on front of Vess A3340 Power System Status Fan Recording Network Link Act HDD Activity Global RAID OPAS USB HDD Status ...

Page 220: ...ess A3340 provides an embedded version that requires a certain process to rebuild the OS image Users need to consult PROMISE tech support and follow installation guide to complete the setup Q When I rebuild the Window embedded OS image a product key is required A No users do not have to enter any product key during re installation You need to get all the required software package like OS image lic...

Page 221: ...d support PROMISE E Support https support promise com PROMISE web site http www promise com When you contact us please have the following information available Product model and serial number BIOS firmware and driver version numbers A description of the problem situation System configuration information including motherboard and CPU type hard drive models SAS SATA ATA ATAPI drives devices and othe...

Page 222: ...5228 5692 EG Son The Netherlands Technical Support E Support https support promise com Web site http www promise com Austria Technical Support E Support https support promise com Web site http www promise com France Technical Support E Support https support promise com Web site http www promise com Germany Europaplatz 9 44269 Dortmund Germany Technical Support E Support https support promise com W...

Page 223: ...romise com Luxembourg Technical Support E Support https support promise com Web site http www promise com United Kingdom Technical Support E Support https support promise com Web site http www promise com Taiwan Technical Support E Support https support promise com Web site http www promise com China Room 1108 West Wing Shi Chuang Plaza 22 Information Road Shangdi IT Park Haidian District Beijing ...

Page 224: ...ort promise com Web site http www promise com Singapore Technical Support E Support https support promise com Web site http www promise com Japan 3F Mura Matsu Bldg 3 8 5 Hongo Bunkyo ku Tokyo 113 0033 Japan Technical Support E Support https support promise com Web site http www promise com 213 About this manual Vess A3340 Product Manual ...

Page 225: ...ich are new and in cartons on the date of purchase b is not transferable c is valid only when accompanied by a copy of the original purchase invoice d Is not valid on spare parts This warranty shall not apply to defects resulting from a improper or inadequate maintenance or unauthorized modification s performed by the end user b operation outside the environmental specifications for the product c ...

Page 226: ...n to vary the terms of this limited warranty PROMISE s sole responsibility with respect to any product is to do one of the following a replace the product with a conforming unit of the same or superior product b repair the product PROMISE shall not be liable for the cost of procuring substitute goods services lost profits unrealized savings equipment damage costs of recovering reprogramming or rep...

Page 227: ...required Return shipping address Daytime phone number Description of the problem Copy of the original purchase invoice The technician helps you determine whether the product requires repair If the product needs repair the technician issues an RMA Return Merchandise Authorization number Important Obtain an RMA number from Technical Support before you return the product and write the RMA number on t...

Page 228: ...oper transport or packaging is not covered under the Limited Warranty When repairing returned product s PROMISE may replace defective parts with new or reconditioned parts or replace the entire unit with a new or reconditioned unit In the event of a replacement the replacement unit is under warranty for the remainder of the original warranty term from purchase date or 30 days whichever is longer P...

Page 229: ...n These are available for download from the PROMISE website www promise com in a single compressed file package Instructions for uninstalling the driver and how to check the driver version are included after the update instructions Note if you are using this procedure to update the driver and software I O operations will cease during the update procedure so make sure any clients that are using the...

Page 230: ...ts running the Windows 7 operating system Download Driver Package 1 Go to the PROMISE website and click on Products near the top of the page select the Vess option then choose Vess A Series Scroll down and expand the Resources menu scroll down more for the Drivers Utilities Firmware links menu Find the driver or driver package listed under Drivers and click the link to download 2 Uncompress the fi...

Page 231: ...nstall are used interchangeably in the following description to mean driver update or driver installation The procedure for both updating or installing the driver are identical 1 Launch the Driver Update Package install application To launch double click on this icon 2 The first dialog menu to appear is a standard warning Press the Run button to proceed 3 A new dialog asks if you want to install t...

Page 232: ...ry to reboot the Vess A Series during the update process Click Yes to proceed with the update 5 In the Setup Wizard menu click on the Next button to proceed 221 Driver Installation and Update Vess A3340 Product Manual ...

Page 233: ...6 The driver update resumes press the Install button to proceed 7 In the Driver Installation Wizard menu press the Next button 222 Vess A Class NVR Storage Appliance Promise Technology ...

Page 234: ... is now installed Press the Finish button to continue 9 The final Setup menu appears Click on Finish 10 A restart is required for the new driver to begin operating Press the OK button to restart the system 223 Driver Installation and Update Vess A3340 Product Manual ...

Page 235: ...ms and Features to uninstall the driver Go to Control Panel All Control Panel Items Programs and Features choose the Unistall option Get the most recent version of the VessApp Update Package listed in the menu 2 A system restart is necessary are uninstalling the driver Click Yes to continue 224 Vess A Class NVR Storage Appliance Promise Technology ...

Page 236: ...l the driver by clicking on the Yes button 4 Click the OK button to continue 5 Click the OK button to restart Windows Upon restarting the driver and software have been removed 225 Driver Installation and Update Vess A3340 Product Manual ...

Page 237: ... the Windows device manager Check versions with CLI Tocheck the BIOS version Firmware version software version and Install package version with the CLI user interface 1 To open the CLI menu click on the Windows Start button type clitest in the text entry menu and press Enter This displays the icon for the shortcut to the CLI interface Double click on the icon 226 Vess A Class NVR Storage Appliance...

Page 238: ... additional version information login and type ctrl v Note that the default User Name is administrator and the Password is password The version information is listed below the administrator prompt See example above 227 Driver Installation and Update Vess A3340 Product Manual ...

Page 239: ...click the shortcut of CLI of WebPAMProE on the desktop 2 Login The default User Name is administrator and the Password is password 3 To view the Driver Version go to Controller Controller1 Install PKg Version the package version is listed in the menu display see below 228 Vess A Class NVR Storage Appliance Promise Technology ...

Page 240: ...indows Device Manager 1 Open the Windows Device Manager Go to Start Control Panel Device Manager Double click the Device Manager icon 2 Look for Storage controllers and right click on the Properties option in the pop up menu 229 Driver Installation and Update Vess A3340 Product Manual ...

Page 241: ...3 Click the Driver tab to see the driver version 230 Vess A Class NVR Storage Appliance Promise Technology ...

Reviews: