Operating and Maintenance Instructions - Chiller - Series EB 210 - EB 440
© Pfannenberg GmbH
Page 86 / 293
EN
•
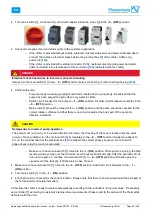
Turn main switch
[1]
, control switch, all circuit breakers inside the e-box
[2]
to the
- 0 - (OFF)
position.
•
Connect main power feed and alarm cable to the customer application.
o
If the chiller is provided without cables, customer must provide power and alarm cable and has to
connect the cables on terminal blocks inside the electrical box
[2]
of the chiller. Cable entry
position is
[12a]
.
o
If the chiller is provided with external connector
[12b]
, customer must provide power and alarm
cable connected to the female part of the connector
[12b]
(delivered with the chiller).
DANGER
Electrical shock hazard due to incorrect connector handling
Always turn the main switch
[1]
to the
– 0 – (OFF)
position before connecting or disconnecting the plug
[12b]
.
•
Chiller with pump:
o
Purge pump by loosening purging screw that is located on the pump body. Be advised that the
pump has been purged correctly when only water is visible.
o
Switch circuit breaker for the pump to
– 1 – (ON)
position. All other circuit breakers must stay in the
– 0 – (OFF)
position.
o
Main switch
[1]
should be turned to the
- l - (ON)
position and the pump should be checked for the
correct rotation. (Please note that there is an arrow located at the back part of the pump for
direction indication).
CAUTION
Damage due to incorrect pump operation
The pump must not run dry or in inverse direction; therefore, the checking of the correct rotation must be quick.
In case of wrong rotation, turn the main switch
[1]
immediately to the
– 0 – (OFF)
position. Swap two phases R-
S-T on the terminal board of the electrical box
[2]
to establish the correct phase sequence. On chiller with
phase check relay the control is automatic.
o
Make sure to have main switch
[1]
turned to the
- l - (ON)
position. While pump is running; the fluid
level must always stay over the minimum level (check level indicator
[4]
). After the hydraulic circuit
has run for approx. 5 minutes, turn main switch
[1]
to
– 0 – (OFF)
position and check again the
visual level of the tank
[4]
; refill the tank in case of need.
•
Make sure to have main switch
[1]
turned to the
- 0 - (OFF)
position. Switch all circuit breakers to the
– 1 –
(ON)
position.
•
Turn main switch
[1]
to the
– 1 – (ON)
position.
•
Fan
[5]
should be checked for the correct rotation. (Please note that there is an arrow located at the side part of
the fan-shroud for direction indication).
At this time the chiller is ready to operate automatically according to the controller’s “set point values”. If necessary,
set controller
[7]
according to customer’s temperature requirements. (Please refer to the manual of the thermostat
delivered with the unit).
Summary of Contents for EB 210
Page 97: ...DE Betriebs Wartungsanleitung Chiller Serie EB 210 EB 440 Version 1 0 Juni 2019...
Page 196: ...ES Manual de uso y mantenimiento Refrigerador Serie EB 210 EB 440 Versi n 1 0 Junio 2019...
Page 244: ...RU EB 210 EB 440 1 0 2019...
Page 245: ...Pfannenberg Pfannenberg Pfannenberg...
Page 248: ...EB 210 EB 440 Pfannenberg GmbH Page 248 293 RU 1 1 1 1 2 1 3 c...
Page 249: ...EB 210 EB 440 Pfannenberg GmbH Page 249 293 RU 1 4...
Page 251: ...EB 210 EB 440 Pfannenberg GmbH Page 251 293 RU 2 1...
Page 252: ...EB 210 EB 440 Pfannenberg GmbH Page 252 293 RU 2 2 2 2 1 2 3 2006 42 CE...
Page 253: ...EB 210 EB 440 Pfannenberg GmbH Page 253 293 RU 2014 68 UE I...
Page 254: ...EB 210 EB 440 Pfannenberg GmbH Page 254 293 RU 3 Pfannenberg 3 1 3 2 1 2 3 4 5 6 1 2 2 3 4 5...
Page 255: ...EB 210 EB 440 Pfannenberg GmbH Page 255 293 RU 3 3 3 3 1 3 3 2...
Page 256: ...EB 210 EB 440 Pfannenberg GmbH Page 256 293 RU 3 3 3 3 3 4 3 3 5 3 3 6...
Page 257: ...EB 210 EB 440 Pfannenberg GmbH Page 257 293 RU 3 4...
Page 259: ...EB 210 EB 440 Pfannenberg GmbH Page 259 293 RU...
Page 263: ...EB 210 EB 440 Pfannenberg GmbH Page 263 293 RU 4 4 3...
Page 264: ...EB 210 EB 440 Pfannenberg GmbH Page 264 293 RU 4 5 4 5 1 EB 210 4 5 2 EB 260...
Page 265: ...EB 210 EB 440 Pfannenberg GmbH Page 265 293 RU 4 5 3 EB 310 4 5 4 EB 360...
Page 266: ...EB 210 EB 440 Pfannenberg GmbH Page 266 293 RU 4 5 5 EB 410 4 5 6 EB 440...
Page 268: ...EB 210 EB 440 Pfannenberg GmbH Page 268 293 RU 4 7 4 7 1 EB 210 260...
Page 269: ...EB 210 EB 440 Pfannenberg GmbH Page 269 293 RU 4 7 2 EB 310 440...
Page 272: ...EB 210 EB 440 Pfannenberg GmbH Page 272 293 RU 5 5 1 5 2...
Page 274: ...EB 210 EB 440 Pfannenberg GmbH Page 274 293 RU 33 7 5 mm S355JR 1 0045 5 3...
Page 279: ...EB 210 EB 440 Pfannenberg GmbH Page 279 293 RU 6 30...
Page 280: ...EB 210 EB 440 Pfannenberg GmbH Page 280 293 RU Harting...
Page 282: ...EB 210 EB 440 Pfannenberg GmbH Page 282 293 RU 7 PFANNENBERG PFANNENBERG...
Page 283: ...EB 210 EB 440 Pfannenberg GmbH Page 283 293 RU 6 1 1...
Page 284: ...EB 210 EB 440 Pfannenberg GmbH Page 284 293 RU 6 2 10 Eliwell SMP 6 3 7 7 1 7 2 30 7 3...
Page 285: ...EB 210 EB 440 Pfannenberg GmbH Page 285 293 RU 8 30...
Page 286: ...EB 210 EB 440 Pfannenberg GmbH Page 286 293 RU TD TD Pfannenberg 2 1 Klixon...
Page 287: ...EB 210 EB 440 Pfannenberg GmbH Page 287 293 RU...
Page 289: ...EB 210 EB 440 Pfannenberg GmbH Page 289 293 RU 9 2 1 2 3 4 5 6 7 8 9 10 11 12 13 14 15 16 17...
Page 290: ...EB 210 EB 440 Pfannenberg GmbH Page 290 293 RU 10 10 1 10 2 Pfannenberg...


