


Operating the GUI screen controls
43
PRO6 Live Audio System
Owner’s Manual
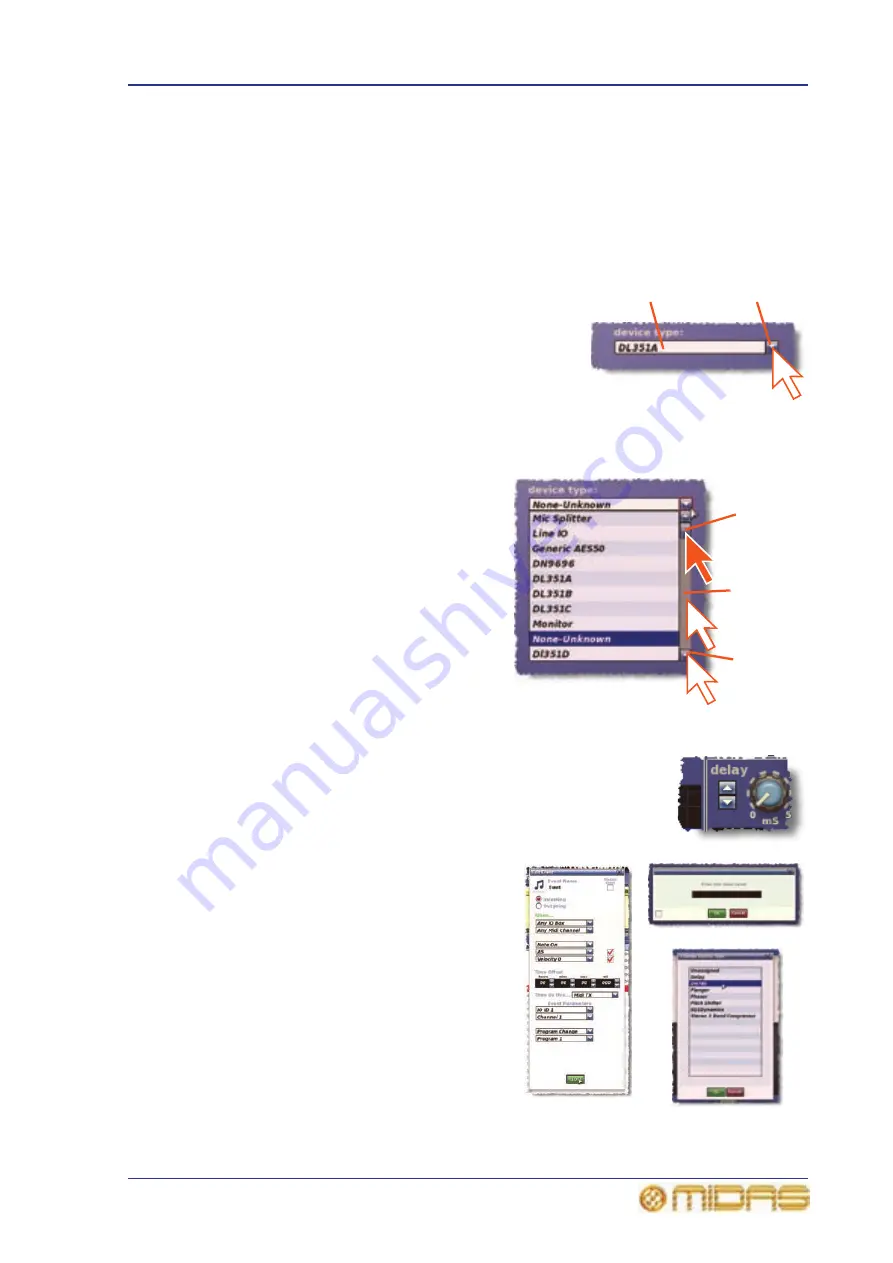
Using drop-down lists
Certain configurable name fields, particularly the signal routing ones, have drop-down
lists that offer a number of preset or context-sensitive options to choose from. Long
lists — containing more options than can be displayed simultaneously — have sliders
that allow you to access all the options.
>> To select an option from a drop-down list
1
Click the drop-down arrow. The drop-down list
will unfold to display some or all of its contents,
depending on how many items it contains.
2
Do one of the following:
• Click the option you require.
• If necessary, scroll the list (see “To scroll a
drop-down list” below) to display the option, and then click it.
>> To scroll a drop-down list
With the drop-down list displayed, do one
of the following:
• A. Drag the scroll box.
• B. Click the scroll bar. The scroll box
will ‘jump’ in the direction of the click
to another position in the scroll bar.
• C. Click an up/down scroll arrow. The
scroll box will ‘jump’ in the direction of
the scroll arrow to another scroll bar
position. Clicking a scroll arrow when
the scroll box is adjacent to it has no
effect.
Spin buttons
Up/down spin buttons let you increase/decrease the attribute or
value of an item. For example, the amount of time a signal is
delayed (see “Input channel delay (GUI only)” on page 262).
About windows
There are three main types of window you
will encounter when using the GUI, as
follows (an example of each is shown in the
diagram on the right):
• Properties windows contain elements
that you can select or edit, such as
options, lists, tick boxes, text fields etc.
• Message windows contain text that can
be a prompt or an error message.
Generally, this type of window will
contain an OK and a CANCEL button by
which you can acknowledge the
message or cancel the operation,
respectively. Also, some message
windows contain a user-editable text
field, as shown in the example (right).
Drop-down
arrow
Currently selected
list item
Scroll arrow
Scroll bar
Scroll box
B
C
A
Properties
window
List window
Message window
Summary of Contents for PRO6
Page 2: ......
Page 4: ......
Page 6: ......
Page 10: ......
Page 14: ...xvi Precautions PRO6 Live Audio System Owner s Manual...
Page 24: ...xxvi Contents PRO6 Live Audio System Owner s Manual...
Page 25: ...PRO6 Live Audio System Owner s Manual Volume 1 Overview...
Page 26: ......
Page 30: ...4 Chapter 1 Introduction PRO6 Live Audio System Owner s Manual...
Page 42: ...16 Chapter 2 PRO6 Live Audio System PRO6 Live Audio System Owner s Manual...
Page 50: ...24 Chapter 3 About The PRO6 Control Centre PRO6 Live Audio System Owner s Manual...
Page 51: ...PRO6 Live Audio System Owner s Manual Volume 1 Getting Started...
Page 52: ......
Page 59: ...PRO6 Live Audio System Owner s Manual Volume 2 Basic Operation Of The PRO6...
Page 60: ......
Page 64: ...38 Chapter 5 Before You Start PRO6 Live Audio System Owner s Manual...
Page 104: ...78 Chapter 8 Patching PRO6 Live Audio System Owner s Manual...
Page 131: ...PRO6 Live Audio System Owner s Manual Volume 3 Advanced Operation And Features...
Page 132: ......
Page 136: ...110 Chapter 10 Stereo Linking PRO6 Live Audio System Owner s Manual...
Page 144: ...118 Chapter 11 Panning PRO6 Live Audio System Owner s Manual...
Page 148: ...122 Chapter 12 Soloing PRO6 Live Audio System Owner s Manual...
Page 150: ...124 Chapter 13 Muting PRO6 Live Audio System Owner s Manual...
Page 192: ...166 Chapter 18 Copy And Paste PRO6 Live Audio System Owner s Manual...
Page 242: ...216 Chapter 24 User Libraries Presets PRO6 Live Audio System Owner s Manual...
Page 246: ...220 Chapter 25 File Management PRO6 Live Audio System Owner s Manual...
Page 250: ...224 Chapter 26 Using Other Devices With The PRO6 PRO6 Live Audio System Owner s Manual...
Page 267: ...PRO6 Live Audio System Owner s Manual Volume 4 Description...
Page 268: ......
Page 335: ...PRO6 Live Audio System Owner s Manual Volume 5 Appendices...
Page 336: ......
Page 365: ...Audio signal path 339 PRO6 Live Audio System Owner s Manual Audio signal path...
Page 366: ...340 Appendix C Klark Teknik DN370 GEQ PRO6 Live Audio System Owner s Manual...
Page 372: ...346 Appendix D Klark Teknik DN780 Reverb PRO6 Live Audio System Owner s Manual...
Page 376: ...350 Appendix E I O Modules PRO6 Live Audio System Owner s Manual...
Page 400: ...374 Appendix I Documentation PRO6 Live Audio System Owner s Manual...
Page 511: ...Return 485 XL8 Live Performance System Owner s Manual Gate Not applicable EQ Not applicable...
Page 612: ...586 Glossary PRO6 Live Audio System Owner s Manual...


