


228
Chapter 27: Changing The User Settings
PRO6 Live Audio System
Owner’s Manual
Changing the user interface preferences
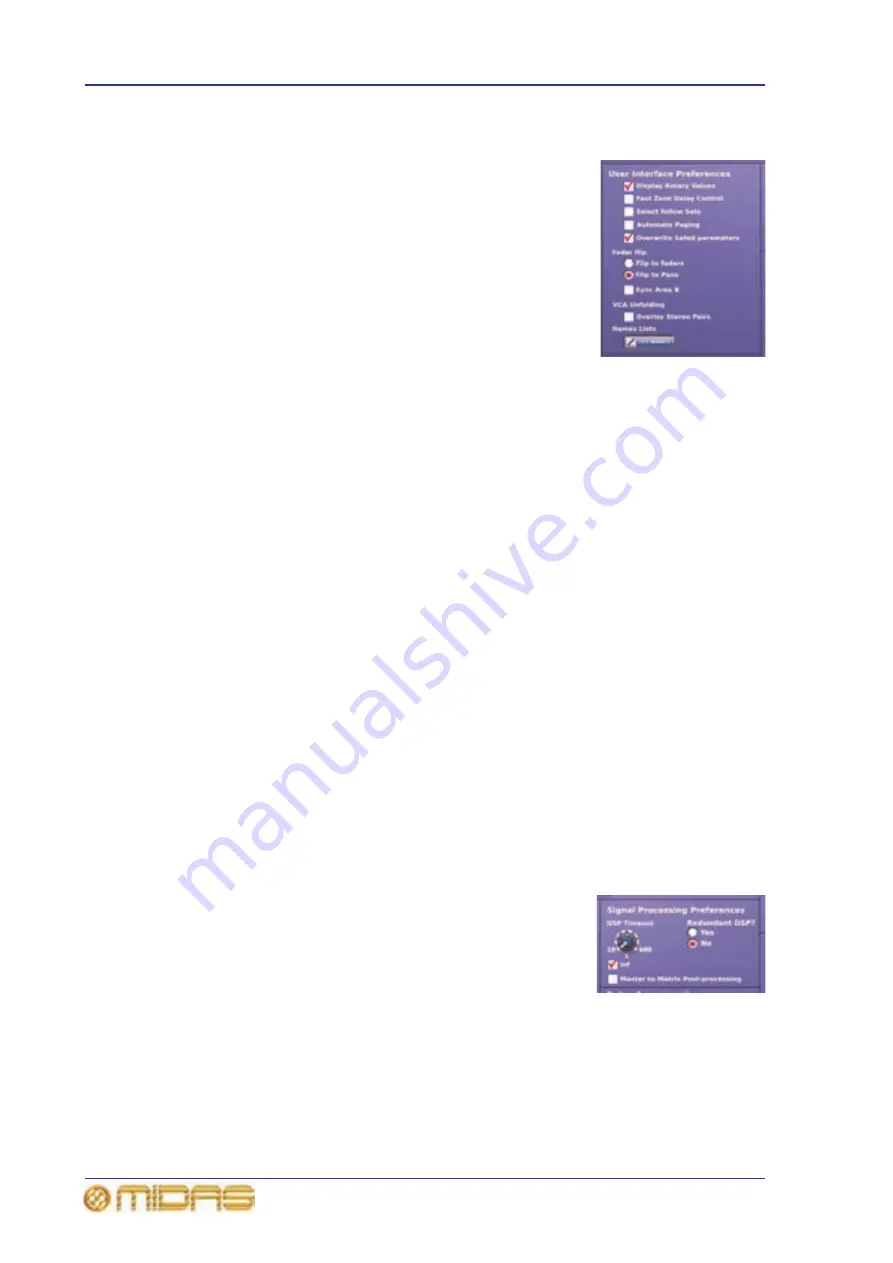
The User Interface Preferences section of the
Preferences screen lets you set some of the PRO6’s
operating parameters to suit your own preferences.
• Display Rotary Values — the current value of a control
knob can be displayed as a numerical value on the GUI
(see “Parameter values displayed on touch” on page 42).
• Fast Zone Delay Control — selecting this option means
that you place the delay control for the inputs onto the
surface controls. To do this you have to cycle the gain
swap switch (see “Mic amp input gain (preliminary input
processing)” on page 264) through digital gain, analogue
gain and then delay. Without selecting this option, the
inputs delay control is a GUI only feature.
• Select follow Solo — when you solo an aux or matrix output, the channel is
automatically selected, thus bringing the output controls to the surface detail area.
This option only works in fader flip mode.
• Automate Paging — select this option to store channel paging in automation. So
that, on scene recall, the control surface (channels assigned to it) will revert to the
state it was in when the scene was last saved. When unselected, scene recall does
not affect channel paging.
• Overwrite Safed parameters — see “Overriding store scope” on page 187.
• Fader flip:
• Choose between Flip to faders and Flip to Pans to control the currently
selected mix bus using the faders or the pan control buttons, respectively, in the
full input bay (see “Controlling the mix buses in flip mode” on page 36).
• Sync Area B — when the PRO6 is set up for two-man operation (see “Two-man
operation” on page 102) and you are using fader flip, selecting this option will
synchronise the mix bus selection across areas A and B, so that both areas
operate on the same mix buses.
• VCA Unfolding — select Overlay Stereo Pairs to unfold only left channels of
channel pairs when a VCA group is selected; use the scroll by 1 navigation buttons
to display any right channel you want.
• Names Lists — click the SET NAMES to open a window from which you can change
the names in the input and output sheet list (see “Changing the default input/output
names” on page 229).
Changing the signal processing preferences
The Signal Processing Preferences section of the
Preferences screen lets you set up your DSP preferences.
• DSP Timeout — control knob for adjusting the amount of
time (between 10 and 600 seconds) the DSP engine will
continue to run after an update is received from the
control surface, before muting the audio.
• inf — tick box for selecting infinity, which will allow audio to continue indefinitely if
power to the control surface is lost.
• Master to Matrix Post-processing — tick box for selecting whether the tap-off
point is either a pre- or post-master channel processed signal that is sent to the
matrix channels (see “Master to matrix post-processing option” on page 235), and
determines whether the signal is sent without or with processing, respectively. This
Summary of Contents for PRO6
Page 2: ......
Page 4: ......
Page 6: ......
Page 10: ......
Page 14: ...xvi Precautions PRO6 Live Audio System Owner s Manual...
Page 24: ...xxvi Contents PRO6 Live Audio System Owner s Manual...
Page 25: ...PRO6 Live Audio System Owner s Manual Volume 1 Overview...
Page 26: ......
Page 30: ...4 Chapter 1 Introduction PRO6 Live Audio System Owner s Manual...
Page 42: ...16 Chapter 2 PRO6 Live Audio System PRO6 Live Audio System Owner s Manual...
Page 50: ...24 Chapter 3 About The PRO6 Control Centre PRO6 Live Audio System Owner s Manual...
Page 51: ...PRO6 Live Audio System Owner s Manual Volume 1 Getting Started...
Page 52: ......
Page 59: ...PRO6 Live Audio System Owner s Manual Volume 2 Basic Operation Of The PRO6...
Page 60: ......
Page 64: ...38 Chapter 5 Before You Start PRO6 Live Audio System Owner s Manual...
Page 104: ...78 Chapter 8 Patching PRO6 Live Audio System Owner s Manual...
Page 131: ...PRO6 Live Audio System Owner s Manual Volume 3 Advanced Operation And Features...
Page 132: ......
Page 136: ...110 Chapter 10 Stereo Linking PRO6 Live Audio System Owner s Manual...
Page 144: ...118 Chapter 11 Panning PRO6 Live Audio System Owner s Manual...
Page 148: ...122 Chapter 12 Soloing PRO6 Live Audio System Owner s Manual...
Page 150: ...124 Chapter 13 Muting PRO6 Live Audio System Owner s Manual...
Page 192: ...166 Chapter 18 Copy And Paste PRO6 Live Audio System Owner s Manual...
Page 242: ...216 Chapter 24 User Libraries Presets PRO6 Live Audio System Owner s Manual...
Page 246: ...220 Chapter 25 File Management PRO6 Live Audio System Owner s Manual...
Page 250: ...224 Chapter 26 Using Other Devices With The PRO6 PRO6 Live Audio System Owner s Manual...
Page 267: ...PRO6 Live Audio System Owner s Manual Volume 4 Description...
Page 268: ......
Page 335: ...PRO6 Live Audio System Owner s Manual Volume 5 Appendices...
Page 336: ......
Page 365: ...Audio signal path 339 PRO6 Live Audio System Owner s Manual Audio signal path...
Page 366: ...340 Appendix C Klark Teknik DN370 GEQ PRO6 Live Audio System Owner s Manual...
Page 372: ...346 Appendix D Klark Teknik DN780 Reverb PRO6 Live Audio System Owner s Manual...
Page 376: ...350 Appendix E I O Modules PRO6 Live Audio System Owner s Manual...
Page 400: ...374 Appendix I Documentation PRO6 Live Audio System Owner s Manual...
Page 511: ...Return 485 XL8 Live Performance System Owner s Manual Gate Not applicable EQ Not applicable...
Page 612: ...586 Glossary PRO6 Live Audio System Owner s Manual...


